

Newsletter Categories
Newsletter categories provide a powerful tool for organizing and customizing your newsletter content to suit the interests of your subscribers. This documentation outlines how to enable and utilize newsletter categories effectively.
Key features of Newsletter categories
Newsletter categories offer several key features:
- Transformation of post categories: post categories are seamlessly transformed into newsletter categories.
- Subscriber preferences: subscribers can choose to receive subscription emails from only the categories they are interested in.
- Opt-out preferences: every subscriber starts out subscribed to all categories. When a subscriber confirms their category selection, each category they left unselected is saved as an opt-out.
- Emails for posts outside newsletter categories: posts published in categories that are not newsletter categories are emailed only to subscribers who have not opted out of any newsletter category. A subscriber who opts out of at least one newsletter category stops receiving emails for posts outside newsletter categories.
- Targeted emails: emails are sent only for posts published under the categories chosen by subscribers.
- Automatic subscription: when a new category is added, existing subscribers are automatically subscribed to it.
Note: If you want to ensure a specific post is not sent as a newsletter, you’ll need to disable email notifications for that post manually during the publishing process.
Here’s an example of what your subscribers will see when subscribing to your site with newsletter categories enabled:
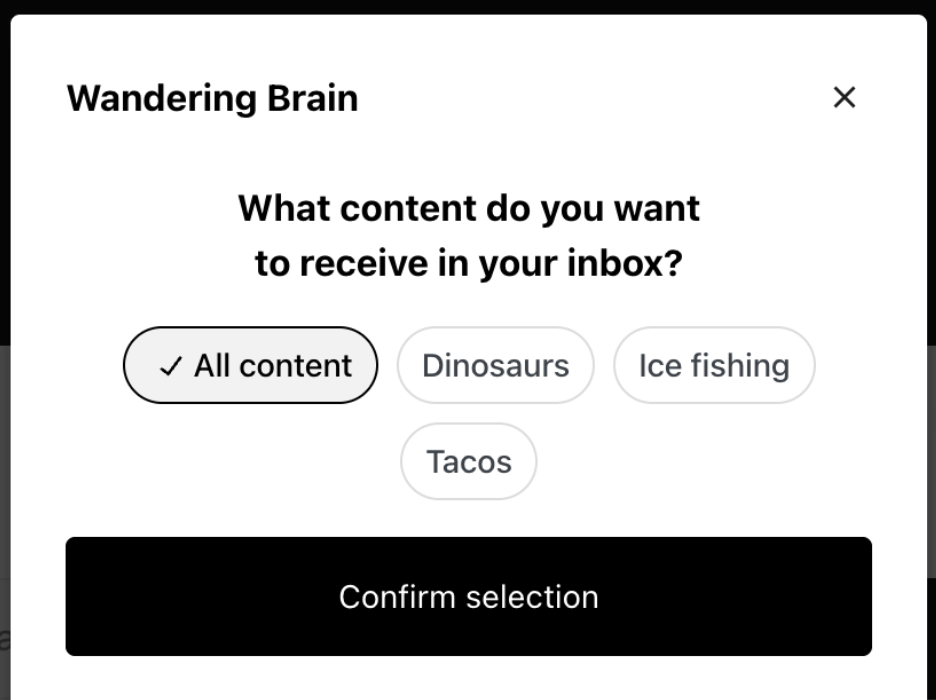
Paid Newsletter upgrade offers additional features
If you’re using Paid Newsletters, visitors will select a subscription from your configured paid offerings. Then, they can also select the categories to which they wish to subscribe.
For Site Owners
Enable Newsletter categories
Newsletter categories are not enabled by default. To enable Newsletter categories, follow these steps:
- In your WP Admin, navigate to Jetpack → Newsletter → Settings
- Toggle on Enable newsletter categories under the Newsletter categories heading
- Use the search bar within the Newsletter Categories section to select the categories you want to include or exclude.
- Click Save settings after you’ve chosen categories.
Adding Newsletter categories
You can add a new category by typing the name (for example “Test”) and then hitting enter. It will save the category and add it to your list of newsletter categories.
How to view your subscribers’ subscribed categories
Site owners can view which categories their subscribers have subscribed to.
- In your WP Admin, navigate to Jetpack → Subscribers. This will open your Subscribers page on WordPress.com.
- To view the categories a subscriber has chosen to follow, click the three dots next to the subscriber’s listing on the page.
- Click View. This will give you Newsletter subscription details for the subscriber, including their subscription date, the categories they’re subscribed to, the plan they’ve chosen for your site, and any paid upgrades they have.
How changing your newsletter categories affects existing subscribers
Removing or reducing your newsletter categories does not unsubscribe anyone. How each subscriber is affected depends on whether they have opted out of a category:
- Subscribers who have never opted out of a category keep receiving emails for all posts. This includes everyone who subscribed through the legacy Jetpack subscription widget.
- Subscribers who opted out of a category stay opted out of it, even if you remove it from your newsletter categories and add it back later. These subscribers do not receive emails for posts outside newsletter categories.
- When you add a new newsletter category, all existing subscribers are subscribed to it automatically.
For blog subscribers
How to manage your subscribed categories
When you subscribe to a site with newsletter categories enabled using the Subscribe block, you are prompted to choose the categories you want to receive emails about. Select the categories you’re interested in, then click Confirm selection.
Other subscription methods, such as the legacy Jetpack subscription widget, do not show the category selection prompt. If you subscribed this way, you can choose your categories afterward from your Subscription Management page on WordPress.com.
You can change your subscribed categories at any time, including if you subscribed through a form that did not show the category selection prompt.
To change your categories from a newsletter email:
- Click the Manage Subscription link in the footer of any newsletter email from the site.
- Toggle on the categories you want to receive emails about, and toggle off the ones you don’t. Your settings are saved automatically.
To change your categories from WordPress.com:
- Go to Reader → Manage subscriptions.
- Click the title of the site.
- Toggle on the categories you want to receive emails about, and toggle off the ones you don’t. Your settings are saved automatically.
If you subscribed without a WordPress.com account, use the Manage Subscription link in a newsletter email, or view your subscriptions on the WordPress.com email subscriptions page.
You can also unsubscribe from receiving email updates using the “Unsubscribe” link in a subscription email’s footer. You will find a “Manage Subscription” link in email footers as well.
If you deselect any category, you also stop receiving emails for the site’s posts that are not in a newsletter category.
Still need help?
Please contact support. We’re happy to advise.

