
Imagine clicking on a website and waiting one, two, three, four, five seconds before the content finally loads. It’s frustrating, right?
If this is what people experience when they’re on your site, they’ll likely leave the page and look for information or products elsewhere.
WordPress caching is designed to prevent this. It’s a powerful solution that accelerates your website’s load times and enhances the overall user experience.
On this page, we’ll show you how caching works and how to implement it on your site.
What is WordPress caching?
Every time a visitor requests a page, their device has to retrieve page content and files, process it, and finally deliver it. While this process is usually efficient for small sites with local visitors, high-traffic sites with large media libraries can experience slowdowns.
Caching mitigates this problem by storing copies of your website’s content and serving them to repeat visitors. Instead of generating pages from scratch, which consumes server resources and time, caching delivers pre-built pages and reduces load times.
So, when a visitor returns to your site, they see the cached content and everything loads more quickly for them.
Benefits of WordPress caching
Implementing caching on your WordPress site offers several advantages, including:
1. Faster page load times
A cached website loads more quickly because it bypasses database queries and PHP processing.
Faster load times help visitors access your content immediately, which is important for user retention and engagement.
2. An enhanced user experience
Nobody enjoys waiting for a page to load, especially if they need something urgently.
A fast site keeps visitors happy. In turn, this reduces bounce rates and increases interaction with your content.
If your content loads quickly, you’ll likely experience a boost in conversions and overall visitor satisfaction.
3. Optimized server resource allocation
Since caching reduces the need to process the same database queries, it lowers the load on the server. As a result, your site is able to handle more visitors without degrading performance.
This is particularly useful if you’re on a shared hosting plan. Caching can prevent slowdowns due to limited resources on your server.
4. Improved search engine optimization
A fast website has a better chance of ranking well in search results. This is, in part, because a good user experience translates to high engagement rates, which signals to search engines that your website offers valuable content.
Search engines also take into account performance on its own. For example, Core Web Vitals measure site speed and user experience. You can optimize specifically for these metrics and may see higher search engine rankings and more organic traffic as a result.
Types of WordPress caching
You can implement caching at different levels to improve performance. Here are the main types of caching strategies used on WordPress sites:
Client-side caching (browser caching)
Browser caching stores static website elements (like images, CSS, and JavaScript files) on the visitor’s local device.
When they return to your site, this content loads from the cache in the browser, instead of being downloaded again from the server. This makes subsequent visits much faster.
Server-side caching
Server-side caching involves storing full or partial copies of your pages on the server (called page caching).
However, it is also used for storing database queries (object caching) so they don’t have to be processed repeatedly, as well as PHP code (opcode caching) to speed up execution.
Types of caching tools for WordPress
There are several ways to implement caching on your website, including:
Caching plugins
WordPress caching plugins automate the process, enabling you to optimize your site’s performance with minimal work on your end. Some plugins focus solely on caching, while others include additional features to improve site speed, like image compression.
Hosting-level caching
Many managed WordPress hosting providers offer built-in server-side caching. This is often optimized for their infrastructure and requires no configuration or maintenance from you. Plus, it eliminates the need for third-party caching solutions.
CDN-based caching
A content delivery network (CDN) caches copies of your website across multiple global servers. When someone visits your site, the CDN delivers the cached content from the server that is closest to their location. This reduces latency and improves loading times.
You can use a standalone CDN solution, but many caching plugins include this feature.
Recommended plugins for WordPress caching
Now, let’s look at two powerful caching plugins for your WordPress website.
| Feature | Jetpack Boost | WP Super Cache |
| Best For | Core Web Vitals & Ease of Use | Technical Control |
| Page Caching | ✅ Auto-Configured | ✅ Manual Configuration |
| Image CDN | ✅ Included (Free) | ❌ No |
| CSS Generation | ✅ Critical CSS | ❌ No |
| Setup Time | < 2 Minutes | 5-10 Minutes |
Jetpack Boost

Jetpack Boost is a plugin by Automattic, the people behind WordPress.com, with the ease of use that beginners need and the effectiveness that advanced users love. It offers caching and additional features for boosting performance, all of which can be enabled with a few clicks.
Besides page caching, you’ll get an image CDN that loads resized images from Jetpack’s worldwide servers. Jetpack Boost also optimizes CSS loading, defers non-essential JavaScript, and more.
WP Super Cache
WP Super Cache is a free caching tool also developed by Automattic. It generates static HTML files and serves them to visitors, reducing the load on your server.
With WP Super Cache, you get three levels of caching, which include a simple mode for beginners and advanced options for more tech-savvy users. The plugin also comes with a configurable CDN and supports custom caching.
How to choose the right plugin based on your needs
You might be wondering: which plugin should I use?
The choice will largely depend on your needs and the type of website you run.
If you have a small and static website (meaning, it gets minimal changes and updates), you can opt for a solution that handles caching only, like WP Super Cache. In this case, you might not need additional optimization settings, like what’s offered in Jetpack Boost.
On the other hand, if you have an active blog or an ecommerce site, you might need more than caching to boost performance. For example, an image CDN will be very useful if you use a lot of photos in your articles. Jetpack Boost offers many optimization options, which you can manage from a beginner-friendly interface.
How to install and configure a caching plugin
Let’s look at how to install and configure the recommended plugins.
The easiest speed optimization plugin for WordPress
Jetpack Boost gives your site the same performance advantages as the world’s leading websites, no developer required.
Boost your site for free1. Setting up Jetpack Boost
In your WordPress dashboard, go to Plugins → Add New Plugin and look for Jetpack Boost. Click on Install Now, followed by Activate.

The plugin will prompt you to connect your site to your WordPress.com account. If you don’t have one, you can set it up for free.
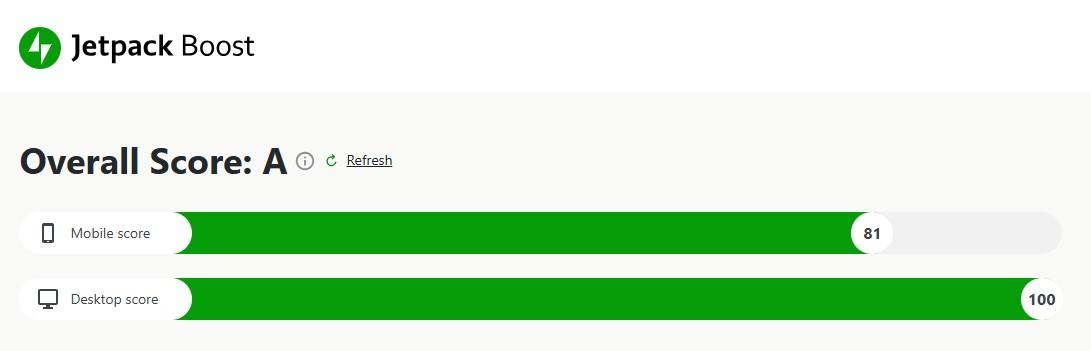
Now, go to Jetpack → Boost. The first thing you’ll see is your site’s performance score.
Scroll down to the optimization settings. You’ll find a toggle button for each option, including Cache Site Pages.
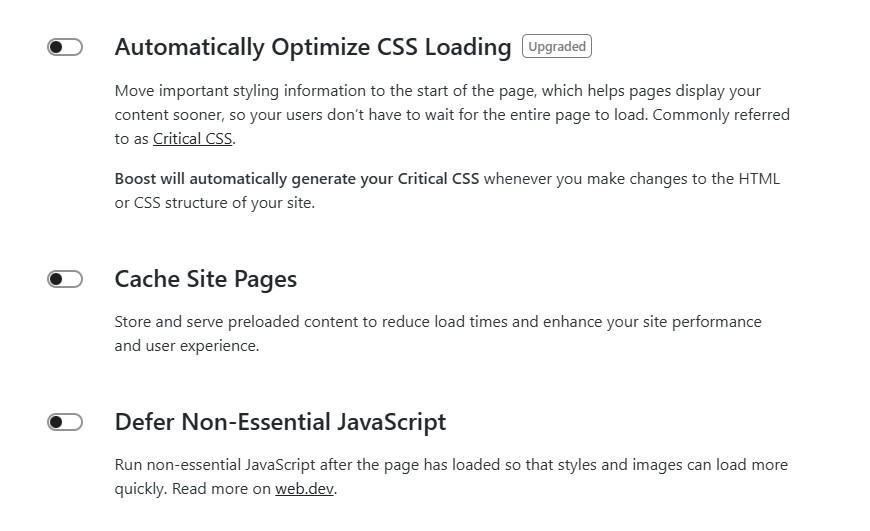
Simply click on it to enable the setting. If you select Show Options, you’ll be able to add the URLs of pages or posts that you don’t want to cache.

You also have the option to clear the cache and activate logging so you can track all caching activity.
While you’re here, you might also want to switch on other features, like the image CDN.

You can also ask Jetpack to concatenate CSS and JavaScript. This means it will group and minify scripts for faster load times.
After you enable these settings, return to the site speed score at the top of the page. You should see a significant improvement in both the mobile and desktop scores.
As this tutorial has shown, Jetpack is very quick to set up. After enabling the caching and optimization settings, you’re done. There’s no further configuration required.
2. Setting up WP Super Cache
Now, let’s look at how to set up WP Super Cache. Unlike Jetpack Boost, this is solely a caching plugin. It also caters to more advanced users, giving you greater control over configuration.
Find and install the plugin as shown earlier. Then, go to Settings → WP Super Cache. In the Easy tab, you’ll see that caching is currently turned off.

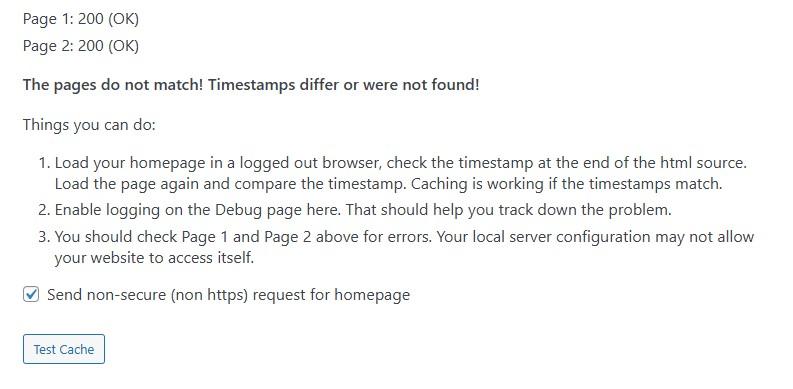
Select the Caching On option and select Update Status. You can now scroll down to the Cache Tester section to run a test.
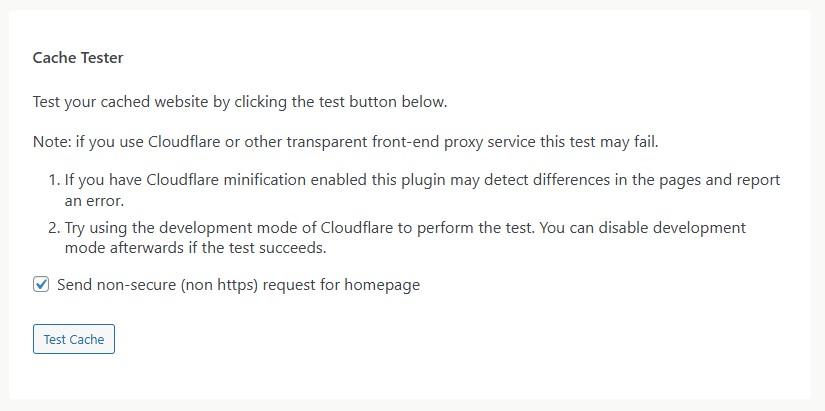
The plugin will let you know if there are any caching problems with your pages, and it will give you instructions on how to resolve them.
Now, if you return to the top of the page and select the Advanced tab, you’ll see more configuration settings. You can choose between the Simple and Expert cache delivery method.

The Simple option is the recommended setting, as the Expert mode may require some technical configuration. Don’t worry, you’ll still have plenty of control with the Simple method.
As you’ll see, other recommended settings are already selected for you.
For example, you’ll want to disable caching for logged-in visitors. This is particularly important if you have an online store, as caching could lead to outdated or incorrect data like order statuses.
It’s also a good idea to enable page compression, which will speed up load times.
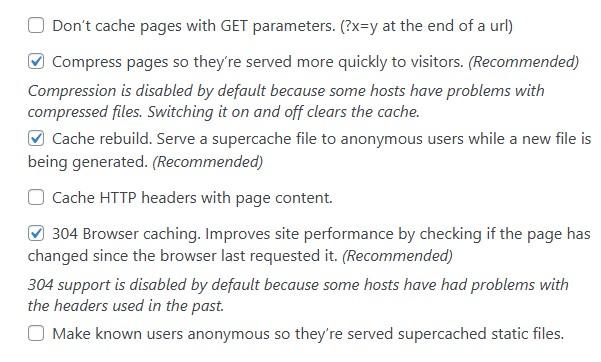
You’ll also want the Cache rebuild setting enabled. This way, when a cached page expires or needs to be updated, the plugin will continue serving the old cached file to anonymous (non-logged in) users, while a new version is generated in the background.
So, instead of making visitors wait while the cache rebuilds, it serves the last available cached version, ensuring a fast experience.
Another useful setting is 304 browser caching. This improves site performance by reducing unnecessary data transfers between the browser and the server.
When someone visits a web page, the browser stores a cached version. The next time they request the same page, the browser asks the server if the page has changed since the last visit.
If the page has not changed, the server responds with HTTP status code 304 (Not Modified). This tells the browser to use its cached version instead of downloading it again.
Now, let’s look at the more advanced caching settings. Here, WP Super Cache recommends enabling Extra homepage checks.

This ensures that the homepage always displays the most up-to-date content. For example, if the page has frequently-updated widgets like the latest posts or live counters, the cache may be bypassed to show the most recent information.
Of course, you’re free to enable any other caching setting in this section. For instance, you might choose to clear all the cache every time you publish or update a new post or page.
You also have the option to only refresh a page when a new comment is posted.
When you’re done, click on Update Status and scroll down to the Expiry Time & Garbage Collection section.

Garbage collection cleans up cache files that are out of date. WP Super Cache recommends a cache timeout of at least 1800 seconds.
Choose between the Timer and Clock to specify when the garbage collector should do its job. For instance, you might use the timer to run it at regular intervals (like every 600 seconds) or the clock for specific times (like once hourly).
If your site generates a lot of new data, WP Super Cache recommends setting the cache timeout to 60 and the timer scheduler to 90 seconds.
Remember to save your changes when you’re ready.
WP Super Cache also offers a CDN, which you can enable by navigating to the relevant tab.
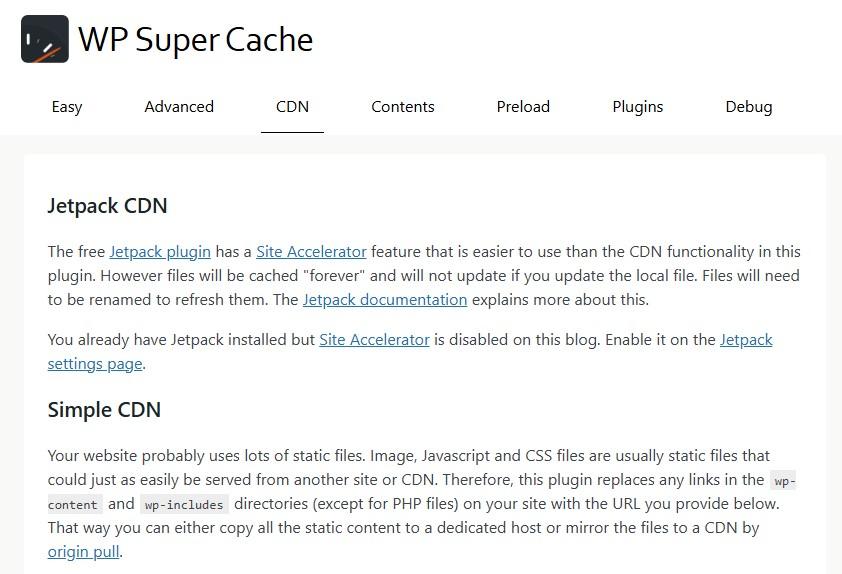
As you’ll see, the plugin recommends using the free Jetpack CDN as it’s more beginner-friendly.
If you still want to use the WP Super Cache CDN, just select the box for Enable CDN Support and click on Save Changes.
Troubleshooting common caching issues
Enabling caching is a straightforward process, especially if you use a plugin like Jetpack Boost or WP Super Cache. However, you might still encounter some issues.
Here’s how to resolve these problems.
Changes not appearing after updating the site
Your cached pages may continue displaying old content even after updates. If this happens, you’ll need to clear WordPress cache manually from your caching plugin settings.
Alternatively, you can set up an automatic cache expiration rule to refresh content periodically (like every week).
Broken layouts or missing CSS/JavaScript
Minification or file concatenation may break styles or scripts. The solution is to disable these settings or exclude critical CSS/JS files from optimization in your caching plugin.
A conflict with WooCommerce or membership plugins
Dynamic pages such as shopping carts, checkout pages, or member dashboards may not update properly when cached.
So, configure your caching plugin to exclude these pages from being cached. Both Jetpack Boost and WP Super Cache let you do this.
Frequently asked questions
To wrap up, let’s answer some common questions about WordPress caching.
Do I need a caching plugin if my hosting provider offers caching?
If your host provides built-in caching, a plugin may not be necessary. However, some plugins offer additional optimizations beyond server-level caching, like image compression and a CDN.
It’s best to reach out to your hosting provider to see what caching solutions are in place (if any), then decide if you need to install a plugin for further speed boosts.
Which is the best WordPress caching plugin for beginners?
Jetpack Boost is an excellent choice due to its simple interface and powerful performance enhancements. Once you install the plugin, you’ll just need to enable the settings you want using toggle buttons.
WP Super Cache gives you more control over the caching settings. Although it’s ideal for more tech-savvy users, you can follow our guide above to configure it.
Can I use multiple caching plugins together?
It’s not advisable to use more than one caching plugin on your site, as it will likely create conflicts. Stick to one caching solution for best results.
What other speed optimization techniques should I use alongside caching?
In addition to caching, you’ll want to compress images, use a CDN, and optimize CSS and JavaScript loading. Jetpack Boost includes many of these features.
For example, it lets you defer non-essential Javascript, minify CSS, enable an image CDN, and more, just by toggling a switch.
How is object caching different from regular page caching?
Page caching creates a static HTML copy of your entire webpage. When a visitor lands on your site, the server shows them this copy instead of building the page from scratch. This process reduces the workload on your server significantly.
Object caching works differently because it focuses on the database. It stores the results of specific database queries, such as your navigation menu, widget settings, or recent post lists. Without object caching, WordPress must ask the database for this information every time a page loads. By saving these specific pieces of data, object caching speeds up the processing time for dynamic parts of your site. This is very useful for logged-in users or ecommerce sites where full page caching is not always possible.
What is the difference between browser caching and server caching?
Server caching happens on your web host before the data ever leaves the data center. The server creates a ready-made copy of your webpage and sends it to the visitor. This reduces the time it takes for the server to start sending data.
Browser caching happens on the visitor’s own computer or phone. When someone visits your site, their browser downloads images, CSS files, and logos. Browser caching tells the browser to keep these files on the device for a set period. When the user visits a second page or returns later, the browser loads these files from the local storage instead of downloading them again. This makes the website feel instant for returning visitors because much of the content is already there.
How often should I clear or purge my WordPress cache?
You should only clear your cache when you have made a specific change to your website that needs to be visible immediately. Many beginners make the mistake of clearing the cache too frequently. Doing this forces the server to rebuild every page from scratch for the next visitor. This causes a temporary slowdown and higher server load.
Modern caching plugins are smart enough to handle this for you. They will usually clear the cache automatically when you publish a new post or update an existing page. If you change your theme, update a plugin, or edit your CSS design, you will need to manually clear the cache. Otherwise, trust the automated settings to keep your site fast and your content fresh.
Will caching fix a slow theme or bad plugins?
Caching will hide performance issues, but it will not fix the root cause. If you have a poorly coded theme or a plugin that runs heavy database queries, caching saves a static copy of the page so visitors do not feel the slowness. The site will appear faster to the public.
However, the underlying problem remains. When the cache expires or needs to be rebuilt, the first visitor will still experience a long load time. Additionally, a slow backend will hurt your administrative dashboard. You might find it slow to edit posts or manage orders. While caching is a powerful tool, you should still remove unused plugins and choose a lightweight theme to ensure your foundation is solid.
What is a TTL and how should I set it?
TTL stands for Time to Live. It is a setting that tells the caching system how long to keep a copy of a page before deleting it and creating a new one. Once the TTL expires, the cache is considered “stale,” and the server will generate a fresh copy for the next visitor.
Setting the right TTL depends on how often your content changes. For a news site that updates every hour, a short TTL of 60 minutes is appropriate. For a typical business site or blog that only updates a few times a week, a longer TTL of 10 to 24 hours is better. A longer time is generally preferred because it means more visitors get the fast, cached version of your page.
Do I need a CDN if I already use a caching plugin?
Yes, using a Content Delivery Network, or CDN, alongside your caching plugin is highly recommended for the best performance. A caching plugin speeds up your main server, but that server is still located in one physical place. If your server is in New York and a visitor connects from Tokyo, the data still has to travel a long distance.
A CDN solves this by copying your images, CSS, and JavaScript files to a network of servers all around the globe. When the visitor from Tokyo connects, they download the large files from a server in Japan instead of New York. This reduces latency significantly. Your caching plugin handles the page structure, while the CDN handles the heavy media files.
Can caching break my WooCommerce checkout or dynamic pages?
Yes, aggressive caching can break the functionality of dynamic pages like shopping carts, checkout screens, and user account areas. These pages display unique information for every single user. If you cache the cart page, the first customer’s items might be saved and shown to the next customer. This is a serious privacy and usability risk.
To avoid this, you must ensure your caching plugin excludes these specific URLs. Most top-tier plugins generally detect WooCommerce and automatically set up these exclusions for you. However, you should always test your checkout process in an Incognito window after setting up a new caching tool to ensure the dynamic data is loading correctly.
Why does my updated content not show up immediately?
This is a very common issue called cache invalidation failure. When you update a post, your caching plugin is supposed to delete the old version of that page so the server can build a new one. Sometimes this process fails, or the browser itself is holding onto an old version.
If you make an edit and do not see it, first try opening the page in an Incognito or Private window. If the change appears there, the issue is your browser cache. If the old content is still there, you need to manually purge the page cache in your WordPress settings. To prevent this in the future, check your plugin settings to ensure it is configured to automatically purge the specific page cache whenever you click the update button.
The easiest speed optimization plugin for WordPress
Jetpack Boost gives your site the same performance advantages as the world’s leading websites, no developer required.
Boost your site for free