Installing the Meta (formerly Facebook) Pixel on your WordPress website helps you track conversions, optimize ad performance, and improve your targeting strategies. Whether you run a small site or a large e-commerce store, the Pixel enables you to see how visitors interact with your content after clicking your ads.
This guide explains how to set up and install the Meta Pixel on WordPress using both plugin-based and manual methods. It also includes instructions for validating the installation, setting up events, and remaining compliant with privacy laws.
What is the Meta Pixel, and why does it matter?
The Meta Pixel is a short snippet of JavaScript code that tracks visitor behavior on your site. It sends data back to Meta to help you measure and optimize your ad campaigns. The Pixel can track actions like page views, button clicks, form submissions, and purchases.
Benefits of the Meta Pixel
With the Meta Pixel, you can:
- Track conversions and visitor actions
- Improve return on ad spend
- Build custom and lookalike audiences
- Enable dynamic ads
- Analyze traffic quality from ads
Adding the Pixel is the first step towards using advanced targeting and reporting features in the Meta Ads Manager.
What you need before installation
Before you begin, make sure you have the following:
- Access to your WordPress dashboard
- Access to the Meta Business Manager, with permission to create or manage Pixels
- Familiarity with your WordPress theme and the ability to install plugins
Step 1: Create your Meta Pixel
You will need to create the pixel before you can add it to your WordPress site.
How to create a Pixel
- Go to the Meta Events Manager while logged into Business Manager.
- Click Connect Data Sources and choose Web.
- Select Meta Pixel and click Connect.
- Name your Pixel and optionally enter your website URL.
- Click Continue.
Once the pixel is created, choose a method of installation. Select Install code manually to get the script.
Copy your Pixel base code
You will see a script block that starts with:
<!-- Meta Pixel Code -->

<script>

...

</script>
Copy this entire block to your clipboard. You’ll insert this code into your WordPress site in the next steps.
Step 2: Add the Meta Pixel to WordPress
There are three primary ways to install the Meta Pixel on a WordPress site:
- Use a plugin like PixelYourSite
- Use a header/footer code insertion plugin
- Manually add the code to your theme
Each method has pros and cons depending on how comfortable you are with code and how your site is set up.

Option 1: Use the PixelYourSite plugin
PixelYourSite is a dedicated plugin that allows you to install the Pixel and manage events easily.
How to install and configure:
- In WordPress, go to Plugins → Add Plugin.
- Search for PixelYourSite.
- Click Install Now and then Activate.
- Go to PixelYourSite → Dashboard.
- Enable the Facebook Pixel and enter your Pixel ID (you can find this in Events Manager).
- Save the changes.
PixelYourSite can also track standard events like page views and form submissions without extra setup.
Option 2: Use the WPCode plugin
WPCode is a more general solution that allows you to add code to your header and footer areas.
How to set it up:
- Go to Plugins → Add New and search for WPCode.
- Install and activate the plugin.
- Go to Code Snippets → Header & Footer.
- Paste the Meta Pixel code in the Header section.
- Click Save.
This method works well if you don’t want to edit theme files and just need the basic tracking setup.
Option 3: Manually insert the code into your theme
If you prefer to add the code directly without plugins, you can edit your theme files.
How to do it manually:
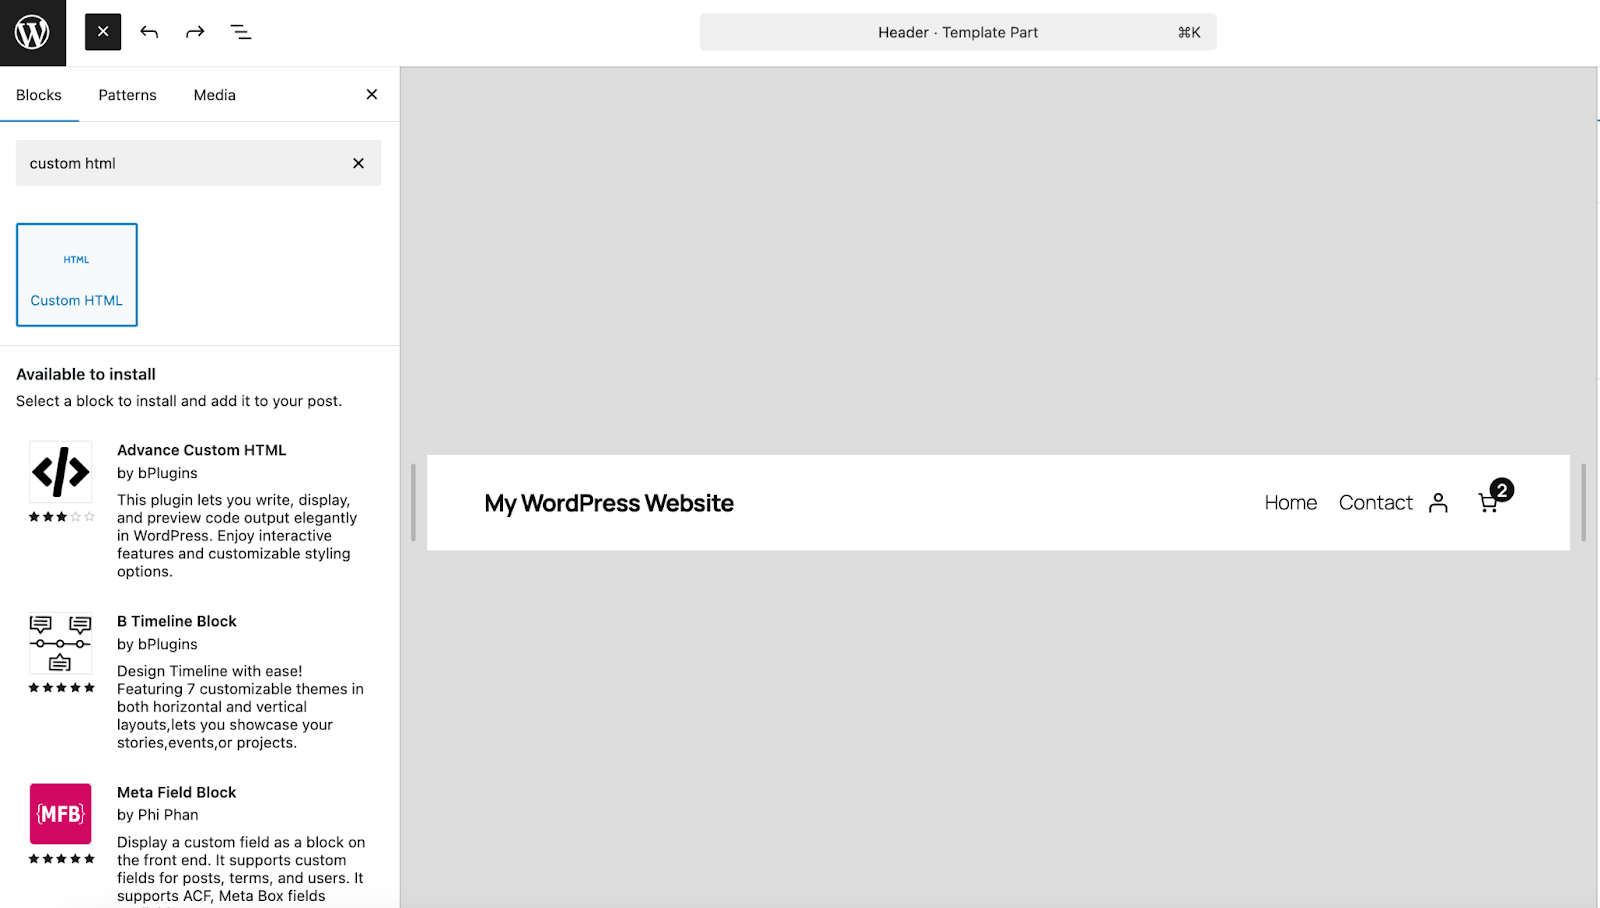
- In WordPress, go to Appearance → Editor.
- Click Patterns → All Template Parts.
- Select the Header template.
- Click the + block inserter and search for the Custom HTML block. Add it to your site.
- Paste your code into the HTML block.
- Save the template.
Step 3: Confirm that your Pixel is working
After adding the Pixel code, confirm that it’s functioning properly.

Use the Meta Pixel Helper
The Meta Pixel Helper is a Chrome extension that can detect and validate Pixel installations.
- Install the extension from the Chrome Web Store.
- Visit your WordPress site in Chrome.
- Click the Pixel Helper icon in your browser toolbar.
- You should see a confirmation that the pixel has fired, along with its ID and any events triggered.
Check Events Manager
You can also verify the installation from within Meta Business Manager.
- Go to Events Manager.
- Select your Pixel.
- If it’s receiving activity, you’ll see real-time events coming through.
Step 4: Configure events and custom conversions
The Pixel alone will track basic page views. To get deeper insights, you can set up events and custom conversions.
Add standard events
You can manually add standard events like:
- Lead
- Purchase
- AddToCart
- CompleteRegistration
These are added as part of the Pixel script. For example:
<script>

fbq('track', 'Lead');

</script>
Place this script on the confirmation or thank you page after a form submission.
Use the Event Setup Tool
Meta also offers a no-code tool that helps you track buttons, URLs, and form actions.
- In Events Manager, select your Pixel and click Add Events.
- Choose From the Pixel and enter your site URL.
- Click Open Website.
- Tag buttons or links to create events like Add to Cart or Subscribe.
Publish once. Share everywhere.
Automatically share your website content to your favorite social media platforms, from one place.
Get Jetpack Social for freeSet up custom conversions
Custom conversions help you track actions that don’t match standard events.
- In Events Manager, click Custom Conversions.
- Click Create Custom Conversion.
- Define a rule based on a URL or event parameter.
- Assign a name, category, and optional value.
You can then optimize custom conversions in your ad campaigns.
Step 5: Stay compliant with privacy laws
Adding a Meta Pixel also means handling user data responsibly. Here are some tips:
Implement a cookie consent banner
If your site receives traffic from regions covered by GDPR or similar laws, use a consent management plugin. Popular choices include:
These tools allow you to block the Pixel from firing until a visitor gives consent.
Offer opt-out options
Make it easy for people to opt out of tracking. This can be through a link in your privacy policy or an additional toggle in your consent manager.
Common troubleshooting tips
If the Pixel doesn’t appear to be working:
- Double check the placement of the Pixel code in your header.
- Make sure your browser isn’t blocking cookies or trackers.
- Disable caching plugins temporarily to test.
Ensure that only one Pixel is installed to avoid conflicts. - Use Meta’s diagnostics tab in Events Manager to identify issues.
| Symptom | Most common cause | Fix |
|---|---|---|
| Pixel Helper says “No Pixel Found” | Cache, wrong placement, ad blocker | Clear cache, confirm code is in header, test with blocker disabled |
| Duplicate PageView events | Pixel installed twice | Remove one install location (theme + plugin, or plugin + GTM) |
| Purchase not firing on WooCommerce | No ecommerce event integration | Use official plugin or WooCommerce-ready pixel plugin |
| Events show in Pixel Helper but not in Events Manager | Wrong Pixel selected / delayed processing | Verify Pixel ID + check Test Events / Diagnostics |
Take your social strategy further through automation
Once your Meta Pixel is installed and capturing the right events, you’ve laid the foundation for effective ad tracking and performance optimization. But to keep your audience engaged and grow your reach consistently, you also need to focus on how your content is distributed. That’s where Jetpack Social can help.
Jetpack Social is designed to simplify and automate the way you share content to your connected social media profiles. With minimal setup, it allows you to schedule and publish posts directly to platforms like Facebook, LinkedIn, and Instagram, without switching between dashboards or copying links manually.
For site owners looking to build momentum across both paid and organic channels, pairing Meta Pixel with Jetpack Social is a smart and scalable approach. Learn more about Jetpack Social here.
Frequently asked questions
What is the difference between the Meta Pixel and the Conversions API?
The Meta Pixel is a piece of code that runs in a visitor’s web browser to track their activity. The Conversions API, on the other hand, lets your website’s server send visitor activity directly to Meta.
Think of it as two separate channels sending the same information. You should use both together. The browser pixel can be blocked by ad blockers or browser privacy settings. The Conversions API provides a more reliable backup, ensuring more of your visitor actions are captured accurately for better ad targeting and measurement.
Why does the Meta Pixel Helper show ‘No Pixel Found’ on my WordPress site?
This error usually points to a few common problems. First, check if you have a caching plugin running on your site. You may need to clear your website’s cache and your browser’s cache for the pixel code to appear. Second, confirm the pixel code was pasted correctly into the header section of your website.
If you used a plugin, ensure it is active and the settings are saved. Finally, some aggressive ad blockers can prevent the Pixel Helper tool from seeing the code, so try disabling your ad blocker and testing again.
Can I add the Meta Pixel to WordPress without a plugin?
Yes, you can add the Meta Pixel to WordPress without using a plugin. The manual method involves editing your theme’s header.php file or using the Site Editor to add a Custom HTML block to your header template. This places the code directly into your site.
This approach gives you full control but requires more technical comfort. Be careful, because mistakes can break your site. Always use a child theme when editing theme files directly, so your changes are not lost when you update your theme.
How do I track specific actions, like a form submission, with the Meta Pixel?
To track a specific action, you need to use a standard event or a custom conversion. For a form submission, you would typically use the ‘Lead’ standard event. You can add the event code to the “thank you” page that users see after they submit the form.
When a user lands on that page, the event code fires and tells Meta that a lead was generated. Some pixel plugins also have features that let you set up event tracking without needing to manually place code on specific pages.
Will the Meta Pixel slow down my WordPress website?
The Meta Pixel code itself is very small and is loaded asynchronously, which means it should not have a noticeable impact on your site’s loading speed. However, using too many tracking scripts or a poorly configured plugin can contribute to slower performance.
To avoid issues, use a well-coded plugin for implementation or add the code manually. Make sure to follow performance best practices, such as using caching and optimizing images with a plugin like Jetpack Boost, to keep your entire site running fast.
Do I need a cookie consent banner for the Meta Pixel in WordPress?
Yes, you may need a cookie consent banner if you use the Meta Pixel. Privacy laws such as the GDPR in Europe require you to get explicit consent from visitors before you can place tracking cookies on their browser.
Your consent banner must inform users that you use cookies for advertising purposes and give them a clear choice to accept or reject them. The Meta Pixel should only fire for users who have given their consent. Many WordPress plugins can help you manage this process correctly.
What is the difference between a standard event and a custom conversion?
A standard event is a predefined action that Meta recognizes, such as ‘Purchase’, ‘AddToCart’, or ‘CompleteRegistration’. You use these common events to report conversions and build audiences.
A custom conversion is a rule you create based on a URL. For example, you can create a custom conversion for anyone who visits your “thank-you.html” page. You can then name that conversion ‘Ebook Download’. Custom conversions are useful for tracking important actions that do not fit into one of Meta’s standard event categories.
Why is my Meta Pixel tracking duplicate events on one page?
Seeing duplicate events, like two ‘PageView’ events firing, usually means the pixel code has been installed more than once. This can happen if you add the code manually to your theme and also use a plugin to add the same pixel ID. It might also occur if your theme has its own built-in feature for a tracking pixel that you forgot about.
To fix this, carefully check all possible locations: your theme files, your pixel plugin settings, and any header/footer script plugins. Remove all but one instance of the pixel code.
Can I use Google Tag Manager to add the Meta Pixel to WordPress?
Yes, using Google Tag Manager (GTM) is an excellent way to add the Meta Pixel to WordPress. This method is often preferred by marketers because it keeps all tracking scripts organized in one place.
To do this, you first install the GTM container code on your WordPress site. Then, within your GTM container, you create a new tag for the Meta Pixel base code and set it to fire on all pages. You can also use GTM to set up more complex event tracking with greater flexibility than most WordPress plugins offer.
How do I make sure my Meta Pixel works correctly for my WooCommerce store?
For a WooCommerce store, basic page view tracking is not enough. You need to track important e-commerce actions like ‘ViewContent’ (viewing a product), ‘AddToCart’, and ‘Purchase’.
The best way to do this is with a specialized plugin designed for WooCommerce, such as PixelYourSite or the official Meta for WordPress plugin. These plugins automatically install the pixel and configure the necessary e-commerce events. They also pass important data like product price and currency, which is critical for measuring your return on ad spend.
Publish once. Share everywhere.
Automatically share your website content to your favorite social media platforms, from one place.
Get Jetpack Social for free