
Allowlisting IP addresses is a precise way to control who can access specific areas of your site. Whether you’re restricting access to the login page, admin dashboard, or other sensitive content, IP allowlisting adds a strict access control layer that blocks unauthorized users outright.
This guide explains how to allowlist IP addresses in WordPress manually or via a plugin, outlines the different use cases for allowlisting, and covers potential missteps to avoid.
Note: This assumes that you’re already comfortable with basic WordPress operations and file-level changes.
When to allowlist IPs in WordPress
By default, WordPress does not limit access to the login screen or admin area. Anyone with the URL can attempt to access it, which makes it a common attack vector. Brute force login attempts, DDoS traffic, and bot scans often target /wp-login.php and /wp-admin.
But allowlisting restricts access to known IPs only. This makes it nearly impossible for unauthorized users to interact with protected areas, even if they have valid credentials or botnets.
Here are some key use cases for IP allowlisting in WordPress:
- Locking down the login page to office or home IPs only
- Restricting admin dashboard access during site development
- Controlling who can reach REST API endpoints or custom admin tools
- Securing staging environments or hidden test pages
Where to allowlist IPs in WordPress
You can apply IP-based restrictions across multiple layers:
- Web server configuration files: .htaccess (Apache) or nginx.conf (Nginx)
- Security plugins: Tools that offer built-in firewall or access rules
- Firewall-level solutions: Server-based or third-party firewalls
- Functions.php or a custom plugin: Conditional logic in PHP (not recommended for critical restrictions)
Each method has trade-offs. File-level rules are fast and server-enforced, but harder to manage. Plugin-based methods are more user-friendly, but may be bypassed under some conditions.
Method one: Allowlist IPs using a security plugin
If you don’t have access to server configs or prefer a UI, there are plugins that offer IP allowlisting. Jetpack, for example, includes a built-in feature for managing IP allowlists, designed to work with its security and brute force protection tools.
Steps to allowlist IPs in Jetpack:
- Install Jetpack on your site.
- Navigate to Jetpack → Settings → Security.
- Scroll down to the section labeled “Always allowed IP addresses”.
- Toggle the feature On to activate IP allowlisting.
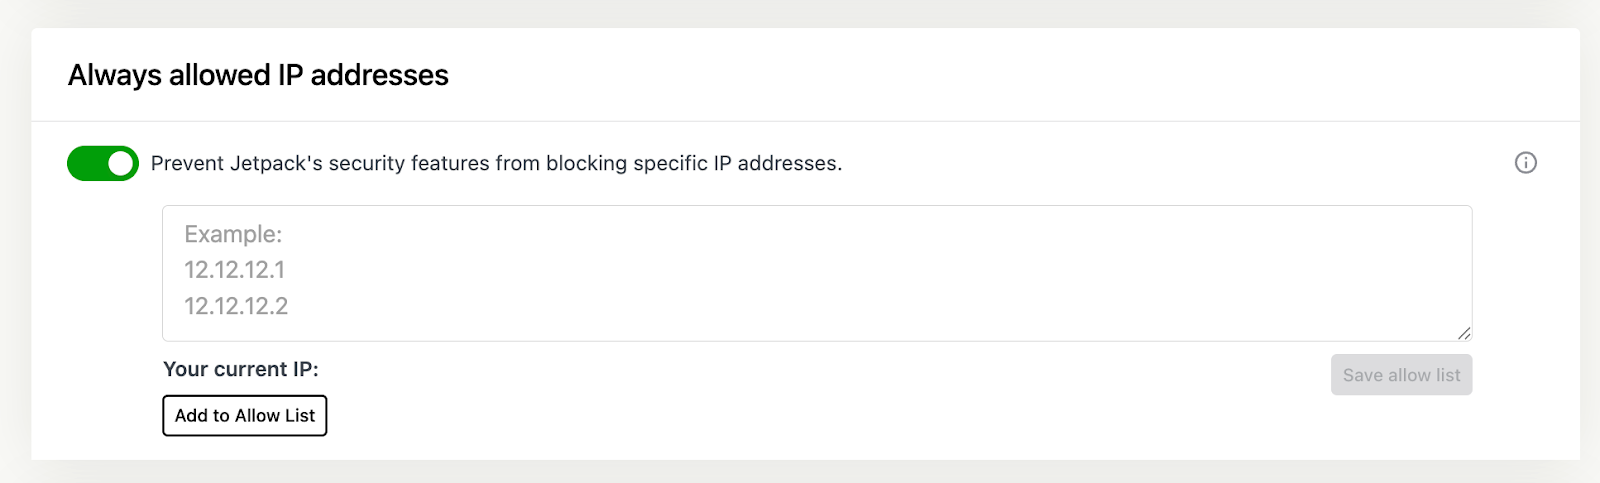
How to format IP entries:
- Enter each IP address in the text field.
- Separate entries using commas, spaces, or line breaks.
- To specify ranges, use CIDR notation (like 192.168.1.0/24) or dash-separated ranges, (like 192.168.1.10–192.168.1.100).
Jetpack will always allow requests from these IPs, even if brute force protection or firewalls are active. This ensures that trusted users or systems won’t be blocked, even if their request patterns trigger other defenses.
Method two: Allowlist IPs via .htaccess (Apache)
If your server runs Apache, the .htaccess file lets you control access to specific files or directories.
Allowlist an IP for wp-login.php
This restricts access to the login page to specified IPs.
Steps:
- Open your .htaccess file, located in the root of your WordPress installation.
- Add the following code above the WordPress rules:
<Files wp-login.php>

    Order Deny,Allow

    Deny from all

    Allow from 123.456.789.000

    Allow from 234.567.890.123

</Files>- Replace the IPs with your own.
- You can list multiple “Allow from” lines as needed.
Allowlist an IP for /wp-admin
To restrict the entire admin folder, use this code instead:
<Directory /path/to/your/site/wp-admin>

    Order Deny,Allow

    Deny from all

    Allow from 123.456.789.000

</Directory>
Important notes:
- This can break AJAX calls and admin-ajax.php if not configured correctly.
- To prevent this, also allow access to admin-ajax.php, using the code below. And, as always, test on a staging site prior to editing website code and make sure you have backups in place.
<Files admin-ajax.php>

    Order Allow,Deny

    Allow from all

    Satisfy any

</Files>
Method three: Allowlist IPs via Nginx configuration
If your site is hosted on Nginx, the configuration approach is similar, but with different syntax.
Restrict access to wp-login.php:
location = /wp-login.php {

    allow 123.456.789.000;

    allow 234.567.890.123;

    deny all;

}
Restrict access to wp-admin:
location /wp-admin {
    allow 123.456.789.000;
    deny all;
}
To reload Nginx after making changes, use the following:
sudo systemctl reload nginx
Avoid blocking access to admin-ajax.php under /wp-admin. You can add an exception like this:
location ~* /wp-admin/admin-ajax\.php$ {
    allow all;
}
Method four: Allowlist IPs via a server firewall
If you’re managing your own server, tools like UFW or CSF can enforce IP allowlisting at the OS level.
Example with UFW (Ubuntu):
sudo ufw allow from 123.456.789.000 to any port 80
sudo ufw allow from 123.456.789.000 to any port 443
sudo ufw deny from any to any port 80
sudo ufw deny from any to any port 443
This applies sitewide. Use with caution on shared hosting environments.
IP allowlisting best practices
We guard your site. You run your business.
Jetpack Security provides easy‑to‑use, comprehensive WordPress site security, including real‑time backups, a web application firewall, malware scanning, and spam protection.
Secure your siteKeep an emergency access method
Always have an alternate way to regain access in case your IP changes. This could be:
- SSH access to the server
- SFTP access to remove .htaccess rules
- A secondary admin IP allowlisted in advance
Don’t rely solely on IP allowlisting
IP addresses can be dynamic, shared, or spoofed. Allowlisting is effective, but not foolproof.
Jetpack Security offers a powerful, all-in-one solution for protecting WordPress sites. It brings together real-time backups, malware scanning, a web application firewall, brute force protection, downtime monitoring, an activity log, and more — all designed to protect your site from threats and help you recover if something does go wrong.
Because Jetpack includes so many key security tools, it’s an excellent complement to other protective measures you may already have in place. Together with strong passwords, regular updates, and IP allowlisting, Jetpack helps you create a layered security strategy that’s both comprehensive and easy to manage.
Document every change
Track which IPs were added, when, and why. This prevents confusion when multiple admins or teams manage access controls.
When to allowlist, and when not to
Allowlisting IP addresses makes sense when your team works from fixed locations or when you’re securing a staging environment. It’s less ideal for teams that work remotely on dynamic networks or rotate VPNs often.
If you rely on mobile devices, travel, or flexible IP environments, allowlisting can cause more friction than benefit. In those cases, look to token-based access, time-based controls, or password-protected directories instead.
Final checkpoint before you proceed
Before deploying IP allowlisting, confirm that:
- You have your current IP address on hand.
- You’ve tested rules on a staging site.
- You have a backup access method in case of misconfiguration.
- You’ve logged which team members have static or dynamic IPs.
Access control is only effective when it doesn’t interfere with legitimate work. Implement with caution, audit frequently, and keep access paths predictable and minimal.
Frequently asked questions
What is the difference between allowlisting and whitelisting an IP address?
Allowlisting and whitelisting refer to the exact same process. Whitelisting is the older term that people used for many years. It means creating a list of approved users or IP addresses that are permitted to access your website.
The tech industry has started using the word allowlist instead because it is clearer and more inclusive language. Both terms mean you are blocking everyone else by default and only letting in the specific people on your list. You might see these words used interchangeably in plugin settings or server documentation.
How do I find my own IP address to add it to the allowlist?
Finding your IP address is very simple. You can open a new tab in your web browser and search for “what is my IP” on Google. The search results will show a string of numbers at the very top of the page.
This is your public IP address. If you see a long string of letters and numbers combined, that is likely an IPv6 address. Most hosting companies and security plugins accept both the shorter IPv4 format and the longer IPv6 format. You should copy this number exactly as it appears.
What happens if my IP address changes after I set up an allowlist?
If your internet service provider changes your IP address, you will get locked out of your own website. This happens because your new IP is not on the list of approved visitors. You will likely see a 403 Forbidden error message when you try to log in.
To fix this, you need to access your website files using an FTP client or the file manager in your hosting account. You must open the .htaccess file and manually update the code with your new IP address. If you travel often or have a dynamic IP, using a plugin for security is safer than hard-coding rules into your server files.
Can I allowlist an entire range of IP addresses instead of just one?
Yes, you can allow a whole group of addresses. This is helpful for offices or schools where many computers share a network. You do this using something called CIDR notation. It looks like a normal IP address but ends with a slash and a number, such as /24.
For example, using 192.168.1.0/24 covers every address from 192.168.1.0 to 192.168.1.255. You should be careful with this method. If you make the range too wide, you might accidentally let in attackers who are on the same network provider as you.
Will allowlisting IP addresses stop all hackers from attacking my site?
Allowlisting is a strong security measure, but it does not stop everything. It is great for stopping brute force attacks where bots try to guess your password. It works because the bots cannot even see your login page to try a password.
However, it does not fix weak passwords or outdated plugins. Hackers can still find other ways to break in if you have vulnerable software installed. You should think of IP allowlisting as one layer of protection. You still need to keep your themes & plugins updated to stay safe, and install a reliable security plugin like Jetpack Security.
We guard your site. You run your business.
Jetpack Security provides easy‑to‑use, comprehensive WordPress site security, including real‑time backups, a web application firewall, malware scanning, and spam protection.
Secure your site