
The domain name system (DNS) is one of the cornerstones of the web. Without DNS lookups, it would be impossible to know which domain corresponds to which IP address (the location where a website’s files are hosted). As it is, these lookups can happen in milliseconds, allowing you to jump from website to website almost as quickly as you can click on a link.
Reducing the number of DNS lookups can help keep your website loading times in check. It’s a simple process you can undertake in a number of ways, but it can have a significant positive impact on the user experience.
Below, we’ll go over the basics of DNS lookups, how they work, and how to measure response times. Then, we’ll discuss how to reduce DNS lookups in WordPress.
What is a DNS lookup?
The DNS is a distributed system that maintains records of which domains correspond to which IP addresses. This is essential to the modern web because it enables you to visit sites without needing to remember complex strings of numbers (google.com sounds a lot better than 64.233.160.0!).
A DNS lookup refers to the process of translating a domain name into an IP address. When you enter a URL in your browser or click on a link, a DNS lookup occurs in the background. The browser sends a request to a DNS ‘resolver,’ typically hosted by your Internet Service Provider (ISP). The resolver then looks in its local cache to see if it has the corresponding record, and if it doesn’t, it contacts a DNS server.
All of that process should happen rather quickly. If a website takes only a second or two to load, that means the DNS lookup occurs in just a fraction of that time. But, in some cases, DNS lookups can take an excessive amount of time. If that happens, you’ll want to optimize the process to avoid long loading times for your site.
What is a good DNS response time?
A good DNS response time is typically under 100 milliseconds (ms). But, response times can vary depending on a variety of factors, including:
- The location of the DNS server. The further away the DNS server is, the longer it takes for the query to reach it. The same is true for the time it takes to return the information you’re requesting.
- If the server is under heavy load. A DNS server can take longer to respond to requests if it’s getting a lot of them simultaneously, just as with a normal site-hosting server. This is not a problem you can fix by optimizing your website but by changing DNS providers.
- How complex the DNS query is. Not all DNS queries are the same in terms of complexity. If a URL has multiple subdomains or multiple IP addresses associated with it, a DNS lookup can take longer.
In general, faster DNS response times can result in faster website loading times, as the DNS lookup is the first step in connecting to a website. To put it another way, slow DNS response times can lead to a poor user experience.
How to measure your DNS lookup time on WordPress
There are a lot of ways to measure DNS lookup times for any website, including those built with WordPress. Generally, the easiest way to measure these times is with a third-party tool, which typically works similarly to page-speed-measurement software. Some popular options include:
- DNS Speed Benchmark. This is a free tool that allows you to test DNS lookup times from multiple locations around the world. Simply enter the domain name you want to test, and the tool will show you DNS lookup times in milliseconds for multiple locations.
- Dot-Com-Tools. This DNS checker enables you to run tests using servers from around the globe. It’s a helpful option because it provides you with an average DNS lookup time.
- Browser Developer Tools. Most modern web browsers have developer tools that allow you to analyze network performance, including DNS lookup times. Accessing developer tools in Chrome, for example, is simple. Just right-click on a webpage and select Inspect or press F12 on your keyboard. Then, navigate to the Network tab and reload the page to get results.
It’s important to reiterate that DNS lookup times can vary a lot depending on where the original query comes from. You might get amazing lookup times from your computer if your web hosting server is close to you. But that might not be the same experience for users in other locations.
That type of variation will always exist. Still, if you’re seeing big differences in DNS lookup times after testing them using the tools above, that isn’t normal. Ideally, DNS lookup times shouldn’t vary too much, and if they do, you can optimize them to reduce loading times.
How to reduce DNS lookup time on WordPress
There are many ways to reduce DNS lookup times on WordPress. A lot of these methods will also improve overall site performance. So, if your website is loading slowly, you might want to implement as many of these strategies as possible.
1. Install a reliable CDN plugin
Using a quality Content Delivery Network (CDN) can help you improve DNS lookup times thanks to DNS prefetching. This is a feature that prioritizes DNS lookups and then caches that information. Since the server only needs to check the cache for the IP address, the process is much faster than running a regular DNS lookup, at least for the end user.
CDNs typically have many servers located in different regions around the world. Each of these servers maintains a cache of frequently accessed domain names and their corresponding IP addresses.
By reducing the time it takes to perform DNS lookups, CDNs can improve website performance and the user experience. This way, visitors can access web pages more quickly, and you can reduce the load on your servers.
Overall, there are many reasons to use a CDN beyond reducing DNS lookup times. So, the decision isn’t so much whether to get one, as it is about deciding what the best option is for your website.
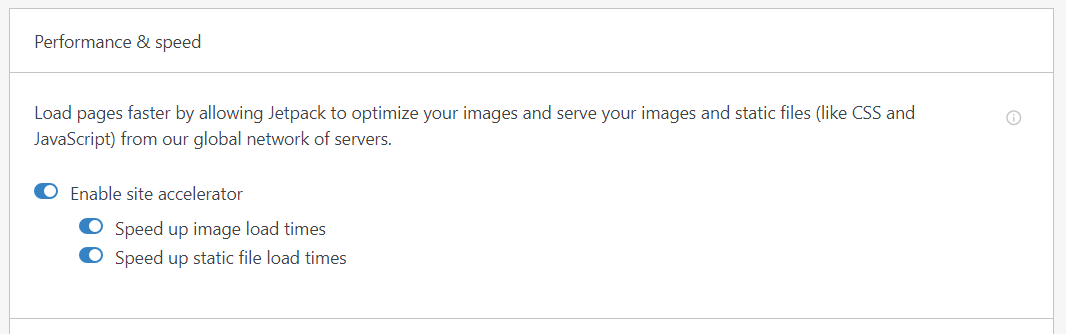
If you’re using WordPress, Jetpack offers an easy way to implement a CDN on your website. In fact, the CDN is available with the free plugin. You can enable it from Jetpack’s Performance & speed settings by selecting the option that says Enable site accelerator.
There are plenty of other CDN options available for WordPress, but they can be a bit more complicated to install and activate.
2. Defer loading of JavaScript
Typically, a web page needs to load all JavaScript before it renders fully. Since JavaScript files can be quite large, this can significantly impact loading times. So, if you’re trying to reduce DNS lookups and improve site speed, you can also defer the loading of JavaScript. Or for that matter, any element that can delay the website from rendering.
But before we explore this option, it’s important to understand the difference between local and external JavaScript files. Essentially, deferring the loading of JavaScript files on your server won’t impact DNS lookup times.
That’s because with these local files, the DNS lookup happens before a page starts to load at all. On the other hand, any external JavaScript files you call from your site involve their own DNS lookups.
Therefore, the ideal solution here is to defer JavaScript altogether, so that even third-party files won’t impact the user experience with additional DNS lookups.
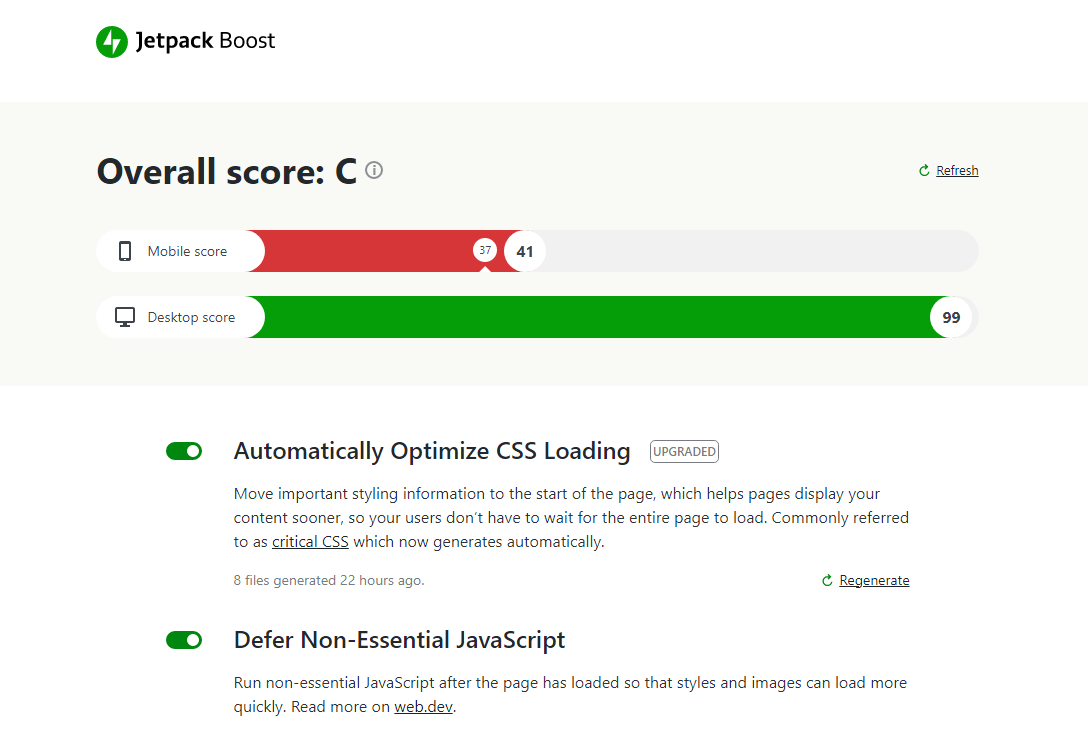
There are several ways to defer the loading of JavaScript. Jetpack Boost is an excellent option, since it enables you to defer all non-essential files by toggling one setting.
If you have Jetpack Boost installed, go to Jetpack → Boost and look for the option that says Defer Non-Essential JavaScript. Simply enable that option, and you should see an immediate improvement in your site’s performance score at the top of the screen.
Keep in mind that deferring JavaScript manually involves editing your site code to add the defer attribute to script tags. Therefore, if you’re not comfortable dealing with code, a plugin might be the easiest option for you.
3. Enable DNS prefetching
DNS prefetching enables a server or browser to perform a DNS lookup in advance and to store or cache that information. That way, when a visitor tries to access the website, the information is available faster. This is because the lookup occurs locally instead of having to go through the full traditional route.
Most modern web browsers use DNS prefetching to some degree, but this doesn’t occur with all websites. For your website, you’ll need either the DNS resolver or a CDN to prefetch DNS lookup results.
Since you can’t ask a DNS resolver to prefetch results only for your site. Your best bet is to focus on the CDN side of things. Using a CDN, like the one available with Jetpack, will let you enable DNS prefetching for your site.
As we mentioned, the CDN is available with the free plugin, and you can enable it from Jetpack’s Performance & speed settings by toggling the option that says Enable site accelerator.
There are some other plugins that offer DNS prefetching. Still, it’s likely better to use a tool that can do more than just that. A CDN solution is an excellent choice, since it will also help improve your website’s performance in general (due to the reduced load on your servers).
4. Consider using a faster DNS provider
Using a different DNS provider can also help you reduce DNS lookup times. Some DNS providers may have faster and more reliable servers, better network connectivity, or more advanced caching techniques. All of this can lead to quicker DNS resolution times.
Your first step is to use a tool like DNSPerf, which shows you a list of the fastest and most reliable DNS providers. Once you decide on a new tool, you’ll need to create an account on their platform. The specific transfer process will depend on the DNS provider you’re currently using, as well as the one that you’re switching to.
Bluehost, for example, outlines the process of moving a domain to their platform in three steps:
- Prepare your domain. Disable any privacy settings, confirm contact information, obtain an authorization code, etc.
- Initiate the transfer. This requires a relatively straightforward process within your Bluehost dashboard.
- Check the progress from within your dashboard.
The process, in its entirety, usually takes a few days. It’s important that you also update any applicable nameservers and DNS settings with the new provider to ensure that your website and any additional services — like email accounts — work properly.
5. Minimize the number of CNAME records
CNAME (Canonical Name) records are DNS records used to map one domain name to another. These records can help you create aliases for existing domain names, like subdomains or alternative domain names for a website.
When you try to access a web page like blog.example.com, the browser needs to perform a DNS lookup to resolve the domain name. If there’s a CNAME record involved, the browser needs to follow that chain until it hits an A name record.
Those are the types of records that map actual domains to their final IP addresses. The more CNAME records you create for your website, the longer the lookup chain becomes, which means it takes longer to resolve the DNS.
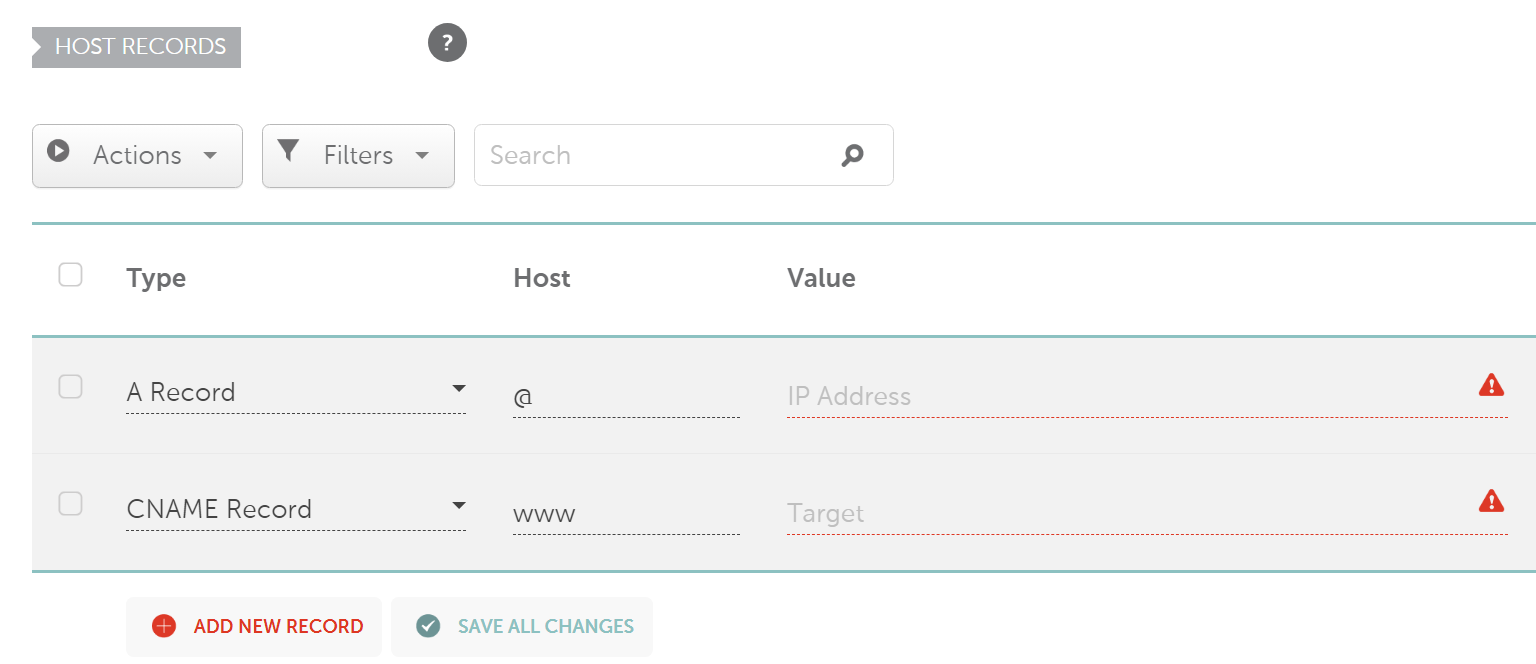
To minimize the number of CNAME records, you can rely as much as possible on A records instead. Here are some guidelines to help you achieve that:
- Use A records for root domains. When configuring your domain, use A records to map the root domain to the IP address of your website’s server rather than using a CNAME record.
- Use CNAME records for subdomains. Use CNAME records for subdomains that point to other domain names, like a CDN or third-party service. This can simplify DNS management since those third-party services may change IP addresses.
- Avoid chaining CNAME records. If you need to use a CNAME record, that’s fine. But, you should avoid CNAME record chains since they only add to DNS lookup times.
- Use TTL wisely. Set the Time-to-Live (TTL) value of your DNS records appropriately. A longer TTL can reduce the number of DNS lookups required, but it can also increase the time it takes to update DNS records.
Changing all of these settings involves accessing your domain registrar or web host. The service you used to register your domain should provide you with options to change its corresponding records. If you’re not sure how to do this, you can contact the registrar or the web host for help.
6. Reduce the number of external hostnames
A hostname is a unique identifier that is assigned to a device or a service on a network. Hostnames are used to identify and locate network resources, like websites, servers, and devices, using the domain name system (DNS).
On your website, there are two types of hostnames, internal and external. Internal hostnames include links that point to other pages on your site. External hostnames refer to links that point to pages and resources outside of your website.
Every time a visitor clicks on an external link, that involves a DNS lookup. This shouldn’t be much of a concern to you, since you have no control over how long DNS lookups take for other sites. What you should care about are hostnames pointing to external files your site needs to load.
These files can be scripts, fonts, tracking pixels, and other resources your site relies on for critical features. Whenever possible, your goal is to host these files locally to reduce DNS lookups on your site.
Earlier in this article, we talked about deferring non-critical JavaScript until pages on your site render. That technique, in combination with reducing hostnames by hosting files locally, should have a significant impact on reducing DNS lookups and loading times.
7. Host third-party resources locally
Most modern websites rely heavily on third-party resources. That includes scripts, fonts, embedded videos, tracking pixels, and more.
All of these tools are useful, but they come with a trade-off: Every third-party resource you add to your website means one or more additional DNS lookups that users have to deal with.
The solution to this problem is not to do away with third-party resources. What you want to do is host them locally whenever possible. This is perfectly workable when it comes to scripts and files like fonts, since they usually occupy very little space.
On the other hand, videos and tracking pixels are larger and more complicated. Tracking pixels, by their nature, need to connect with third-party platforms like Meta. But, you can reduce the impact of this third-party connection by loading them all at once using tools like Google Tag Manager. You can even opt to defer the tags until the page is loaded.

Moreover, when it comes to more top-heavy resources like videos, hosting them locally can have a significant impact on your server’s resources and performance. Having several users loading videos from your site can slow it down much more than a few DNS lookups.
To find out what third-party resources your website relies on, you can use a tool like PageSpeed Insights. When you run an analysis with PageSpeed Insights, it’ll return a list of suggestions on things you can do to improve your website’s performance. Here, you’ll find an entry that reads Reduce the impact of third-party code.

That list will show you which third-party scripts are slowing down your site. Each of those scripts involves DNS lookups, so you’ll need to determine which ones you can host locally and which ones are worth keeping as external.
8. Deactivate plugins that perform DNS lookups
Some WordPress plugins (e.g. tools that use tracking scripts, like live chat and analytics plugins) may perform DNS lookups depending on their functionality and how they’re coded. The plugins that do this typically require the use of external resources — like images, scripts, or other assets — which point to different hostnames.
To load these resources, the plugin may need to perform a DNS lookup to resolve the domain name into an IP address. Similarly, some WordPress plugins may interact with external services, like social media platforms or analytics tools, which could require DNS lookups to establish connections and retrieve data.
If a plugin performs DNS lookups, it can have an impact on your site’s performance. You can minimize this impact by using DNS caching techniques as well as opting to use plugins that don’t rely heavily on third-party resources.
The problem with this is that it can be hard to determine which plugins perform DNS lookups. This involves either analyzing the plugin’s code or monitoring the network activity of the website while the plugin is active. Tools like browser developer consoles, network analysis tools, or server logs can be used to track the DNS queries and network connections made by the plugin.
Another alternative is to use a staging site to conduct a test. You could deactivate plugins one by one and see if it makes an impact on your site’s DNS lookup times. You can find instructions on how to do this in a previous section on measuring DNS lookup times.
Frequently asked questions about reducing DNS lookups
At this point, you likely have a good understanding of DNS lookups and their impact on site speed. But, just in case you have any lingering doubts, we’re now going to answer some of your most frequently asked questions about how to reduce DNS lookups in WordPress!
Why is it important to reduce DNS lookups?
The more DNS lookups a browser has to perform to visit a website, the longer it will take to load. Long loading times can have a negative impact on the user experience.
In turn, this can make your website less effective, hurting things like sales and conversions. Therefore, reducing DNS lookups is key if you want your website to perform well.
Do DNS lookups impact user experience?
The short answer is yes. DNS lookups can impact the user experience if they take too long or a browser has to perform too many lookups to access any given page on your website.
As the number of DNS lookups increases, so does the time it takes to load a page. Users can be notoriously impatient when it comes to loading times, so it’s in your interest to reduce them as much as possible.
Do DNS lookups impact Core Web Vitals?
Google takes a lot of factors into consideration when measuring Core Web Vitals. Significant DNS lookup times can contribute to worse scores when it comes to First Input Delay (FID) and Largest Contentful Paint (LCP).
That impact is due to the fact that pages may not start or finish loading before the browser completes every associated DNS lookup. Therefore, by reducing the number of lookups, you can likely improve Core Web Vitals scores for your website. You can easily optimize your site’s Core Web Vitals using a plugin like Jetpack Boost.
What else can I do to improve my site’s performance?
There are a lot of ways to improve your WordPress website’s performance. Working to improve your site’s Core Web Vitals can be a great start. Aside from that, you can use a CDN, defer non-essential scripts, and optimize images with offsite hosting or lazy loading.
Reduce DNS lookups to improve your website’s performance
DNS lookups are a core aspect of the web. Without lookups and the DNS system, we would have to memorize lengthy IP addresses instead of user-friendly domain names. But too many DNS lookups on a single website can negatively impact your website performance and user experience.
There are a lot of ways to reduce DNS lookups and speed up a WordPress website. Some of the best methods at your disposal include using a CDN and deferring the loading of JavaScript. Additionally, you can change DNS providers or make an effort to minimize your CNAME records and external hostnames.
Do you want to reduce load times, improve Core Web Vitals scores, and improve the overall performance of your WordPress site? Jetpack Boost can help in just a few minutes. Built by the people behind WordPress.com, this is the go-to WordPress speed plugin for serious WordPress pros.
