
An author bio adds credibility to your WordPress posts, giving readers insight into who wrote the content and why they should trust the information. It also helps with personal branding and search engine optimization (SEO).
WordPress provides multiple ways to add an author bio, from built-in options to plugins and manual coding. This guide covers several methods to ensure quick setup and good performance.
Setting up author information in WordPress
Every method discussed here pulls author data stored in WordPress user profiles. Setting this up correctly ensures bios display properly.
Editing user profiles
To edit a user profile, first make sure you’re logged into your WordPress dashboard. Then, go to Users → All Users.
Click on the user profile you want to edit then scroll down to the Biographical Info section. Enter a brief author bio.
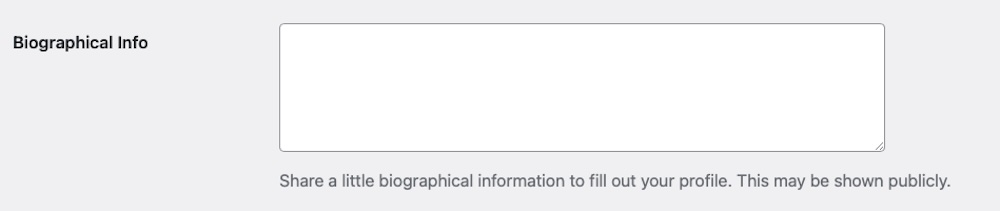
Scroll all the way to the bottom of the page and click Update User to save these changes. This process should be repeated for each author on your site.
Adding a profile picture
WordPress uses Gravatar for profile images. Visit gravatar.com, sign up with the same email as your WordPress account, and upload a photo. It syncs automatically with your site. Test this by viewing a post under your byline. The image should appear if your theme or method supports it.
Method 1: Add an author bio using your WordPress theme
Some WordPress themes include built-in author bio sections. Before adding one manually, check your theme’s capabilities.
How to verify theme support
To check it your theme supports stylized author bios, go to Appearance → Customize. Next, click on Blog then select Single Post.
Scroll down and look for Author Bio, Author Box, or Post Settings settings. Themes vary, so fully explore this customization menu. Then, enable the option if available.
Save your changes then review a post to confirm where the bio appears (usually below the content).
What to do if your theme lacks support
If no options exist, your theme doesn’t include a built-in bio section. You can still add one using plugins or code, however, which we’ll discuss next. Check your theme’s documentation to confirm.
Method 2: Add an author bio using a WordPress plugin
Plugins provide a simple way to enhance author bios with images, social media links, and formatting options. Some of the best options include:
Simple Author Box

Simple Author Box adds a responsive author bio box at the end of posts, displaying the author’s name, avatar, bio, and social media links. Customize the design by adjusting colors, fonts, and layout to match your site. The plugin also supports guest and multiple authors, which works well for blogs with various contributors.
WP Post Author
WP Post Author lets you add an author bio box to your posts, displaying the author’s name, avatar, bio, and social media links. You can customize its appearance to match your site’s design using built-in settings.
Molongui Authorship
Molongui Authorship extends WordPress’s default author features by allowing you to add multiple authors, guest authors, and detailed author bio boxes to your posts.Customize the layout, colors, and social media links to match your site’s design, Plus, it supports co-authors, making it ideal for collaborative blogs and multi-author websites.
Starbox

Starbox adds a stylish and customizable author bio box to your posts, featuring the author’s name, avatar, bio, and social media links. It offers multiple design templates and includes features like Facebook Authorship integration.
Installing and configuring an author bio plugin
Once you decide on a plugin to use. Go to Plugins → Add New Plugin.
Search for the desired author bio plugin and click Install Now then Activate. Go to the plugin’s Settings to configure it and change the bio’s appearance, layout, and other attributes as you see fit.
Method 3: Add an author bio manually using code
If you prefer more control over the design and functionality, add an author bio manually using code.
Editing theme files to include an author bio
If your theme doesn’t support author bios, manually adding it requires editing theme files. To do this, go to Appearance → Theme Editor. Then open single.php or content-single.php.
Locate the section where you want the bio to appear, typically after the_content().
Insert the following code:
<div class="author-bio">

    <h3>About the Author</h3>

    <p><?php echo get_the_author_meta('description'); ?></p>

</div>
Save the changes you’ve made and test your site to make sure all appears as intended.
Adding an author image
To include an author image along with your author bio, first ensure the author has a Gravatar profile linked to their email.
To manually add an image, use the following code in functions.php:
<div class="author-bio">

    <h3>About the Author</h3>

    <p><?php echo get_the_author_meta('description'); ?></p>

</div>
Call this function in single.php where you want the bio to appear like this:
<?php display_author_bio(); ?>Styling the author bio with CSS
To enhance the visual appeal of any author bio you create, add custom CSS. To do this, go to Appearance → Customize → Additional CSS and add the following code:
.author-bio {

    background-color: #f4f4f4;

    padding: 15px;

    border-left: 4px solid #333;

    font-size: 16px;

}

.author-bio img {

    border-radius: 50%;

    margin-bottom: 10px;

}
This custom CSS applies styling to your author bio box, including a light grey background, a border on the left side, and circular images for the author. The padding ensures the content inside the box has appropriate spacing, and the font size adjustment makes the text more readable.
After adding this CSS, save your changes and review your site to ensure the author bio looks as intended.
Adding multiple authors or guest authors
If you have content contributed by multiple authors or guest writers, add their information to your posts, too. This process starts by enabling multiple authors for individual blog posts.
For posts with multiple contributors, a plugin like Co-Authors Plus comes in handy. After installing the plugin, edit a post and scroll to the Authors section.
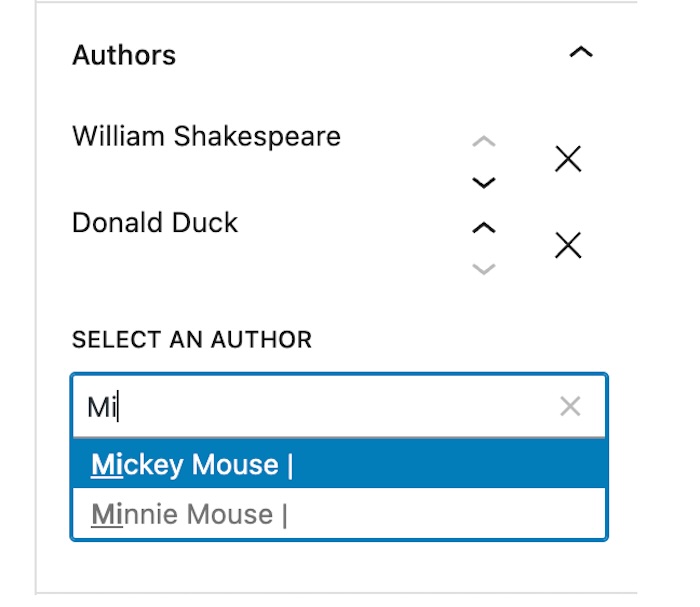
Search for and select additional authors, then save changes to display multiple authors on the post. You can also simply change the author of a post by selecting a different user as the sole author.
Enabling author schema markup for SEO benefits
Google values well-structured author bios. and adding schema markup can help improve author visibility in search results. Here’s how to implement it:
Use an SEO plugin
If you’re using Yoast SEO, enable author schema automatically. Go to Yoast SEO → Settings → Site Representation.
On this page, specify whether your site represents an organization or a person. If a person, select who that is from the dropdown menu. Save your changes then verify the bio for this user is filled in under Users → All Users.
To test that all is working as it should be, perform a Rich Results Test and verify that the author bio appears within the schema results.
Add schema markup manually
If you prefer a custom approach, insert the following JSON-LD schema markup into your theme’s header.php or single.php file:
<script type="application/ld+json">

{

    "@context": "https://schema.org",

"@type": "Person",

"name": "<?php echo esc_html(get_the_author()); ?>",

"description": "<?php echo esc_html(get_the_author_meta('description')); ?>",

"image": "<?php echo esc_url(get_avatar_url(get_the_author_meta('ID'))); ?>"

}

</script>
This script adds structured data for the post author, including their name, bio, and profile image.
Placing it in header.php applies it site-wide, while adding it to single.php ensures it appears only on individual posts.
Troubleshooting common issues
If your author bio isn’t displaying correctly, there may be an underlying issue. Let’s troubleshoot some common issues next:
Bio not showing
Make sure the author’s profile includes a bio, as empty fields won’t display. Verify plugin or theme settings are enabled. For custom code, ensure single.php is the active file. Some themes use content-single.php instead, so verify which one your theme uses. If changes don’t appear and you’re using a caching plugin, clear your site cache.
Image missing
Confirm the email in the user profile matches their Gravatar. Have the user upload a different image to their Gravatar profile to test as well. If using a plugin, check its avatar settings as some override Gravatar, too.
Formatting errors
Check your CSS for conflicts that might affect the author bio’s appearance. Use your browser’s developer tools to identify any overlapping or conflicting styles. Access this by selecting right-click → Inspect. Look for issues like missing margins, incorrect font sizes, or conflicting background colors that affect readability.
Increase author efficiency with Jetpack AI Assistant
Managing a WordPress site efficiently requires tools that simplify content creation while maintaining quality. Jetpack AI Assistant helps authors and site owners generate well-structured, engaging content directly within WordPress.
Jetpack AI Assistant supports content authors through:
- Instant content generation: Quickly draft and refine content, including author bios, to align with your brand and tone.
- Grammar and readability improvements: Ensure clarity and professionalism in every piece of content and author profile.
- Time-saving automation: Reduce the effort required to write content and bios for multiple authors.
By installing Jetpack AI Assistant, WordPress site owners and authors produce consistent, high-quality content effortlessly. This allows them to focus more on engaging with their audience.
