
If you aren’t familiar with it, encountering the “Briefly unavailable for scheduled maintenance. Check back in a minute” error could cause your heart rate to spike.
This message is used every time a WordPress site is running updates, and it’s only intended to be displayed temporarily. Unfortunately, sometimes things go wrong during an update, leaving a site stuck in maintenance mode. Luckily, there’s an easy fix to get your site back up and running.
In this guide, we’ll talk about what WordPress maintenance mode is and how it works. We’ll also explain why sites can get stuck in maintenance mode. Then, we’ll show you how to fix this issue and prevent it from happening again in the future.
In a hurry? The 2-minute fix
If your WordPress site is stuck in maintenance mode, you need to delete the .maintenance file from your site’s root directory.
- Connect to Your Site: Use an FTP client (like FileZilla) or your hosting provider’s cPanel File Manager.
- Navigate to the Root Directory: This is usually a folder named public_html or www.
- Find and Delete .maintenance: Locate the file named .maintenance and delete it. If you can’t see it, enable the option to “Show Hidden Files” in your file manager or FTP client.
Refresh your website. The error should now be gone. If it persists, follow the advanced troubleshooting steps below.
What is WordPress maintenance mode?
WordPress maintenance mode is not exactly an error. Any time you update WordPress core, your plugins, or your themes, there’s momentary downtime on your site while the updates take place.
Maintenance mode is only intended to be in effect while your site is being updated. Normally this just takes a few seconds.
While the updates are taking place, your site will display a message that reads: “Briefly unavailable for scheduled maintenance. Check back in a minute.” This informs anyone who tries to access your site that it’s temporarily unavailable, but will be back very shortly.
What causes WordPress to get stuck in maintenance mode?
Whenever you carry out updates on your site, WordPress will automatically activate maintenance mode at the start of the process and then deactivate it when it’s ready. It does this by adding a .maintenance file to your site’s root directory, and then removing it after the updates have been completed.
Getting stuck in maintenance mode means that the .maintenance file was not removed after the update. When this happens, the message “Briefly unavailable for scheduled maintenance. Check back in a minute” will remain. As a result, visitors won’t be able to view or access your content until you’ve resolved the issue.

Here are a few things that can cause your site to get stuck in maintenance mode:
- The browser was closed in the middle of an update, interrupting the process.
- The update failed to complete due to a server interruption or delay.
- You tried to update multiple plugins at the same time, which may have caused conflicts or server timeouts.
- Bad coding in a new file or update may be preventing WordPress from removing the .maintenance file.
Once an update begins, anything that interferes with its completion could prevent your site from exiting maintenance mode on its own. When this happens, you’ll have to remove your site from this mode manually.
How to fix the “briefly unavailable for scheduled maintenance” issue in WordPress
Getting your site out of maintenance mode is fairly easy. All you need to do is find the .maintenance file and delete it from your site’s directory.
To do this, you’ll need to access your site’s files via a File Transfer Protocol (FTP) client like FileZilla. If you’re using an FTP client for the first time, you’ll need to enter your credentials (including your username and server address) to connect to your site. You can find this information in your hosting account.
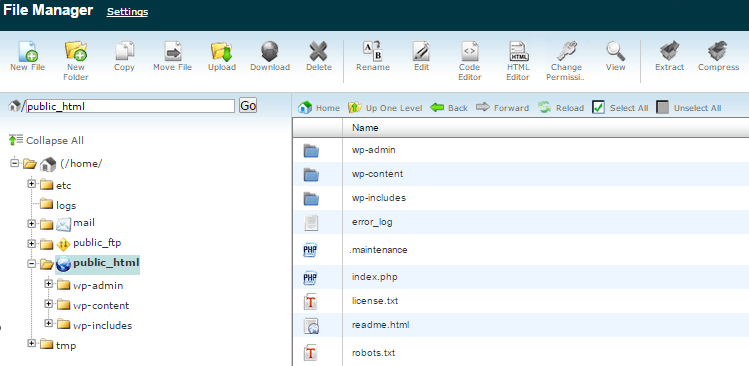
Alternatively, you can use the cPanel or file manager in your hosting account to access your site’s back end. If you’re using the file manager, you may be able to search for the .maintenance file. Simply type in “maintenance” and it should show up. If not, you’ll need to navigate to the public folder and locate the file.
Likewise, if you’re using FileZilla, you’ll need to open the public folder and look for your .maintenance file.
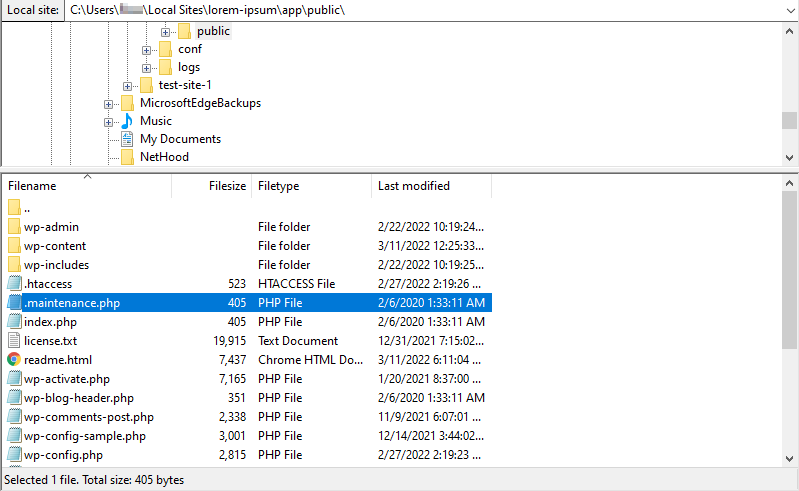
Once you’ve located the file, you can right-click on it and delete it.

Now, the “Briefly unavailable for scheduled maintenance” message should be gone. If you’re unable to locate or delete this file manually, you may want to restore a backup of your website from before the issue occurred. If you use Jetpack Backup, the plugin enables you to easily restore an older version of your site.
Now you can reattempt your updates more carefully, and hopefully your site will complete them without a hitch. Next, we’ll look at some tips you can use to reduce the chances of getting stuck in maintenance mode in the future.
Advanced fixes: When deleting .maintenance isn’t enough
If deleting the .maintenance file didn’t work, or you couldn’t find the file, one of these advanced methods will likely solve the problem.
Check the wp-activate.php file
Sometimes, a WordPress update can be interrupted, leaving a setting incorrectly enabled.
- In your root directory, find the file wp-activate.php and open it for editing.
- Search for the line: define( ‘WP_INSTALLING’, true );
- Change true to false so the line reads: define( ‘WP_INSTALLING’, false );
- Save the file and check your site.
Disable plugins via FTP
A plugin conflict can cause the update process to fail. To rule this out, you can temporarily disable all plugins.
- Navigate to the wp-content folder in your site’s directory.
- Find the plugins folder.
- Rename it to something like plugins_deactivated. This will disable all plugins.
- Check your site. If it loads, the issue was a plugin. Rename the folder back to plugins and reactivate your plugins one by one in the WordPress admin area to find the culprit.
How to avoid the maintenance mode error in the future
Now that you know how to fix the maintenance mode error in WordPress, it’s time to look at some good habits you can adopt to prevent it from happening again. Remember that when your site gets stuck in maintenance mode, your visitors are unable to reach you and view your content.
Avoiding the problem altogether reduces the possibility of extended downtime for your site. Let’s look at some effective precautions.
1. Be patient with updates
While it’s tempting to update all of your plugins at once, this increases the chance of a conflict or delay in communication with the server, which could interrupt the process. If this occurs, updates may not complete properly, and WordPress will fail to remove the .maintenance file from your site’s directory.
Therefore, we recommend that you update one plugin at a time. You’ll also want to wait for each update to complete before starting the next one.
Additionally, you’ll want to make sure that all updates have finished before exiting your site. If you close the tab while an update is still in progress, it may halt it before it finishes, leaving your site stuck in maintenance mode. So make sure to take extra care in order to avoid having an update break your WordPress site.
2. Check for compatibility
When adding new themes or plugins to your WordPress website, it’s always a good idea to check for compatibility. Some tools may not have been updated in a while, so they might not be compatible with newer versions of WordPress.
You can find this information on the plugin’s page in WordPress. For instance, these are the details for Jetpack:
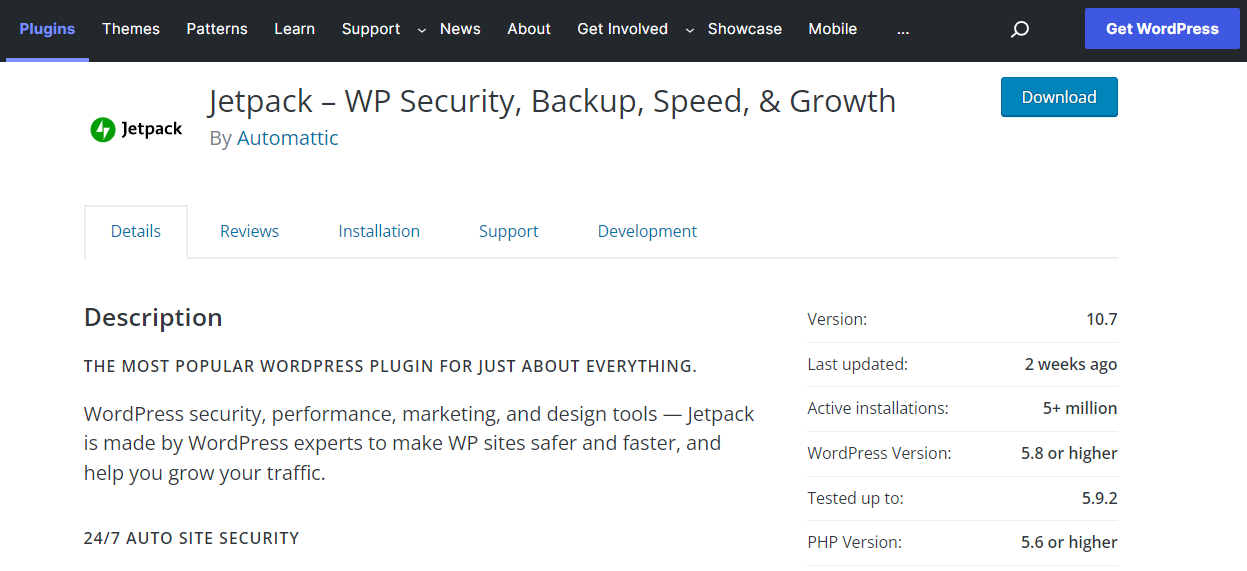
If you’re running a version of WordPress outside of this range, it could result in unexpected behavior from the plugin. This includes failed updates and conflicts with other plugins.
To check what version of WordPress you’re currently running, navigate to your dashboard and click on Updates:

To be extra safe, you can use a staging site to test new plugins and updates before they go live. This way, you can catch any issues before your live site goes into maintenance mode.
3. Consider changing your web host
If your updates frequently time out or you regularly encounter other server-related problems, you may want to consider changing or upgrading your hosting service. If you’re on a basic plan with limited resources, your provider may no longer be able to meet your site’s demands.
A poor hosting service may cause updates to take longer than necessary. It can also increase the chance of timeouts, which can interrupt or corrupt an update.
Therefore, you might want to switch to a more advanced hosting solution. This is not only important for handling large volumes of traffic, but it can also provide a stable connection while you make updates and other changes.
How to change the WordPress maintenance mode template
While you never want your website to get stuck in maintenance mode, there may be times when you want to display the “Briefly unavailable for scheduled maintenance” message for a longer period. For instance, you might decide to revamp your website or make some significant changes to its design.
If that’s the case, consider customizing the maintenance mode screen to make it more visually appealing. For instance, change the default message to something more fun and interesting. You could also add a contact form so that visitors can still reach out to you while you’re carrying out site maintenance.
The easiest way to customize your maintenance mode page is to use a plugin. Rather than coding a page from scratch, you can use a page-building tool like SeedProd.
Once you’ve downloaded and activated SeedProd on your site, click on the Create Your First Page button to get started.

On the Pages screen, you’ll see an option to set up a maintenance mode page. Go ahead and click on it.

Next, you’ll see a selection of templates for your maintenance mode page.

Once you’ve chosen a template, you can start customizing it to your liking. All you have to do is select an element, like an image or text box, and use the settings on the left-hand side to make changes to it.

For instance, you can change the text and images to make your maintenance mode page more entertaining and informative. You could even add links to redirect visitors to your social media pages. Remember to save your changes when you’re ready.
How to turn on maintenance mode
Once you’ve created your custom maintenance mode page, you can go ahead and activate it. To do this, go back to the SeedProd page in your WordPress dashboard, and set Maintenance Mode to Active.

Your new maintenance mode page will appear in place of the default “Briefly unavailable for scheduled maintenance” message. You can visit your site to see how it looks. If you’ve added links to your page, you might want to test them to make sure they work.
Once you’ve finished making updates to your site, you can return to SeedProd in your WordPress dashboard and set the switch for maintenance mode to Inactive. Visitors will now be able to access your content again.
You might also consider customizing other common error pages, like the 404 page.
It’s important to note that SeedProd creates a PHP file to put your site into maintenance mode, rather than creating the .maintenance file in the root directory. As a result, if your site gets stuck in maintenance mode, you’ll need to deactivate the plugin to resolve the issue.
If you can’t access your dashboard, you’ll need to connect to your site via an FTP client to disable the plugin. Once you’re inside the root directory, go to wp-content → plugins, and locate the folder for SeedProd. It’s called coming-soon.

Then, rename the folder to something else (e.g., coming-soon_disable). This will automatically disable the plugin, and you should be able to access your site.
Everyone likes an easy fix
Having your site unavailable for any period of time can be detrimental to your goals. Luckily, if your site gets stuck in maintenance mode, there’s a quick way to get it up and running again. All you have to do is locate the .maintenance file in your website’s root directory and delete it, or restore a backup of your WordPress site.
To avoid this problem in the future, you’ll want to make sure that you carry out plugin updates one at a time. You may need to upgrade to a more powerful hosting solution, as slow servers can cause update interruptions and timeouts.
Additionally, consider customizing your maintenance mode page. You can replace the default “Briefly unavailable for scheduled maintenance” message with an interesting graphic, and include contact information so that users can still reach out to you while you’re working on your site.
Frequently asked questions
Is it safe to delete the .maintenance file in WordPress?
Yes, it is completely safe to delete the .maintenance file. This file is a temporary flag that WordPress creates to show the maintenance message during updates.
When an update finishes correctly, WordPress removes this file on its own. If your website gets stuck, it means the automatic removal failed. Deleting the file manually simply finishes the last step of the update process and lets your site work normally again. It does not affect your content, settings, or other files.
Will being stuck in maintenance mode hurt my site’s SEO?
If fixed quickly, it will not hurt your SEO. The maintenance mode automatically sends a “503 Service Unavailable” status code to search engines like Google. This code tells them the site is down for temporary maintenance and they should check back later.
This prevents them from removing your pages from their index. However, if you leave your site in maintenance mode for many days, it could negatively affect your rankings, so it is important to fix the issue right away.
What do I do if I cannot find the .maintenance file?
The .maintenance file is a hidden file, which means it might not show up by default. To find it, you need to change a setting in your file manager. If you are using an FTP client like FileZilla, look for an option in the menu called “Force showing hidden files” or “Show hidden files.”
If you are using cPanel’s File Manager, go to the settings menu and check the box for “Show Hidden Files (dotfiles).” After you enable this setting, the file should appear in your main WordPress folder.
How can I prevent my WordPress site from getting stuck in maintenance mode again?
The best way to prevent this issue is to be careful with updates. First, always update your plugins and themes one at a time, not all at once. Wait for each update to finish completely before starting the next one. Second, avoid closing your browser tab while updates are running.
Finally, consider using a high-quality hosting provider. Slow servers can cause updates to time out, which is a common cause of the maintenance mode error.
What is the difference between maintenance mode and a “white screen of death”?
Maintenance mode is a specific, planned state that shows an official message: “Briefly unavailable for scheduled maintenance.” It is caused by the .maintenance file.
The “white screen of death” is a more serious error where your site shows a completely blank white page with no information. A white screen is usually caused by a critical PHP error or a database problem, often related to a plugin or theme conflict. Fixing a white screen requires different troubleshooting steps, such as checking error logs and disabling plugins manually.
Can a plugin conflict cause my site to get stuck in maintenance mode?
Yes, a plugin conflict is a very common cause. This can happen when you try to update multiple plugins at once, or when a specific plugin has a bug that interferes with the WordPress update process. The conflict stops the update from finishing properly, so WordPress never gets the command to delete the .maintenance file.
If you suspect a plugin issue, you can connect to your site via FTP, go to the wp-content folder, and rename the plugins folder. This will disable all plugins and should bring your site back online.
What is a staging site and how does it help with updates?
A staging site is a private copy of your live website. It allows you to test changes, such as plugin updates, theme changes, or new code, in a safe place without affecting your public site. Many good WordPress hosting providers offer a “one-click staging” feature.
By running all your updates on the staging site first, you can catch any errors or conflicts before they have a chance to break your live site. If everything works well on the staging copy, you can then safely perform the updates on your live site.
