
Standing out on social media has become quite difficult. Most platforms are crowded with content, and the algorithms that determine your brand’s visibility are unpredictable at best. Digital ads are more expensive each year, and the future of organic search engine traffic is wildly uncertain.
That’s why more creators, brands, and publishers are turning to a channel they can control — email newsletters. These allow you to reach your audience directly, without having to compete for space in social feeds or pay for impressions.
The good news? If you use WordPress, launching your own newsletter is easier than you might think. With a plugin like Jetpack, you can automatically send new posts to your subscribers and even create a paid newsletter to generate income from your hard-earned followers.
In this guide, we’ll walk you through everything you need to know about creating an email newsletter on WordPress — from setup and strategy to advanced tips for monetization and growth.
Reasons to start a newsletter on WordPress
Newsletters have been around for years, and many businesses use them for promotions and other marketing purposes.
So why, decades after their invention, are they making a big comeback? Let’s look at some of the key benefits.
1. Email delivers a high ROI
Email marketing outperforms many digital channels in terms of return on investment. In fact, it delivers an average ROI of $42 for every $1 spent.
In contrast to social platforms that limit reach unless you pay, email puts your message directly in front of subscribers. You won’t have to rely on paid ads or search engine optimization to reach your target audience.
2. Newsletters give you owned traffic
Relying solely on social media is a big risk. If a platform shuts down your account, you’ll lose all content and engagement. Plus, you never know when the next algorithm update will impact your visibility.
Your email list is owned traffic. You control the channel, the audience, and the content.
Even if you decide to change your email marketing service, you own your subscriber list and can easily migrate recipients to another platform.
3. Regular emails nurture long-term relationships
Newsletters build trust and loyalty. People subscribe to your email list because they like your content or products, and they want more. This built-in interest means that your newsletter audience is far more receptive to future offers, updates, and sales.
You can make subscribers feel even more special and appreciated by sharing exclusive discounts, content, and personal stories. This will only amplify the impact of your newsletter and strengthen the long-term value of your subscriber list.
4. It’s easy to launch and manage with the right plugin
Running a newsletter may sound like a lot of work, especially if you’re already stretched thin. In reality, it’s not a major commitment when you use the right tool. Jetpack Newsletter builds the process right into your existing WordPress workflow, so there’s no new platform to learn or tabs to toggle between.
Instead, you can send newsletters directly from your WordPress dashboard — no coding required! Plus, it comes with a prebuilt signup form that you can add anywhere on your site.
The plugin also automates the sending process. You can set it so that every new post is automatically sent to your subscribers, and they can choose how frequently they receive updates — instantly, daily, or weekly. This prevents you from overwhelming casual subscribers while properly serving those who simply can’t get enough content.
Common challenges and how to address them
Running a newsletter isn’t without challenges, but powerful tools like Jetpack will help you avoid common issues like:
Technical setup complexities
In many cases, creating a newsletter means signing up for third-party email services and finding a way to integrate them with your WordPress website. This could involve embedding code or getting an API Key.
However, this isn’t the case with Jetpack Newsletter. All you have to do is install the plugin on your site, and you’ll be able to manage your emails within your WordPress dashboard.
Managing subscriber lists
Setting up a newsletter isn’t only about creating engaging emails. You’ll also need to manage your subscribers while complying with the GDPR and other data protection regulations.
Jetpack simplifies subscriber management. You can access your email list from within your Jetpack account and view information about each subscriber, like their subscription date, open and click rates, country, acquisition source, and other details.
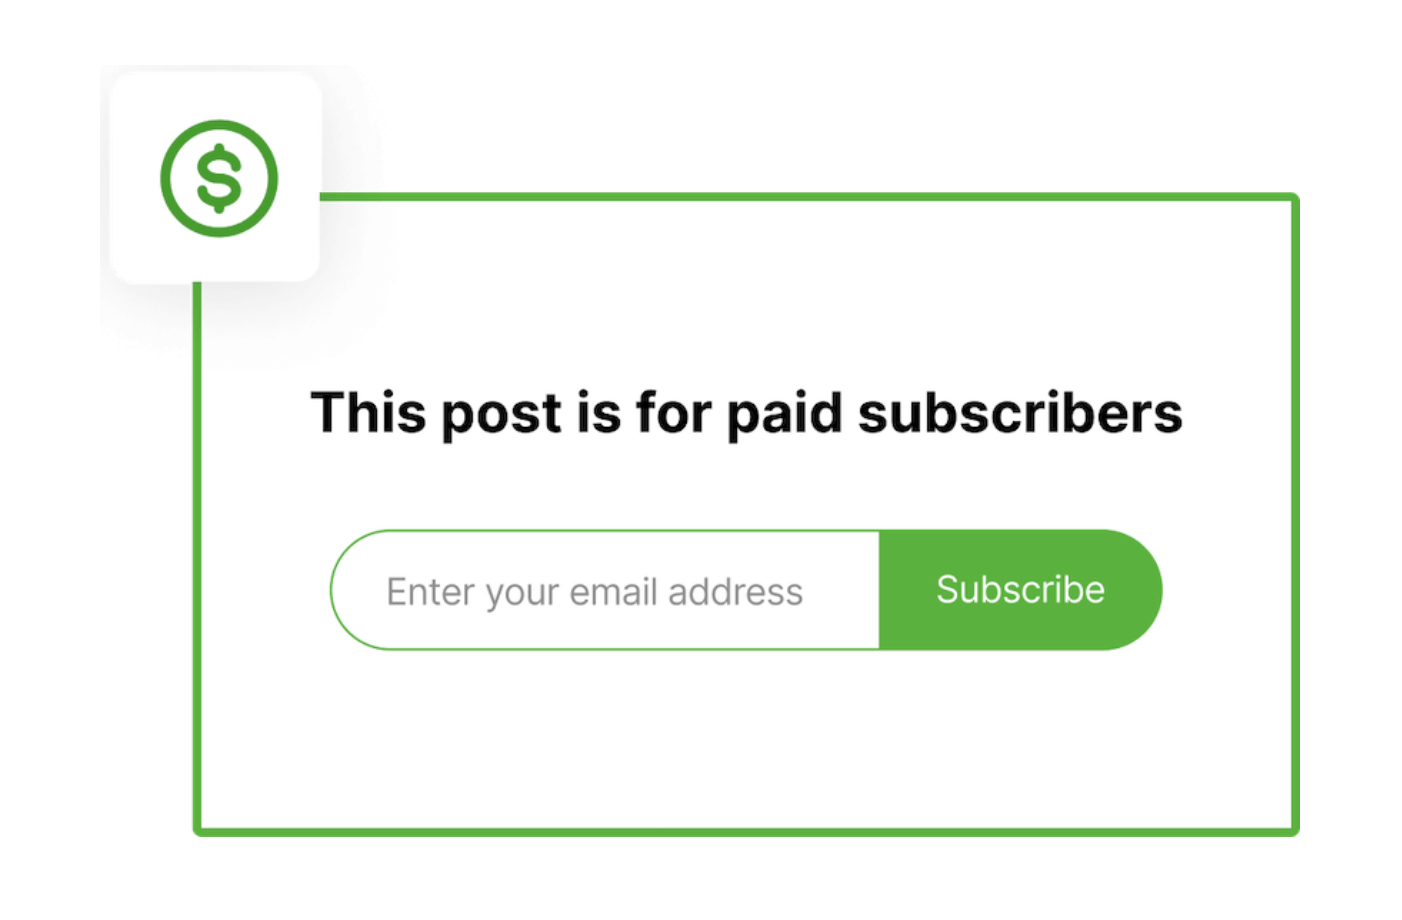
If you decide to create a premium subscription, you’ll also be able to send certain emails to paid subscribers only.
And Jetpack handles GDPR compliance for you. Subscriber data is hosted on secure servers, and you can request a copy of the data associated with your Jetpack account at any time. It also provides features to aid site compliance, including a Privacy Policy Helper and a customizable cookie notice.
Ensuring email deliverability
Email deliverability is a common concern. Your newsletters could easily end up in junk folders, or they might not be delivered at all due to technical issues. WordPress site owners often have to install an SMTP plugin to improve deliverability.
With Jetpack, you won’t have to worry about any of this. Jetpack leverages professional-grade infrastructure to ensure that your emails land in inboxes, not spam folders.
How to create a newsletter in WordPress
Now, let’s look at how to create a newsletter on your WordPress website using Jetpack.
Step 1: Install Jetpack
First, you’ll need to install the free Jetpack plugin. In your WordPress dashboard, go to Plugins → Add New Plugin and look for “Jetpack – WP Security, Backup, Speed, & Growth” in the search bar.
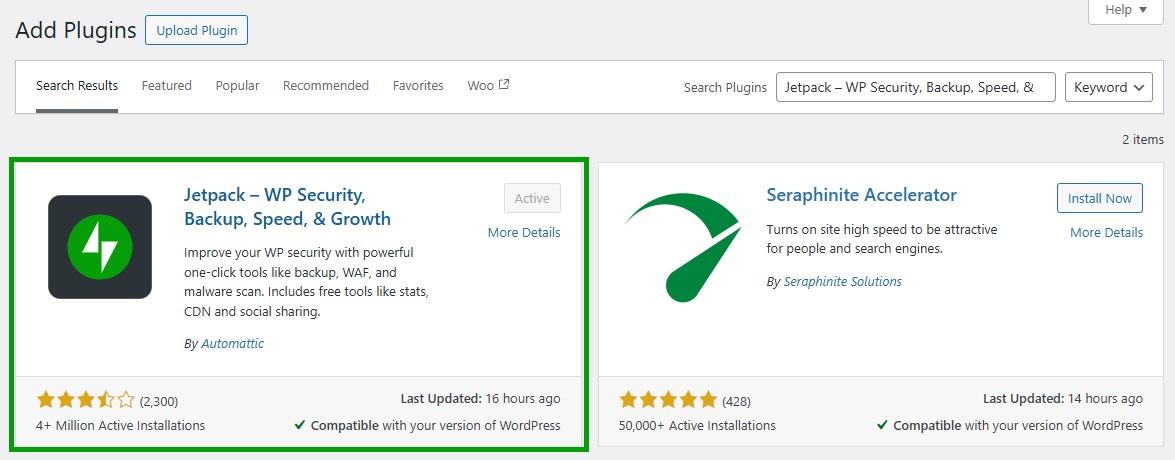
Click on Install Now and Activate. The plugin will now ask you to connect to your WordPress.com account. If you don’t have an account, you can create one for free.
Note that you can use the newsletter feature for free. However, if you want to set up a paid newsletter, you’ll need to purchase the Jetpack Growth plan.
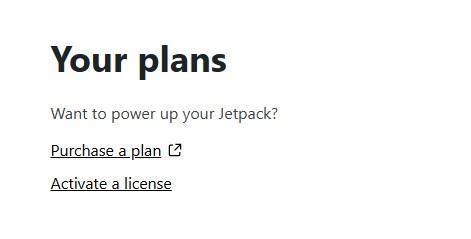
If you get Jetpack Growth, copy the license key sent to your email inbox, then return to your WordPress dashboard and go to Jetpack → My Jetpack.
Under the Your Plans section, click on Activate a license.
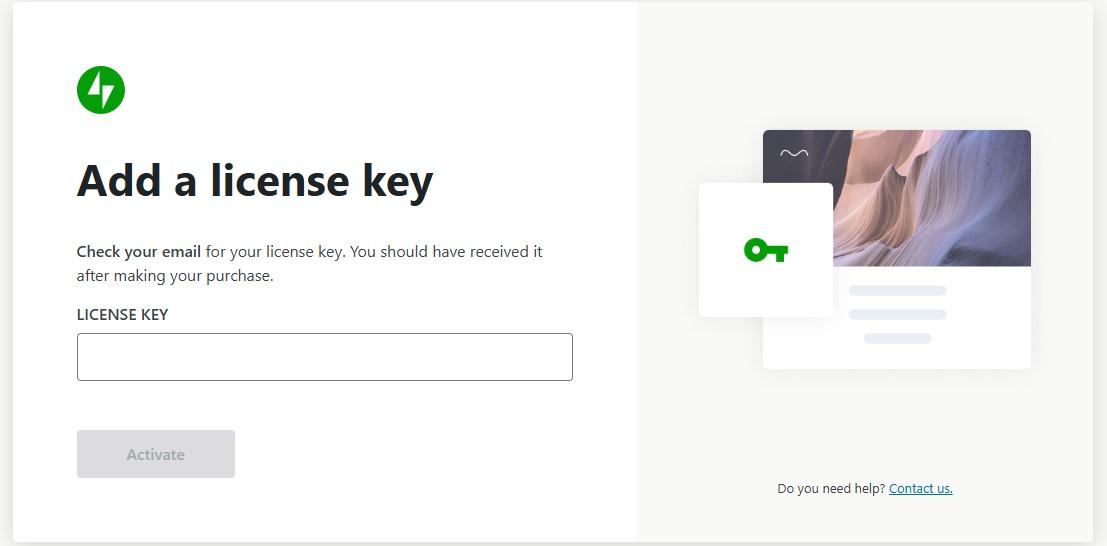
Enter the license key and click on Activate.
You now have Jetpack Growth set up on your website.
Don’t worry if you’re not sure about setting up a paid newsletter yet. You can always upgrade your plan later.
Step 2: Activate Jetpack Newsletter
Once you set up Jetpack, you’ll need to add the newsletter feature to your site.
Navigate to Jetpack → Settings → Newsletter in your WordPress dashboard. Then, use the toggle switch to enable the newsletter.
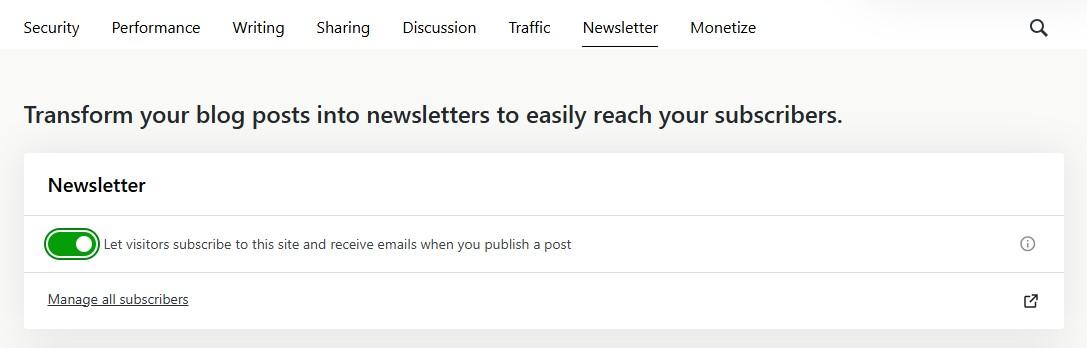
Now, when you hit the Publish button in the block editor, you’ll see an option to send your new post to your subscribers.

If you have Jetpack Growth, you’re also able to send the email to paid subscribers only.
Step 3: Add subscription forms
Now, it’s time to add subscription forms so that people can easily join your email list. Jetpack makes this very simple.
Under the Newsletter tab, you’ll see a Subscriptions section where you can enable settings with toggle buttons.
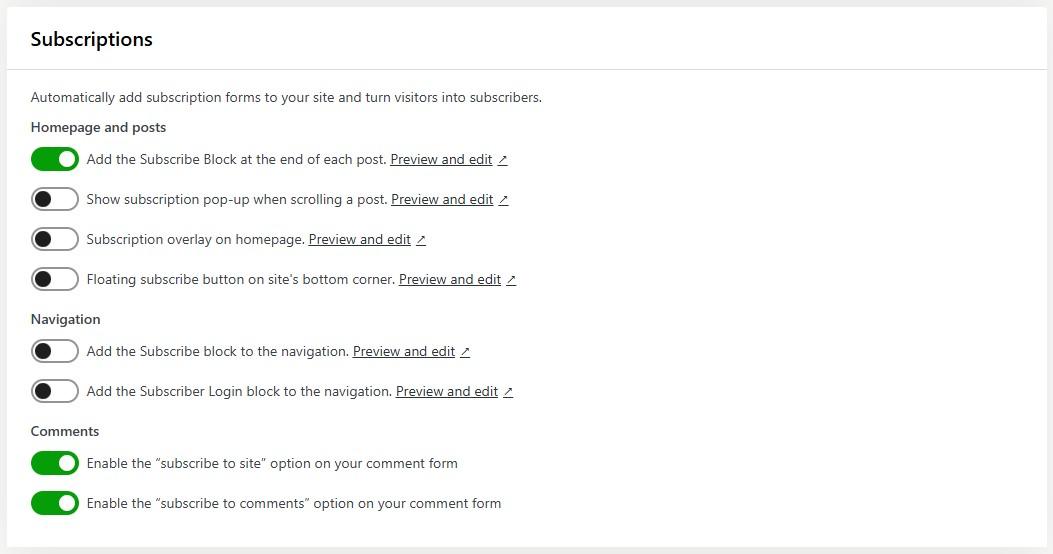
For example, you can automatically add a subscribe block at the end of every post, display a subscription pop-up and a floating subscribe button, and put a subscription overlay on the homepage.
If you want to encourage more subscriptions, you could even add the subscribe option to your site’s navigation and comments form.
If you want to view the subscribe block, click on the Preview and edit option.

Select the form to customize it. For instance, you might change the color of the button.
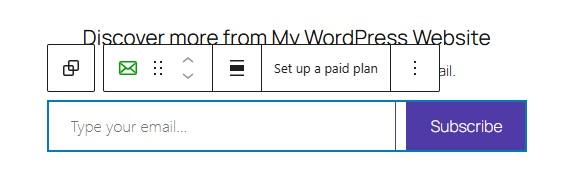
When you edit a subscribe block, these changes will be reflected in all the places where it’s used.
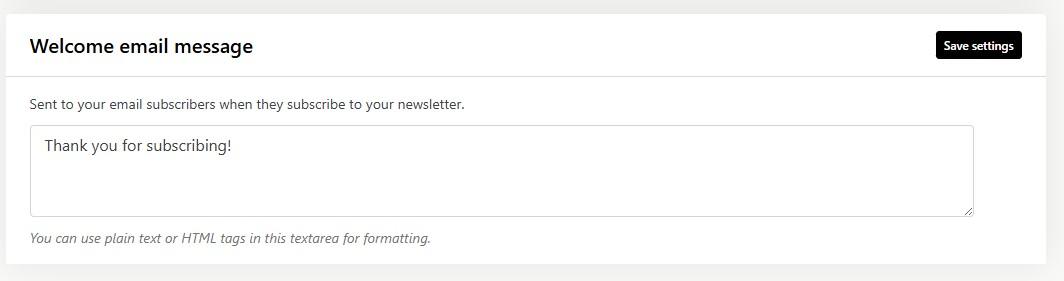
Step 4: Configure your email and newsletter settings
There are additional email options you may want to explore. On the Newsletter page, find the Newsletter categories section and choose which post categories to email your subscribers.

Move on to the Email configuration section. Here, you’ll see an option to edit the email byline, sender name, and reply-to settings.
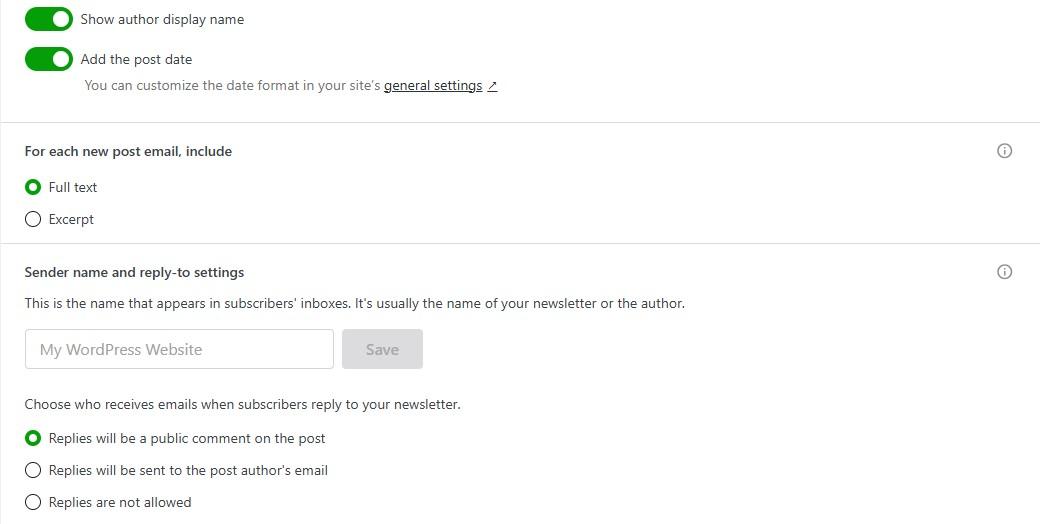
You can even create a custom welcome email for subscribers. For instance, you might remind them of the benefits of subscribing to your newsletter and include links to important pages.
That’s it. You now have a fully functional newsletter on your WordPress website!
Write once, reach all
Transform your blog posts into newsletters to easily reach your subscribers.
Start for freeHow to migrate from other newsletter platforms to WordPress
Are you already using Mailchimp, Substack, or another email marketing platform? The good news is that you can migrate to WordPress & Jetpack without losing your subscribers.
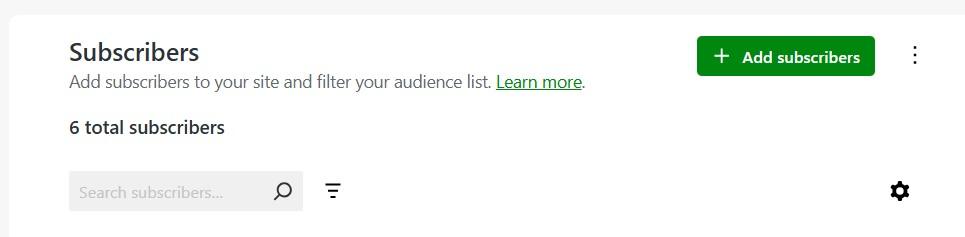
Most platforms let you export your email list as a CSV file. Download it to your local device, then go to Jetpack → Newsletter → Subscribers.
This will take you to your Jetpack account. Click on the Add subscribers button.
Then, select the option to upload a CSV file.
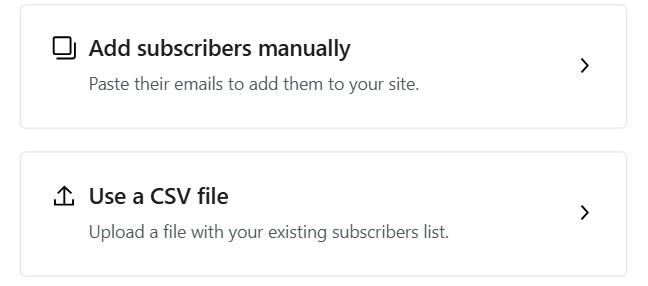
Choose the file you downloaded from the other email platform, and your subscribers will be automatically added to your Jetpack account.
Advanced growth and automation tools
Once your newsletter is up and running, work on growing your list and boosting engagement. It’s also important to automate some tasks to save time and focus your efforts on other important things.
Here are some advanced strategies and tools available through Jetpack that can help:
1. Offer premium content to paying members
With Jetpack, you can turn your newsletter into a revenue stream by offering exclusive content. This can include downloadable resources, more in-depth articles and tutorials, behind-the-scenes looks, and VIP Q&A sessions.
Go to Jetpack → Settings → Newsletter. Then, navigate to the Paid newsletter section and click on Set up.

This will direct you to your Jetpack.com account. Go to Monetize → Payment Settings and select Add a new payment plan.
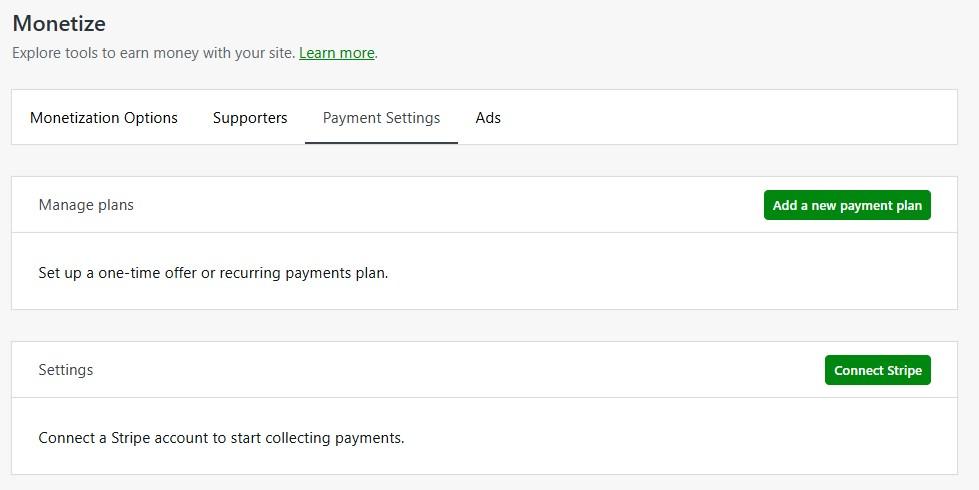
Next, configure the settings for your plan.
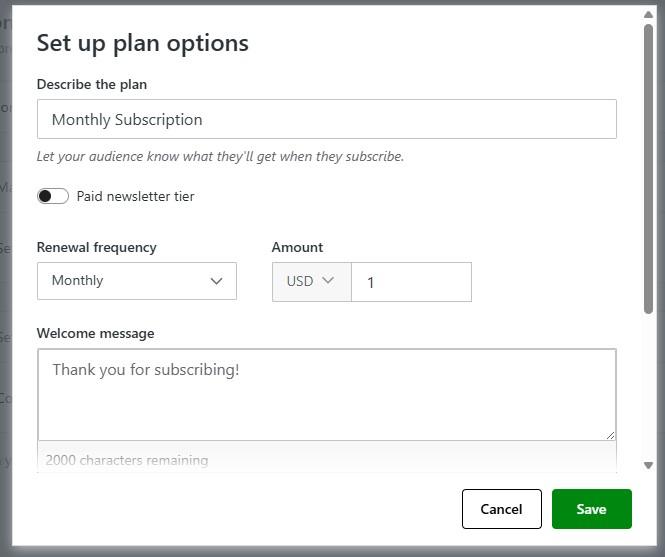
Now, when you create your newsletter in the block editor, you can choose to send it to paid subscribers only.
2. Enable one-click social cross-posting
You can also maximize your reach by sharing newsletters automatically across your social channels. Jetpack makes this process seamless with automated publishing to Facebook, X, Instagram, Threads, Tumblr, and other social platforms.
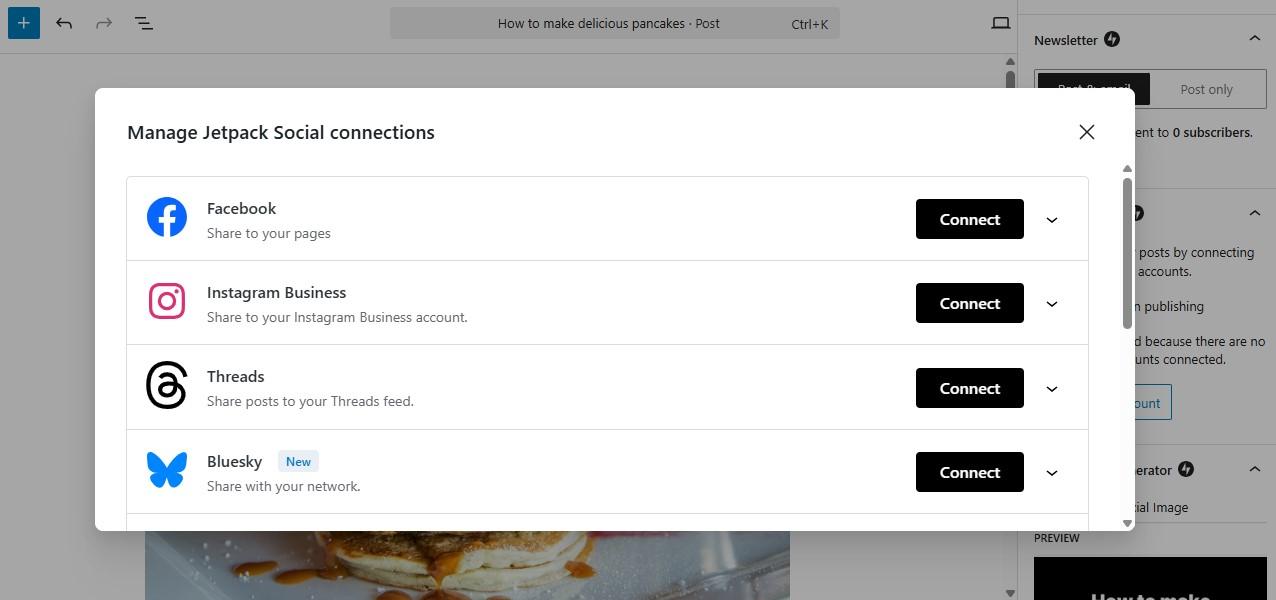
You can even customize the messaging for each platform.
This feature increases visibility and helps you attract new subscribers who discover your content on social platforms.
3. Optimize with the Jetpack App for mobile publishing
With the Jetpack app, you can publish newsletters, monitor stats, and engage with subscribers on the go. This is perfect for creators who travel or juggle multiple jobs.
You’ll have instant access to analytics and engagement reports. Plus, you’ll be able to quickly edit and publish newsletters from your mobile phone. No need to wait until you’re home to get things done!
4. Leverage AI for better copy with Jetpack AI Assistant
Jetpack offers an AI assistant that generates different types of content, including article sections, lists, tables, images, and more. It also optimizes existing content for you, such as titles.
If you’re struggling to create compelling subject lines and content for newsletters, Jetpack AI Assistant will help you get there. It will also provide instant editing suggestions for clarity and tone.
What to do before creating a newsletter on WordPress
Before you create your newsletter, think about a strategy that will help you get more subscribers. Let’s look at some best practices.
1. Define your audience personas
First, you’ll want to understand exactly who you’re trying to reach. This will help you tailor your content to the right people.
Start by creating audience personas that reflect your typical subscribers. It’s important to think beyond demographics like age and location and include their interests, challenges, goals, and preferred content formats.
2. Identify your value hooks
A question to ask when setting up your newsletter is: Why should someone subscribe?
There needs to be a clear benefit of joining your email list.
Your value hook might include early access to blog posts, exclusive discounts or offers, weekly inspiration or advice, behind-the-scenes content, and other valuable information.
You’ll want to clearly communicate this value in your signup forms, landing pages, and welcome emails. A strong hook can significantly increase subscription rates.
3. Choose your content pillars
Content pillars are recurring themes that define your newsletter. They keep your messaging relevant and help you plan content more efficiently.
Start by identifying two to four categories that you want to focus on. These may include personal stories, business insights, product news, or educational how-tos.
These pillars should align with your brand and the interests of your audience personas. Otherwise, you risk losing subscribers.
4. Set a realistic cadence
Consistency is key. If you promise subscribers a weekly newsletter but only send two per month, they may feel shortchanged and lose interest. Infrequent communication also makes it harder for your brand to stay top-of-mind.
Choose a sending frequency that’s sustainable based on your workload and resources. At the same time, you’ll want to avoid sending more than your audience wants.
That’s why Jetpack Newsletter’s feature to allow subscribers to set their own frequency (instant, daily, or weekly updates) is so ingenious. It dramatically reduces the chances you annoy subscribers with too frequent updates while letting you lean into your most eager followers.
If you don’t have a tool like Jetpack Newsletter, you’ll need to set your own cadence. Common options include weekly (popular for blog digests or updates), biweekly (a good balance of quality and quantity), and monthly (ideal for deeper, curated content). Remember: it’s better to commit to a manageable schedule than to overpromise and underdeliver.
5. Choose a tone that reflects your brand
The tone you use for your newsletter should be a natural extension of your website and content style. Think of your newsletter as an ongoing conversation with readers.
Will you be professional and polished, casual and conversational, or friendly and enthusiastic?
Consistency in tone will also build trust and keep readers engaged. You’ll also want to make sure that your subject lines, headers, and body content have the same voice.
6. Define success metrics
If you start a newsletter to boost growth and monetization, you’ll need to keep an eye on the metrics. It’s also important that you set goals. Start with core email marketing KPIs like:
- Open rate
- Click-through rate (CTR)
- Subscriber growth rate
- Conversion rate (if promoting products or services)
Jetpack offers built-in stats to track performance. This helps you refine your marketing based on the metrics.
7. Build a content calendar
Finally, you’ll want to create a newsletter calendar. This will help you stay organized and plan your content well in advance.
You can use the calendar to:
- Map out content themes for each issue
- Schedule send dates
- Coordinate with blog posts or campaigns
There are many tools you can use to build a calendar, from simple spreadsheets to apps like Asana. However, the important thing is to maintain consistency.
Planning ahead prevents last-minute problems and improves content quality.
Ready to hit send? Your WordPress newsletter journey starts now
Building a newsletter in WordPress is an effective way to nurture a loyal following. Whether you’re a professional blogger or a small business owner, a newsletter will also help you promote your content and products to an engaged audience.
With Jetpack Newsletter, you can easily manage your newsletter and subscribers from your WordPress dashboard. Jetpack also lets you create paid subscription tiers and monitor important metrics like open and click rates.
Are you ready to create a successful newsletter? Get started with Jetpack today!
Write once, reach all
Transform your blog posts into newsletters to easily reach your subscribers.
Start for free