
You’ve probably heard that optimizing images makes sites load faster and that’s for good reason: it’s true. If you want visitors to stick around and search engines to rank your site higher, speed needs to be a top priority. Slow-loading pages frustrate people, drive them away, and ultimately hurt your conversion rates.
Images greatly impact site performance, especially if you rely heavily on visuals. That’s why image optimization matters so much. Even so, compressing images to reduce file size can degrade their quality. Thankfully, the WebP image format provides a solution to this issue.
In this guide, we’ll discuss WebP’s impact on site performance and how to use the free features included in Jetpack Boost to convert images to this format.
What is WebP?
WebP stands for Web Picture and is a modern image file format introduced by the Google team. Often considered a next-gen option, WebP enhances website performance by reducing the weight of visual files. It provides better compression than traditional JPEG and PNG images, while retaining the original quality.
Speaking of compression, WebP images clock in at significantly smaller than JPEG or PNG formats, around 25-34% smaller than JPEG and 26% smaller than PNG.
WebP images provide lossy and lossless compression methods. Let’s take a closer look at each:
Lossy compression
This format removes unnecessary image data to achieve the smallest file size possible, but with a certain loss in quality. Used on JPEG images, this method works best for the vast majority of websites, but for photography portfolios or websites where highly-detailed photos are necessary, any loss in quality is a major drawback.
Lossless compression
The lossless format compresses data and removes image metadata. The reduction in file size is not as dramatic as with lossy compression, but the image retains more quality.
With a less destructive method like this, you can even reverse the changes made.
However, for websites with large quantities of images, lossless compression might not make enough of a positive impact on performance.
Converting images to WebP works for both compression methods, and it does a better job with each. In a study, WebP consistently produced similar image quality (measured by SSIM — structural similarity index measure) with fewer bits per pixel (i.e., smaller file size).
Benefits of using WebP
We already discussed how WebP retains image quality while reducing file size. That’s just part of the picture, though. Other benefits of using WebP images in WordPress include:
- Broad browser support: WebP is compatible with most modern browsers, including Chrome, Firefox, Safari, and Edge.
- High-quality images: WebP supports both lossy and lossless compression, allowing you to maintain visual quality while reducing file size.
- Improved site speed: This next-gen format, recommended by Google’s PageSpeed Insights, helps pages load faster by reducing image load times.
- Better search rankings: Optimized WebP images enhance Core Web Vitals (a ranking factor), especially First Contentful Paint (FCP) and Largest Contentful Paint (LCP).
- Faster search engine crawling: WebP allows Google Image search to crawl and index your visuals more efficiently, increasing their visibility.
- Reduced bandwidth needs: Smaller images use less bandwidth, which is especially helpful if your hosting plan has data limits.
- Reduced storage space: Compressed images result in smaller backup files, helping lower your storage costs.
Why automatic conversion to WebP is important
Until recently, most websites leaned on popular formats like JPEG and PNG. WordPress didn’t offer native support for WebP images until version 5.8, released in July 2021. Before that, you had to use a plugin or custom code to upload and display WebP files.
You can now upload WebP images directly to WordPress, but most cameras and image editing tools still export images in JPEG or PNG formats. So how do you get those images into WebP?
Using a tool to convert your images manually to WebP before uploading them to WordPress works, but this doesn’t assist with the images already in your media library.
A better solution involves using a tool to automatically convert images to WebP. This kind of tool saves you time, keeps image quality consistent, and ensures every image you use is optimized.
Introducing Jetpack Boost for automatic WebP conversion
Jetpack Boost provides tools to enhance your website’s speed without a developer or custom code. You can measure and actively monitor mobile and desktop performance and enable improvements with a few clicks. Core performance features include:
- Caching: This tells browsers to store copies of your site and deliver them to returning visitors, making their experience significantly faster
- Optimizations specifically for Core Web Vitals: Up your Core Web Vitals scores with options to generate critical CSS, defer JavaScript, and more
- An image guide: Discover which images need to be resized at a glance
- An image CDN: Automatically resize your images, convert them to WebP, and deliver them from a global network of servers
Did you catch that last one? The power of Jetpack’s Image CDN can’t be overstated. It automatically converts images to WebP, saving you tons of time and dramatically reducing your site’s weight. It also serves images to visitors from its network of global servers, reducing strain on your web host and helping your site load faster for visitors (and search engines).
Plus, it automatically resizes images for mobile devices, so everyone’s always able to view the option best for their situation.
Jetpack Boost is an instant win for nearly every site. Let’s take a closer look at the core features related to image performance:
1. An image CDN
Enabling the Image CDN feature in Jetpack Boost automatically converts your site’s images to the WebP format, enhancing load times and reducing bandwidth usage.
Instead of delivering images from your server, Jetpack’s CDN serves them from a network of high-speed and geographical-distributed data servers.
The Jetpack Image CDN doesn’t alter your media library’s original images. Instead, it generates optimized copies served from the cloud servers closest to your visitors. If you deactivate Jetpack in the future, your site’s images will still function correctly, as the originals remain in your media library.
2. Automatic WebP conversion
As covered earlier, Jetpack Boost’s Image CDN already takes the heavy lifting off your server by hosting images on a global network. However, it goes a step further by automatically converting your images to the faster, more efficient WebP format.
You don’t need to install a separate plugin or convert files manually. Instead, Jetpack handles the entire process in real time. If a visitor’s browser doesn’t support WebP, the CDN detects it and serves the original image format instead, so everyone sees your images without delay or display issues.
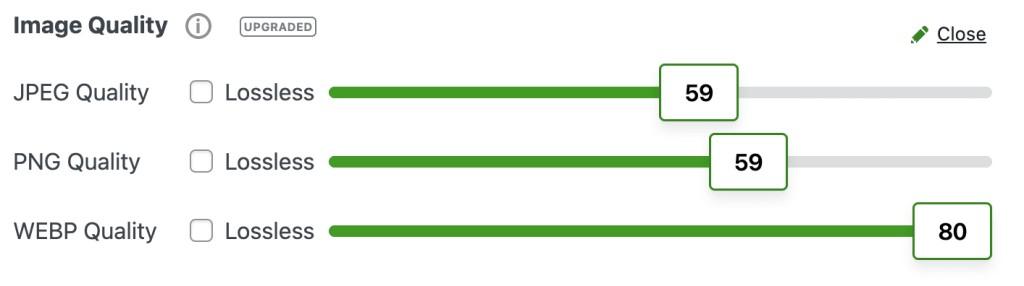
3. Image quality control
Jetpack Boost’s premium paid plan provides improved options to manage the quality of your compressed images. When you enable the Image CDN, you’ll see settings for image quality and lossless compression.
The easiest speed optimization plugin for WordPress
Jetpack Boost gives your site the same performance advantages as the world’s leading websites, no developer required.
Boost your site for free4. Image Size Analyzer
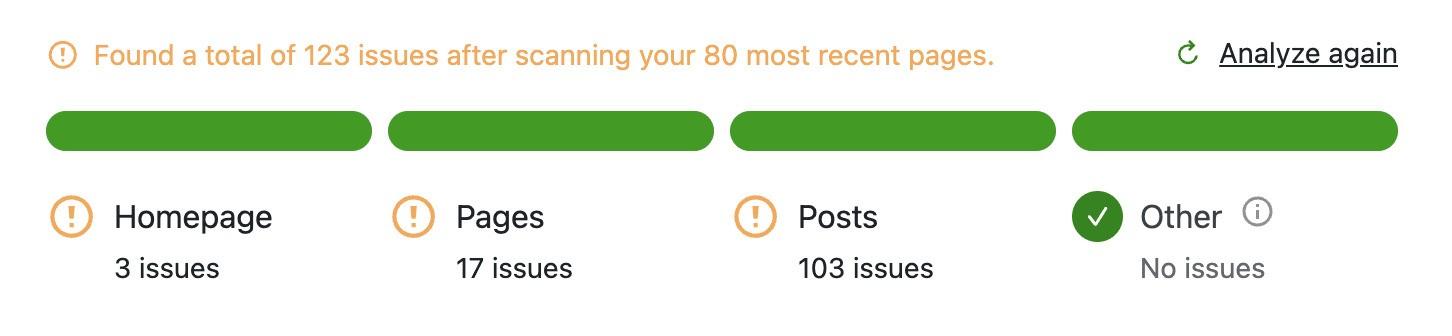
Slow loading images put your visitor’s retention and engagement at risk. To remedy this, use Jetpack Boost Image Size Analyzer to identify excessively large images on your site, those with a suboptimal resolution, or with an incorrect aspect ratio. Integrating this analysis with the Image CDN options ensures efficient image delivery in optimized formats.
If you have a paid Jetpack Boost plan, take advantage of the Image Optimization Report, which points out oversized images within your content. In this report, you can compare the actual and expected dimensions of each image with the displayed size.
To access this report:
- In your WordPress dashboard, go to Jetpack → Boost.
- Scroll down until you find Image Size Analysis.
- Click Start Image Analysis.
- Once the process completes, an option to access the full report becomes available.
The report displays important information and insights to assist with making relevant changes to your images. The Edit Page button provides direct access to the WordPress Editor, where you can apply the necessary updates.
How to automatically convert WordPress images to WebP
As you know, the Jetpack Image CDN feature converts images into a WebP format and then hosts them on Jetpack’s own network of servers, decreasing the strain on your server and providing faster image loading for your visitors.
To access these features, do the following:
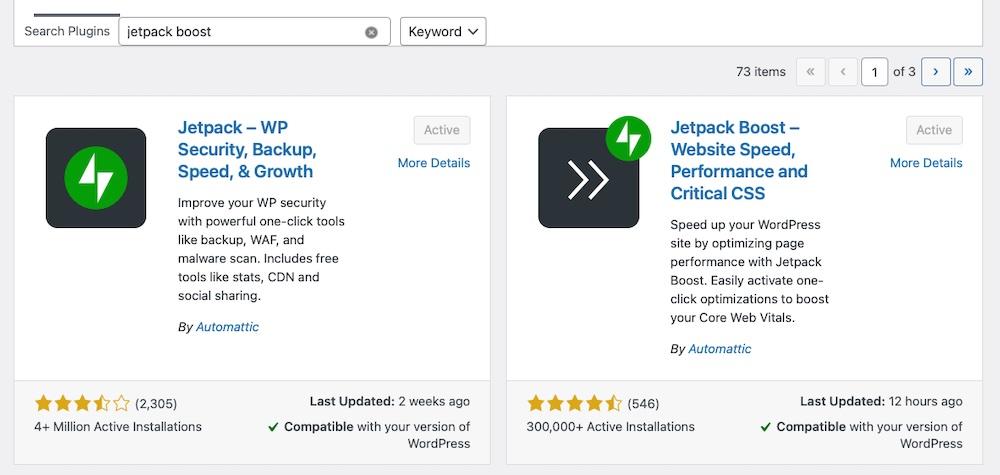
From the WordPress dashboard, go to Plugins → Add New. Type in “Jetpack Boost”. You will find it as Jetpack Boost – Website Speed, Performance and Critical CSS, as shown below:
Click Install Now, waiting for the process to complete, then click Activate. After activating the plugin, choose between the free and paid versions. If you start with the free version, you can upgrade later.
With your plan selected, you’ll be redirected to the Jetpack Boost dashboard. Use this area to access different options to improve your site performance.
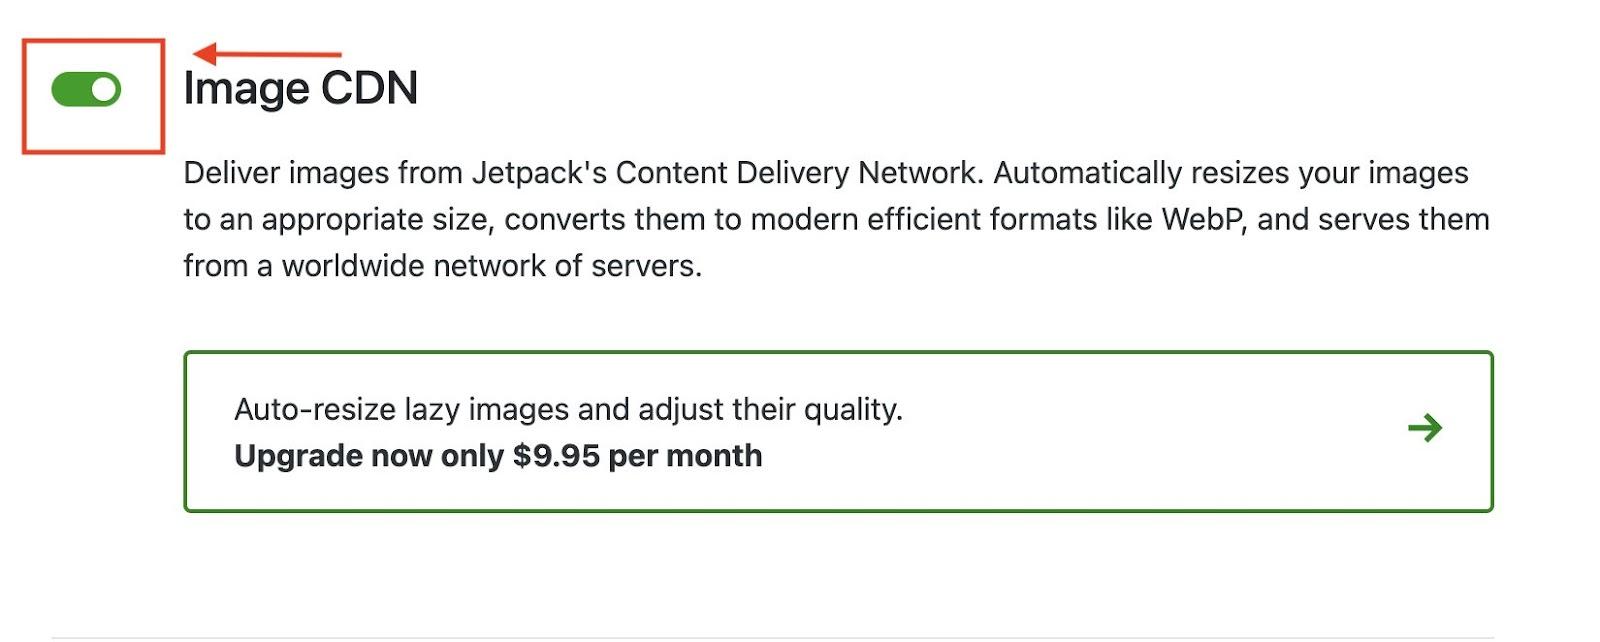
Scroll down until you find the Image CDN section. Enable this option by switching on the green toggle.
To test if your images converted to WebP as expected, right-click an image to open it in a new tab. You should see its WebP extension in the address bar.
Additional WordPress performance tips beyond WebP
Jetpack Boost includes several options to optimize your site. Consider enabling the options available to you, including:
- Optimizing critical CSS loading
- Caching site pages
- Deferring non-essential JavaScript
- Concatenating JavaScript and CSS
Although images play an important role in optimizing site speed, also take into account other variables — like using a lightweight theme. Themes built with performance in mind improve load times, reduce layout shifts, and help your site meet Core Web Vitals benchmarks.
Your hosting’s infrastructure also determines whether your site performs well online. When you select a hosting plan, check limitations for bandwidth, traffic, and site size and pick a host that prioritizes site performance and speed.
Frequently asked questions
Now, let’s address some common questions about using WebP images and Jetpack Boost to help you get the most out of your site’s performance.
Will my original images be replaced with WebP in the Media Library?
No, your original images remain intact in your media library. Jetpack copies an optimized version. If you decide to remove Jetpack, your images continue to render on your site.
Do I need to convert existing images manually?
No, you don’t need to convert existing images manually. Jetpack automatically does this for you.
What about older browsers that don’t support WebP?
For browsers that don’t support WebP, Jetpack offers a fallback, defaulting to the original format of the image file. Although most browsers now support WebP, ensuring your site supports all site visitors still matters.
Do I need any coding knowledge to enable this?
No, you don’t need any coding knowledge to enable WebP conversion in Jetpack Boost.
Do I need a paid version to access the WebP conversion?
No, the free version of Jetpack Boost includes the image CDN features required to automatically convert images to WebP.
The easiest speed optimization plugin for WordPress
Jetpack Boost gives your site the same performance advantages as the world’s leading websites, no developer required.
Boost your site for free