
Managing the number of posts that show up on your blog page gives you more control over how visitors experience your site. Instead of being locked into the default settings, you can decide whether you want a shorter feed that highlights your latest updates or a longer list that encourages browsing.
In this guide, you’ll learn the different ways to change the number of posts displayed on your blog page, how those changes affect your site, and what you should consider before making adjustments. Whether you’re using the default settings, a plugin, or a custom theme, we’ll walk you through the options, step by step.
How WordPress decides the number of posts to show
When you install WordPress, the system is set to show ten posts on your blog page by default. A setting in your WordPress dashboard controls the number of posts that appear on your main blog page, category pages, tag pages, and other archive-style templates across your site.
If you haven’t changed this yet, the default number that you see is ten.
Method 1: Change the number of posts via WordPress settings
This is the most common and user-friendly method. It works for most WordPress themes and takes less than a minute.
To do this, log into your WordPress dashboard, then look for Settings on the left-hand side. Then, click Reading.
Look on the page for the setting that reads “Blog pages show at most” and input the number of posts you want to display.
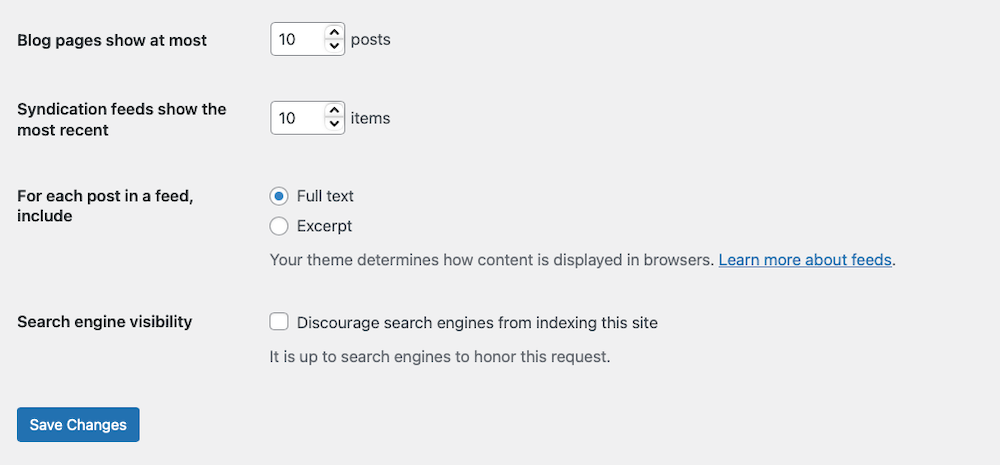
Lastly, scroll down and click Save Changes.
That’s it. Your blog page will now show the number of posts you set.
Method 2: Adjust post count in a custom loop (for developers)
If your site uses a custom theme or template that doesn’t rely on the default WordPress settings, the number of posts shown may be controlled directly in the code. This usually applies when the blog page is created with a custom query or template rather than the standards options under Settings → Reading.
If you’re comfortable editing PHP files, look for the file handling the blog index. This might be home.php, index.php, or a custom template file.
Look for a query that defines the number of posts. You’ll often see something like this:
$args = array( 'post_type' => 'post', 'posts_per_page' => 10,);$query = new WP_Query($args);To change the number of posts, adjust the posts_per_page value:'posts_per_page' => 5,
Before you start making changes to code, though, be sure to use a child theme if you’re editing theme files. This way, your changes won’t get lost during updates. Also, back up your site before editing any code.
Once you’re done making edits, clear or refresh your cache to see the updated post count.
Method 3: Use a plugin for more control
If you want more flexibility without editing code, a plugin can provide finer control over how many posts display across different parts of your site. Some plugins let you set unique post counts for the blog index, category archives, search results, or even custom taxonomies.
Here are two useful plugins worth considering:
- Advanced Post Block: This plugin lets you design custom post grids and lists with options for how many posts to display per block. It’s a useful choice if you want different counts on different pages.
- TaxoPress: Use this plugin to manage categories, tags, and taxonomies. It also includes settings for how content is displayed, like how many posts appear in archives.
Once installed, these plugins usually add new settings panels or block options where you can choose how many posts to show in specific contexts.
Method 4: Change posts per page with the REST API
This is a more advanced option, but if you have the development skills, it’s worth looking into. If you’re building a headless WordPress site or working with the REST API, you can control how many posts are returned by using the per_page parameter in your requests.
Here’s an example request:
https://yoursite.com/wp-json/wp/v2/posts?per_page=5
This code snippet will return five posts per page. By default, WordPress allows up to 100 posts per page. If you need more, the server or theme can raise this limit, but most setups keep 100 as the maximum for performance reasons.
This method is mainly useful if you’re:
- Fetching posts for a custom JavaScript front end, like React, Vue, or Next.js.
- Integrating WordPress content into a mobile app.
- Working with external applications that pull in your site’s posts.
How many posts per page is best for SEO and UX?
There’s no universal “best” number of posts per page, but most WordPress sites benefit from showing between 6 and 12 posts per page, depending on your industry and device usage.
- News / blog sites: 8–12 posts per page balances content density and load time.
- Ecommerce and product blogs: 6–10 posts helps avoid overwhelming users.
- Portfolio and image‑heavy sites: 4–6 posts keeps the page fast and visually clean.
Always test your own site with tools like Lighthouse or PageSpeed Insights after changing the posts per page setting.
Things to consider before changing post counts
Changing the number of posts that display on a page affects the look of your blog and influences site performance, user experience, and even how search engines crawl the content. It’s worth thinking through these factors before settling on a number.
Impact on performance
Showing more posts per page means that your site has to load more images, scripts, and layout elements at once. That can slow down page speed, especially on mobile devices or slower connections. That being said, showing fewer posts per page can speed up load time, which improves performance but may increase the number of requests if visitors need to click through multiple pages.
Impact on user experience
A very long page with dozens of posts feels overwhelming and much harder to scan. Visitors may give up before finding the content they want. In contrast, too few posts per page frustrates readers if they have to keep clicking “Next.”
The ideal number depends on your content style and audience. A photography blog might be better with fewer posts per page, while a text-heavy blog could comfortably show more. Test different post counts to find what works best for your audience.
What about pagination?
When you change the number of posts per page, WordPress automatically updates the pagination to match.
For example, if you have 30 posts and you set the display count to five, your blog page will show six pages. If it was set to ten posts per page, you’d only see three pages.
Customize how pagination looks and functions with plugins like WP-PageNavi or themes with built-in pagination styles.
How to control posts per page on archives
By default, the “Blog pages show at most” setting affects:
- Main blog page
- Category archives
- Tag archives
- Date archives
If you want different behavior for specific archives (for example, fewer posts on search results or author archives), you’ll need to use a custom query or the pre_get_posts hook in your theme’s functions.php file.
Here’s a basic example:
phpfunction custom_posts_per_page( $query ) { if ( !is_admin() && $query->is_main_query() ) { if ( is_search() ) { $query->set( 'posts_per_page', 8 ); } }}add_action( 'pre_get_posts', 'custom_posts_per_page' );
This snippet reduces search results to 8 posts per page, while leaving other archives unchanged.
Troubleshooting common issues
If the number of posts doesn’t update the way you expect, don’t worry: it usually comes down to caching or overrides. Start by clearing your browser cache and, if you’re using a caching plugin like WP Super Cache, clear that as well.
If the problem persists, your theme or page builder may be overriding the global settings. Developers sometimes use the pre_get_posts function or custom loops in theme files to control post output. In other cases, a plugin may be forcing its own post count. Try disabling plugins one at a time to see if one of them is the culprit.
How to speed up your blog content process
Adjusting the number of posts that show on your blog page can shape performance and how visitors interact with your content. Once you’ve found a layout that feels right, the next step involves keeping your site fresh with consistent updates.
That’s where Jetpack AI Assistant can really help. Built directly into the WordPress editor, Jetpack AI Assistant helps you:
- Write new blog posts and pages from scratch using clear prompts
- Rewrite or shorten content to match your style and tone
- Create quick headlines, calls to action, or meta descriptions
- Translate your posts into multiple languages without extra tools
- Get real-time content suggestions without ever leaving your dashboard
It’s simple to use. Just type a prompt or ask a question in the block editor, and the AI Assistant responds in seconds. It helps you go from idea to draft much faster than writing everything on your own. Use it as often as you like while keeping full control over the final result.
To try it out, just make sure Jetpack is installed and activated, then look for the Jetpack AI block in your block editor. It works smoothly with your existing workflow and requires no setup.
Frequently asked questions
How do I change the number of posts per page in WordPress?
You can change how many posts appear on the blog page by using the built‑in WordPress setting under Settings → Reading. Look for the option labeled “Blog pages show at most”, enter the number you prefer, and click Save Changes.
This setting usually affects the main blog page, category pages, tag pages, and other archive pages unless the theme or a plugin overrides it. Common values are 6, 8, 10, or 12 posts per page. After saving, refresh your site to see the change. If the number still looks wrong, check whether your theme or page builder has its own posts‑per‑page option.
Does changing the number of posts per page affect SEO?
Yes, changing the number of posts per page can affect SEO, mainly through page speed, crawl depth, and user experience. More posts on one page usually mean more images, scripts, and content to load, which can slow the page down, especially on shared hosting.
Slower pages can increase bounce rate and hurt some performance metrics that search engines consider. Fewer posts per page often make pages faster and easier to read, but they create more paginated pages. A good balance is usually between 6 and 12 posts per page, depending on how heavy your layout is. Always test your site’s speed and usability after adjusting this setting.
Why are my changes not working even after I updated the number of posts?
Your changes may not work if the theme, a page builder, or a custom plugin is overriding the default setting. Many page builders let you set the number of posts inside a specific block or widget, and that setting takes priority over the global “Blog pages show at most” option.
Some themes also have their own blog or archive settings in the customizer or theme panel. If you use a custom query or code in functions.php, that can also override the default value. To fix this, check your theme options, any page-builder blog blocks, and remove conflicting code unless you know what it does. Clear your cache and test in an incognito window.
Can I show a different number of posts on the homepage, categories, and tags?
Yes, you can show different numbers of posts on different pages, but you usually need custom code or a plugin. By default, WordPress uses the “Blog pages show at most” setting for the main blog, categories, tags, author archives, and date archives.
If you want, for example, 6 posts on the homepage and 10 on category pages, you need to hook into the query with PHP. A common method is to use the pre_get_posts action in your theme’s functions.php and add conditions for is_home, is_category, or is_tag. Some plugins also offer settings to control posts per page by archive type without coding.
How do I change the number of posts per page for custom post types?
For custom post types, the global “Blog pages show at most” setting does not always apply. You often need to change posts per page when you build the query or shortcode that displays those posts. If you use a custom loop in a template file, you can set ‘posts_per_page’ => 8 (or your desired number) inside the query arguments.
If you manage custom post types with a plugin, check its settings for a per‑page option. If you want to control it globally, you can adjust the default posts per page for that post type in the plugin or via code using the pre_get_posts hook and checking post_type. Always test thoroughly, because incorrect values can break pagination.
Is it safe to change posts per page in functions.php?
Changing posts per page in functions.php is safe if you follow basic rules. You should always add code to a child theme and not edit the parent theme directly. Make sure you copy and paste code correctly, keep proper syntax for PHP tags (), and do not remove closing braces or semicolons.
Before saving, create a backup of your site or at least the file you are editing. If you make a mistake and the site stops loading, you can restore the file or use hosting tools to edit it again. If you are not comfortable with code, use a plugin or the WordPress dashboard instead of editing functions.php.
How many posts per page is best for speed and user experience?
A good starting point is between 5 and 10 posts per page for most sites. For lightweight, text‑heavy blogs, 8–12 posts often work well. For image‑heavy layouts or portfolios, 4–8 posts per page helps keep the page fast and readable.
Showing too many posts can increase load time and make the page feel crowded, which can raise bounce rate. If you choose a low number, you will have more paginated pages, but each one will load faster. Test different values with real visitors and performance tools, then pick the number that gives the best balance of speed, readability, and scroll depth.
Does changing posts per page affect pagination?
Yes, changing posts per page directly affects pagination. If you set 6 posts per page on a site with 20 posts, you will see 4 pages of content. If you increase it to 10 posts per page, you will only see 2 pages. If you display too many posts, pagination may disappear because the posts fit on one page. If you display too few, pagination can feel excessive.
You should also make sure your theme properly displays Next/Previous or numbered links. If pagination is missing after changing the number, check for caching issues, theme loops without proper pagination calls, or plugins that modify the main query.
How can I let users choose how many posts they see per page?
You can let users choose how many posts they see by adding a dropdown or radio buttons above the archive and connecting it to the query. The basic idea is to:
Show a form or select with options like 6, 12, and 24 posts.
Use the pre_get_posts hook to read the selected value from the URL and change the posts_per_page number.
Refresh the page when the user changes the selection so the new number takes effect.
This is usually done with a small amount of PHP in functions.php and a bit of JavaScript. Many developers treat this as an advanced feature, so if you are not comfortable coding, you can look for a plugin that offers a user‑selectable posts‑per‑page feature.
What should I do if posts per page is not working correctly?
If posts per page is not working, start by ruling out the easiest causes. First, check your Settings → Reading value and make sure you saved it. Clear any caching plugins, CDNs, or server‑side cache, then refresh the page in an incognito window.
If the issue remains, check your theme or page builder settings for custom blog or archive queries. If you have custom PHP code that changes the query, temporarily deactivate it and test again. If the problem still appears, turn off plugins one by one to see if one is interfering. If none of this helps, you may need to ask a WordPress developer to review the main query and pagination setup on your site.
The most powerful AI tool for WordPress
Turn your ideas into ready-to-publish content at lightspeed.
Elevate your content