
Is your WordPress site behaving oddly, like not showing recent changes to visitors? The culprit might be your cache.
Caching is a common reason for site inconsistencies. This mechanism stores versions of your website on both individual visitors’ browsers and your web host’s servers to improve load times. Unfortunately, sometimes the cache fails to update and causes a few problems. The good news is that you can easily clear old data and get your site back on track.
In this guide, we’ll look at different types of caching and show you how to clear the cache in WordPress using plugins like Jetpack Boost and WP Super Cache. We’ll also discuss clearing the cache in your server, browser, and CDN.
Different types of caching in WordPress
Caching in WordPress helps improve load times by storing copies of your pages in a visitor’s browser. When someone returns to your site, their browser won’t need to request the content from the server again. Instead, it serves the cached data, and the pages load more quickly.
Some caching solutions also store your content on your web server or CDN. Let’s take a closer look at the different types of caching in WordPress.
1. Page caching
Page caching works by storing fully-rendered HTML versions of your pages in the server’s file system or memory. This way, your website bypasses the need to run PHP code and database queries on every page load.
These cached HTML pages are served directly to visitors, reducing load times and server usage.
However, if you publish a new blog post or redesign a page, these changes won’t be reflected in the cached version until the cache is cleared or expires.
2. Browser caching
This caching solution stores static resources — like images, JavaScript, and CSS files — on a visitor’s device. When someone visits your site for the first time, these assets are downloaded and saved in their browser. If they return to your site, the browser will load these resources directly from the local cache instead of requesting them from the server again.
The problem is that if you’ve updated any of these files, visitors may continue to see the older versions unless the browser’s cache is cleared or expires.
3. Server caching
Server-side caching operates on your website’s server. It can include object caching (database query results), opcode caching (storing precompiled PHP code), and full-page caching.
Many hosting providers implement server caching. They typically store the cached data in temporary server directories or in-memory databases like Memcached.
Clearing this cache is crucial when making backend changes, as the server might continue delivering outdated data.
4. CDN caching
A content delivery network (CDN) stores copies of your website’s content on servers distributed around the globe. When someone visits your site, it serves cached versions from the closest geographic server.
This minimizes latency and improves load times. However, if you update content and don’t purge the CDN cache, visitors may still see outdated versions of your site.
Common WordPress caching solutions
There are two plugins that simplify caching: Jetpack Boost and WP Super Cache.
The first one automates the process and requires minimal configuration. Meanwhile, WP Super Cache gives you more control over caching settings.
Let’s look at each option more closely.
Jetpack Boost

Jetpack Boost is developed by Automattic, the people behind WordPress.com. It’s an all-in-one performance plugin that helps you improve site speed with features like an image CDN, optimized code loading, and page caching.
You can enable these features with a single click.

Jetpack gives you the option to exclude certain pages from being cached, and you can clear the cache at any time.
WP Super Cache
WP Super Cache is another caching solution by Automattic. It generates static HTML files from your WordPress site and serves them to visitors.
Unlike Jetpack Boost, this plugin is designed specifically for caching and gives you more control over the settings.
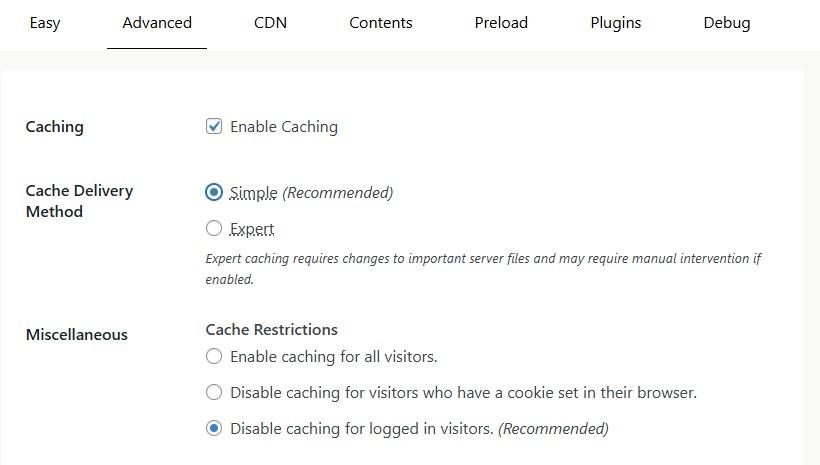
For instance, you can choose between a Simple and Expert cache delivery method, specify what you want to cache, and disable caching for logged-in visitors:
How to clear cache in WordPress
Now, let’s look at how to clear the cache in WordPress. This section also covers browser, server, and CDN caching.
1. Clearing cache with a WordPress caching plugin
If you’re using a WordPress caching plugin like Jetpack Boost or WP Super Cache, clearing the WordPress cache is a quick process.
Jetpack Boost
To clear the cache, navigate to Jetpack → Boost from your WordPress dashboard and scroll down to the Cache Site Pages option. Here, you’ll see a button to clear the cache.
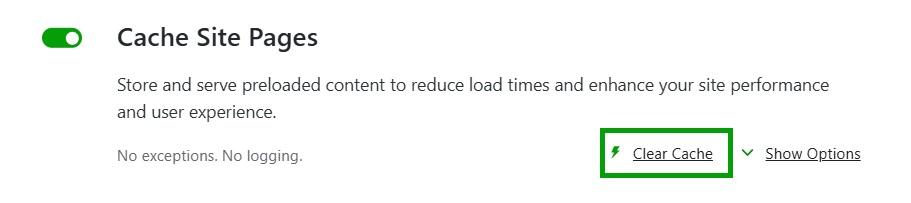
Jetpack will now instantly flush the existing cache and regenerate it with updated content. You’ll want to use this feature after you make major site changes like editing themes, updating plugins, or publishing new posts.
WP Super Cache
If you’re using WP Super Cache, the process is equally straightforward. Go to Settings → WP Super Cache. In the Easy tab, you’ll see a section called Delete Cached Pages.
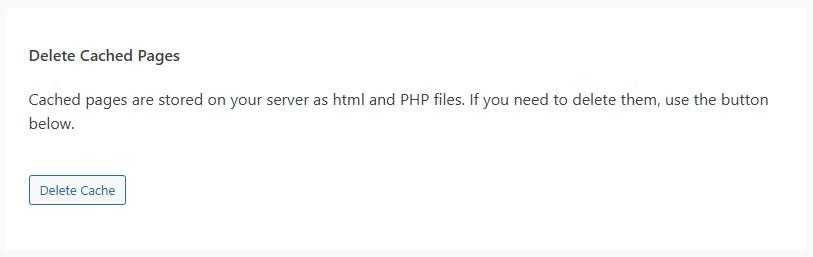
Go ahead and click on Delete Cache. This will remove all stored cache files.
WP Super Cache also lets you schedule automatic cache clearing. Click on the Advanced tab and scroll down to Expiry Time & Garbage Collection.

Garbage collection removes outdated cache files. You can set the cache timeout and choose between the Timer and Clock to specify when the garbage collector should run.
2. Clearing the browser cache
Sometimes, the issue lies with the browser rather than your WordPress setup. Browsers cache files like images and stylesheets to speed up page loading. If you’re not seeing the latest version of your site, you may need to clear your browser cache.
If you’re using Chrome, click on the three dots at the top right-hand corner of the browser window. Select Settings, then Privacy and security.
Here, click on Delete browsing data.
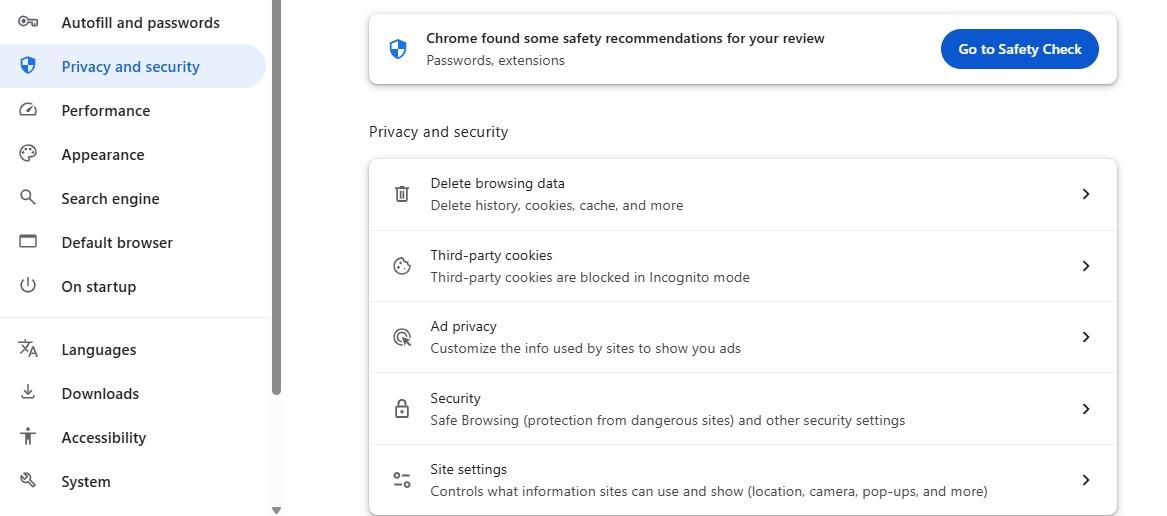
Then, select Cached images and files and click on Delete data.

If you’re using Safari, go to the top menu bar and click on Safari → Preferences. Navigate to the Advanced tab and check the box labeled Show Develop menu in menu bar.
Once enabled, you’ll see a new Develop option in the menu bar. Click on it and select Empty Caches.
If the outdated cache is on a visitor’s browser, there isn’t much you can do about it. However, if someone reaches out to let you know they can’t see something on your site, you might want to instruct them to clear their browser’s cache as the first troubleshooting step.
3. Clearing the server cache
If you’re using a managed WordPress hosting provider, you likely have server-side caching included in your plan. You should be able to clear the cache from your hosting account.
Log into the cPanel and look for an option to clear the cache in the site management tools. If you don’t see it, you will need to contact your web host for assistance.
4. Clearing the CDN cache
If you’re using a CDN like Cloudflare, you may also need to clear that cache. This process involves logging into your CDN provider’s dashboard and navigating to the caching or performance section.
Most CDNs provide options to purge everything or specific URLs only. If you choose to clear the cache for the entire site, it will temporarily increase load times until the cache is rebuilt.
How to verify that the cache has been cleared
You might be wondering, how do I know for certain that the cache has been cleared? Well, there’s a quick way to check.
Start by visiting your site in an incognito or private browser window. This ensures that you’re not loading any stored data from previous sessions.
If you’re seeing the latest changes you made to your site, the cache has been successfully cleared.
You can also use browser developer tools to see whether resources are being pulled from the cache or freshly served. In Chrome, right-click on the site and select Inspect.
Navigate to the Network tab and reload the page. Now, look at the Size column for each file.
If it says (disk cache) or (memory cache), it means the resource is being loaded from your browser’s cache.
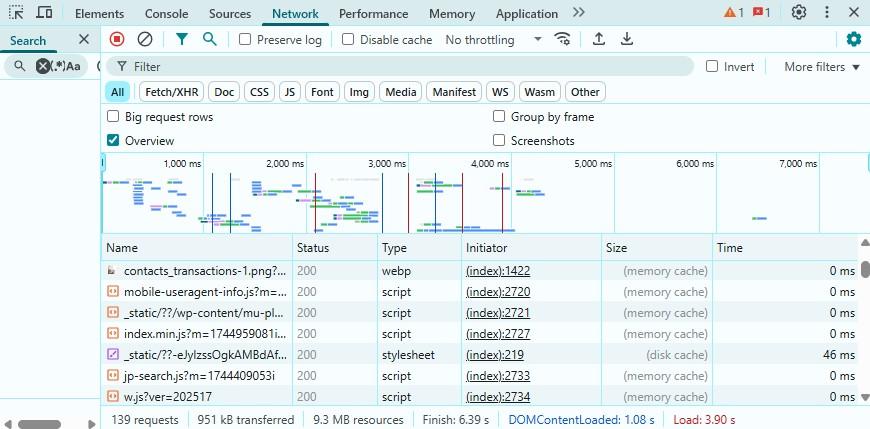
You can also check the Status column for HTTP response codes like 200 (fresh content) or 304 (not modified, served from cache).
This helps you verify if updates to assets like CSS or images are taking effect or if the browser is serving an outdated cached version.
WordPress cache still not clearing? Try these fixes
If you’ve cleared the cache but still see outdated content, work through these steps in order:
- Try a hard refresh. Instead of a normal browser refresh, press Ctrl+F5 on Windows/Linux or Cmd+Shift+R on Mac. This forces your browser to bypass its local cache and re-download all page resources.
- Test in an incognito window. Open a private/incognito browser tab and visit your site. This eliminates browser cache as a variable entirely.
- Check your hosting provider’s server cache. Many managed hosts maintain their own server-level cache that operates independently of your WordPress plugins. You’ll need to clear this from your hosting dashboard.
- Check for conflicting caching plugins. Running two caching plugins simultaneously (such as WP Super Cache and W3 Total Cache) can cause conflicts where one plugin’s cache immediately replaces another’s cleared version. Deactivate all but one.
- Check your CDN. If you’re using external CDN services like Cloudflare, their cache is separate from your WordPress cache. See the CDN section above for instructions on purging it.
- Check object cache. If you’re using a persistent object cache (like Redis or Memcached), this requires separate clearing — usually through your hosting dashboard or a WP-CLI command:
wp cache flush
Frequently asked questions
Finally, let’s answer some common questions about WordPress caching.
What is cache in WordPress?
A cache refers to the temporary storage of web pages, images, scripts, and other files. By caching your content, you can reduce server load and improve site speed. WordPress cache exists at different levels, including browsers, servers, and CDNs.
What does clearing or flushing the cache mean?
Clearing or flushing the cache means deleting the stored files so that the most recent content is served to users. You’ll want to do this after making design or content changes to your website, like publishing a new page. This will ensure that visitors can see these updates.
What are common reasons to clear WordPress cache?
One of the main reasons for clearing the cache is because recent updates are not appearing for your site visitors. Deleting cached data will ensure that changes are instantly reflected, and visitors will no longer see outdated content.
You might also need to clear the cache due to performance issues. For instance, if the cache contains too much content (including outdated data), it can lead to slow load times.
Another reason is to resolve plugin or theme conflicts. When the cache stores outdated scripts or styles that don’t match newer plugin or theme versions, it might result in broken layouts or glitches.
How often should I clear my cache?
A good rule of thumb is to clear the cache after making significant changes to your site or running major plugin/theme updates. For example, if you’ve just published a new article or launched a new product, you’ll want to clear the cache so that visitors can immediately see it.
Note that routine clearing is not necessary. Servers and browsers have built-in cache expiration settings that determine how long files should be stored. Once that time expires, they will fetch a new version.
Can clearing WordPress cache affect SEO?
Clearing your cache does not negatively affect your SEO rankings. In fact, it can improve them.
Search engines re-crawl cached pages periodically, so clearing outdated cache ensures Googlebot sees your most recent content, not an old version. The brief period while your cache rebuilds (during which pages load slightly slower) is too short to affect ranking signals.
Why is my WordPress cache not clearing?
The most common cause is that your hosting provider has a separate server-level cache that isn’t affected by your WordPress plugin.
Log into your hosting dashboard and look for a separate cache-clearing option there. Another common cause is a CDN (like Cloudflare) serving a cached version independently of your plugin cache.
How do I clear WordPress cache from cPanel?
In cPanel, navigate to “Advanced” or “Software” and look for a “LiteSpeed Web Cache Manager” or “Cache Manager” option. Click “Flush All” or “Purge Cache.”
If this option is unavailable, contact your hosting provider, as some hosts manage cache at a server level that requires their intervention.
Is it safe to clear WordPress cache?
Yes, it is completely safe. Clearing your cache never deletes your posts, pages, media files, or plugin/theme data.
It only removes the temporarily generated static copies of your pages. These copies will be automatically rebuilt the next time a visitor accesses those pages.
What are the best free caching plugins for WordPress?
Jetpack Boost and WP Super Cache are two powerful plugins by Automattic, and they’re both free.
WP Super Cache gives you granular control over caching. For instance, you can instruct the plugin to clear all cache files when you publish a new post or page, and disable caching for logged-in users. You also get to set your own cache timeout and refresh schedule.
Jetpack Boost has fewer caching settings than WP Super Cache, but it offers additional performance tools like an image CDN and code optimization.
What’s the best way to combine caching with other speed optimization techniques?
You can instantly improve your site’s overall performance by installing an all-in-one optimization plugin like Jetpack Boost.
Besides caching your pages, this plugin optimizes CSS loading, defers non-essential JavaScript, and offers an image CDN.

Jetpack Boost is beginner-friendly and requires very little work on your end. You can enable your preferred optimization settings using toggle buttons.
It also shows you speed scores for desktop and mobile, so you’ll always know how your site is performing.
The easiest speed optimization plugin for WordPress
Jetpack Boost gives your site the same performance advantages as the world’s leading websites, no developer required.
Boost your site for free