
Navigation menus display your most important pages, providing quick access to visitors, no matter where they are on your site. The default WordPress menu functionality is enough for most websites. But you might be wondering how to customize the menu or build a more elaborate one.
If you’re using a block theme, you can create your menu with the Navigation block. This gives you more customization options, and you can even build whole new menus directly in the editor.
But if you’re still using a classic theme, the traditional menu editor enables you to add new items, create dropdown menus, and include search bars and buttons.
In this detailed guide, we’ll first show you how to create and customize your menu using the classic WordPress menu editor. Then, we’ll walk you through the process of building your menu using the Navigation block (for those sites that use a block theme).
Table of contents
Classic menus vs. Block navigation: Which should you use?
Choosing between the classic Appearance > Menus screen and the new Site Editor’s Navigation block depends on your theme. Here’s a breakdown of the key differences:
| Feature | Classic Menu Editor | Block Navigation (FSE) |
| Ease of Use | Familiar, stable interface | More visual, drag-and-drop |
| Flexibility | Limited to links, categories, custom links | Add any block (buttons, search, icons) |
| Live Preview | Available via the Customizer | Real-time editing in the Site Editor |
| Styling | Depends on theme; requires CSS for changes | Built-in controls for color, font, spacing |
| Best For | Older themes, users who prefer the traditional dashboard | Modern block themes, users wanting full visual control |
Part 1: Building menus using a classic theme
If you’ve not yet upgraded to a block theme, you can still do a lot of cool things to enhance the user experience with a menu. Let’s take a look.
How to find the WordPress menu editor
Let’s start by finding the traditional WordPress menu editor. First, log in to your WordPress dashboard, then navigate to Appearance → Menus. You might see a menu in place already, and you can either edit this one or create a new one.

You can also edit your menus using the theme customizer screen. This has the benefit of providing a live preview of your edits as you work. On the Menus page, click the Manage with Live Preview button, or go to Appearance → Customize and click the Menus option.
Either method provides almost the same options, so choose whichever one you prefer.
How to create a custom menu in WordPress
First, let’s learn how to create a new menu in WordPress if you’re using a classic theme. If you already have an existing one, then just click the Create a New Menu link near the top of the page.
If you haven’t made a menu yet, then you don’t need to click anything — you’ll be dropped right into the menu creation screen.

Lastly, if you’re on the Live Preview screen, you can just click the Create New Menu button at any time.
Come up with a name for your menu that describes its purpose, then choose where it should show up on your site. Once you’ve filled out these simple requirements, you’re ready to start fleshing out your menu and adding items.
How to edit a menu in WordPress
Need to edit an existing menu on a WordPress site? If you have only one menu, just go to the Appearance → Menus screen, and it will be right there on the page, ready to be customized.
If you have multiple menus, you’ll see the Select a menu to edit dropdown near the top of the page. This makes it easy to change navigation menu settings or switch between different menus on your site. Pick the one you want, then click Select to load it.
If you’re using the Theme Customizer, you’ll see a list of all your existing menus at the top as soon as you open the Menus screen. Just click the one you want to open.
How to add items to your WordPress menu
Now it’s time to get into the real meat of creating a menu if you’re using a classic theme: adding items and customizing their functionality. Maybe you want to create a nested dropdown menu, add certain pages or posts to it, or add other items to your menu bar.
Add a page or post to your menu
First, you’ll want to give easy access to your most important pages, so let’s add some links to your menu. This is an important part of navigation on your site, and it’s very easy to add new entries to a menu.
Look to the left box, where you should see the Add menu items box with several tabs. Open the Pages tab, which contains three categories: Most Recent, View All, and Search.
The first will show a handful of your latest pages for easy access. If you have hundreds of pages on your site, the View All tab will likely be a bit unwieldy. Instead, use the Search tab to find the ones you want to add.

You can also click the Select All checkbox at the bottom if you want to add all displayed pages to your menu.
When you’ve selected what you want, click Add to Menu to finalize your selections. Your new pages will now be listed on the right.
For blog posts, it works very similarly. Select the Posts tab, and as before, choose from all of your most recent posts, or search for the ones you want. Then click Add to Menu.
What if you want to remove a menu item you’ve added? There are two ways to do so. In the Menu structure section on the right, select one of the pages or posts by clicking the arrow on the right. Then, click the red Remove link.

You can also bulk remove multiple pages at once. Click the Bulk Select checkbox and then tick each menu item you want to delete. Then click Remove selected items.
Finally, you can rename menu items so they appear with a different title. Select a page item using its dropdown arrow, then change the Navigation Label. This is useful if you want your menu items to have a shorter title to save space.
Add a blog category to your menu
What if you want to link to a top-level category page from your blog? After all, you may want to give visitors easy access to top-level category pages to encourage them to keep reading.
This is very similar to adding a post or page, except you need to click the Categories dropdown tab. Then you can pick from your most-used categories, see the whole list, or search for the ones you want.
When you’re finished, click Add to Menu, and it will appear on the side just like a post or page.

Add a custom link to your menu
What if there’s a page on your site that’s not covered by the other categories, or you want your menu to link to an external site? In that case, you can add a custom link. This can link to any URL you want.
Click the Custom Links tab, then insert the URL, set the menu text, and click Add to Menu.

Add a link to your menu that opens in a new tab
Sometimes you want a menu link to open in a new tab, so visitors can return to your website and keep browsing. This is especially true if you’ve added an external link — if you send visitors to another site, there’s no guarantee they’ll return.
This is a hidden option within the Menus interface. You’ll need to turn it on by clicking Screen Options at the top of the screen, then ticking the Link Target checkbox.

Now when you use the dropdown arrow on a menu item, you’ll see a new checkbox: Open link in a new tab. Click it, and you’re good to go.

Add a link to a section of a page from your menu
Sometimes you want to link to a specific section of a page. In that case, rather than using the typical Posts or Pages dropdown, use the Custom Links section.
First, you need to create a custom URL that will jump visitors down to the proper section. You’ll want to create what’s called an “anchor,” which you can do in the Block Editor. Then, you’ll add the anchor that you created to the end of your site URL with a # symbol. For example, if your anchor is “create-a-page-jump,” your URL will be https://example.com/#create-a-page-jump.
Paste this into the custom links bar, set its label, and click Add to Menu.
Add a dropdown menu item
Nesting items is an important part of menu functionality. This is how you make certain menu items dropdown on hover. You can nest items as deeply as you want, creating submenus within submenus infinitely.
There are two ways to do this. The first option is to simply click the item you want to nest and drag it to the right until the dotted lines shift to the right as well. Keep doing this to nest more items.
The second way is to open the menu item you want to move and click the Under [Menu Item Name] link.

Add a menu item without a link
Most of the time, you’ll want your menu items to link to a page. But sometimes, like when creating a dropdown menu, you just want the top-level link to be text and nothing else.
To do this, create a Custom Link like normal, but instead of inserting a link, insert the # symbol. Then title the menu item as usual and click Add to Menu.

You can leave the # symbol if you want, or you can open your new menu item, delete the symbol, and click Save Menu.
While the menu item still looks like a link, it will not be clickable. You can always change its styling with CSS if you want it to look different. We’ll show you how to do that later.
Add a search icon or bar to your menu
If your theme has a header widget, adding a search bar to it is easy. Just go to Appearance → Widgets, click the blue + in the top-left corner, and drag the Search widget into the header area.
If this doesn’t work, you’ll need to switch to a theme that places a search bar in the header or use a plugin. Most popular WordPress search plugins include an option to add a search bar to the header menu.
Add a description to a menu item
While it isn’t usually necessary, you may want to add a description to your menu items. Maybe you want to give a brief description of where this link will take visitors when they click.
First, on the Menus screen, open the Screen Options at the top right and tick the Description checkbox. You’ll now find a Description box whenever you open a menu item from its dropdown arrow.

Type in a description and make sure to click Save Menu. When you visit your site, you should see your new description. Remember that not all themes support this feature.
How to activate your WordPress navigation menu
When you’re finished customizing your menu and are ready to show it to the world, all you need to do is pick a Display location for it. It will then show up on your site.
Conversely, if you want to work on your menu in private, just don’t select a display location until you’re finished. A menu without a display location is essentially invisible to all visitors.
Not sure how to set a display location? Let’s go over it.
How to change your menu position in WordPress
If you don’t like where your menu is located or aren’t sure how to set it to display where you want, it’s very easy to change the menu position in WordPress.
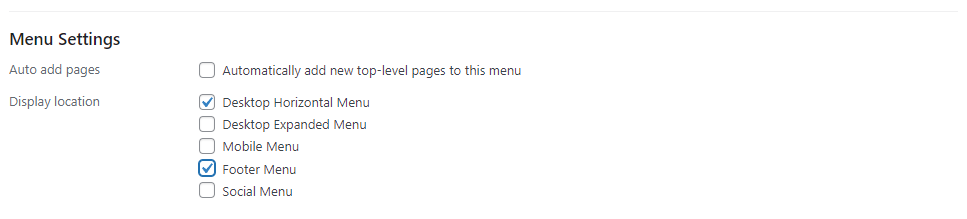
There are three ways to do this: First, on the Appearance → Menus screen in the default Edit Menus tab, look to the main menu editing area. You should see a section labeled Menu Settings. Then look for Display location.
Now just tick the boxes where you want your menu to appear. You’ll need to go visit your site to see how your new menu looks.
The second way to change the menu position in WordPress is to click on the Manage Locations tab, then assign which menus you want to appear in each one. This is a little easier to set up if you have multiple menus.
Finally, you can use the Live Customizer. Open up Appearance → Customize and click the Menus tab, then either select the menu you want to edit or click the View All Locations button. The benefit of this is you get to immediately see what your menus will look like and the location of each display option.
Keep in mind that each display location can only be occupied by one menu at a time, though you can assign a single menu to multiple display locations.
Also, display locations are determined by your theme. If you don’t have the ones you’re looking for, you may need to switch to a new theme.
How to use multiple menus across your WordPress site
You’re not limited to a single menu. You can create as many as you have space to display (and more!). You could have your main menu, a more compact sidebar menu, a separate menu in your footer, etc. It all depends on the number of menu locations your theme provides.
In any case, you can create a second menu by clicking Create a New Menu and selecting a separate display location for it. Just fill out the name and set pages for it as you did with your first menu and repeat as many times as you need.

The live preview screen is even more intuitive; just click the Create New Menu button, and all your created menus will be listed in one easy-to-access place.
Remember to use the Manage Locations screen to more easily assign each menu to a location, as it’s much more streamlined than having to manually select and set options for each menu.
How to style your menu’s appearance using CSS
While WordPress provides some basic options to get your menu acting the way you want, when it comes to its actual appearance, there’s not a lot there. But if you’re not happy relying on your theme’s menu styling, you can take control with CSS.
While CSS can be difficult to learn, you don’t need to be an expert to use it. For basic appearance tweaks, you just need to know what to change and where to put it.
While you can edit your theme files directly, this generally isn’t recommended unless you’re adding a lot of CSS, especially if you’re not using a child theme. Instead, you can use the Additional CSS box on the Appearance → Customize screen or the Custom CSS feature available in Jetpack.
You also need to find your theme’s menu class. If you have multiple menus in your theme, each will have a different class.
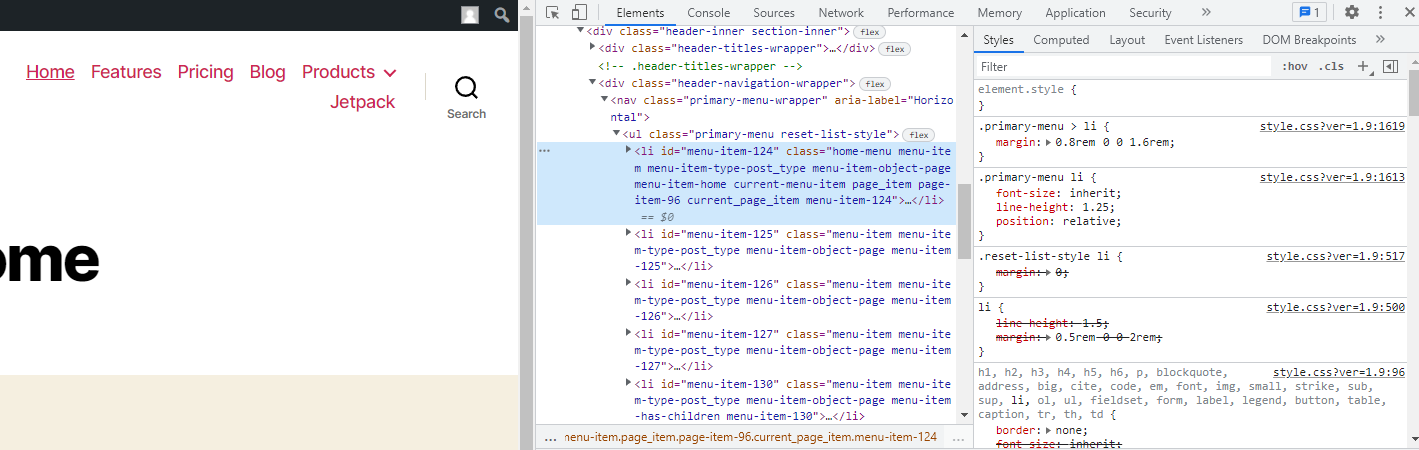
For example, in the Twenty-Twenty WordPress theme, the class for the primary menu is simply “.primary-menu”.
Right-click your menu and use the Inspect Element tool to find your menu’s class.
Should any of the sample codes not work, your theme may be forcing a certain style, locking in a font size, color, and so on. You can override this using the !important tag, but try to do so sparingly. It can be better to create a child theme and edit your stylesheet directly if you’re skilled in CSS.
How to target a single menu item
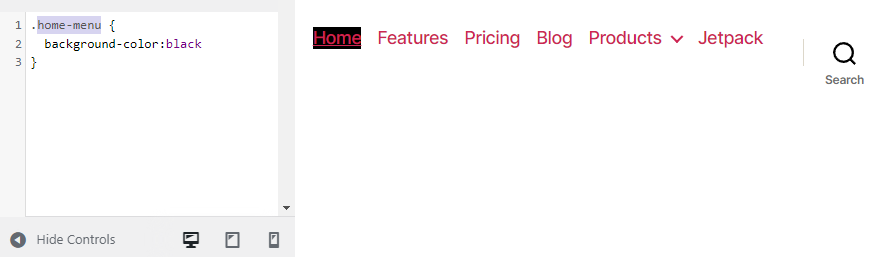
You may want to change a single menu item rather than all of them at once. For this, go to the Appearance → Menu page, open Screen Options, and turn on CSS Classes. Edit a menu item and give it a CSS class, then replace the “.primary-menu” in the code examples provided below with the custom CSS class.
So if you set the homepage link to have the class “home-menu”, replace “.primary-menu” with “.home-menu”.
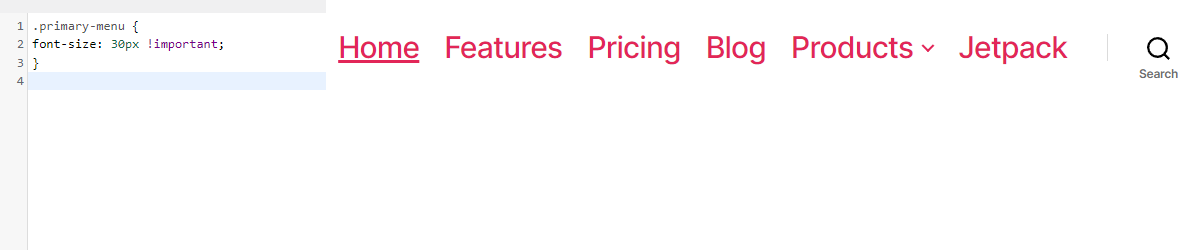
How to change your menu’s font size
If your menu is a bit too obtrusive, or a bit too hard to read, try changing the font size. Use this code to do so:
.primary-menu {font-size: 30px;}
Simply change the “30px” to whatever size you’d like.
How to change your menu’s color scheme
A common request from WordPress users is to change the color of the links in their menu or even add a background color.
First, let’s change the font color. Use the following code:
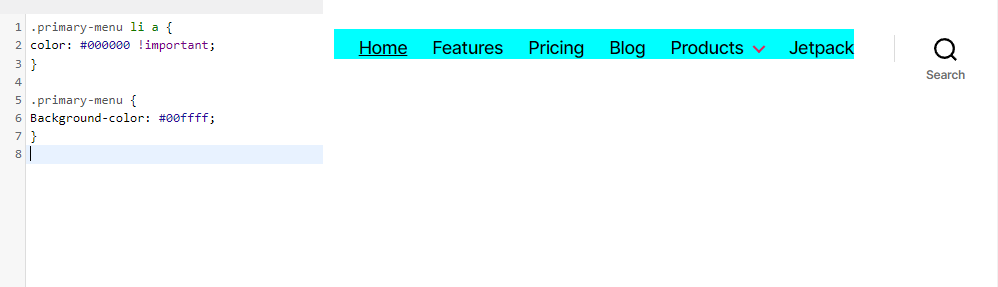
.primary-menu li a {color: #000000;}
This will turn your menu links black. Replace the color hex code above — you can use a color code site to easily create a hex code of the color you want.
What about background color? Try this for a teal background:
.primary-menu {background-color: #00ffff;}
How to change your menu’s hover effects
A fancy hover effect can subtly spruce up your design, but this part can get a bit more complicated. There are plenty of hover effects you could implement, but let’s do a simple one: changing the font color when you hover over a menu item.
.primary-menu li.menu-item a:hover {color: #DEB0F1;}
Now if you hover over a link in your menu, it will turn lavender.

There’s more to experiment with — try using the background color, opacity, border/border-radius, and transition tags.
How to make your WordPress menu sticky
“Sticky” or fixed menus follow the visitor as they scroll, meaning they don’t need to scroll all the way back to the top to reach the navigation menu. It can be a bit more convenient for people, and encourage them to keep browsing.
The way to do this is with the “position:fixed” tag, but you’ll likely need to add a bit more to make things work properly.
The following will make a basic floating navigation menu:
.primary-menu {position: fixed;top:0;right:0;}
But you may want to use the background, height, width, border, padding, and top/down/left/right tags to build a sticky menu that’s more than just floating text. Here’s a simple example:
.primary-menu {position: fixed;top:0;right:0;background:#000000;height:50px;width:100%;border-bottom: 2px solid #F7156B;padding-top:10px;padding-right:30px;}

How to add a button to your menu
While it’s possible to add buttons to your menu using plugins, let’s try adding a simple one with CSS. First, you’ll need to set a custom CSS class for the button menu item, unless you want every item in the menu to be styled this way.
Now try this code:
.menu-button { background: #000000; padding: 5px 10px 5px 10px;}
If you want to round the button’s corners, try adding this line of code above the closing bracket:
border-radius: 5px;

Part 2: Building menus using the Block Editor (FSE)
At this point, you should know how to create and edit menus using the default WordPress menu editor. But if you use a block theme instead of a classic theme, you can edit your menu with the Navigation block.
How to create and edit a menu using the Navigation block
In this section, we’ll talk more about this feature and show you how to use it to create menus.
What is the Navigation block?
The Navigation block was released with WordPress 5.9. This version of WordPress introduced the Site Editor, which is the main tool for editing block-based themes.
As the name suggests, block themes are made entirely of WordPress blocks. This enables you to edit layouts in the same way that you customize posts and pages with the block editor.
This adds a greater level of flexibility to site customization. For example, you can create and edit templates, template parts like footers and headers, patterns, and more.
Some of the available functionality isn’t too different from the default menu editor that you use for classic themes. You can still add menu links to pages and posts. And, you can still insert submenus if you have lots of content on your site.
The nature of block-based editing means that you can add pretty much any block inside the Navigation block. For instance, you might include logos, images, contact details, social icons, and search bars.
Although the Site Editor offers more customization options, there are still some limitations to the Navigation block. For example, you won’t be able to build mega menus without using a dedicated plugin.
How do I know if I have the Navigation block?
As mentioned earlier, the Navigation block is only available for block-based themes.
These themes are built entirely with WordPress blocks. This gives you more control over your site’s appearance, without needing to rely on external tools and plugins.
You’ll only get access to the Navigation block if you have one of these block themes activated on your site. You can check this by going to Appearance in your dashboard.

If you see the Menus option, this generally means that you’re using a classic theme, and you’ll have to edit your navigation menus using the method above. But if you see the Editor option, you’re using a block theme with access to the Navigation block.
How to access the Navigation block
There are various ways to access the Navigation block if you’re using a block-based theme.
You can open the Site Editor by going to Appearance → Editor. Here, you can choose the page, pattern, or template that you want to modify.
In this instance, you’d need to click on the Navigation option at the top.
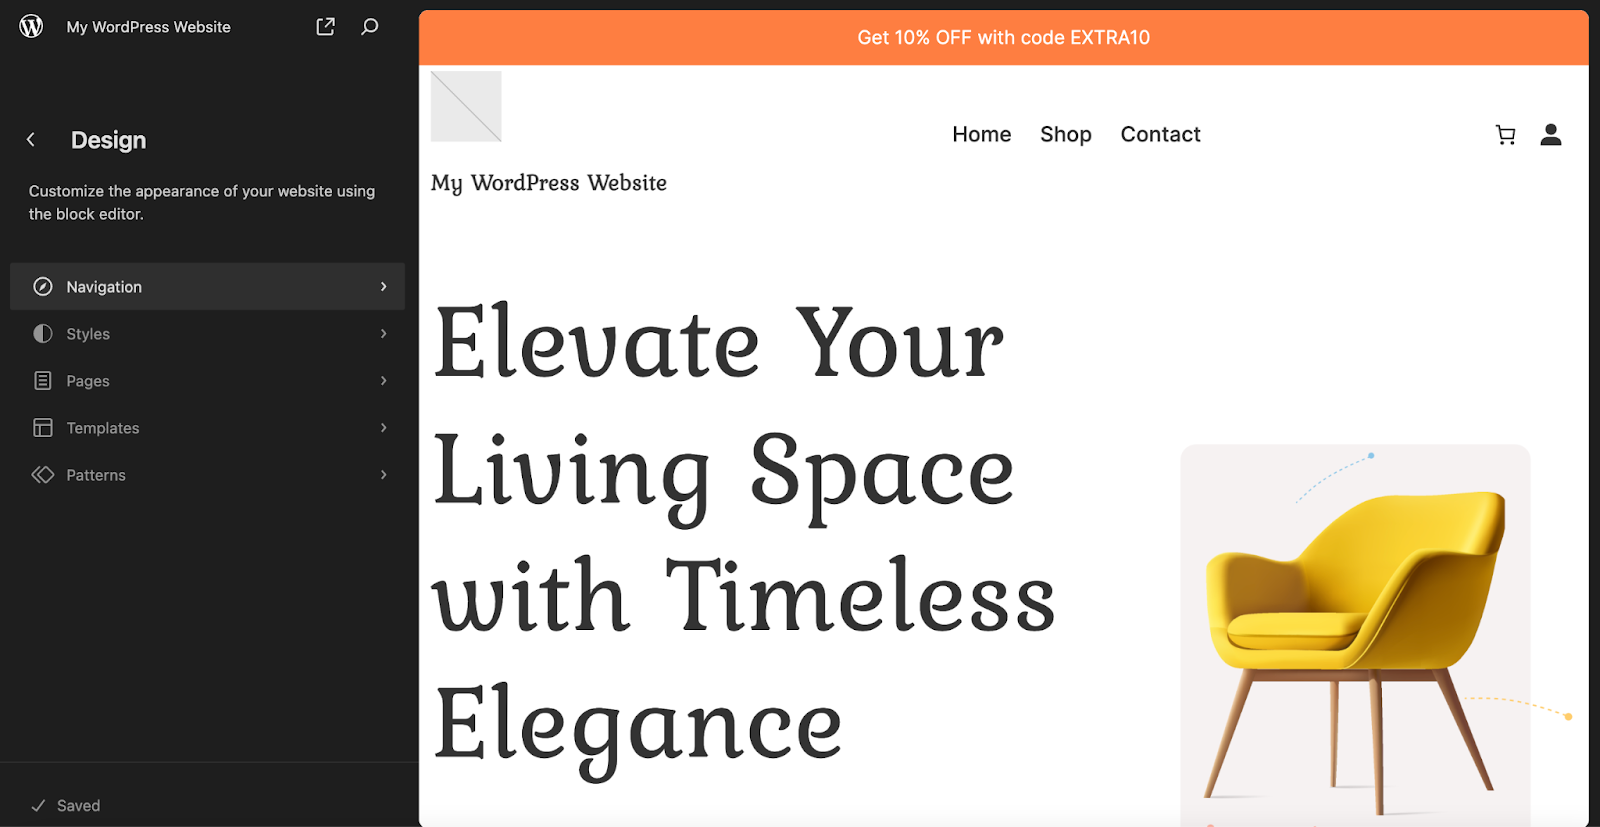
Then, select the pencil icon to open and edit the block.
Note that, since the Site Editor is more flexible than the Customizer, it doesn’t really matter which aspect of the website you’re editing. All you have to do is click on your menu items, and you’ll see the option Select parent block: Navigation.
Many block themes come with their own theme panels or settings. For instance, the EarthTones theme gives you access to a Theme Settings option when you go to Appearance.
If you click on this, it directs you to a page where you can make changes to your layout. Here, there’s an Add Menus option which leads you straight to the Site Editor (and the Navigation block).
How to create a menu with the Navigation block
If you activate a block theme on an existing site, your navigation menu will typically be generated using the existing one that you created with the default WordPress menu editor. Sometimes, your website might inherit the menu that’s available with the block theme.
That said, if you want to create a new menu, or you’re just building your site for the first time, you can do this in the Site Editor. Simply open the editor, select the Navigation block, and remove the existing layout if you want to start from scratch.
Your page will usually be divided into columns and rows (like the posts and pages you create using the block editor). Therefore, when you run your mouse over the page, you’ll see various locations where you can add new blocks.
Alternatively, you can add new columns and rows if you can’t add a menu in your desired place. It’s best to add a Navigation block in a fixed position like a footer, sidebar, or header.
Click on the + icon to add a new block. Search for “Navigation” and drag the block into place.
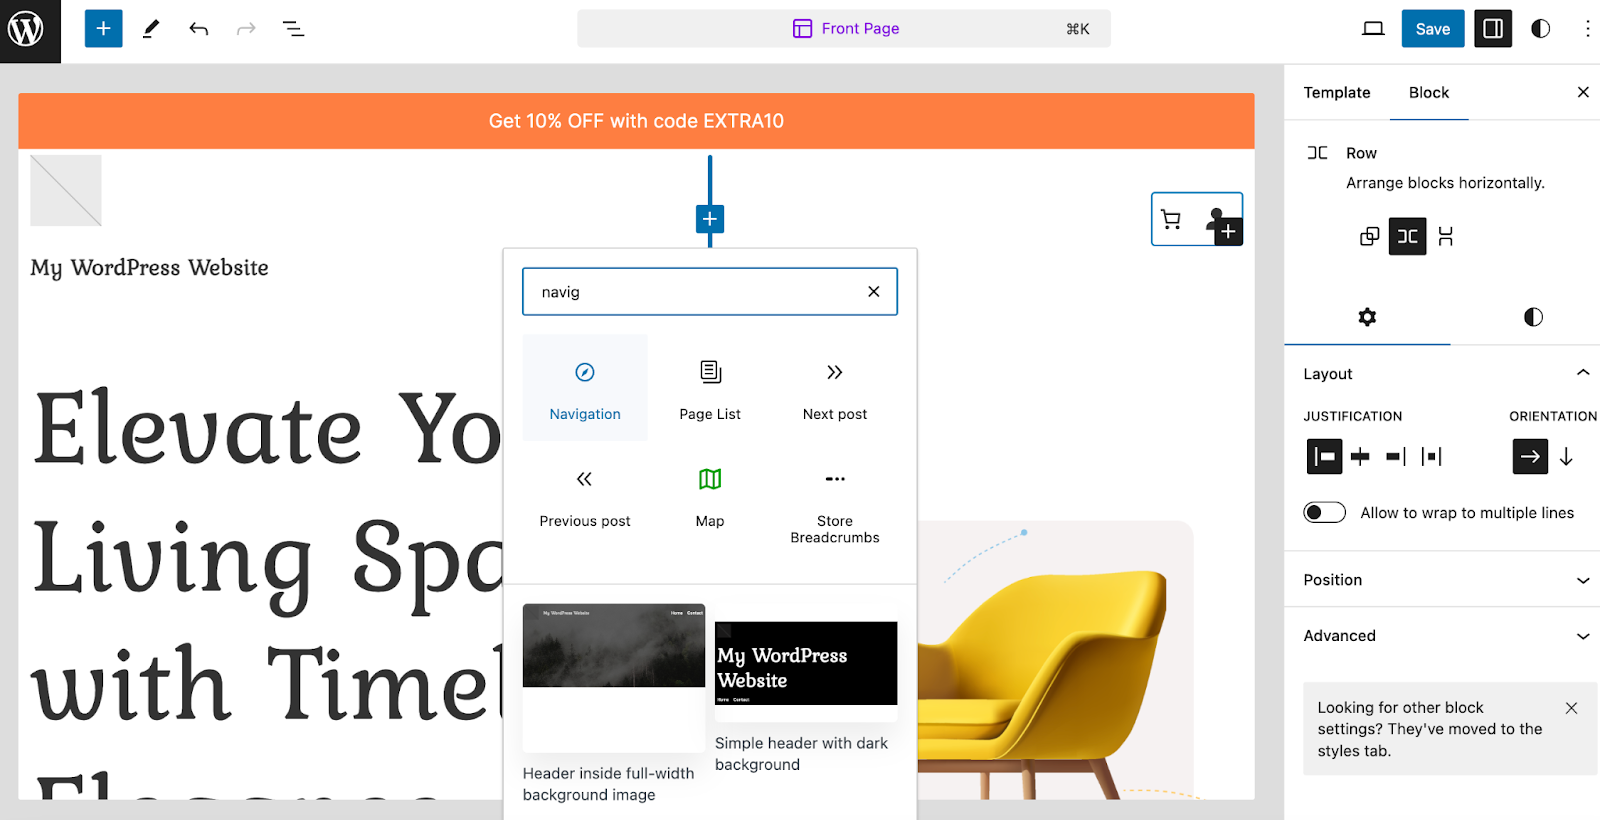
Some menu items may appear instantly, but you can change these by clicking on the specific item.
Here, you’re able to replace the menu label, enter a new URL, and add a description using the Block settings to the right of the screen. If you switch to the Styles tab, you can also adjust the typography size and dimensions.

Additionally, you’re able to add new menu items by clicking on the + icon within the Navigation block. Plus, you can create submenus, change the order of menu options, and more. We’ll show you how to achieve each of these things in the next section.
How to style your menu with the Navigation block
There are various ways to customize a menu that you create in the Site Editor. In this section, we’ll show you how to add new items, reorder items, change colors, and more.
How to add new menu items to the Navigation block
First, you might want to add new pages, posts, or even custom links to your navigation menu. Fortunately, this is very simple to do using the Site Editor.
Make sure you’ve selected the Navigation block within the editor. You should be able to see the + icon that lets you add new blocks within other blocks, rows, and columns. All you have to do is click on this icon.
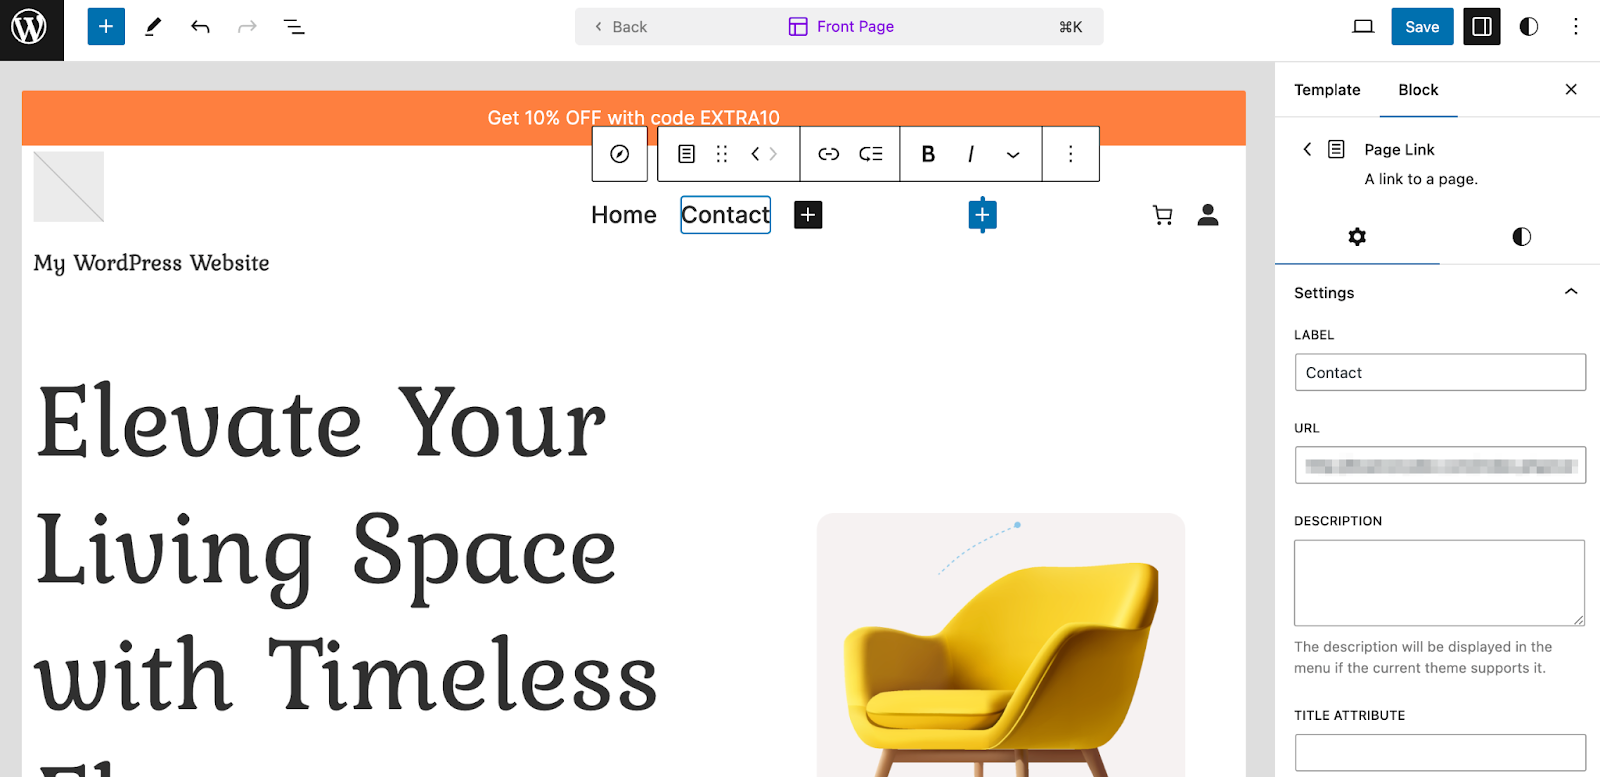
Then, you can search for existing pages on your site, or enter a custom URL. Let’s say that you want to add a link to your blog page. Simply find the page within the list or search for “blog”.

Clicking on it will automatically add the page to your Navigation block. If you want, you can set the link to open in a new tab when visitors click on it. In the Block settings to the right, you can modify the label, add a description, and change the style of the menu item so that it slots in nicely with the existing options.
How to add submenu links within the Navigation block
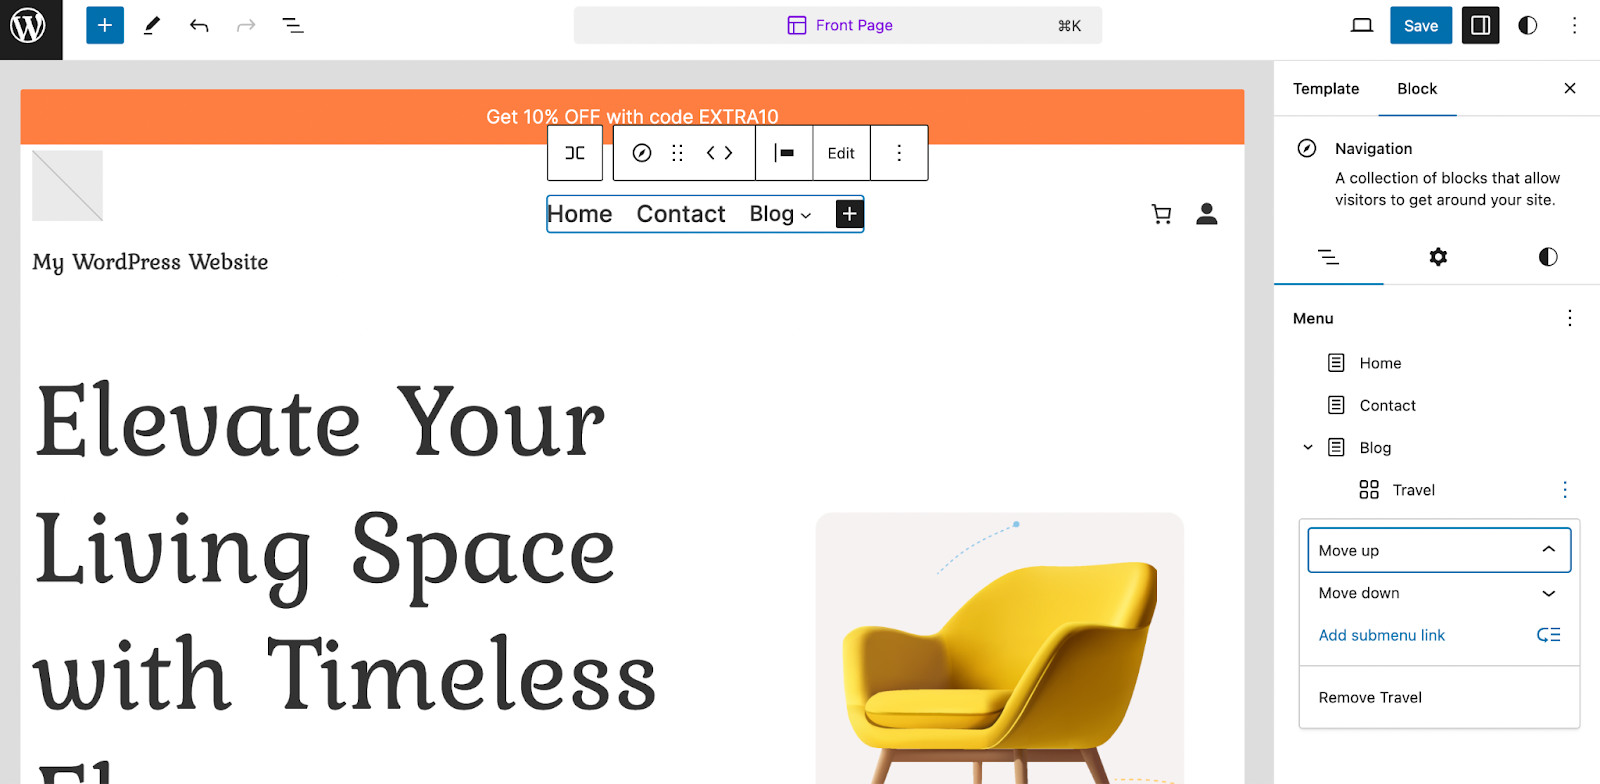
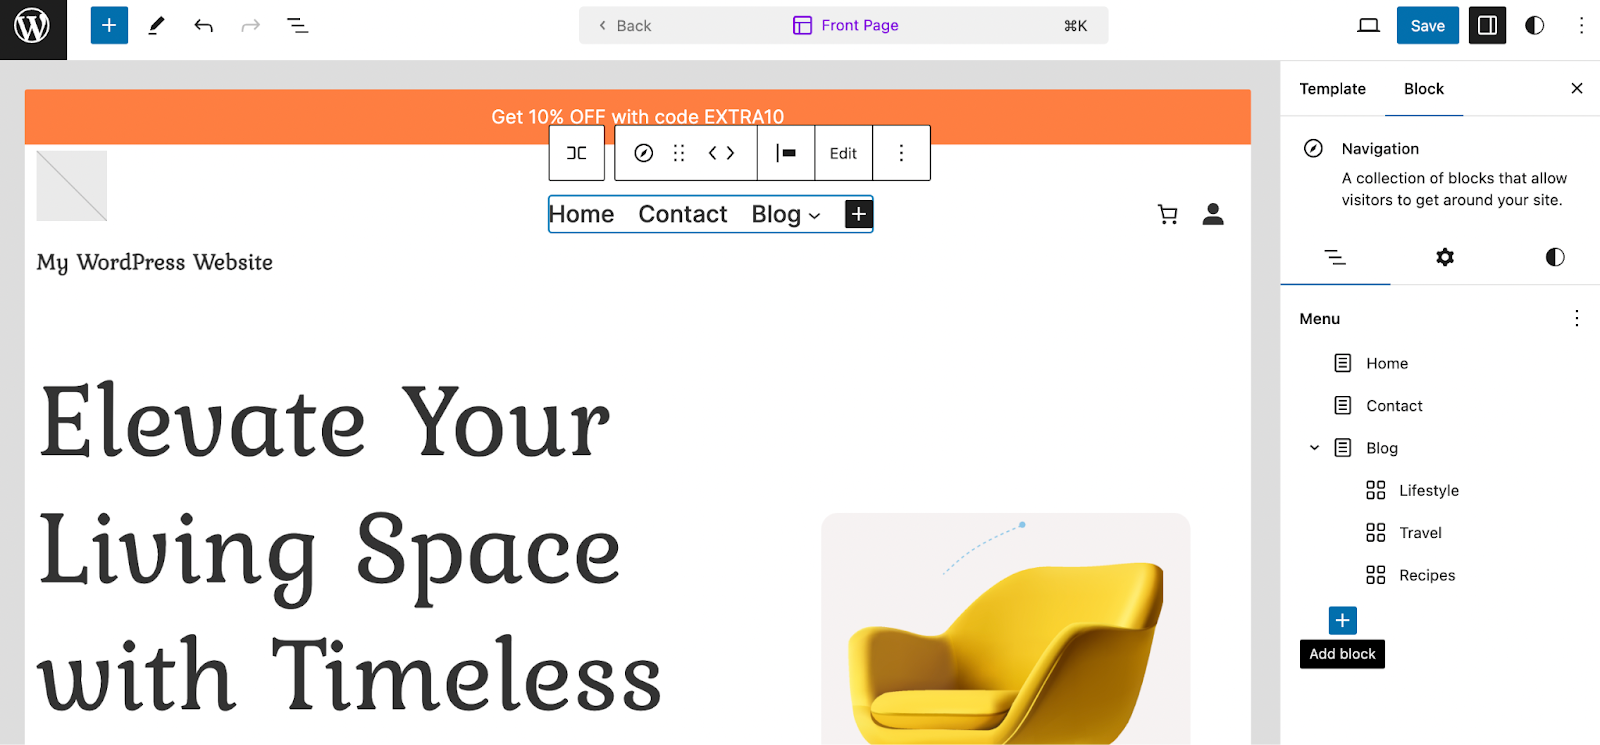
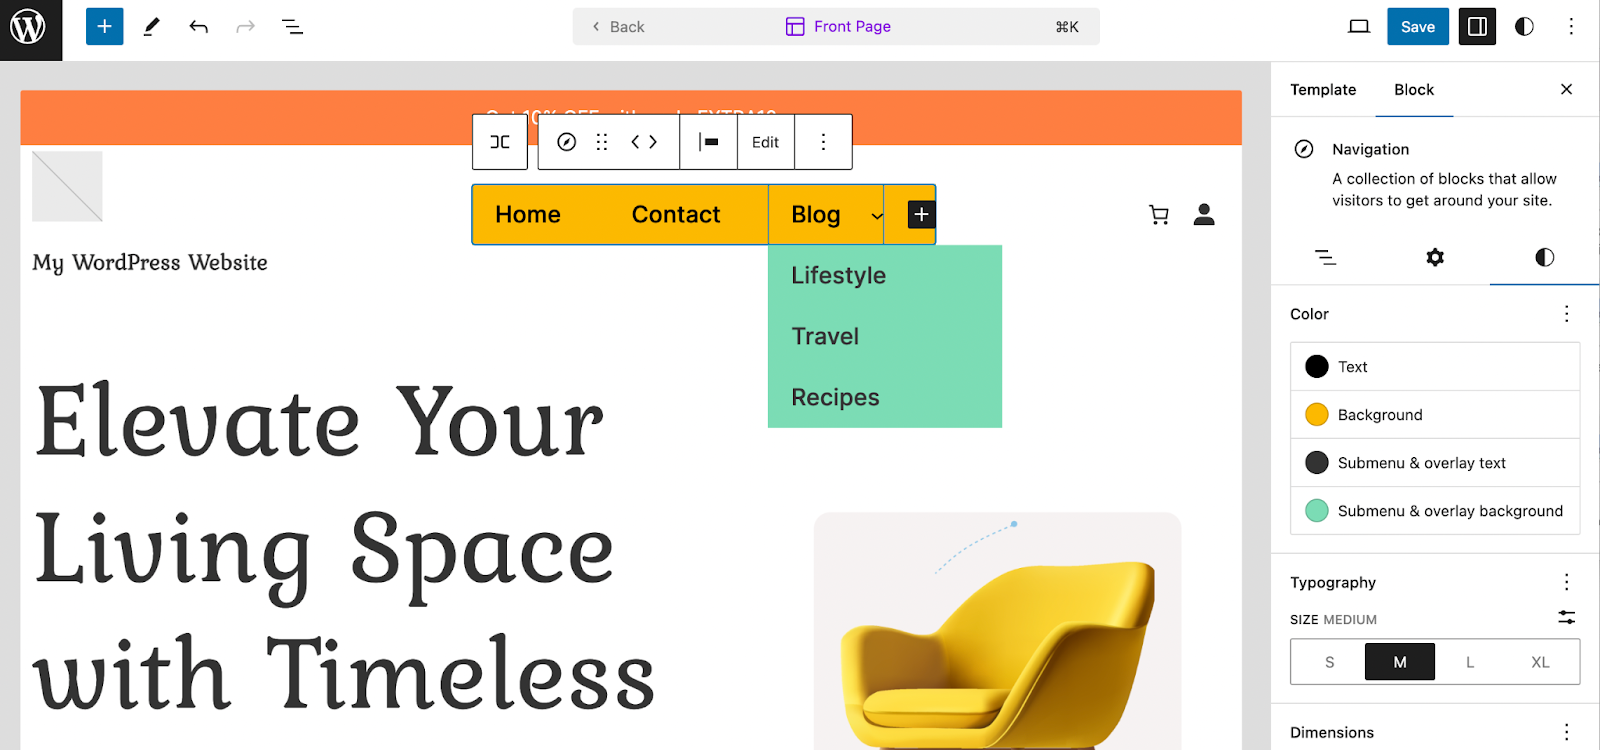
If your website has lots of pages, it can be useful to create submenus (or dropdown menus). These enable visitors to navigate around your site more easily. Let’s take the blog menu item we just added.
It can be useful to add submenus that direct visitors to specific categories for blog posts they’re most interested in. If you haven’t configured categories for your posts, you can do this by going to Posts → Categories.
When you create a new category, you can also enter a custom slug which will function as the link for your submenu item. So in the editor, select the Navigation block and move to the Blog option we just added.
In the toolbar, click on the Add submenu icon.

A small arrow will appear next to the Blog menu item that shows visitors that it’s a dropdown menu. Now, click on Add link.

Just like earlier, you can search for pages or enter a custom URL. Since your post categories are set up with a permalink, you can also search for these here.
Once you’ve added the first link, hit the escape button to add even more items to your Blog submenu.

Then, repeat the process until you’ve added all your categories to the Navigation block.
If you want to go one step further, you can even create submenus for your submenu items. Let’s say your recipes are organized into sub-categories like desserts, drinks, and breakfast. Or, your travel posts might be organized by destination.
To configure this, highlight the Navigation block and locate the Block settings to the right.

All you have to do is click on the three dots beside the relevant submenu item and select Add submenu link.
Then, repeat the process that we’ve described in this section.
How to change the order or menu items in the Navigation block
Although we’ve shown you how to add new menu items to the Navigation block, you may wish to change the order in which they appear.
Take the Blog option that we just added. Perhaps you want it to sit right after the Home menu link.
To set this up, all you need to do is click on the Navigation block and select the Blog menu item. If you don’t select the specific menu link, you’ll move the entire Navigation block instead.
Once you’ve selected the right option, you should see two arrows appear in the block toolbar.

Now, because the Blog option is right at the end, you won’t be able to select the right arrow since there’s nowhere to move it to. But if you click on the left arrow, your menu item should move one place to the left:

As you can see, the Blog option has switched places with the Contact link. You can click on the arrow once more to move it to the very left (and replace the current Home option).
If you want to reorder your submenu items, all you have to do is select the relevant item. In the toolbar, rather than seeing right and left arrows, you should see arrows to move items up and down.

Simply click on these to rearrange the appearance of your submenu.
How to add extra blocks to the Navigation block
As we discussed, one of the best features of the Navigation block is that it allows you to include a range of different elements, besides just links.
Make sure the Navigation block is selected. To the right of the page, you’ll see a list view. Click on the + icon at the bottom to add a new block.
Then, search for a block as you usually would. We’re going to select Social Icons.
Immediately, you’ll see that the block gets added to the list view of your menu. The change will also translate within the Navigation block in the editor.
Switching to the editor, if you click on the social icons, you’ll see a mini + icon that lets you add the links you need.

Once you click on the + icon, you can either add a custom link or browse the range of widgets supported by WordPress, like Instagram and TikTok.
When the Social Icons block is selected, you can add more icons to the block.

Meanwhile, when you select a specific icon like the Instagram block, you can add the link to your social media page.

You can also add labels in the Block settings to help screen reader users. And, you can change the position of icons using the arrows in the toolbar above.
This is just one of the many blocks you can add to the navigation menu. You might also like to add your company logo, a search bar, a list of key web pages, buttons, and more.
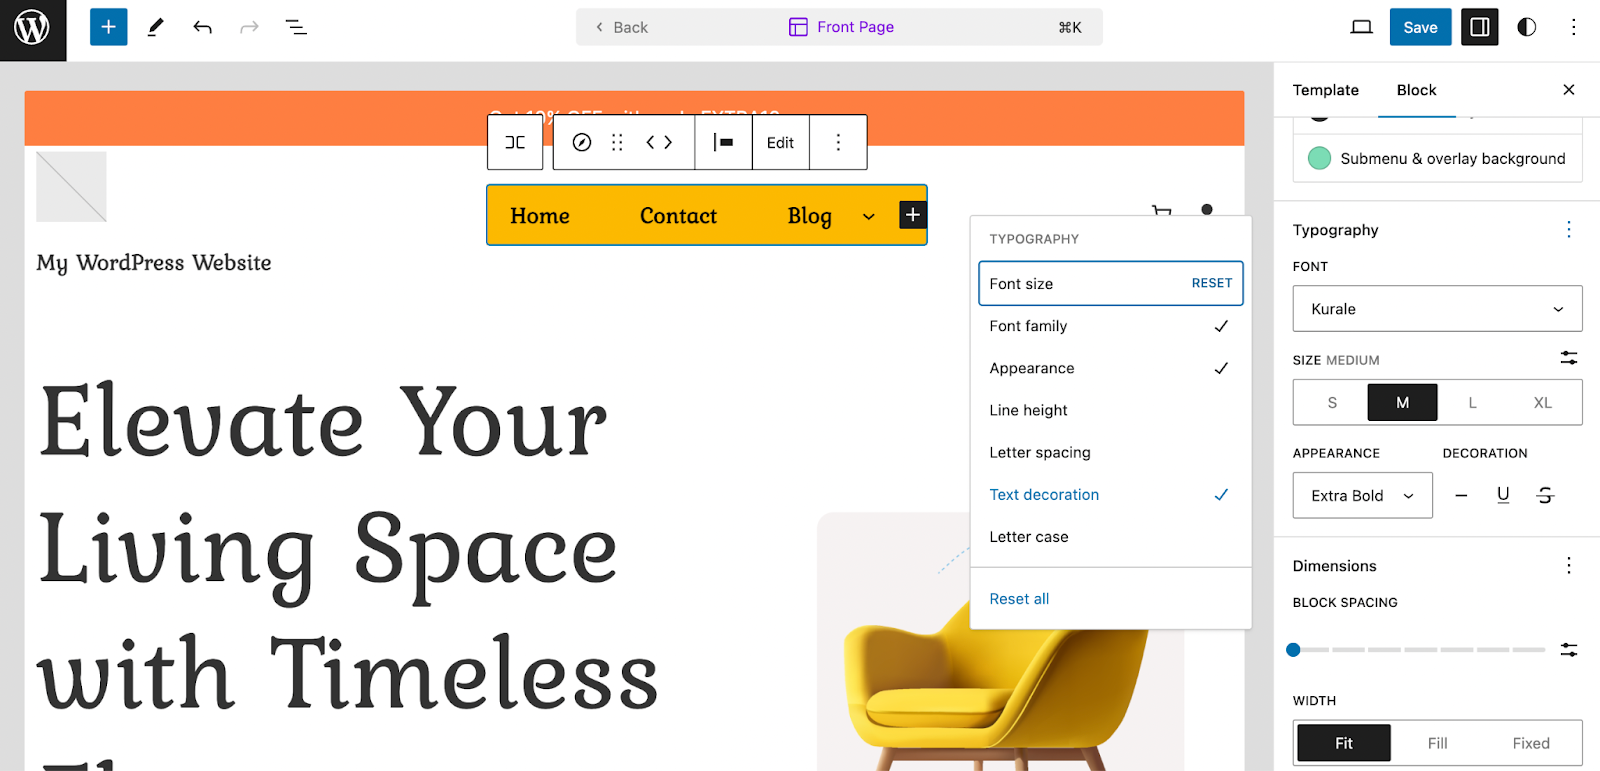
How to change colors, fonts, and alignment of the Navigation block
At this point, you have all the menu items, submenus, and extra widgets that you want to feature in the Navigation block. But you might want to customize the appearance of the block. This may involve changing the colors, fonts, and alignment.
To do this, select the Navigation block in the Site Editor. In the Block settings to the right of the page, you’ll see the list view of your menu. Switch to the Settings tab.
Here, you can change the orientation of your menu items so that it displays vertically rather than horizontally (which is useful if you’re creating a menu in your site’s sidebar).

You can also configure some important settings for your mobile menu. Make sure the Mobile option is highlighted in the Overlay menu section. Then, you can select a new icon to display.
Plus, you can also define whether submenus show when visitors hover over the menu item (using the Show arrow toggle), or make the options expand when clicked.
Now, let’s move over to the Styles tab.

The first option is to choose a color for the text in your Navigation block. You can also apply a background color, and determine the colors of text and backgrounds in your submenus.
Below, you can adjust the size of the text. If you click on the three dots in the typography section, you’ll see some additional settings.
For instance, you’re able to select a new font family, modify the appearance (bolds and italics), change the letter case, line height, spacing, and more.
Further down in the Dimensions section, you can increase the space between menu items using the Block spacing bar. Once you’re ready, simply save and preview your Navigation block.
Frequently asked questions
For such a simple feature, menus can get pretty complicated once you really get into their functionality. Let’s wrap up with a few commonly-asked questions about menus just in case we missed anything.
Can I delete or rename a WordPress menu?
Classic theme
You can create as many menus as you like in WordPress, and it’s completely possible to delete them. Just open up the Appearance → Menus screen and click the red Delete Menu text.
You’ll get a pop-up asking for confirmation. Click OK and the menu will be gone forever.
If you just want to rename a menu, open it up and change the Menu Name box, then click the Save Menu button. Simple as that!
Block theme
To delete a menu, go to Appearance → Editor → Navigation. Click the vertical ellipses at top right and select either Rename or Delete.
Can I add tags to a WordPress menu?
Classic theme
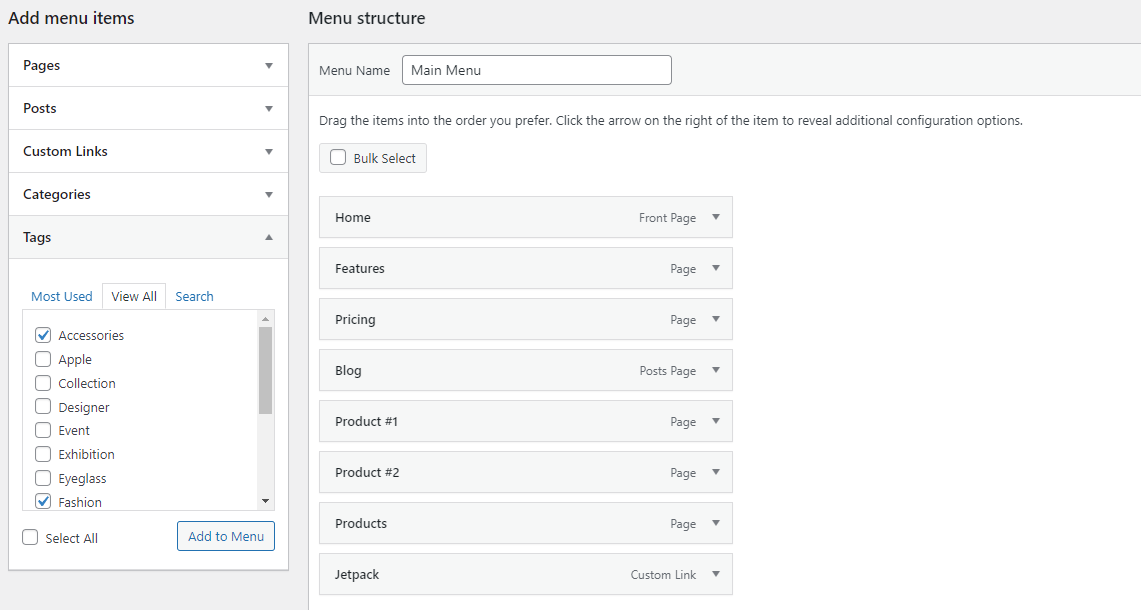
It’s possible to add categories to your WordPress menu, but what about tags? Good news: This is built into the menu functionality. You just need to turn it on.
First, make sure you’re on the Appearance → Menus screen, then click Screen Options in the upper-right corner. In the Screen elements section, you’ll see a row of options, all but one of which is ticked: Tags. Select it now.
A new menu will appear below the Categories option in the Add menu items section. You can search or pick from any tags you like and add them to your menu.
Block theme
In the navigation block, click the + to add a new link. Then, you can either search for a specific tag or type in the URL for that tag.
Can I duplicate a menu in WordPress?
If you want to work on a menu without changes being broadcast live to your visitors, the ability to duplicate a menu could be very useful.
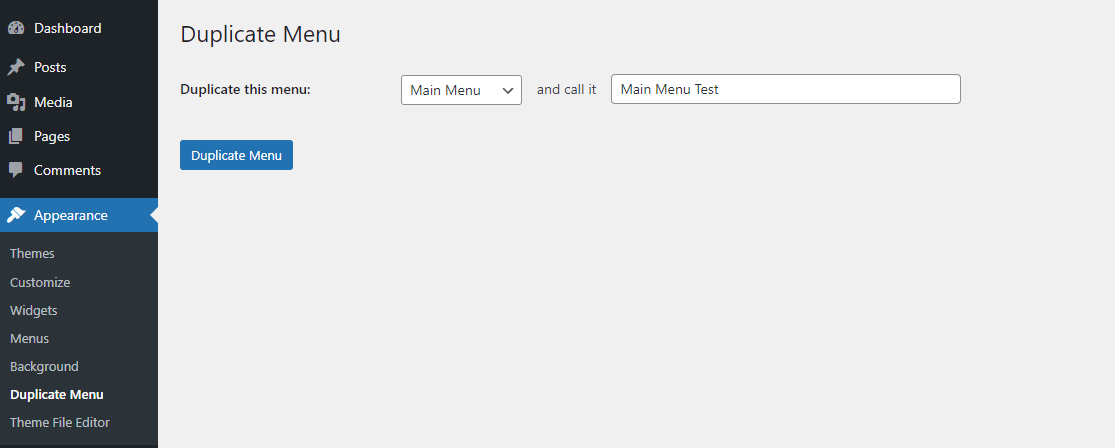
Classic theme
WordPress doesn’t come with this functionality by default, but you can do it with a simple plugin appropriately titled Duplicate Menu. Install it through the Plugins → Add New screen, and you’ll see a new page under the Appearance tab: Duplicate Menu.
Go here, and you’ll find a very simple screen prompting you to name your duplicate menu. Then, click Duplicate Menu.
This will only take a moment. Then you can jump right to your duplicated menu. Everything will be the same except for display locations, which will be blank as two menus can’t occupy the same space.
No visitors will be able to see your new menu until you set a display location or swap it out with the old menu. You’re free to do your work without worrying about breaking your visible site.
Block theme
Go to Appearance → Editor → Navigation, select the vertical ellipses, and click, “Duplicate”.
Can I add an image to a menu?
It’s not possible to add an image to your menu by default, but a plugin called Menu Image changes that.
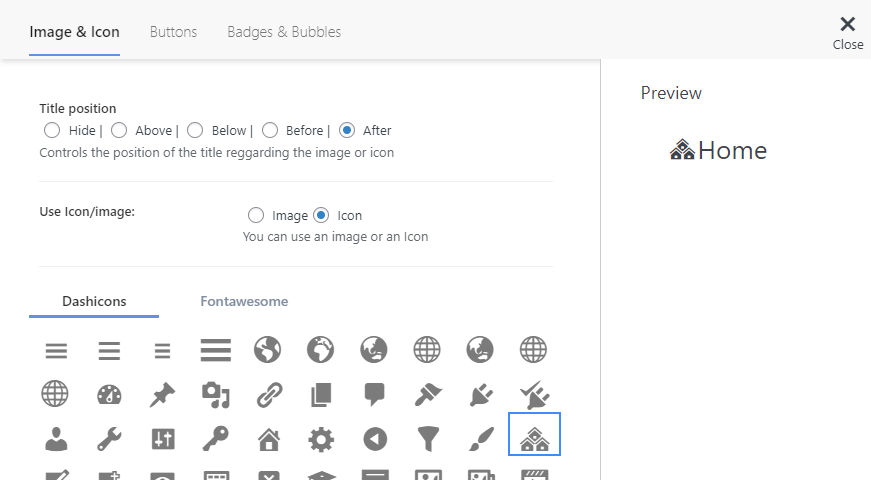
Install it through Plugins → Add New and notice the new Menu Image option in your sidebar. You can go here to set the menu image sizes. Back in Appearance → Menus, open up a menu item and click the new Add Image/Icon button.
Tweak the settings as you like. Click Image to upload an image or Icon to pick from icons. You’ll see a preview before you save.
Can I add a mega menu in WordPress?
If you want a menu with a ton of links, the default menu styling will end up looking very cluttered and unprofessional. Instead, you should create a mega menu for much neater customization.
Unfortunately, WordPress doesn’t support mega menus, so you’ll need to install a plugin like Max Mega Menu.
Install this using Plugins → Add New, and you’ll see a new Mega Menu option near the bottom of the sidebar.
To set it up, go to Mega Menu → Menu Locations and tick Enabled to turn it on. Then you can change the hover animations and menu behavior and even customize a theme in the Menu Themes tab.
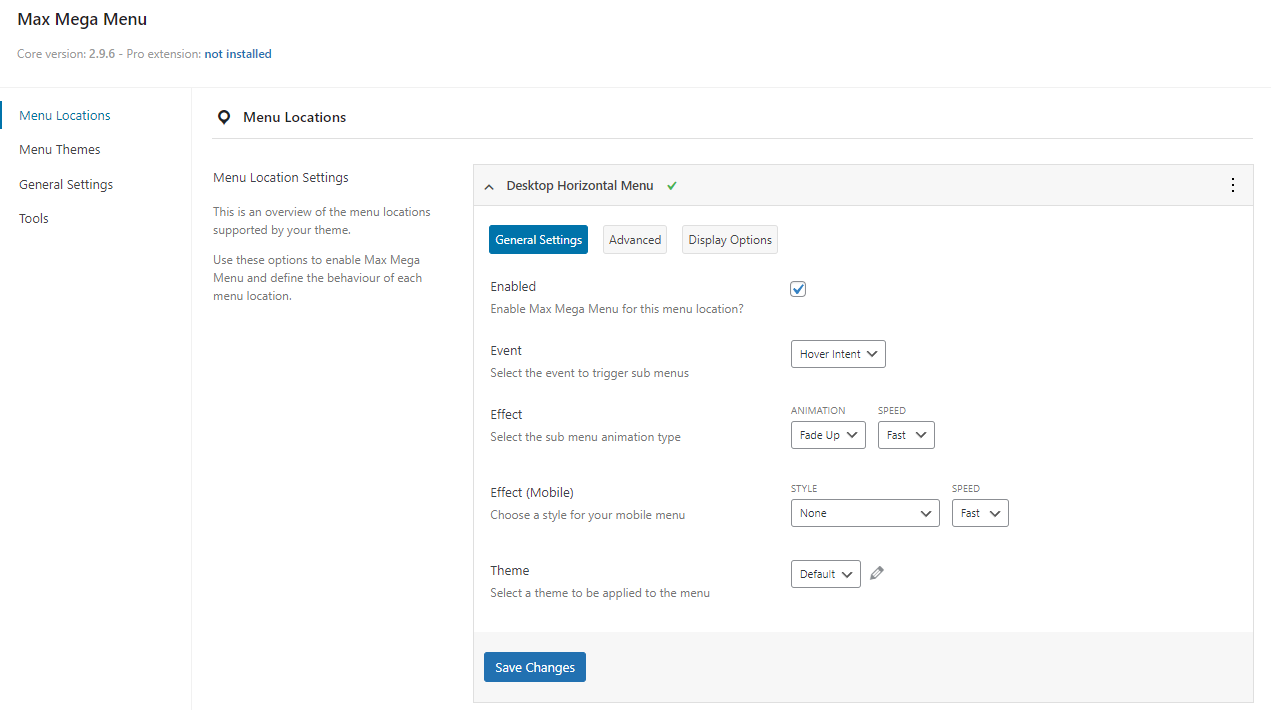
You can also access some of the basic Mega Menu features from the Appearance → Menus screen, where you’ll find a new Max Mega Menu Settings tab.
Can I add a JavaScript onclick event to my menu?
You can add JavaScript to your WordPress site by either editing your theme files or installing a plugin like Simple Custom CSS and JS.
Note: If you choose to edit the functions.php file directly, you should set up a child theme first How to Create a WordPress Child Theme. If your theme updates, all your custom scripts will be lost unless you’re using a child theme.
If you’re not sure how to target an individual menu item, try going to the Appearance → Menus page, open the Screen Options, then turn on CSS Classes. Add a class to the menu item, then target this class in your onclick event.
If you’re using the Mega Menu plugin, you’ll additionally need to go to Mega Menu → Menu Locations, select the menu you’re targeting, click Advanced, and turn off the Unbind JavaScript Events option. Just be careful doing this, as it can cause conflicts.
What happens to your menu if you switch themes?
You might be a bit concerned about switching to a new theme if you’ve put a lot of time into organizing your menu. Luckily, switching themes will leave your menu fully intact, whether you’re using a classic or block theme, so there’s no danger in doing so.
If your old menu has all of its old display locations unassigned, you’ll need to go set that up again. Just go to Appearance → Menus and the Manage Location tab, then reassign your menus back to where they belong.
Where are navigation menus located in the WordPress database?
Classic theme
If you need to edit your custom menus in the database for any reason, you can find it within the wp_posts table, within the menu_order field. Navigation menus are built as a custom post type, which is why you can find them there.
Block theme
When using the Navigation block, menus are stored in wp_posts using the wp_navigation post type.
How do I make my WordPress navigation menu sticky so it stays at the top?
To make your menu sticky, you need to use a small piece of Custom CSS code. First, find the unique CSS selector for your menu’s main navigation container.
You can do this using your browser’s Inspect tool. Then, go to the WordPress Customizer under Appearance → Customize → Additional CSS. Add your menu’s selector and apply the properties position: sticky; and top: 0;. This tells the browser to keep the menu fixed to the top of the viewport as the user scrolls down the page. Remember to add a background color to the menu so text does not scroll behind it.
What is the difference between a classic menu and a block navigation menu?
A classic menu is the traditional way to manage navigation through the Appearance → Menus screen in your WordPress dashboard. It is best for older themes and gives you a structured list-based interface.
A block navigation menu is the modern method used in block themes and the Site Editor. It lets you build and style your menu visually, right on the front end of your site. Block navigation is more flexible because you can add not just links, but also buttons, search bars, and other blocks directly into your menu without needing extra code.
What is the best way to structure a navigation menu for good user experience?
For a good user experience, keep your main navigation simple and clear. Limit the top-level menu to a maximum of seven items. This prevents overwhelming your visitors.
Use simple, descriptive words for your labels, such as “Services” or “Contact,” instead of confusing or internal jargon. Place your most important pages at the beginning of the menu (on the left) and less critical items, like “Contact,” at the end (on the right). A well-organized menu helps users find what they need quickly, which improves their experience on your site.
How do I add social media icons to my WordPress menu?
You can add social media icons to your menu using two main methods. The first is with a plugin that is specifically designed to add social icons. These plugins often give you simple options to place icons in your header or footer navigation.
The second method is to add the icons manually. In the menu editor, create a new “Custom Link” for each social profile. In the “Navigation Label” field, instead of text, you will insert an HTML tag for the icon or an icon font class, like those from Font Awesome. This requires some basic HTML knowledge.
Can I have a different navigation menu on different pages of my site?
Yes, you can display different menus on different pages. While WordPress does not offer this feature by default, you can achieve it with a plugin. Plugins like “Conditional Menus” allow you to set rules for where each menu appears.
For example, you can create one menu for your blog section and a completely different one for your store pages. You simply create your various menus under Appearance → Menus and then use the plugin’s settings to assign each one to specific pages, posts, categories, or other areas of your website based on your defined conditions.
How do I make my navigation menu accessible for screen readers?
To make your menu accessible, focus on clear structure and descriptive labels. Ensure every link’s text accurately describes its destination. For dropdown menus, use proper ARIA attributes in your theme’s code to tell screen readers that a menu item has a submenu and whether it is open or closed.
If you use icons without text, such as a hamburger menu icon, you must include screen-reader-only text that describes its function, such as “Open main menu.” Most modern, well-coded WordPress themes handle these technical accessibility requirements automatically for you.
A brand new navigation menu
WordPress enables you to build and customize navigation menus for your site, without having to install a plugin or use code. As your website grows in traffic, it becomes even more important to have an optimized menu to help visitors get around.
There are different ways to modify the WordPress navigation menu. If you use a classic theme, you can harness the power of the built-in menu editor. If you have a block theme, the Navigation block gives you more customization and styling options.
Before you make any significant changes to your website, you’ll want to back up your content in case something goes wrong. With Jetpack VaultPress Backup, you’ll get real-time cloud backups, easy restorations, and a 30-day activity log. Get started today!
