
You create a website, it starts to grow, and you establish a decent following. Then one day, you wake up to find it hacked. How did it happen?
Perhaps you weren’t using the right security tools or your website contained outdated plugins. Maybe you simply used a weak password.
In this guide, we’ll discuss the importance of security monitoring, and show you how to set it up on your WordPress site. We’ll also look at common cyber threats and how to respond to them. Finally, we’ll discuss some best practices for ongoing security.
So, let’s secure your site!
Why security monitoring is crucial for WordPress sites
WordPress powers more than 40 percent of the internet, making it one of the most widely-used content management systems. However, this doesn’t make it immune to cyberattacks.
Hackers like to exploit vulnerabilities in websites (often the result of outdated software) to steal data, inject malicious code, and disrupt business operations. If you’re targeted, you could lose sensitive, important information and suffer financial losses. A data breach could also damage your reputation.
When you implement security monitoring, you can detect threats early, prevent breaches, and ensure compliance with data protection regulations. This not only safeguards your website, but also builds trust with your visitors and customers.
Who needs to monitor their WordPress site?
Hackers can target any website, regardless of its size or type. Let’s look at some examples:
- Personal bloggers: While blogs may not always store sensitive data, they can still be targeted with spam or malware injections.
- Small business owners: Online stores, service providers, and local businesses handle customer transactions, so security should be a priority to prevent financial fraud.
- Corporations: Large organizations store customer and employee data, making them high-profile targets for hackers.
- Membership-based organizations: Websites with user accounts need robust security to prevent unauthorized access through login credentials.
So, security monitoring is essential for all websites. It helps you protect data, maintain smooth business operations, and prevent costly security incidents.
A step-by-step guide for setting up security monitoring
Now, let’s look at how to implement security monitoring. As you’ll see, you won’t need to hire an expert to get started. There are beginner-friendly tools that automate many tasks for you.
Step 1: Install a security plugin
A powerful security plugin is the backbone of WordPress security monitoring. It provides features like real-time threat scanning and firewall protection to keep your site safe while requiring minimal input from you.
When choosing the best security plugin for your site, consider the following factors:
- Comprehensive protection: Look for tools that include features like a malware scanner, a spam blocker, and a web application firewall (WAF).
- Real-time monitoring: Instant alerts help you react quickly to security threats.
- User-friendliness: A simple interface ensures that non-technical users can configure security settings without issues.
- Compatibility: The plugin should work seamlessly with your WordPress setup and other plugins on your site, like form builders.
- Regular updates: Frequent updates show that developers actively maintain the plugin to counter evolving threats.
- Recovery solutions: If the worst does happen, your plugin should have tools to help you fix issues and restore access quickly.
Jetpack Security offers all of the above. It’s an all-in-one security solution by Automattic, the people behind WordPress.com.
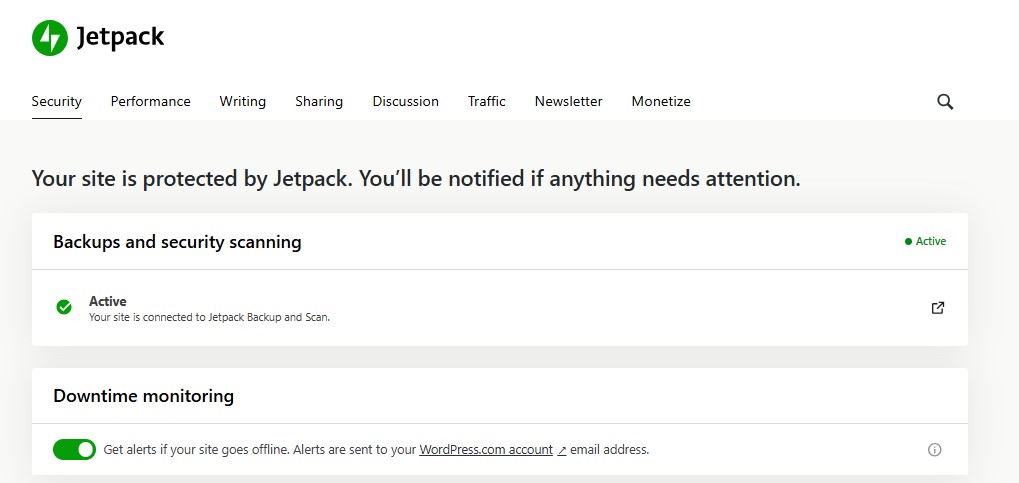
Jetpack includes real-time malware scanning, spam protection, downtime monitoring, up-to-the-minute, off-site backups, a firewall, and other essential security tools.
Plus, you don’t need to configure any of its features. Once you install the plugin, it will automatically start scanning your site for threats. You can also enable tools like downtime monitoring and a firewall using a toggle button.
Step 2: Set up a web application firewall (WAF)
A web application firewall filters incoming traffic and blocks malicious requests before they reach your website. It protects against different threats, including brute-force attacks, SQL injections, and cross-site scripting attacks (which we’ll cover later in the post).
Jetpack Security provides built-in firewall protection. You can enable it by navigating to Jetpack → Security in your dashboard.
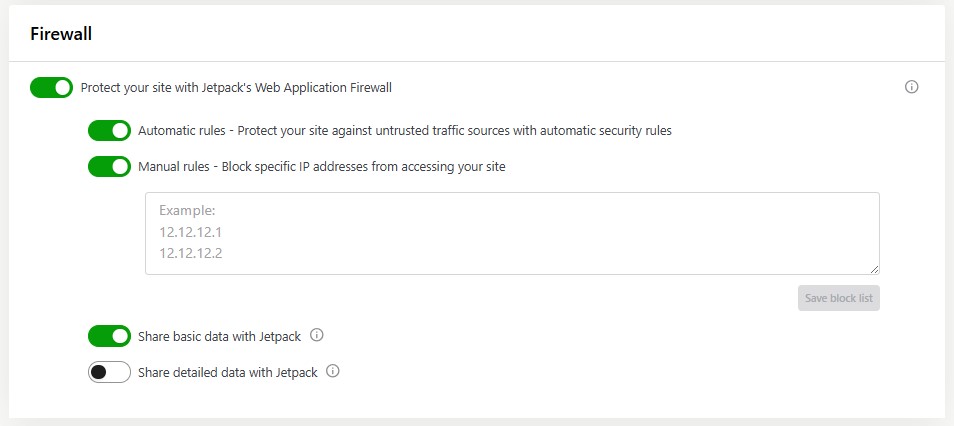
Jetpack’s firewall monitors traffic in real time and blocks any suspicious activity as it happens. However, you also have the option to block specific IP addresses. So, if there are any known harmful IPs, you can add them to the list.
Step 3: Implement automated malware scanning
Malware infections compromise your website’s security. This happens when hackers inject harmful content into your site, usually with the intent to steal user data.
Regular malware scanning helps detect and remove threats before they cause significant damage to your site and business.
Jetpack Security comes with automated malware scanning. It also suggests one-click fixes for many issues.
Step 4: Enable real-time backups
A backup is a lifesaver if your site gets hacked or compromised. Once you remove the threat, you’ll be able to restore your site to a recent, clean state.
Ideally, you should perform backups in real time and store them in an off-site location (somewhere different from your web host). With Jetpack Security, you’ll get automated real-time backups saved in a remote cloud location.
Every time you make a change to your site, even if it’s small, Jetpack will automatically save it. Jetpack also offers unlimited one-click restores so you can get back online without delay.
Step 5: Monitor activity logs and user accounts
Tracking user activity helps detect suspicious behavior. This may include failed login attempts, as well as unauthorized activities like new admin account creation, file modifications, and plugin and theme changes.
With Jetpack, you’ll have a 30-day activity log that lists actions taken on your site. It shows a timestamp for each event, as well as a description and who made that change.
So, if your site is breached or you notice suspicious activity, you can refer to the log and see which user action could be the root cause.
Step 6: Implement downtime monitoring
Unexpected website downtime can indicate security breaches or server issues. Jetpack Security lets you know instantly when your site is down.
You can enable downtime monitoring from Jetpack Security settings.
If you get a notification that your site is down, you can react quickly by contacting your web host (to see if this problem is on their end) and accessing the activity log (to see if your site was hacked or a user made a mistake).
Step 7: Perform regular security audits
Regular security audits ensure that your protection measures remain effective over time. They also help you detect potential weaknesses before attackers can exploit them.
Here are some key tasks for your audit:
- Review user roles and permissions.
- Scan for outdated plugins and themes.
- Check for unauthorized file changes.
- Test backup restoration to ensure it works properly.
Ideally, you’ll perform an audit every three to six months, depending on the size and nature of your website. For example, if you have a large online store or there are multiple users on your site, you’ll want to review your security measures more frequently.
Common security threats to WordPress sites
Understanding potential threats helps you manage your site’s security more effectively.
Malware and viruses
Malware and viruses are among the most common threats to WordPress sites. Hackers can inject malicious code into your website through vulnerabilities in plugins, themes, or outdated software.
Once infected, your site may display unwanted ads that redirect visitors to harmful sites or even allow their personal information to fall into the wrong hands. Plus, it can ruin your hard-earned reputation.
With malware scanning, you’ll be able to remove this harmful content before it’s too late.
Brute force attacks
Brute force attacks occur when hackers attempt to get into your WordPress dashboard by trying different username and password combinations. Typically, they use automated software that generates thousands of credentials in just a few minutes.
This is one instance when a firewall is useful. It can detect these suspicious attempts from the same IP address, and block the requests.
SQL injections
SQL injection attacks exploit vulnerabilities in poorly-coded plugins or themes. Hackers use them to manipulate your website’s database queries, leading to data theft or even a complete website takeover.
Implementing a firewall and keeping plugins updated helps prevent SQL injection attacks.
Cross-site scripting (XSS)
Cross-site scripting attacks involve injecting malicious scripts into your website’s pages. These scripts are designed to steal user data or manipulate website content.
To carry out these attacks, hackers typically target user input fields on forms, comment sections, or vulnerable plugins. Using secure tools that scan for XSS vulnerabilities will mitigate this risk.
Unauthorized access
Attackers often exploit weak passwords or unprotected admin accounts to get inside a WordPress site. If successful, they can modify files, steal sensitive data, or install malware.
To prevent unauthorized access, enforce strong password policies on your website. This means using long passwords that contain a mix of letters, numbers, and special characters.
You should also restrict user permissions (more on this later) and monitor admin activity logs for suspicious behavior.
How to respond to a WordPress security threat
Did your site get targeted? The first thing to do is stay calm.
Then, follow these steps:
- Quarantine the issue: Take your site offline if necessary.
- Scan for malware: Use a security plugin like Jetpack to identify infections.
- Restore a backup: Revert your website to a clean version.
- Update passwords: Change all administrator and user passwords on your website.
- Patch vulnerabilities: Update WordPress core, themes, and plugins if needed.
- Notify users: Inform affected users (including customers).
A website hack can be a scary experience. However, a security solution like Jetpack will help you navigate the problem more smoothly.
Best practices for ongoing WordPress security
So far, you know how to implement security monitoring using a tool like Jetpack. While this will help stop cyberattacks, there are things you can do to further protect your website and visitors.
Let’s look at some best practices for maintaining a secure WordPress site.
Keep WordPress, themes, and plugins updated
Outdated software is one of the main causes of security breaches. Hackers can exploit vulnerabilities in old versions of WordPress core, themes, and plugins to gain unauthorized access to your site.
Typically, developers release security patches when a vulnerability becomes known. Therefore, you’ll need to check your website for updates and run them straight away.
WordPress lets you enable auto-updates for themes and plugins.
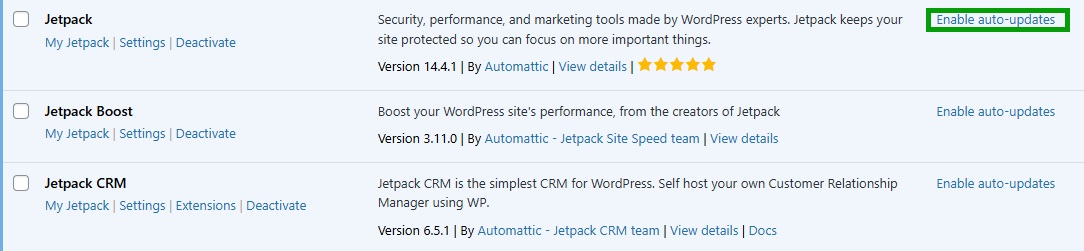
If you do this, you won’t have to worry about missing an important security update. After all, if you’re busy running a business or creating content, you might not always remember to check your website for updates.
Enforce strong password policies
Weak passwords pose a major security risk. Your passwords should contain a combination of uppercase and lowercase letters, numbers, and special characters.
If there are other people with access to your website (like authors or shop managers), you’ll want to make sure that they’re using strong passwords and remind them to change them every few months.
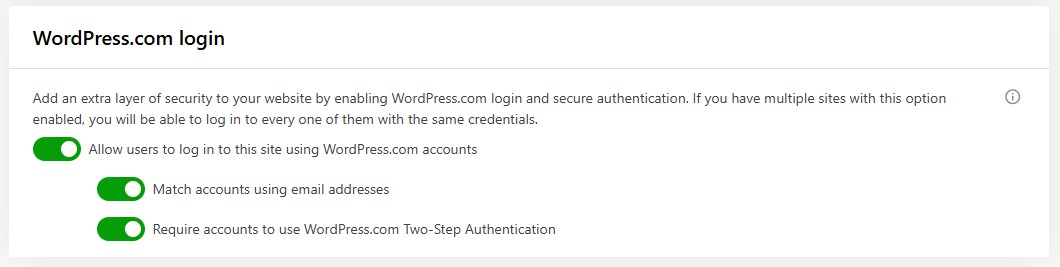
Additionally, you might want to consider implementing two-factor authentication (2FA). This adds a layer of protection by requiring users to verify their identity using a second factor, like a code sent to their inbox or mobile phone.
With Jetpack Security, you can require users to log in through WordPress.com and enforce the WordPress.com 2FA.
Assign appropriate user roles and permissions
As the site administrator, you can add new users and assign them roles. For instance, if you run an online magazine, you might assign the Editor and Author roles to your content team.
Each role has its own set of permissions. For example, editors and authors are able to create posts, but they cannot install plugins.
The administrator has full control over the website. Ideally, there should only be one person with this role (i.e. you).
Assigning appropriate roles and permissions minimizes the risk of unauthorized changes and data leaks. Try to practice the principle of least privilege by giving users the minimum level of access needed to perform their jobs.
Also review and adjust user roles as needed. For example, if a writer no longer works on your site, you should delete their accounts immediately.
Conduct periodic reviews of site security measures
Implementing the security measures discussed above is a good starting point. However, it’s important to regularly revisit them to ensure that they’re still effective (and sufficient).
Cyber threats evolve, and so should your security strategies. Periodic reviews help you detect outdated configurations and weak security settings.
For instance, you might need to add more IP addresses to the blocklist or implement another form of 2FA for added protection (like verification through the Google Authenticator app).
Frequently asked questions
What is WordPress security monitoring?
WordPress security monitoring is the ongoing practice of tracking high-signal security events (logins, file changes, malware detections, vulnerable plugins, and downtime) and alerting the right people quickly so threats can be contained and remediated.
How often should I run malware scans and vulnerability checks on WordPress?
For most sites, run automated malware scans daily, and run vulnerability checks at least daily as well. A plugin like Jetpack Security enables you to run automated real-time malware and vulnerability scans.
Which WordPress security monitoring tools do I need at a minimum?
At a minimum, you need five things. First, a way to track logins and key changes, often called an activity log. Second, a firewall that blocks common attacks before they reach WordPress. Third, malware scanning that can detect injected code and bad files. Fourth, automated backups stored off site. Fifth, downtime monitoring so you get a warning if the site goes offline.
You can use separate tools or one plugin like Jetpack Security that covers multiple areas. What matters most is that alerts are clear and you can act fast.
