
Whether you’re rebranding, switching to a different top-level domain (TLD), fixing a typo, or just prefer a new name, there are plenty of reasons to change your website’s domain name.
When making this change, it’s important to remember that your domain name impacts more than just branding and SEO (though those matter, too). It forms the backbone of your site’s entire linking structure. An error in the domain exchange process could lead to broken pages or database issues.
This guide will walk you through how to change your domain name safely. From preparation to post-move checks, you’ll learn what to do at each step to avoid common pitfalls and keep your site running smoothly.
TL;DR
- Back up files and database before changing a domain.
- Point the new domain’s DNS to the correct host and confirm SSL can be issued.
- Update WordPress Address and Site Address in Settings > General when the dashboard is accessible.
- Use database search and replace, WP-CLI, or a trusted migration tool to update internal URLs safely.
- Set 301 redirects from the old domain to the matching new URLs.
- Update hard-coded links, menus, forms, tracking tools, CDN settings, email sending domains, and plugin integrations.
- Add the new domain to Google Search Console, submit updated sitemaps, and file a change of address request on the old domain’s Search Console property.
- Test login, checkout, forms, media, redirects, SSL, and analytics after the change.
What to do before changing your domain name
Your website’s URL touches almost every part of your WordPress installation, from internal links to media files and database entries. For that reason, it’s good to take a few precautions before making the switch.
Go through the items below to make sure everything’s ready before changing your domain name.
Make a complete backup
There’s never a bad time to back up your website — but it’s a must-do before you change your domain name.
A complete, reliable backup gives you a safety net. If something goes wrong during the switch, you can restore your site quickly without losing any data.
Jetpack VaultPress Backup is a great tool to use. It provides real-time cloud backups specifically for WordPress sites, including WooCommerce stores. It automatically saves every change and stores your backups off-site, keeping your data safe even if your host runs into trouble.
To create a backup with Jetpack VaultPress Backup:
- Install and activate the Jetpack plugin on your WordPress installation.
- Connect your site to your WordPress.com account.
- Activate VaultPress Backup through the Jetpack dashboard.
- Follow the prompts to back up your website.
Always create a fresh backup before making major changes to your website. Even if you have a recently stored (or scheduled) backup, making one now ensures that you know exactly when your site was working and prevents any chance of lost data between time gaps.
Inform key stakeholders
Even if you run a small website, make sure to inform your team and visitors about the upcoming domain name change.
Letting people know in advance helps you:
- Set expectations for when the change will happen
- Ensure that users know they’ll need to access your site through the new domain
- Reduce confusion by explaining the reason for the switch
- Share alternate ways to get updates if anything goes wrong
- Avoid support tickets or urgent messages once the change goes live
If you still own your old domain, set up a redirect to the new site name. That way, anyone who visits the old URL still ends up in the right place.
A simple blog post, site banner, or email announcement does the job. It keeps everyone in the loop and helps the transition go more smoothly.
Choose the right time
Since user activity tends to fluctuate throughout the day, plan your domain change during a low-traffic period. Even if minor issues pop up, fewer visitors will experience them — especially if you’ve already communicated the upcoming change.
Use an activity monitoring plugin like Jetpack to track visitor patterns and identify the optimal time for the switch.
Finally, block off a few hours for maintenance rather than setting a specific time for the transition. This gives you the flexibility to handle any unexpected hiccups without rushing.
Steps to change your WordPress website’s domain name
After you’ve completed the prep work and reduced the risk of any disruptions, you’re ready to switch to your new domain. Follow each step carefully to ensure a successful transition.
1. Update domain settings at your hosting provider
The first step in changing your domain happens outside of WordPress — in your hosting and domain settings.
Register your new domain
If you haven’t already done so, register your new domain name. You must own the domain to make DNS changes and ensure your website appears when someone enters the URL. Technically, you could change your site’s domain to something like google.com (please don’t), but unless you own the domain, no one will be able to reach your site.
You can buy a domain through a domain registrar or directly through your hosting provider. Once you’ve registered it, you’ll need to connect it to your hosting account.
Add the new domain to your hosting account
- Log into your hosting control panel (such as cPanel, Plesk, or your host’s custom dashboard).
- Find the section labeled “Domains,” “Domain Manager,” or “Sites.”
- Add your new domain and point it to the folder where your WordPress installation lives.
This tells your host where to find your website files when someone visits the new domain.
Update DNS settings
- Open the DNS management area for your new domain (this may be through your registrar or hosting provider).
- Set the domain’s nameservers to match your hosting provider.
- If your host handles DNS, create an A record that points to your server’s IP address.
Your hosting provider should also provide detailed documentation on how to handle this process for your website.
Note: DNS changes can take anywhere from a few minutes to 48 hours to fully propagate across the internet.
Install an SSL certificate
Before changing the domain in WordPress, install an SSL certificate for the new domain. This prevents browsers from flagging your site as “not secure” once the switch is live.
Most reputable hosting providers offer free SSL certificates for all connected domains.
- Activate SSL through your hosting panel or contact support to help you set it up.
- If you need a paid SSL certificate, make sure to install it before moving forward.
Once you’ve registered the domain, updated your DNS, and secured it with SSL, you’re ready to make changes inside WordPress itself.
2. Update WordPress address settings
Once your new domain points to your WordPress installation’s root directory, head into your WordPress dashboard to make the switch official.
Update the site URL
- Using your old domain, log into your WordPress dashboard.
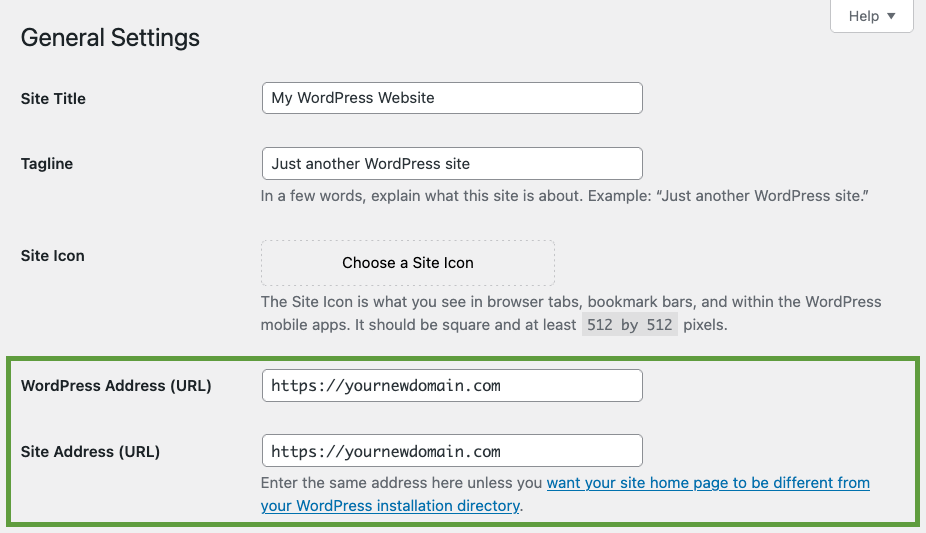
- In the left-hand menu, go to Settings → General.
- Locate the WordPress Address (URL) and Site Address (URL) fields.
- Replace both with your new domain, including https:// if you’ve already installed an SSL certificate.
- Scroll down and click Save Changes.
After saving, WordPress will log you out—and you might even see an error page. Don’t worry, that’s expected.
Your site now uses the new domain to direct traffic, so the old domain no longer works for logging in. Instead, access your admin dashboard using the new domain. For example: https://yournewdomain.com/wp-admin
Use the same username and password you had before. If you run into any issues or can’t log in, continue with the steps below to troubleshoot.
3. Update wp-config.php manually if necessary
If your site doesn’t log you out after updating your domain in the WordPress settings — or if the new domain’s login page doesn’t load — you can force WordPress to use the new domain by editing the wp-config.php file.
How to update wp-config.php:
- Connect to your server using an FTP client or your hosting control panel’s File Manager
- Navigate to your WordPress root folder (often public_html)
- Locate and open the wp-config.php file
- Just above the line that says /* That’s all, stop editing! */, add the following lines:
define('WP_HOME', 'https://yournewdomain.com');define('WP_SITEURL', 'https://yournewdomain.com');
- Save the file and refresh your site
This tells WordPress to use the new domain, even if the database still references the old one. Once everything loads correctly and you regain access, you can safely remove these two lines.
4. Update the database URLs
As mentioned earlier, your domain is woven throughout your WordPress database — from image paths to internal links and file references. Changing the domain name alone doesn’t update these embedded links, which can lead to broken images, missing pages, and other errors.
Thankfully, you don’t have to manually update each reference in your database. A plugin or a command-line tool can handle this task for you.
Option 1: Use a plugin (recommended for beginners)
One of the easiest ways to update your URLs is by using a plugin like Better Search Replace.
Here’s how to use it:
- Install and activate the Better Search Replace plugin
- Go to the plugin settings in your WordPress dashboard
- In the Search for field, enter your old domain (e.g.,
https://yourolddomain.com) - In the Replace with field, enter your new domain (e.g.,
https://yournewdomain.com). Be sure to include the full URL, includinghttps://orhttp://, to avoid missing any matches. - Enable the Dry Run or Test Run option first. This will show what changes the plugin plans to make without actually updating the database
- Once everything looks correct, run the full search and replace
Option 2: Use WP-CLI via SSH (Advanced)
If you prefer working in the terminal — or need to handle this on a larger site — you can use WP-CLI, the WordPress command-line interface.
This method is fast, but riskier. Only use it if you’re confident using the terminal, and make sure you have a full backup before running any commands.
Remember: Replace the URLs with your actual old and new domain names.
- Connect to your server via SSH
- Navigate to your WordPress installation (e.g., cd /home/username/public_html/)
- Preview the changes first (optional but recommended):
wp search-replace 'https://yourolddomain.com' 'https://yournewdomain.com' --dry-run
- Run the search and replace command:
wp search-replace 'https://yourolddomain.com' 'https://yournewdomain.com' --skip-columns=guid
The –skip-columns=guid flag prevents changes to the guid column in the database, which WordPress uses internally to track posts. Changing it can cause issues with feeds or post duplication.
Whether you use a plugin or the command line, updating your database URLs ensures your site works as expected on the new domain — without broken images, missing stylesheets, or redirect issues.
5. Update permalinks
Permalinks — short for “permanent links” — are the rules WordPress uses to structure URLs and route visitors to the correct content.
After changing your domain and updating URLs in the database (via a plugin or WP-CLI), WordPress may still rely on outdated rewrite rules stored in memory (like in the .htaccess file or internal cache).
If you don’t refresh these settings, you might encounter issues such as 404 errors, broken links, incorrect redirects, or even pages loading without proper styling.
Refreshing your permalinks clears the old rules and regenerates new ones, ensuring WordPress correctly recognizes and routes your updated URLs.
How to update your permalinks:
- In your WordPress dashboard, go to Settings → Permalinks.
- Click Save Changes without modifying any settings.
This action flushes the outdated permalink rules, ensuring that everything works properly across your posts, pages, and archive URLs.
6. Implement 301 redirects
Even if you notified users ahead of time about the domain change, some may have missed the message — or forgotten it. To make sure no one hits a dead end, you need to implement 301 redirects from your old domain to your new one. This ensures that users and search engines automatically land in the right place.
301 redirects are helpful for:
- Preserving your SEO rankings
- Avoiding broken links
- Maintaining a smooth user experience
Note: You must still own your old domain to set up redirects. If you no longer control it, you won’t be able to update its DNS or server settings, so these steps won’t apply.
Use your hosting control panel
Most hosts offer a built-in domain redirection tool. Look for it under sections such as “Domains” or “Manage Domains” in your hosting dashboard. Then:
- Select the old domain.
- Set the redirection target as your new domain.
- Confirm the redirect as a permanent (301) redirect.
Set up a 301 redirect via .htaccess (Apache servers only)
If your site runs on an Apache server and you still have access to your old domain’s files:
- Connect to your old site via FTP or use File Manager in your hosting control panel
- Open the .htaccess file located in the root directory
- Add this code at the top:
RewriteEngine OnRewriteCond %{HTTP_HOST} ^yourolddomain\.com$ [OR]RewriteCond %{HTTP_HOST} ^www\.yourolddomain\.com$RewriteRule (.*)$ https://yournewdomain.com/$1 [R=301,L]
4. Save and upload the updated .htaccess file
Not sure if you’re using Apache or how to access your .htaccess file? Reach out to your hosting provider for help — they’ll point you in the right direction.
7. Notify Google and other search engines
Once your website is running smoothly under the new domain, it’s time to notify search engines about the change. This should be your final step — you don’t want search engines crawling your updated pages before everything is in place. Broken links or unresolved issues can hurt your search engine rankings if discovered too early.
Update Google Search Console:
- Log into the Search Console property for your old domain.
- Use the Change of Address tool to notify Google of your domain move.
- If you haven’t already, create a new Search Console property for your new domain.
- Submit your updated XML sitemap through the new property to help Google reindex your pages quickly.
For Bing and other search engines, you’ll need to submit your new domain through their respective webmaster portals. Look for options like “Site Move” or “URL change” in their dashboards to guide you through the process.
Also, don’t forget about third-party analytics and SEO tools that rely on your old domain — including Google Analytics and SEMrush. Update your settings and properties on these platforms to ensure accurate tracking and data continuity after the switch.
Post-change checklist
You’re almost at the finish line, but before you announce that site maintenance is complete, take time to double-check your work. A quick quality assurance (QA) review helps you catch small issues that could affect your visitors or SEO.
Here’s a checklist to go through before you officially wrap things up:
| Task | What to check | What to do |
| Test your website thoroughly | Visit your homepage, internal pages, blog posts, and forms. Make sure everything loads and functions properly. | Use Broken Link Checker or similar tools to catch broken links. |
| Check internal links and media | Review menus, sidebars, footers, embedded images, and hard-coded links. | Some plugins auto-update links, but always double-check manually. |
| Update external references | Social media bios, email signatures, and online listings with your website link. | Be consistent across all platforms to avoid confusion. |
| Update third-party integrations | Payment gateways, email marketing tools, CRMs, automation services. | Log in to each service and update domain settings. |
| Monitor traffic and SEO | Keep an eye on traffic drops, crawl errors, and uptime. | Use Google Analytics, Google Search Console, and uptime monitors like Jetpack Security. |
If you notice anything unusual during your checks — from broken links to traffic dips — address it right away. Catching issues early makes them easier to fix and prevents long-term damage to your site’s performance or search rankings.
Common mistakes to avoid
Whether the change is a single letter or a full rebrand, updating your domain is a major shift for your website. Avoid these common pitfalls by planning ahead and moving carefully through the process:
- Skipping backups: Always create a full backup so you can restore your site if something goes wrong.
- Neglecting redirects: Set up 301 redirects to keep traffic flowing and preserve your search engine rankings.
- Not updating your SSL certificate: Make sure your SSL certificate works on the new domain to avoid browser security warnings.
- Missing link updates: Update all internal links and references to prevent confusion and SEO issues.
- Failing to communicate: Let users and stakeholders know about the change to maintain trust and reduce surprises.
Closing thoughts on changing your WordPress domain name
On the surface, changing your domain name might seem straightforward — but in practice, it’s more like changing your home’s street name. Your website may still live on the same server, but unless people (and search engines) know where to find you, you’ll lose traffic fast.
To ensure a smooth transition, take your time, focus on the details, and keep your users in the loop. If anything goes sideways, your hosting provider can help get things back on track.
Handled correctly, a domain name change won’t just avoid issues — it can boost your SEO, clarify your brand, and set your site up for long-term success.
