
If you run a business that takes appointments, reservations, or event sign-ups, a booking form with a built-in calendar is one of the easiest ways to cut down on back-and-forth emails. Instead of asking people to call or message you, visitors can see your availability, pick a date, and confirm their booking directly on your WordPress site.
In this guide, you’ll learn how to create a free, no-code WordPress booking form using Jetpack Forms. We’ll walk through adding a calendar date picker, customizing your fields, connecting email notifications, and even embedding a Calendly scheduling widget for more advanced appointment management — all in under five minutes.
What is a booking form in WordPress?
A booking form enables you to accept reservations, appointments, or event registrations directly through your WordPress site. Typically, it includes the following:
- User information fields: Like name, email, and phone number
- Calendar date field: For choosing appointment dates
- Confirmation messages: To reassure customers that their booking went through
- Email notifications: So you get alerted when a new booking is made
A solid booking form eliminates confusion, reduces admin work, and ensures a smooth booking process for your business. For example, you can avoid double bookings by letting clients pick available slots.
If you’re organizing an event, a booking form enables you to track RSVPs more easily and let people know when only a few tickets remain. Or if you’re a freelance consultant, you can set up a booking form to schedule calls.
Essential features to look for in a booking form plugin
There are several form plugins out there, but you need to ensure that you choose the right one for your website. Here are the key features to consider:
- Date selection via a calendar: A simple, interactive date picker makes your form more user-friendly. Instead of typing dates manually, users can visually select their preferred day and reduce the risk of errors and scheduling mishaps.
- User information fields: Of course, the booking form plugin should offer the basics, including name and email fields. This way, you’ll know who your clients are, and you’ll also be able to contact them regarding their booking.
- Confirmation notification: A confirmation message lets users know that their booking went through successfully. This means they won’t have to email or call you to make sure they’ve booked.
- Customizable form fields: You may want to add more fields to your form, like phone numbers, preferred times, and special requests. So, you’ll want a plugin that enables you to create custom fields for your unique needs.
- Spam protection: When you publish any form on your site, you’ll likely get bot submissions. So, choose a plugin with spam filtering to keep your inbox clean.
- Email notifications: You should receive an instant notification when a booking is made, so you can adjust your schedule accordingly and prevent missed appointments.
You’ll also want a plugin that’s easy to use. Ideally, it should integrate with the block editor so you can build your forms within a familiar interface.
Why Jetpack is the best plugin to build booking forms
If you’re looking for a free, powerful, and beginner-friendly option, Jetpack Forms is the right plugin for you.
Created by Automattic, the same people behind WordPress.com, this plugin integrates right into the block editor, so you can create your booking forms on any page or post. It offers an easy-to-use date picker field and calendar field for your booking and scheduling needs.
Plus, it comes with a free Calendly block for advanced scheduling, like availability syncing and time zone adjustments. You’ll also benefit from:
- An AI assistant: You can simply describe the form you want, and the Jetpack AI assistant will generate it instantly.
- Customizable form fields: Add name and email fields, text boxes, dropdowns, and more, and customize them to align with your site’s design.
- Built-in spam protection: Jetpack integrates with Akismet, which automatically filters your submissions and blocks spam.
- Email notifications upon form submission: You’ll immediately receive an email when a visitor submits a form. The email also includes a summary of their input.
Finally, Jetpack Forms is fully responsive. This means that your booking forms will look good on all devices, and visitors will also be able to make bookings through their mobile phones.
How to create a WordPress booking form in less than five minutes
Now, let’s look at how to create a WordPress booking form with Jetpack Forms. We’ll cover two methods, which are both user-friendly and will help you get your form up and running in just a few minutes.
Before you get started, you’ll need to install the main Jetpack plugin. Go to your WordPress dashboard, click on Plugins → Add Plugin, and look for “Jetpack – WP Security, Backup, Speed, & Growth” in the search bar.
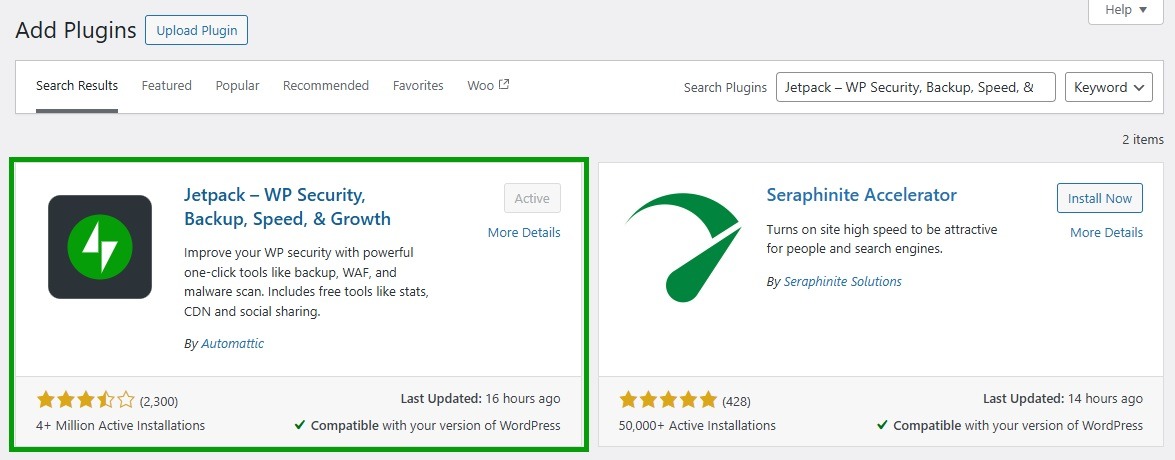
Select Install Now and Activate. Then, connect to your WordPress.com account, or create one for free.
Once you’ve activated the plugin, you’ll instantly have access to Jetpack Forms.
Option one (free): Build your booking form with Jetpack Forms
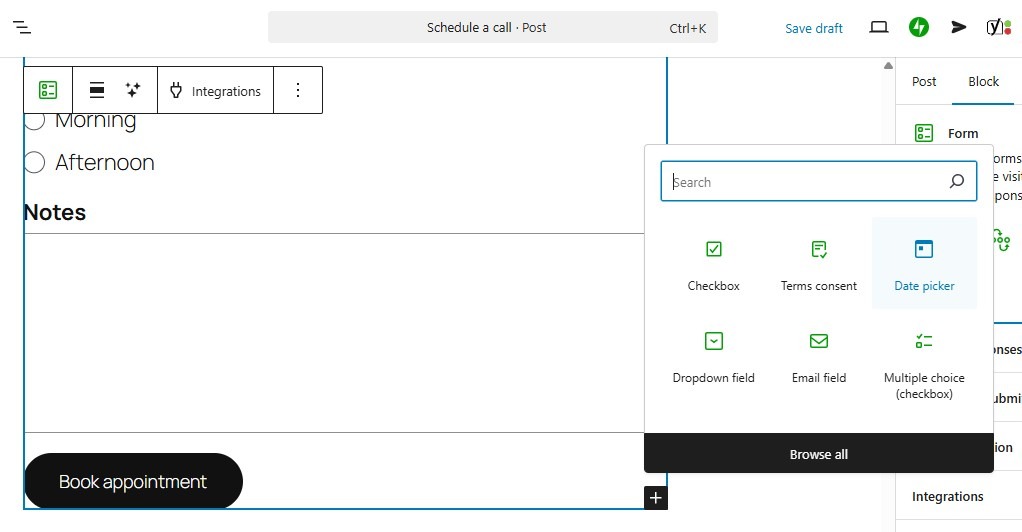
Open the page where you want to publish your booking form and click on the plus (+) icon to add a new block. Choose the Form block.
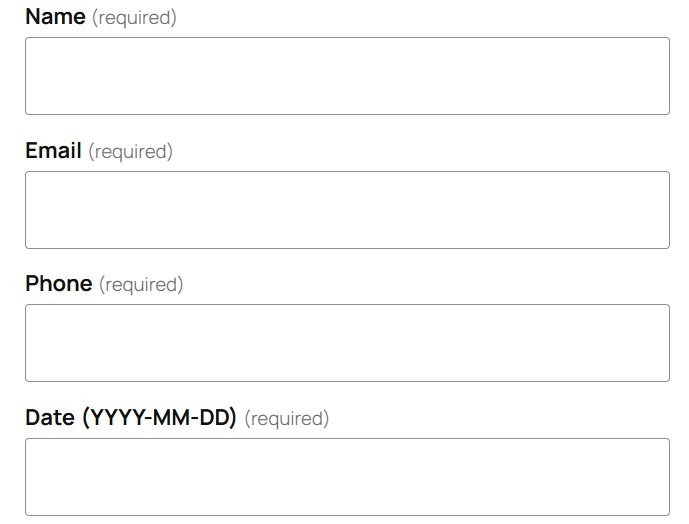
Jetpack makes things easier for you with a selection of pre-made forms. As you can see, there’s an Appointment Form template that you can use if you’d like.
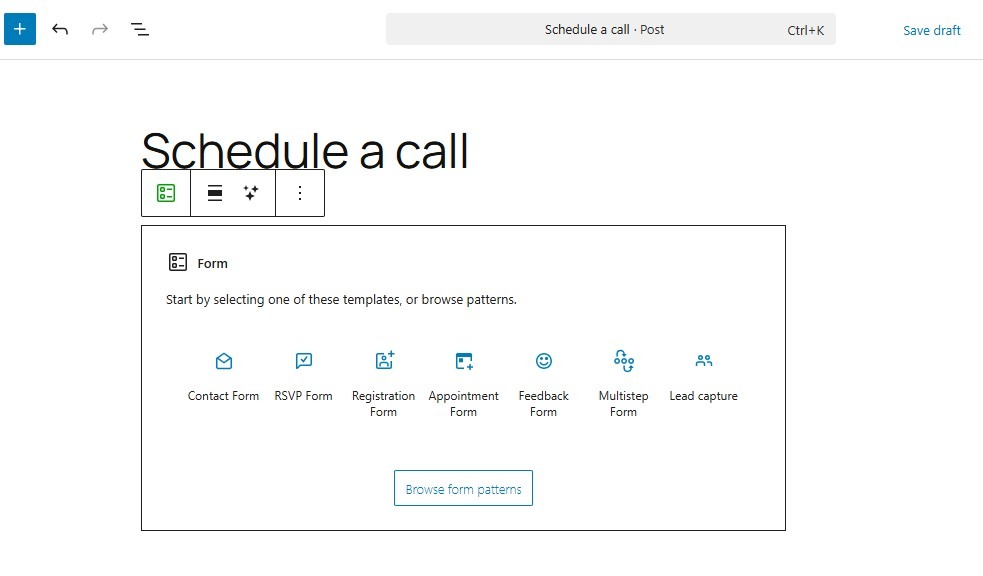
This comes with essential fields like name, email, and phone number. There’s also a date picker field.
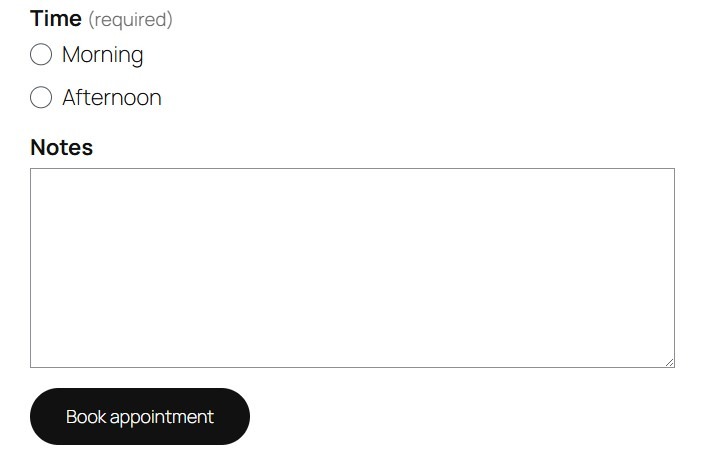
Plus, visitors can choose a time and add any requests or information in the Notes field.
If you chose another template, or you decided to create the form from scratch, you can simply add the date picker yourself.
Just select the form, then click to add a new block and select Date Picker.
Alternatively, you can ask the AI Assistant to add this field for you.

If you preview the form on the front end, you’ll see that visitors will be able to pick a date from a calendar.
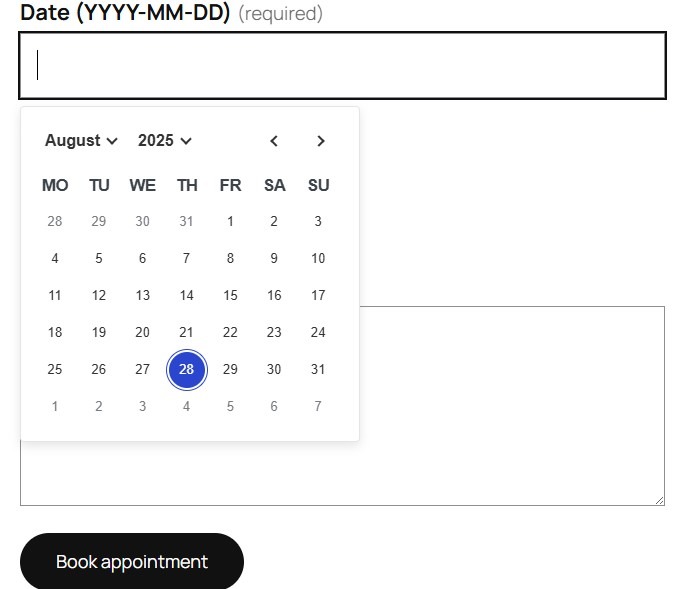
You can also change the format of the date. Select the Date Picker field, then use the settings on the right.
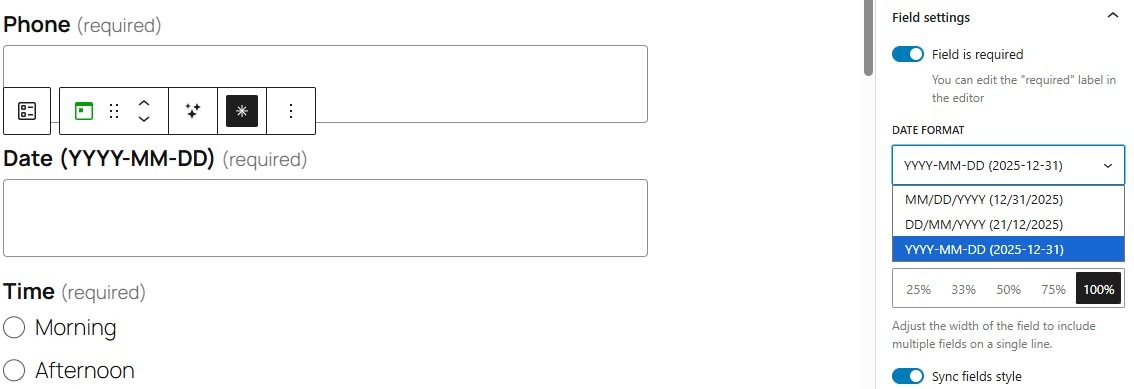
Of course, make sure that the field is set to Required. This will ensure that all visitors will choose a date.
Feel free to add, remove, and edit fields as needed. You can also customize the button.
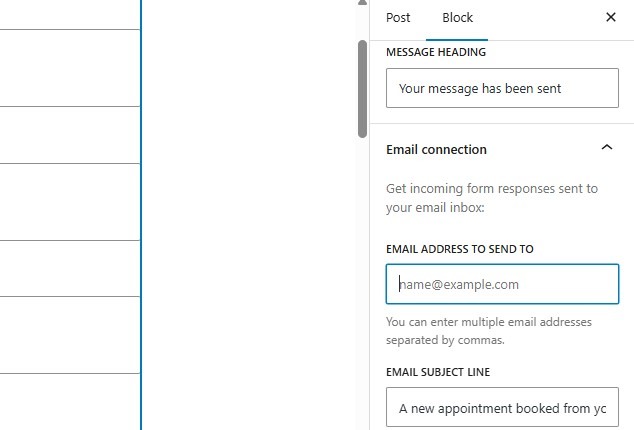
If you select the form and navigate to the settings on the right, you can edit the confirmation message in the Action after submit section. This will be displayed to visitors once they submit a form.
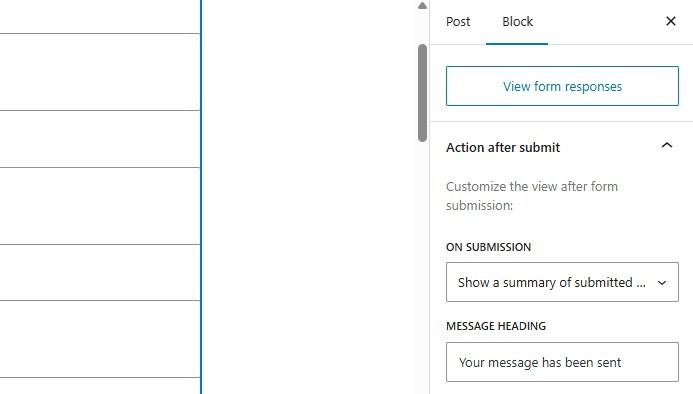
From the On Submission menu, choose what you want to see in your email notification.
Now, if you go to the Email connection section, you can enter the email address that submissions will be sent to, and create a custom subject line.
Once you’ve finished your form, go ahead and publish it. Then, make a few test submissions to ensure that everything is working correctly.
Note: The basic Date Picker field allows clients to request a date. To prevent double-bookings automatically (where two clients book the same slot), we recommend using the Calendly integration described in Option 2 below.
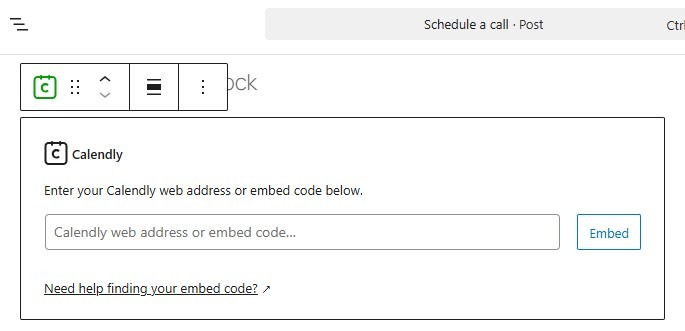
Option two (free): Use the Jetpack Calendly block for advanced scheduling
If you use Calendly for online meetings, you’ll be pleased to know that Jetpack offers a Calendly block. If you don’t already use this scheduling tool, you can create an account for free.
Display the Calendly block as a full calendar, button, or pop-up. Simply add it to your page, then enter your Calendly link (which you’ll find in your account).
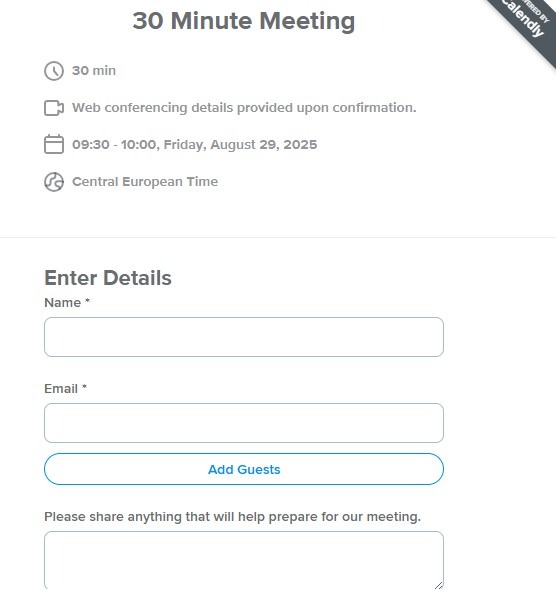
Here’s what the calendar looks like on the front end:
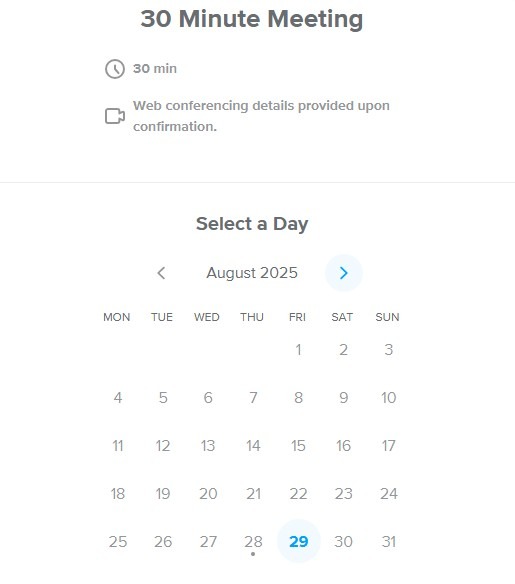
Once a visitor selects a day and time, they’ll be asked to enter their details.
So, if you’re using the Calendly block, you won’t need to have a booking form on the same page. Every appointment will be synced with your Calendly account.
Best practices for WordPress booking forms
Now that you know how to create a booking form in WordPress, let’s discuss some best practices to make sure it’s user-friendly.
1. Keep the form concise: ask only what you need
When designing your WordPress booking form, you’ll want to only ask for information that’s absolutely necessary. Long forms can overwhelm visitors and discourage them from completing their booking.
So, focus on the essentials like name, email, and booking date. If you want to collect additional information, make it optional to avoid creating friction for users.
For example, you might enable visitors to supply relevant information, like allergies or accessibility needs.
2. Use clear labels and instructions
You’ll also want to make sure that the booking form has clear labels for all fields. Instead of vague names like “Message” or “Info,” use specific labels such as “Preferred Date,” “Email Address,” or “Additional Notes.” This makes it easy for users to understand exactly what information is required, reducing errors and confusion.
Also, if you’re using dropdown fields or options, add clear instructions like “Choose between X and Y” or “Select a location.”
3. Optimize font size and color contrasts for accessibility
It’s important that your booking form is accessible to all visitors, including those with visual impairments or other disabilities. Use readable font sizes, sufficient color contrast, and screen-reader-friendly labels.
When customizing colors for your blocks, WordPress will let you know if your selected options make it difficult to read the text.
4. Submit test bookings to verify functionality
Before going live, submit a few test bookings to verify that every part of your form works correctly. Check email notifications, confirmation messages, the date picker, and other fields.
This will help you catch issues early and provide a seamless booking experience.
5. Create compelling button text (such as “Book My Spot”)
The submit button is a key element of your booking form. Instead of using generic text like “Submit,” choose compelling and action-oriented phrases like “Book My Spot,” “Reserve Now,” or “Schedule Your Appointment.”
These calls to action encourage visitors to complete their booking.
6. Add social proof and testimonials near the form
It’s also a good idea to place testimonials or reviews near your booking form. Trust signals reassure visitors that your business is reliable, and can therefore increase form submissions and reduce hesitation.
For instance, if you offer coaching sessions, you might include quotes from previous clients that attest to your expertise. Similarly, if you run a salon, you might display your Google reviews on the booking form page.
Frequently asked questions (FAQ)
Finally, let’s answer some frequently asked questions about adding a booking form in WordPress.
What is the easiest way to add a booking form to a WordPress website?
You can easily add a booking form to WordPress using Jetpack Forms. This plugin is free and simple to set up. It integrates with the block editor and includes a calendar date picker for bookings.
Can I create a booking form in WordPress without using any code?
Yes, Jetpack Forms enables you to build booking forms entirely via the block editor, no coding required. Plus, it comes with pre-made templates for appointment and RSVP forms, which you can customize with the block settings.
What information should I include in a basic booking form?
At a minimum, you’ll want to collect the user’s name, email address, and desired booking date. Depending on your needs, you might also ask for a phone number, in case you need to get in touch with them urgently.
If you need to know information about allergies, dietary requirements, or accessibility, you might also include a field where visitors can supply this information.
How can I prevent spam on my WordPress booking form?
Jetpack Forms offers built-in spam protection by integrating with Akismet. This powerful tool filters out spammy submissions in the background, without interrupting the user experience.
You can enable it from Jetpack → Forms → Integrations in your WordPress dashboard.
Is the Date Picker field in Jetpack Forms free to use?
Yes, it’s included for free with Jetpack Forms. You can simply add the field to the form as a block, then choose your preferred date format. If you select the Appointment Form template, this field is already included in the form.
Can Jetpack Forms send email notifications after form submission?
Yes. You’ll receive an email whenever someone books through your form. Just remember to add your email address in the form settings. You can choose to receive a summary of the customer’s responses with the email notification.
How do I accept online payments from my WordPress booking form?
To accept payments, you need to add a payment step on or around the booking form, not just collect dates and names. The easiest path is to use a payment block or a plugin that supports Stripe or PayPal, then place this near your booking form.
You can ask users to pay a deposit or the full amount when they submit the request. Make sure your confirmation email mentions what has been paid and what is still due. Always test the payment flow in a sandbox or test mode before you go live.
How do I make my WordPress booking form GDPR friendly and respect user privacy?
To make your booking form GDPR friendly, you should collect only the data you truly need, such as name, email, and booking details. Add a short privacy notice near the form that explains how you store and use the data, and link to your full privacy policy.
Many sites also add a required checkbox where users confirm they agree to the policy. Make sure emails and form entries are stored securely, with limited access for staff. If users ask to see or delete their data, have a simple process ready to respond.
How should I test my WordPress booking form before making it live for customers?
You should always test your booking form as if you were a new visitor who knows nothing about your business. Use an incognito browser window, fill in the form with test data, and follow the full path from the form to email and any calendar or payment steps.
Check spelling, labels, and error messages, and see if you understand what to do without guessing. Ask a friend or team member to repeat the test on a different device. Only after you fix every issue should you promote the booking page.
Where is the best place to put a booking form on my WordPress site for more bookings?
The booking form should be easy to find and not buried under many clicks, or people will give up before they finish. Most service sites place a short booking form or a strong “Book now” button on the main services page and on the homepage.
You can also add the form or a link to it in your header, footer, and contact page. Make sure the page has a clear headline, a short description of what users are booking, and any key rules such as cancellation or rescheduling. This reduces confusion and support emails.
