
Adding a contact form to your WordPress site provides visitors with an easy way to get in touch. They don’t have to leave your site, dial a phone number, copy an email address, or do anything else. Plus, it gives you an opportunity to communicate with prospects while keeping personal information private.
There are different plugins you can use to add a contact form to your WordPress site. Some of them, like Jetpack Forms, come with pre-made templates and optional AI capabilities to make the process easier and quicker.
In this guide, we’ll show you everything you need to know about contact forms, including how to create them, embed them, and secure them.
Why adding a contact form to your WordPress site is a good idea
There are a few reasons you might want to add a contact form to your WordPress site. Here are some of the most common ones:
- It helps keep your email address private. By having a contact form, you don’t have to publicly share your email address. This can help cut down on spam emails.
- It’s more user-friendly than an email link. Many people are hesitant to click on email links because they don’t want to go through the trouble of opening and using an email client. Plus, if they’re not super familiar with your site, they might not want to click on unknown links for fear of being directed to less-than-friendly sites. With a contact form, they can send a message quickly and safely.
- It looks more professional than an email link. If you’re running a business website, you’ll want to come across as professional. Having a contact form can help with that.
- It offers spam protection. You can add contact form spam protection to cut down on the amount of unwanted submissions you receive.
- It aids in lead generation. If you’re looking to generate leads, provide several easy ways for people to reach out. A contact form is a top choice for many users, and you can offer something in exchange for their contact information, like an eBook or white paper.
Now that you know why having a contact form is a good idea, let’s take a look at how to create one.
Choosing the right WordPress contact form plugin
While there are many excellent form plugins available, the best choice depends on your specific needs for ease of use, security, and advanced features. Here’s how the top contenders stack up:
Here are a few of the most popular options:
- Jetpack Forms: This integrates directly with the block editor, enabling you to quickly add a contact form on any page. It also comes with access to an AI assistant to help you customize fields and other form components more easily.
- Contact Form 7: This is one of the most popular contact form plugins for WordPress. It’s free and easy to use, with a simple interface that allows you to create complex forms with just a few clicks.
- Gravity Forms: Gravity Forms is a premium plugin that offers a great deal of flexibility when customizing forms. It’s perfect for creating forms with multiple steps, such as order forms or surveys.
- WPForms: WPForms is another popular contact form plugin that boasts an easy-to-use drag-and-drop interface. With this tool, you can create intricate forms without having to write any code.
| Feature | Jetpack Forms | WPForms | Contact Form 7 | Gravity Forms |
| Best For | Beginners & existing Jetpack users wanting simplicity and AI assistance. | Users who need a balance of power and a user-friendly drag-and-drop builder. | Developers who want a free, customizable (but less intuitive) solution. | Businesses needing features like conditional logic, surveys, and payments. |
| Ease of Use | Excellent (integrates with block editor, AI-powered) | Good (drag-and-drop builder) | Moderate (requires shortcodes and manual setup) | Good (powerful but with a learning curve) |
| Spam Protection | Excellent (integrates with Akismet out of the box) | Good (integrates with Akismet) | Basic (requires other plugins for robust protection) | Good (includes honeypot and reCAPTCHA support) |
| Pricing | Free (included with Jetpack Core) | Freemium (Lite version is free, Pro starts at $49.50/year) | 100% Free | Premium only (starts at $59/year) |
For most WordPress users who value a seamless, secure, and intelligent form-building experience without leaving the native block editor, Jetpack Forms is the ideal starting point. It’s built and maintained by the same team behind WordPress.com, ensuring top-tier compatibility and security.
With Jetpack Forms, you won’t have to create and configure fields manually. You can just give written instructions to the AI Assistant and it will do the work for you.
Plus, you can customize the design of the form and its components from the familiar interface of the block editor.
Let’s walk through how to set it up.
How to create a WordPress contact form with a plugin
Let’s look at how to create a contact form with the plugin Jetpack Forms.
1. Install and activate Jetpack
First, you’ll need to install and activate the Jetpack plugin. To do this, head over to your WordPress dashboard and navigate to Plugins → Add New.
In the search bar, type in “Jetpack,” and look for “Jetpack – WP Security, Backup, Speed, & Growth.” Click on Install Now, then Activate.

Once you’ve activated the plugin, you’ll be prompted to connect it to your WordPress.com account. If you don’t have an account yet, don’t worry — you can create one for free.
2. Create a contact form
Once you have Jetpack installed and activated, creating a contact form is easy. Simply navigate to Pages → Add New in your WordPress dashboard to get started, or open an existing page.
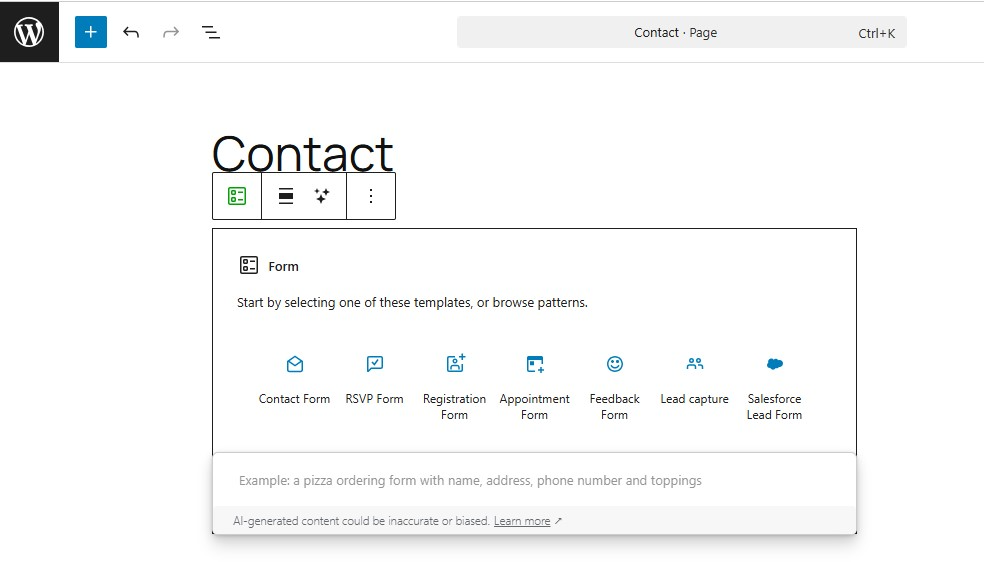
In the block editor, click on the (+) symbol and look for “Form.” Add the block to the page, and you’ll see a selection of templates that you can use, which include:
- Contact Form
- Newsletter Sign-up
- RSVP Form
- Registration Form
- Appointment Form
- Feedback Form
- Lead Capture
In this case, you’ll need to select the contact form template:
Jetpack will now add the form to your page:

This is just a template, but you can customize it with the AI Assistant and the block settings. We’ll show you how in the next steps.
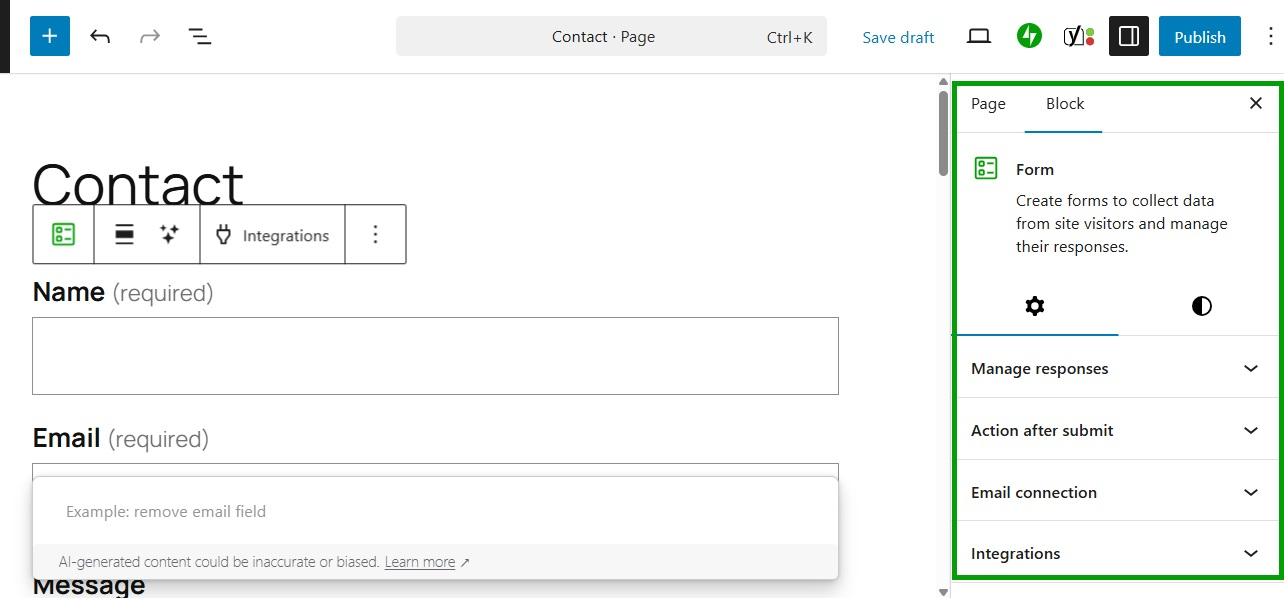
3. Configure your contact form settings
Once you add the form, you’ll need to configure some settings. Select the form, then navigate to the panel on the right. Here, you’ll find several options:
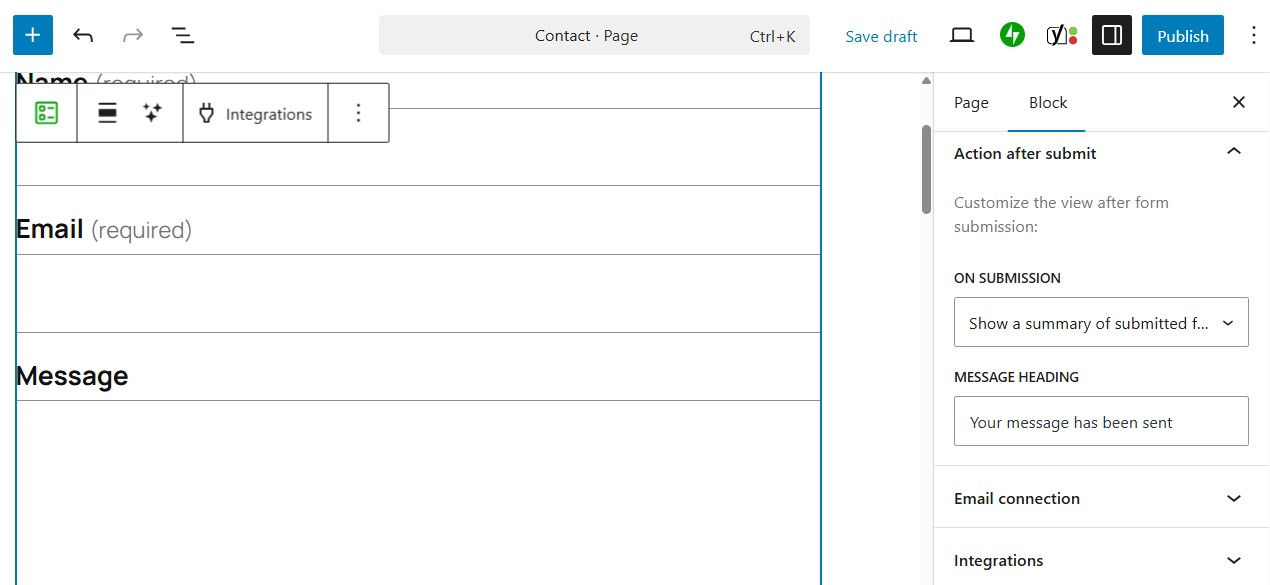
For example, if you click on Action after submit, you can decide what happens when a visitor submits a form. You might show a summary of their entries and write a custom message:
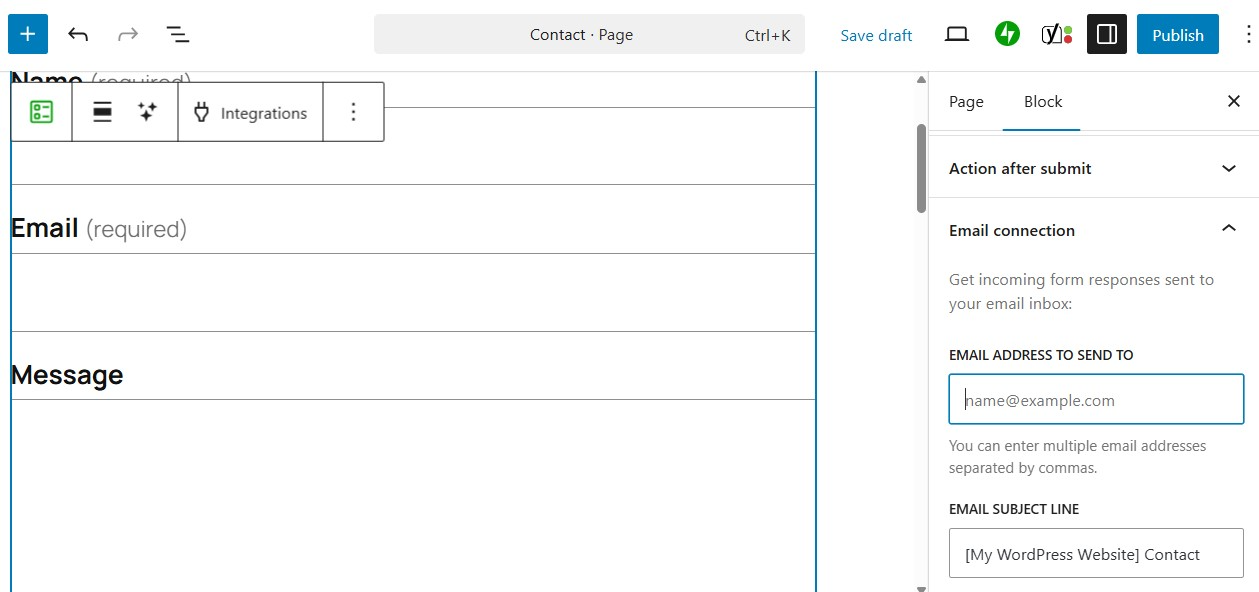
If you go to Email connection, you can enter the email address that should receive submissions.
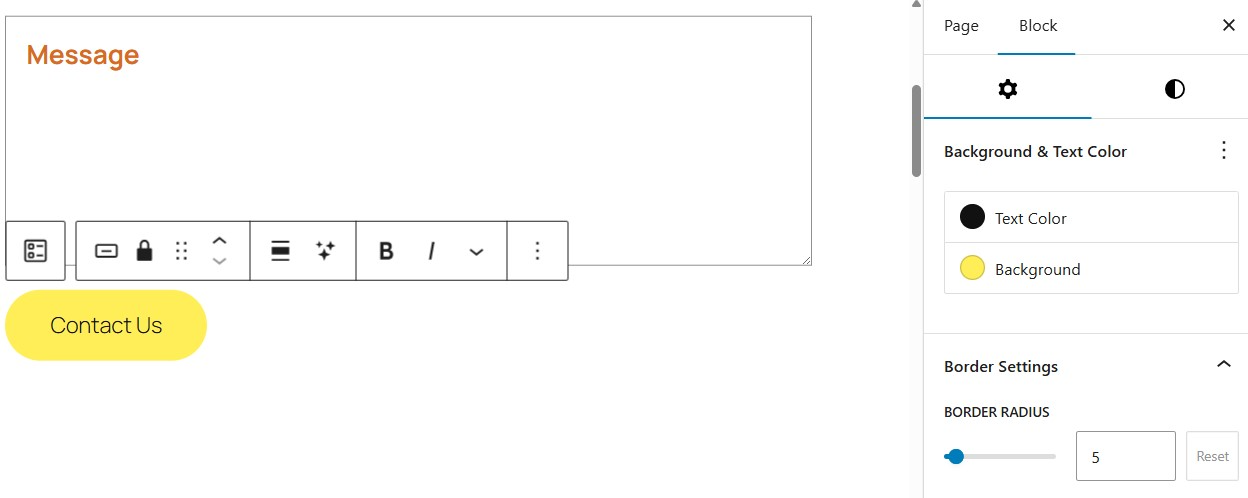
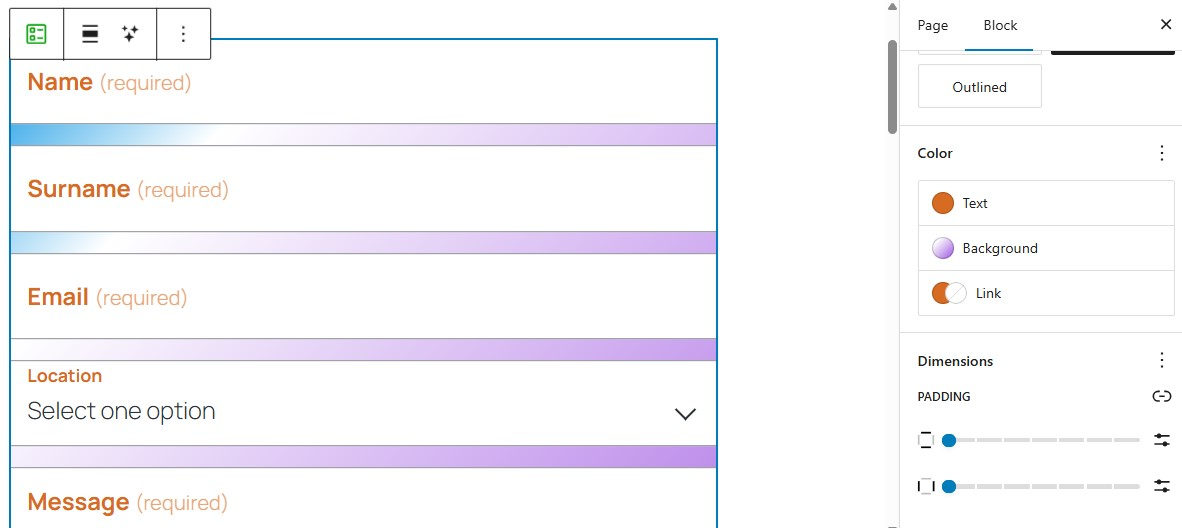
Now, go to the Styles tab to customize the design of the form. For instance, you might change the colors of the field labels.

You can even edit individual elements of the contact form. For instance, select the button to customize its background and text colors, width, and more.
You can do the same thing with individual fields in the form. Just select the field and customize it using the settings on the right.
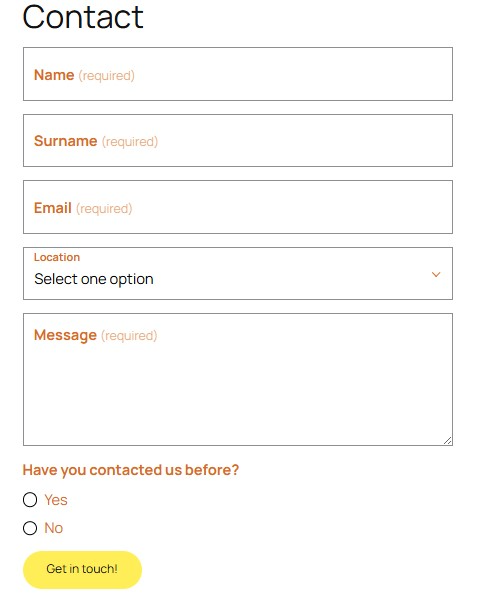
4. Choose which fields you want to include in your contact form
As you might have noticed, the contact form comes with three fields: name, email, and message. However, you can add and remove fields as needed.
The quickest way to do this is with the Jetpack AI Assistant. Select the form and click on the AI Assistant icon in the toolbar.
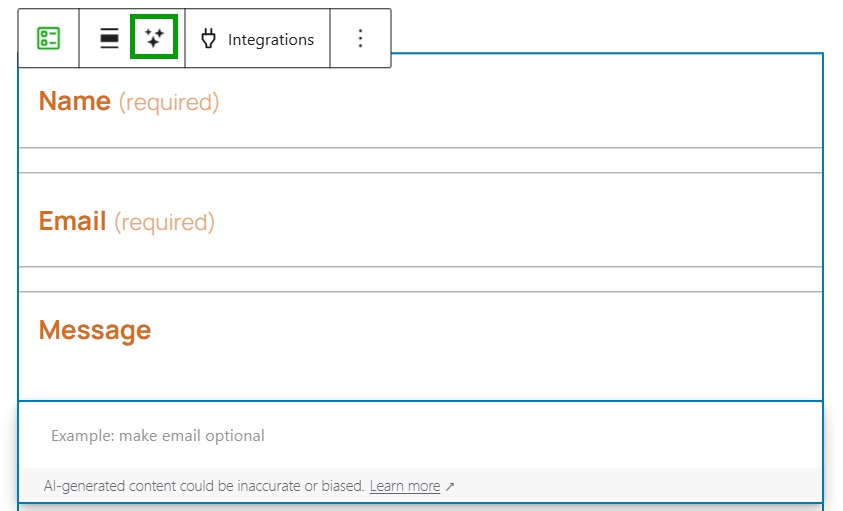
Now, use the text field provided to write your request. Let’s say you want visitors to enter their location.
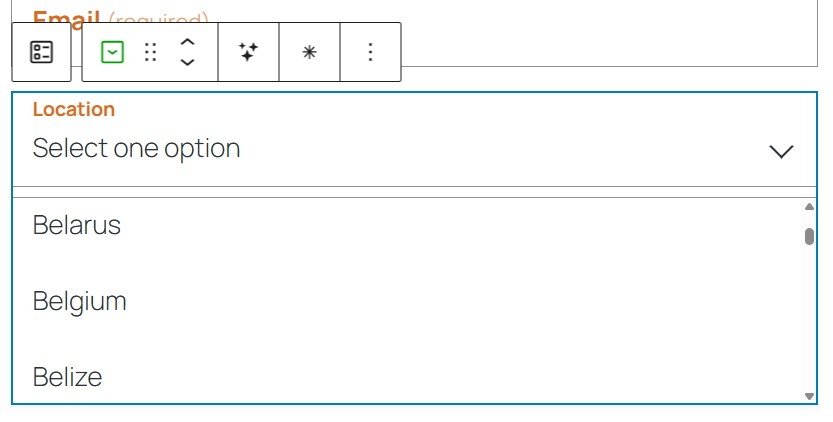
In this case, you’ll need to add a “location” field, with a dropdown menu that includes all the countries in the world. This makes it easy for visitors to select their location, but it will be a headache for you to create manually.
Instead, write your request to the AI Assistant. You can tell it to “create a location field with a dropdown menu that includes all the countries in the world.”
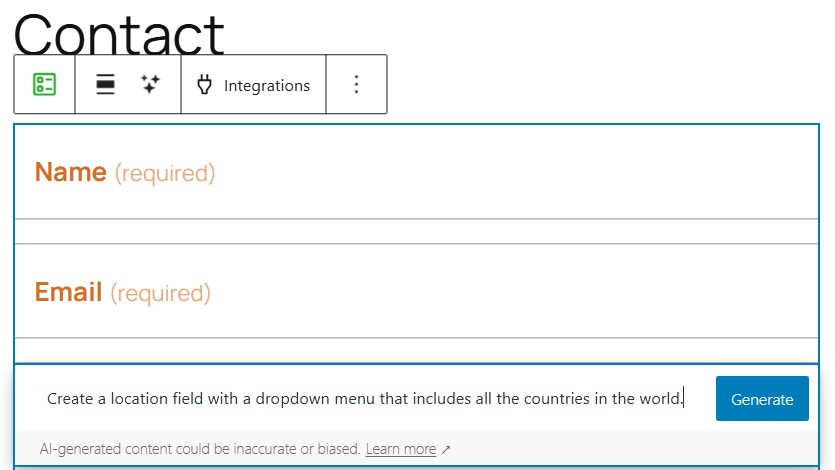
Hit Generate, and the AI tool will add your requested field to the form.
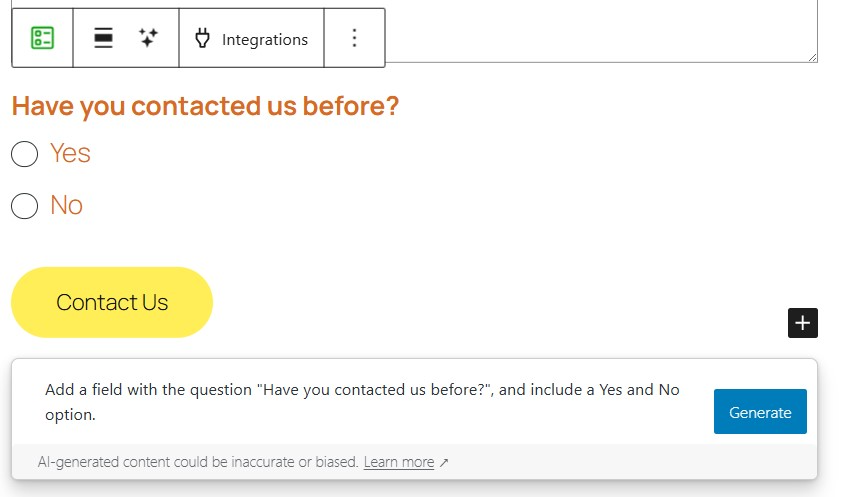
Let’s look at another example. You might want to know if a visitor has contacted you before.
So, ask the AI Assistant to “add a field with the question ‘Have you contacted us before?’ Include a Yes and No option.”
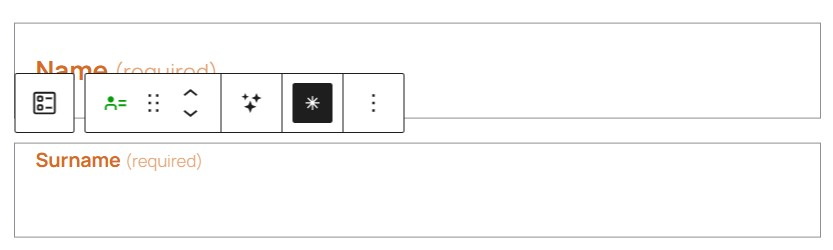
Note that you can use the AI Assistant for simple requests, like “remove the name field” or “create a surname field and make it required.”
To rearrange the fields, use the arrows in the toolbar to move them up or down.
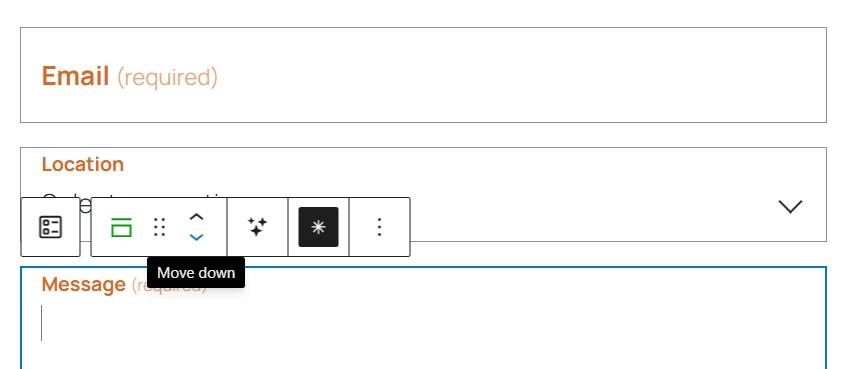
To make a field required (or optional), click on it and select or deselect the asterisk.
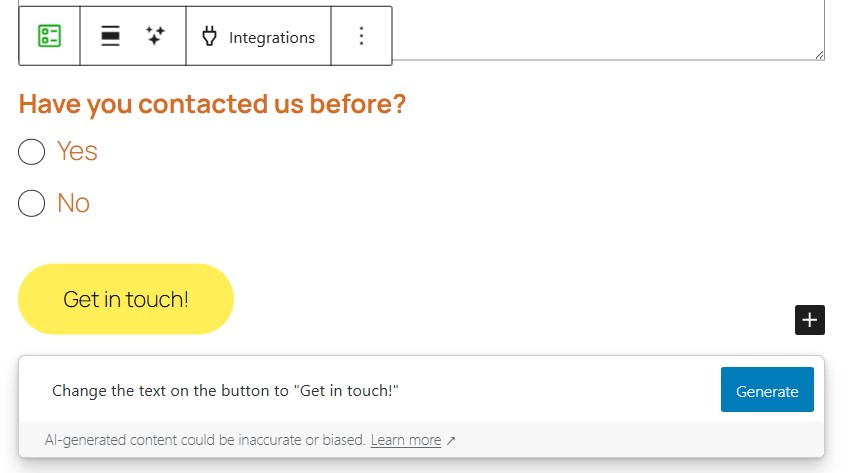
You can also use the AI Assistant to customize the button, not just the fields. For instance, you might ask it to change the text on the button.
These are just some examples. There’s a lot more that the AI Assistant can do for you, so take some time to explore its full capabilities.
5. Preview your contact form
Once you’ve configured your settings, it’s a good idea to preview your contact form to make sure everything looks correct. To do this, simply click on the View button at the top of the page and select Preview in new tab.
The next logical step would be to publish your form, but before we discuss that process, let’s first talk about security concerns and some of the more advanced customization options available.
How to secure and customize your contact form
Now that you know how to create a contact form, it’s important to discuss some of the security concerns you’ll need to keep in mind.
By default, contact forms don’t come with advanced security measures, which means they can be susceptible to spam submissions and other malicious attacks. Fortunately, there are a few steps you can take to mitigate these risks.
Here’s what you’ll need to do.
1. Use a CAPTCHA
A CAPTCHA is a type of challenge-response test that attempts to prevent bots from using your contact forms. Visitors will need to answer a question or solve a math problem to prove that they’re an actual person.
There are also more advanced options called reCAPTCHA, which involve checking a box.
Learn more about stopping contact form spam on WordPress.
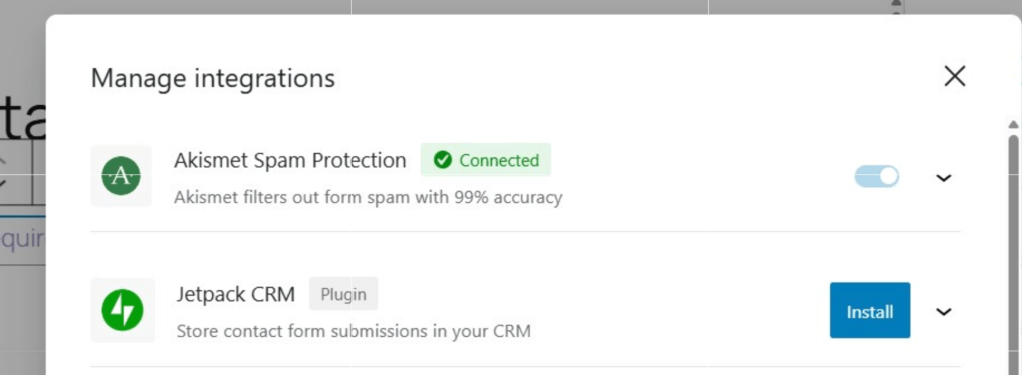
2. Block spam with Akismet
A better way to combat spam submissions is by using Akismet.
This plugin often comes pre-installed with WordPress, and it does an impressive job of automatically filtering out spam comments and contact form submissions. It works behind the scenes, so it doesn’t add any extra work for your users.
Akismet utilizes global learning from millions of websites to identify spam based on phrases used, IP addresses, and other characteristics of known spammers.It automatically filters out spam submissions so you never see them, but you can review them manually at any time if you’d like.
To configure Akismet for your contact form, go to Plugins → Add New. Search for “Akismet,” then click on Install Now → Activate.

Once you activate Akismet, it will automatically connect with Jetpack Forms.
Follow this guide to activating Akismet to be up and running in just a couple of minutes!
3. Add a honeypot field
A honeypot is a hidden form field that helps catch spam submissions. By default, Jetpack includes a honeypot field in all of its contact forms.
Some other form plugins have options to add a honeypot field as well. If the one you’re using does not, you’ll need to add one manually.
Use the CSS style display: none !important; to make the field hidden and tabindex=”-1″ autocomplete=”false;” to ensure the field is empty by default.
Once you’ve done this, be sure to mark the field as required so that it’s always filled out when the form is submitted.
4. Customize the look of your contact form
In addition to securing your contact form, you may also want to customize its appearance to match the overall look and feel of your website. Advanced users can do this by adding custom CSS.
As shown earlier, you can also make many appearance changes from within the block editor. Let’s look at a few more customization options.
For instance, if you select the button on your form, you can make changes to it via the settings panel that appears on the right-hand side of the screen:
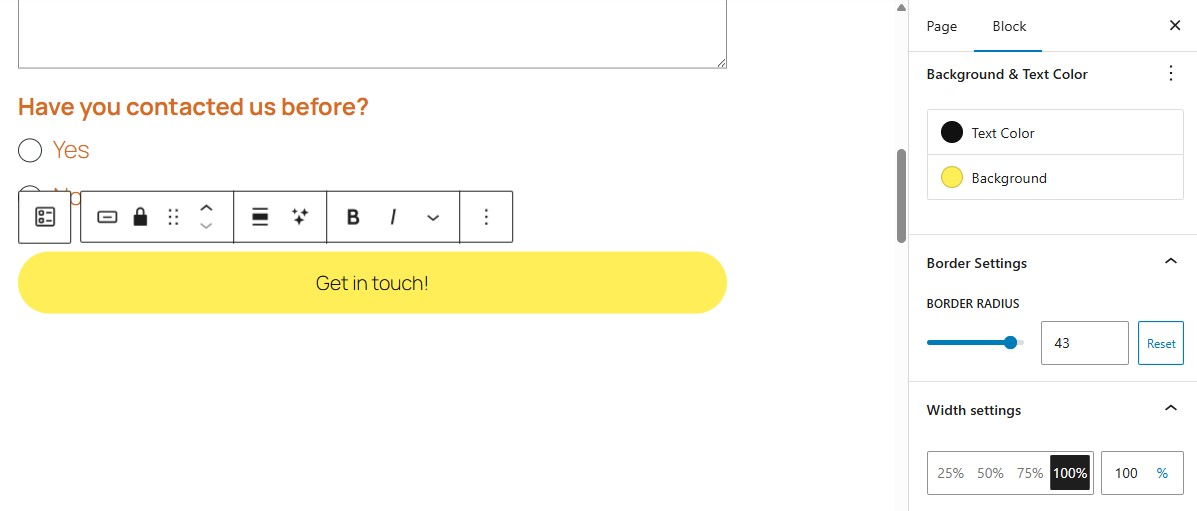
You can change the button to be filled or outlined, change the text and background colors, and adjust the border radius.
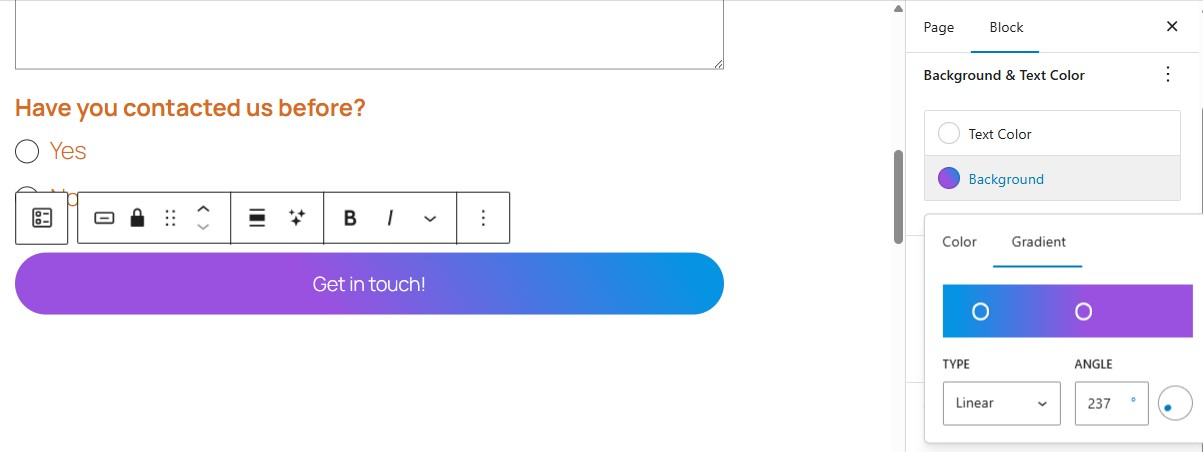
If you want to get creative, set the background color to a gradient. You can even go as far as changing the angle of the gradient, how much of each color is shown, and whether you’d like the gradient to be linear or radial.
To change the background color of the entire form, select the form block, go to the Styles tab, and find the Color section in the block’s settings. Again, choose between a solid color and a gradient.
If you want to change the width of individual fields, that’s an option, too. Simply select the field you want to edit and go to the Width section in the settings panel.

Feel free to explore all the available customization settings for your contact form and individual fields.
5. Add radio buttons and checkboxes
In addition to standard text-based fields, you can add options like checkboxes and radio buttons to your form.
Navigate to the form you want to edit. Press the blue + icon at the top left of the screen to browse available blocks.
Find the section titled Jetpack and choose from the list of fields. For example, if you want a list of radio buttons, choose the Single Choice (Radio) block.
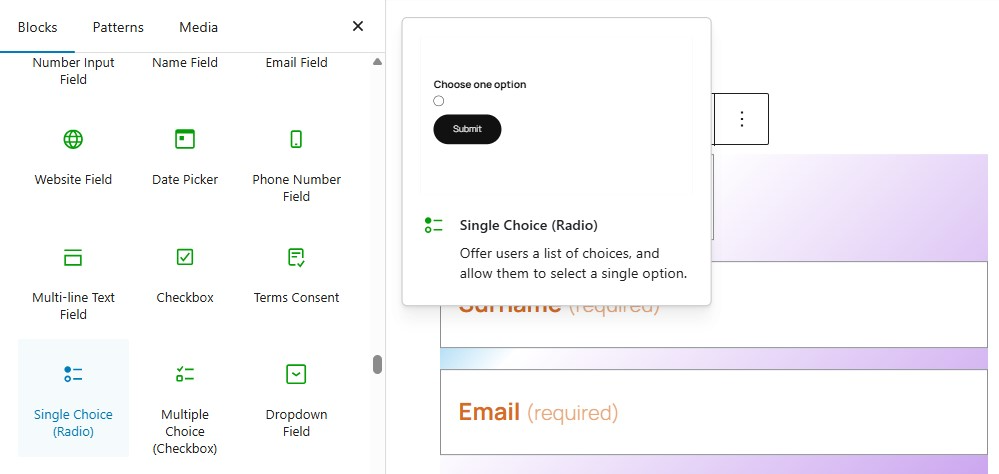
You can also add a Checkbox or Multiple Choice (Checkbox) block. However, as demonstrated earlier, the AI Assistant will easily add these fields to your forms with the right prompt.
For example, you can ask it to create a multiple-choice field that requires users to select their interests (or other items) from a given list.
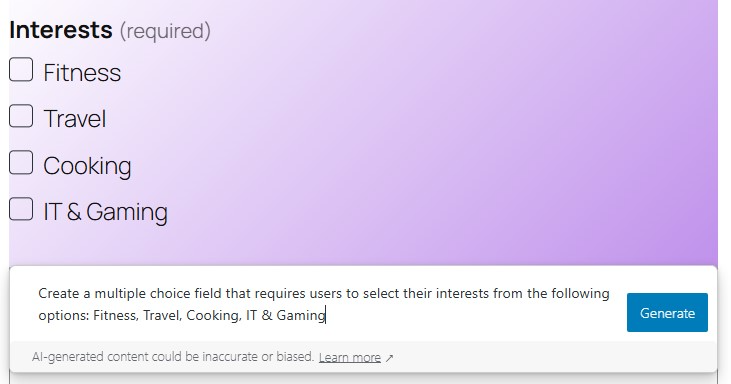
This method is a lot quicker, as you won’t have to manually add each option and configure the field.
6. Add conditional logic to your contact form
Another useful customization is conditional logic. This allows you to show or hide fields based on how a user fills out your form. While Jetpack doesn’t include this functionality, you can do this with a plugin like Gravity Forms.
Let’s say that you offer interior design services. You might have a form field that asks visitors whether they’re interested in a virtual or in-person consultation. If they select “in-person,” you want to find out where their home is located.
We’re assuming that you’ve already installed Gravity Forms and created your initial form. Now, you would need to start by adding an Address field. Click on the field and scroll down in the Settings panel.
Expand the Conditional Logic section and toggle the box to enable it. Choose “Show” and “All” for the first two dropdowns. Then, select the “What type of consultation are you interested in?” question for the next dropdown, followed by “is” and “In-Person.”
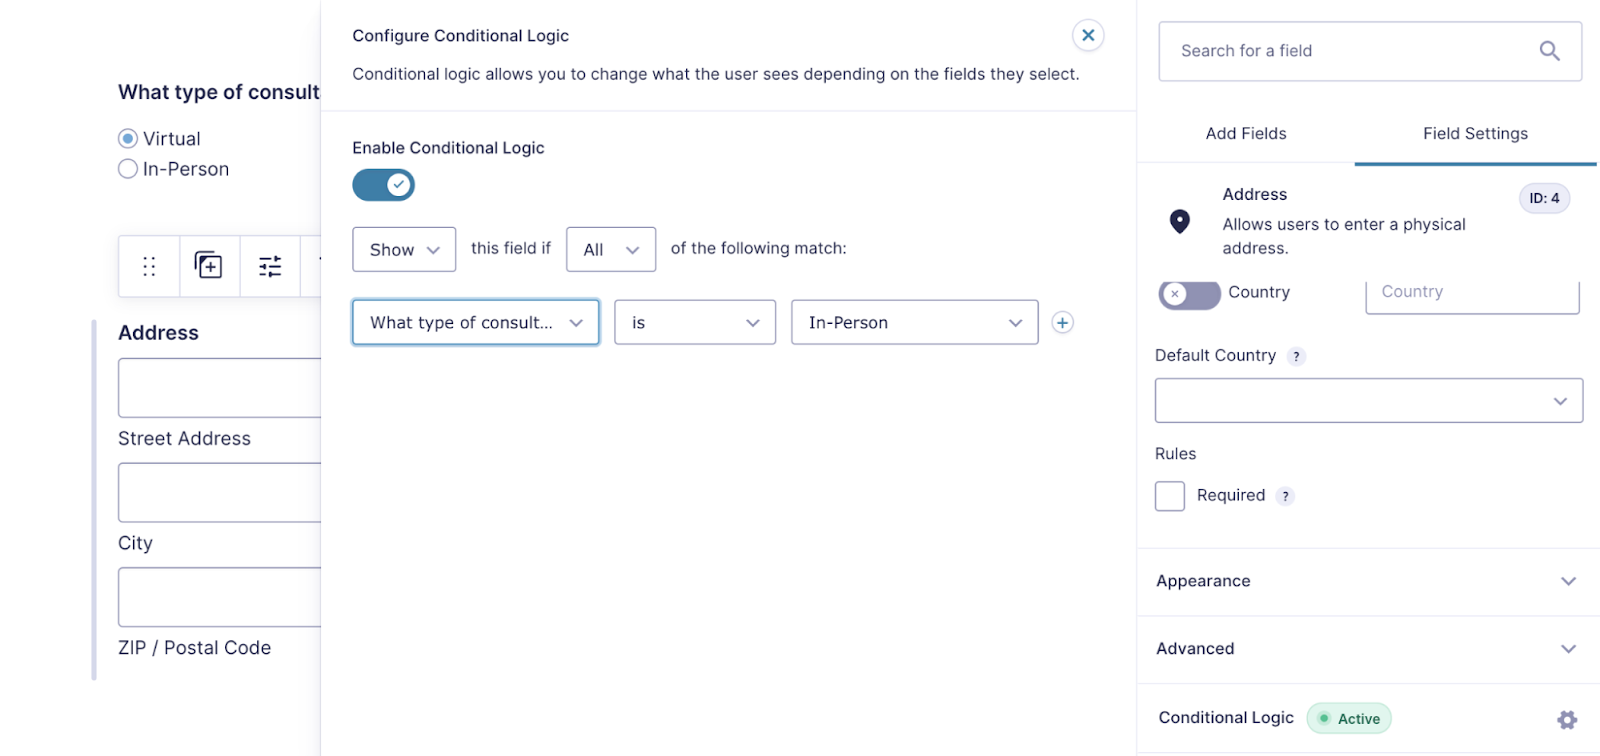
Now, the address field will only appear when someone is interested in an in-person consultation. Feel free to play around here — there are a variety of options you can choose from.
7. Enable file uploads
You might also want site visitors to be able to upload files. Perhaps you’d like them to submit a photo of the project they want help with or a PDF version of their resume. If you have a Complete plan, you can do this with Jetpack through the File Upload Field block.
You can also do this with the Gravity Forms plugin.
When editing your form, go to Add Fields and expand the Advanced Fields section. Then, drag and drop the File Upload field into your form.
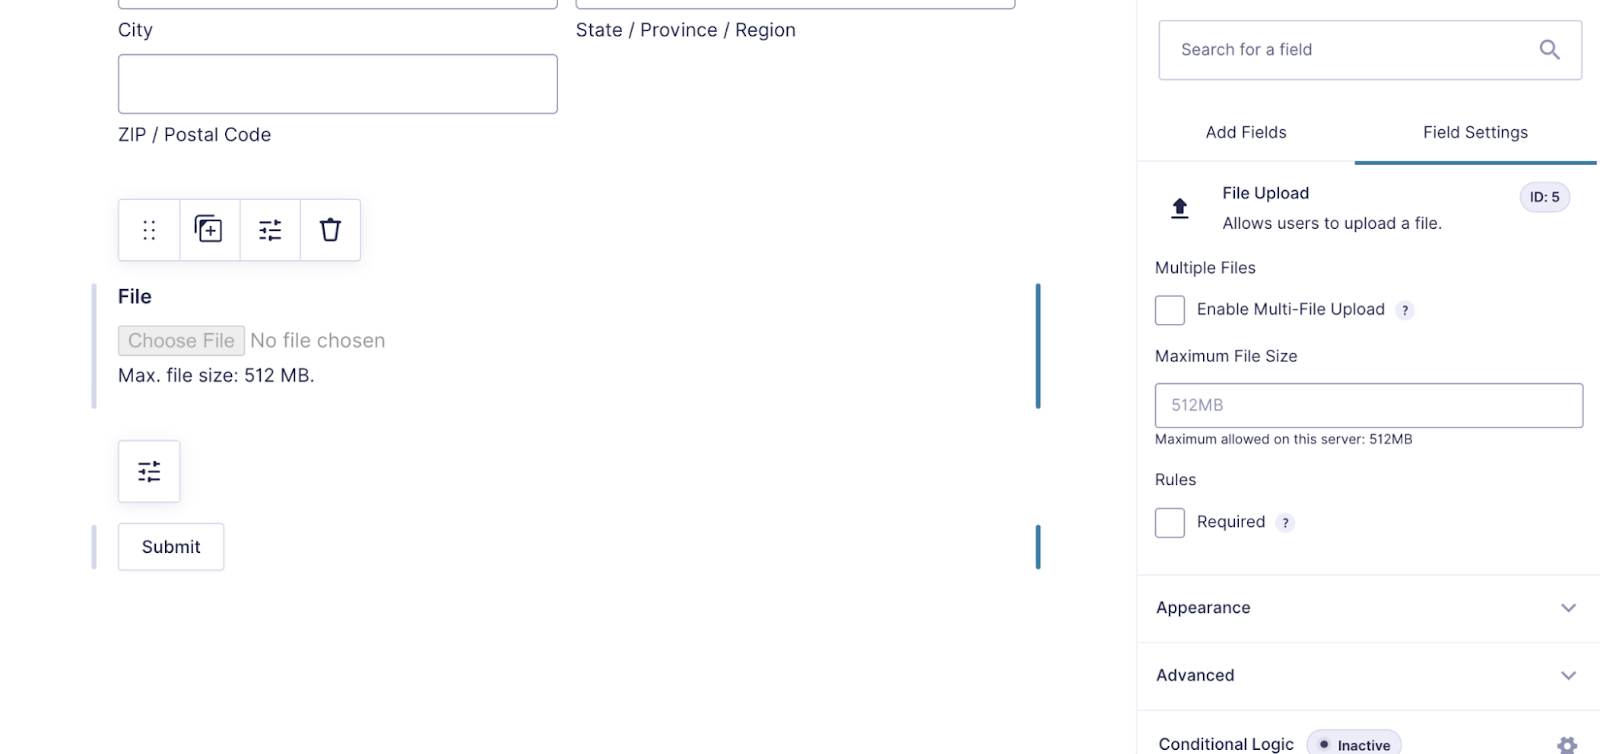
Click on it to configure settings like file size and whether you’ll accept multiple files at once.
Where and how to add your WordPress contact form
There are other places you can embed contact forms besides pages and posts. Let’s take a look at a few options.
1. Add your form to the sidebar
The sidebar can be a great place to add a contact form because it appears on multiple pages or posts throughout your site. If you’re using a block theme with full site editing capabilities, you’ll need to use the Site Editor to make changes to your sidebar.
In the WordPress dashboard, go to Appearance → Editor, select Templates, and you’ll see the full list of options.
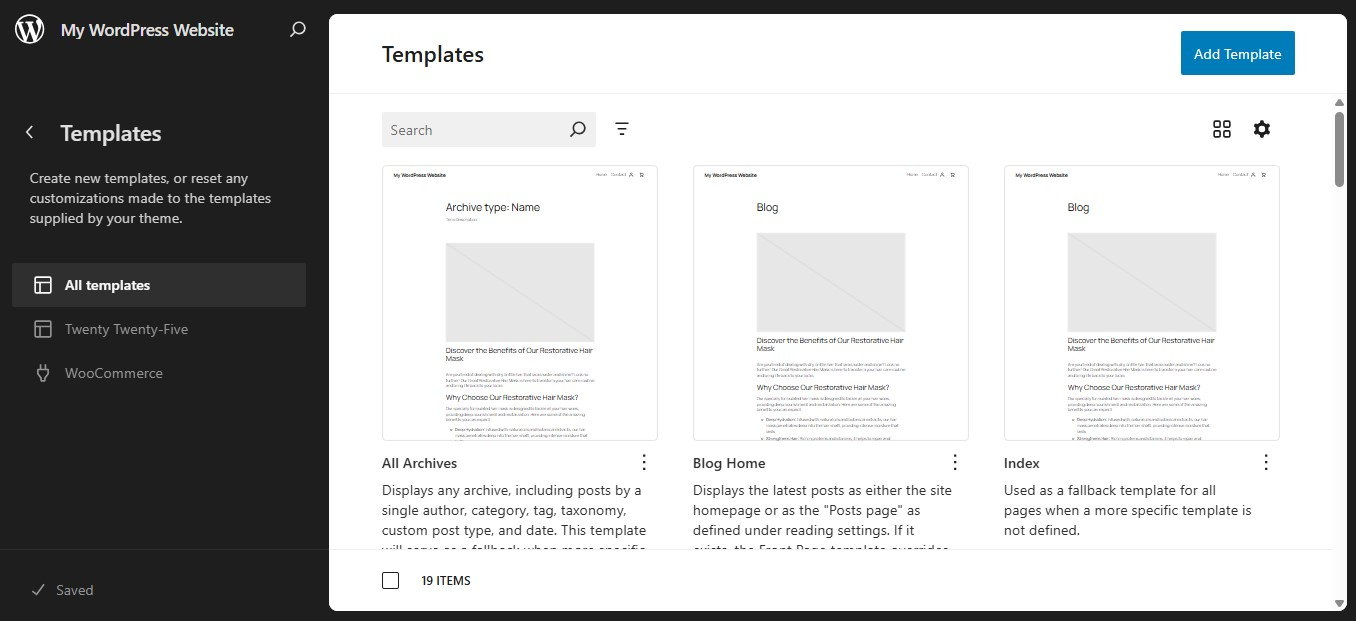
For example, if you want to edit the sidebar on all of your blog posts, choose the Single Post template.
Now, click the + icon at the top left of the Editor, search for your form block, and drag it into your sidebar column. Make any necessary changes and click on Save.
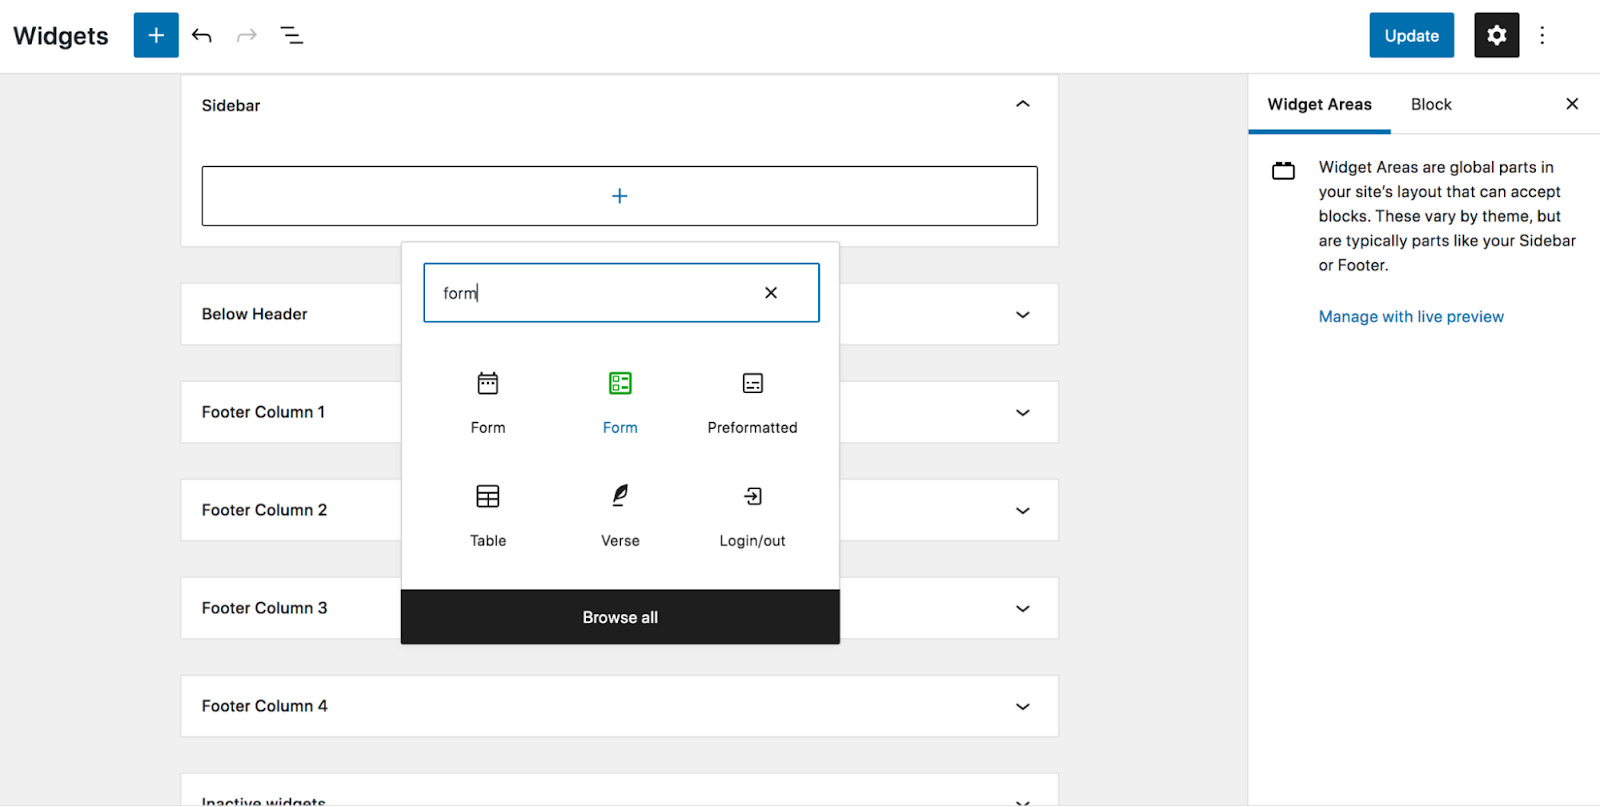
If you’re not using full site editing, go to Appearance → Widgets and then expand your Sidebar area. Click + to add a new block and select the appropriate Form block associated with your plugin.
2. In a template file
If you’re using a block-based theme that allows for full site editing, you can also add your contact form to any templates that you create.
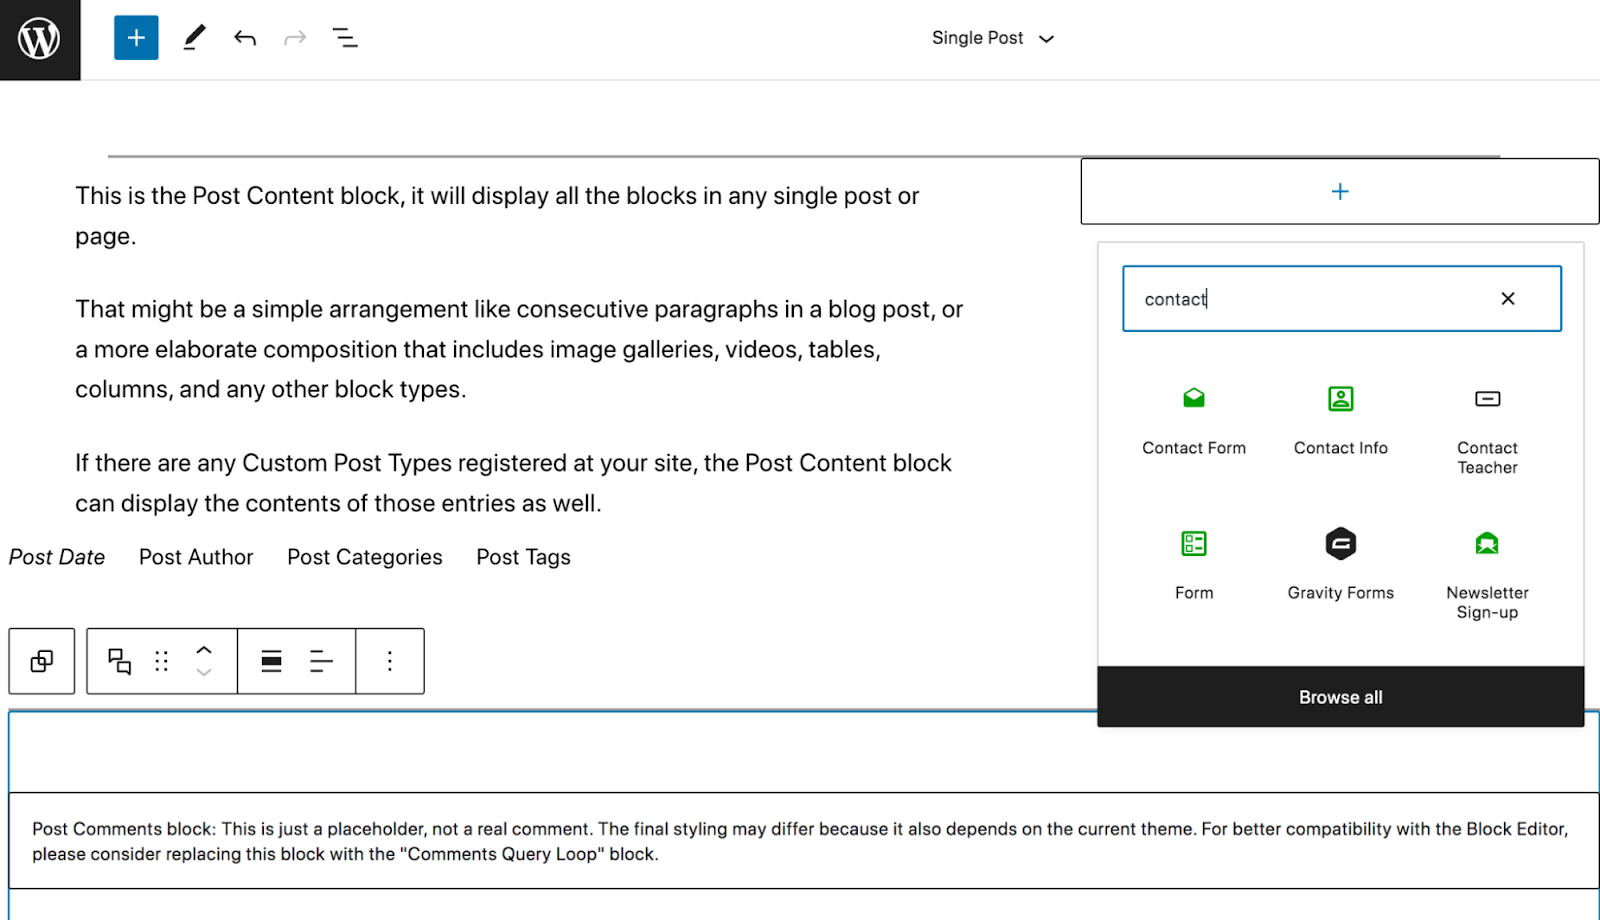
Let’s say you want to add a form to your blog post template. In the WordPress dashboard, navigate to Appearance → Editor, go to Templates, and select the template you want to edit.
Now, simply click the blue + icon at the top left, find your contact form block, and drag it into the template. There, you can edit the settings and make whatever changes you’d like.

3. Add your contact form in the footer
You might want to add your contact form to the footer so that visitors can access it no matter where they are on your site. If you’re using a block-based theme, the steps are similar to adding a form to a template.
In the WordPress dashboard, go to Appearance → Editor and select Footer from the templates.
Click the blue + icon at the top left, find your contact form block, and drag it into the footer wherever you’d like it to go. Make any necessary changes, and save them.
If you’re not using the full site editor, you can still add a contact form to your footer. Navigate to Appearance → Widgets in the WordPress dashboard. Scroll to the Footer section — you may have multiple footer columns — click the + sign and add your contact form block wherever you’d like.
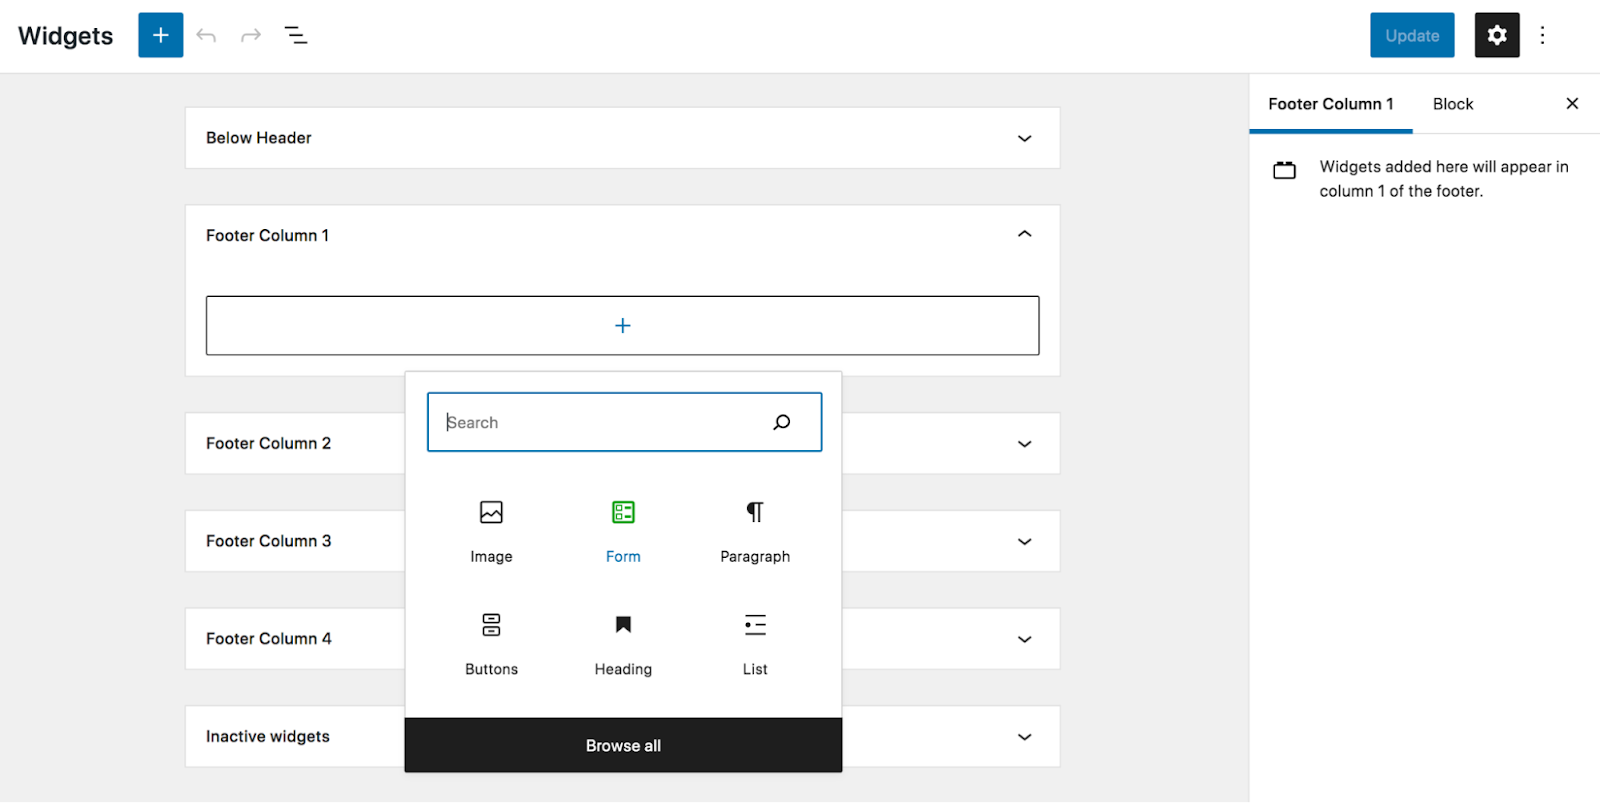
Now, just edit the settings and save!
4. As an on‑click popup
If you want to display your contact form as an on-click popup, there are a few WordPress plugins that can help. Let’s look at how you can do this using WPForms and the Popup Maker plugin.
Once you’ve installed and activated the plugins, simply head to WPForms → Add New in your WordPress dashboard. Then, select Use Template. Build your form and click on Save.
Next, you’ll need to create a popup. Go to Popup Maker → Create Popup in your WordPress dashboard. Give it a name. Then click on the Add Form button. Select the form you just made a few moments ago from the dropdown list and then click on Add Form. This will insert a shortcode for the form.
Next, go to Popup Settings and click on the Triggers tab to configure the settings related to how and when your popup will appear. Be sure to click on Add when you’re done making your selections and customizations.
From there, go to the Targeting tab and select the conditions for where the popup will appear. This is where you’ll choose which pages, devices, etc. it’ll display on.
Continue clicking through the tabs in Popup Maker to set the popup’s appearance. Once you’re done making changes, click on Publish. Be sure to navigate to the page(s) where you’ve set the popup form to appear to verify it’s working properly.
How to create a WordPress contact form without a plugin
If you don’t want to use a plugin to create your contact form, you can always do it yourself using WordPress core functionality. However, this method is more complex and requires some basic knowledge of HTML, CSS, and PHP.
You’ll also have to code all the error handling and form field validation that comes by default when using a dedicated plugin, making what should be a simple task complex and time-consuming.
If that doesn’t deter you, let’s dive in.
Note: Any changes made here should be done after a full WordPress website backup and using a child theme.
We’re now going to walk you through how to create a very basic contact form, with fields for name, email address, and message. Of course, you can add more fields if you’d like to.
You’ll start by adding the HTML for the form — this specific code was created by Daext:
<form id="contact-form" action="<?php echo esc_url( get_permalink() ); ?>"
    method="post">
    <input type="hidden" name="contact_form">
    <div class="form-section">
        <label for="full-name"><?php echo esc_html( 'Full Name', 'twentytwentyone' ); ?></label>
        <input type="text" id="full-name" name="full_name">
    </div>
    <div class="form-section">
        <label for="email"><?php echo esc_html( 'Email', 'twentytwentyone' ); ?></label>
        <input type="text" id="email" name="email">
    </div>
    <div class="form-section">
        <label for="message"><?php echo esc_html( 'Message', 'twentytwentyone' ); ?></label>
        <textarea id="message" name="message"></textarea>
    </div>
    <input type="submit" id="contact-form-submit" value="<?php echo esc_attr( 'Submit', 'twentytwentyone' ); ?>">
</form>
Now, you’ll need to sanitize the data from your contact form, which means cleaning or filtering it. WordPress offers data sanitization functions to make this process easier. In this case, you’ll use the sanitize_text_field() and sanitize_textarea_field() functions.
Next, you’ll need to set up form validation, which validates that fields aren’t left empty when the form is submitted. You’ll also add error messages that appear if a field doesn’t pass validation. You can use the following code to do this, editing the messages if you’d like:
//Validate the data
if ( strlen( $full_name ) === 0 ) {
    $validation_messages[] = esc_html__( 'Please enter a valid name.', 'twentytwentyone' );
}
if ( strlen( $email ) === 0 or
    ! is_email( $email ) ) {
    $validation_messages[] = esc_html__( 'Please enter a valid email address.', 'twentytwentyone' );
}
if ( strlen( $message ) === 0 ) {
    $validation_messages[] = esc_html__( 'Please enter a valid message.', 'twentytwentyone' );
}
You’ll also need to add code to display the error messages, send an email with the form submission to the site administrator, and create a shortcode that allows you to add the form to one of your pages. You can then style the form to match your site’s design.
You can find more detailed instructions and code for all of those functions in the walkthrough from Daext.
Frequently asked questions about WordPress contact forms
Now let’s answer some common questions about creating contact forms in WordPress.
Do I need a plugin to create a contact form in WordPress?
There are plugins that can assist you in creating a contact form, like Jetpack Forms. However, you could create a form without a plugin if you wanted to. This approach is more difficult and necessitates some fundamental HTML, CSS, and PHP knowledge.
How do I add a contact form to my WordPress website?
There are two methods you can use to add a contact form to your WordPress website. You can either use a plugin or do it yourself using code.
If you want to use a plugin, Jetpack Forms is a great choice. It’s easy to use and comes with everything you need to create a powerful contact form, including an AI Assistant that will do most of the work for you.
What should I do if I’m not receiving emails from my contact form?
If you’re not receiving emails from your contact form, there are a few things you can check.
First, contact your hosting provider to see if there are any restrictions in place that could be blocking the email from being sent.
Next, check the settings of your contact form to make sure the email is being sent to the correct address.
If none of that fixes the problem, you may need to use an SMTP plugin to help validate and send your emails.
Can I add a contact form to my WordPress sidebar?
Yes! If you want to add a contact form to your WordPress sidebar, just insert the Jetpack Form block into your page or post template (if using full site editing) or sidebar widget area.
Do I need a separate contact page on my WordPress website?
No, you don’t necessarily need a separate contact page on your WordPress website. However, you may want one so that visitors can easily find your contact form. Plus, it gives you an opportunity to include additional information on how visitors can get in touch.
For example, you may want to include your email address, phone number, and social media links on your contact page. This way, visitors can choose the method they’re most comfortable with.
Do I need a separate contact form for each page on my WordPress website?
No, you don’t need a separate contact form for each page on your WordPress website. However, this could help you collect more relevant data from your visitors.
For example, if you have a form on your contact page, you may want to ask visitors for their name and email address. Meanwhile, if you have a contact form on a support page, you may want to ask for their name, email address, and require them to specify the type of issue they’re experiencing.
What is the best way to stop spam on WordPress contact forms?
There are a few things you can do to stop spam on your WordPress contact forms. We recommend enabling Akismet. This tool uses AI learning from millions of websites to identify common traits of spam, and stops unwanted messages with 99.99% accuracy before they ever reach your inbox. It does all of this behind the scenes without slowing down your site — both of which lead to happier visitors and a higher conversion rate.
