Attract high-quality traffic to your site using Blaze. Using this service, you can advertise a post or page on some of the millions of pages across WordPress.com and Tumblr from just $5 per day.
Requirements
The Jetpack plugin should be installed and connected on your site. New to Jetpack? Check out this support guide to get started with that.
Activate Blaze
Starting with Jetpack 12.3, Blaze needs to be activated under the Jetpack Feature modules page.
Blaze your content
To access Blaze Ads from WP Admin, the menu location depends on your site’s setup:
- On a Jetpack site (without WooCommerce): go to Jetpack → Blaze Ads
- On a site with WooCommerce and Jetpack: go to Marketing → Blaze Ads
If your site has active Blaze campaigns, “Blaze Ads” is promoted to a top-level WP Admin menu item (look for the megaphone icon!) for quicker access.
You can also access Blaze Ads from the WordPress.com Dashboard by going to Tools → Blaze Ads, or by visiting wordpress.com/advertising/your-site.com.
To launch a Blaze campaign for your post or page, when on the Balze Ads dashboard:
- Use the search bar or scroll to find the content you want to promote (posts or pages).
- Click Promote next to the post or page. This will open the campaign setup screen, where you can configure your ad.
Once you start creating your campaign, you’ll be able to customize your ad’s appearance, choose your audience, set your budget, and schedule.
Appearance
This section asks for information to determine how your Blaze campaign will look when promoted across the network.
- Ad creative: Upload an image for your ad. This will be the post’s featured image by default, but you can upload a different one. You can also crop the image from here.
- Site title: This appears just below your image and as non-bolded text. This can be the post title or something more catchy and will be truncated if it exceeds 32 characters. Use this to briefly describe what the ad is about.
- Snippet: A short text description of your post that appears underneath your image and title. You can write a maximum of 140 characters here. We recommend using this text to support the title and give viewers more context about what they will see when they click the ad and arrive at your content. You can also use it to capture their attention.
Note that the ad creative, site title and snippet are all required.
Audience
Choose who will see your ad by adjusting the following:
- Language: Select the target language(s) spoken by your intended audience. You can select more than one target language here and can choose All languages to target all available languages.
- Interests: Choose the interests of your intended audience using the dropdown. Select All topics to show your post to all potential viewers regardless of their interests.
- Location: Select geographic areas where your post will be promoted. You can narrow down your audience or select Everywhere to show your post to all potential viewers regardless of their location.
As you adjust your settings on this screen, your ad preview will reflect your choices and provide you with an estimated reach for your campaign, which is the number of times your ad will be shown.
Budget and duration
Control how much you would like to spend on your Blaze campaign:
- Total: Select your total spend for the campaign using the slider. You can choose a minimum of $5 per day and up to a maximum of $50 per day. Your budget will be shown in USD. No other currencies are supported at this time.
- Start date: Choose when you would like your campaign to start running.
- Duration (days): Select the number of days you would like your campaign to run, between 1 and 28 days.
If you’re not sure what to select here, we suggest starting at $5 per day over 7 days, then growing from there based on your results.
As you adjust your targeting choices, you will see an estimate of how many people you will reach (estimated number of impressions). It’s important to balance your reach with how relevant your content is to the audience. This helps to maximize how many clicks your ad receives and, ultimately, how much traffic it produces for you.
Advanced Settings
Select your target devices, set your destination URL, and add any custom parameters for tracking:
- Targeted Devices: Choose whether you would like your post to be seen by viewers on desktop computers or mobile devices. Select All devices to show your post to all potential viewers regardless of the device they’re using.
- Destination URL: This is where visitors will be directed when they click on the campaign. This can be the post itself or your site’s homepage.
- URL parameters: Add custom parameters to your destination URL for more advanced tracking and analytics purposes. This is especially useful for platforms like Google Analytics and your in-house analytics tools if you have those.
Payment
Currently, Blaze supports payment only through credit/debit cards for campaign creation.
In the Payment section, fill out your payment details and then click the Submit campaign button. You won’t be charged until after the ad has been approved and starts running on our network of sites.
Payments will be made automatically on a weekly basis based on delivered impressions over that period (i.e. how many times your ad was served). You will be charged weekly for ads served across all of your promotions.
When a payment is made, you will receive an email receipt to the email address associated with your WordPress.com account.
You can cancel your campaigns at any time. You will only be charged for the portion of your ad campaign that was served up until that point. It is not possible to refund any charges for ads served, so it is recommended to set your budget to an amount you are willing to pay.
Ad Approval
We review all Blaze campaigns for compliance with our Advertising Policy before they are seen by others.
We try to moderate posts as quickly as possible, depending on how much content we need to review. Currently, we average around 30 minutes, but there’s no guaranteed time.
If your post has been approved, you will receive an email saying that your post was approved and will be put online.
Your post will be rejected if it does not conform to our Advertising Policy. You will not be charged if your post is rejected.
Manage Your Campaigns
Visit wordpress.com/advertising to access your running campaigns. You will see the details of your live campaigns and any posts awaiting moderation:
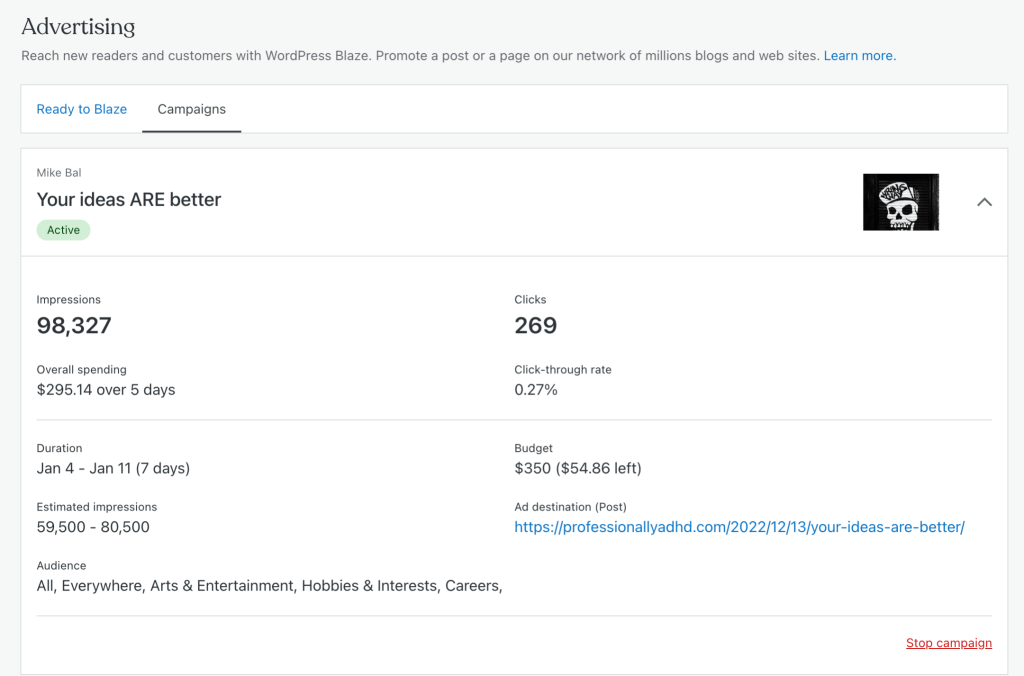
Note: all analytics tools work a little differently, so you may see clicks on your campaign that don’t show up in your site stats or preferred analytics tool.
If you wish to stop a campaign, follow the steps below:
- Visit wordpress.com/advertising and click on the Campaigns tab.
- Click the downward arrow to the right of the campaign you’d like to stop.
- Click on the Cancel campaign link in the bottom right corner.
Once a campaign has been canceled, it will stop running, with no option to restart it.
If you need to edit a campaign that’s already submitted, you can cancel that campaign and create a new one with the necessary updates, then submit that for approval.
Where Your Ad Appears
Your Blaze campaign will appear across the network of Tumblr and free WordPress.com sites, with an ‘Advertisement’ label like in this example:

For more information, please review our Advertising Policy and Terms of Service.
Still need help?
Please contact support. We’re happy to advise.
