
Jetpack offers a number of great features for theme developers that help you cut down both development time as well as load times. Most of these features work right out of the box, but you can also get under the hood to apply tweaks and customisations that really take your theme to the next level.
This article introduces you to:
- Speeding up your theme with Photon
- Showcasing posts with Featured Content
- Automatically loading posts with Infinite Scroll
- Instantly applying a Mobile Theme
- Customising CSS
- Providing Sharing functionality
- Integrating Social Links
- Showing similar content with Related Posts
- Additional resources
1. Speeding up your theme with Photon
 Photon is a free image CDN offered by Jetpack. As soon as Photon is enabled, it automatically serves the images found in posts and pages from WordPress.com’s speedy servers around the globe.
But did you know that you can use it to save bandwidth and speed up load times for images within your theme, too? You can link to a Photon-ized version of an image by calling the jetpack_photon_url() function. Its quite straightforward and we’ve put together some step-by-step instructions to make it even easier.
2. Showcasing posts with Featured Content
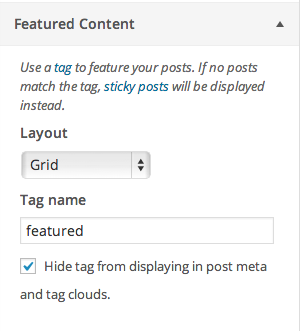 Featured Content is one of Jetpack’s lesser known features. But it’s a really powerful tool for theme development because you can use it to create a completely custom area in your theme for users to showcase posts. The appearance and placement is completely up to you, the theme author.
Your users can then specify which posts to show in that area simply by selecting a tag of their choice. There’s even an option to hide the tag from post meta and tag clouds.
Whether you are building an image slider on your homepage, or want to allow users to highlight specific posts, Featured Content makes it easier than rolling your own custom functionality. You can see a few examples of the feature in action here.
3. Automatically loading posts with Infinite Scroll
With Infinite Scroll active, users no longer have to click a link to get to the next set of posts on archive pages. Instead, your theme loads the next set of posts automatically into view when the reader approaches the bottom of the page. You’ve probably seen similar functionality on other sites, and thanks to Jetpack, it’s a snap to add it to your theme.
4. Instantly applying a Mobile Theme
 Mobile internet usage is growing exponentially and any theme worth its salt should work on mobile devices. That’s why you’ll be happy to know that Jetpack ships with a full Mobile Theme ready-to-go out of the box.
Just use the .mobile-theme CSS class to style the mobile theme or take things a step further and use jetpack_is_mobile to target mobile visitors.
That way you can build the best user experience for your theme, no matter what device visitors are using.
Check out this article on customizing Jetpack’s mobile theme to learn more.
5. Customising CSS
If you’ve published a theme before you most likely know that users often want to customize its appearance. Savvy users might create a child theme, but more often than not, users will simply edit your theme’s files directly.
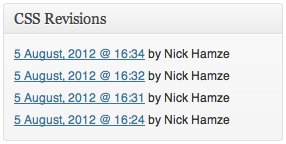 That can get messy when you release a theme update that overwrites users’ modifications. But thanks to Jetpack, a much more user-friendly alternative is available through the Custom CSS feature which also includes a revision history.
After activating the feature, a ‘Custom CSS link’ is added to the Appearance menu in the Dashboard. From there, users can add their own Custom CSS, without touching the theme’s files. They can even use their favorite CSS pre-processer, as support for both SASS and LESS is built right in.
6. Providing Sharing functionality
The Sharing feature allows you to add social media sharing buttons to your theme. There are multiple display options built in and you can opt to use your own custom styles as well.
In this way you can integrate social sharing buttons in your theme, and keep complete control over their appearance. You can even alter the functionality with some jQuery magic. Our friends over at ThemeShaper have a great article with more information about this.
7. Integrating Social Links
Jetpack also makes it easy to include Social Links within your theme. After a user connects their social media accounts through Publicize, you can automatically use links to their accounts in your theme. You can add support with add_theme_support() and then use the Theme Modifications API to pull the data into your theme.
8. Showing similar content with Related Posts
 Related Posts is one of Jetpack’s newer features. When activated, this adds a section to single posts that includes automatically generated links to similar content.
By default the section appears at the bottom of your content, but you can also move it to the top with a filter. In addition users can add a shortcode wherever they want the section to appear.
This means that you can include styling for the Related Posts section in your theme and then users are able to drop in a custom Related Posts section that matches the rest of their site wherever they want.
9. Additional resources
- If you’ve not used Jetpack before or need helping installing it for the first time follow these step-by-step instructions.
- If you roll your own theme based off _s, then you can check /inc/jetpack.php to get started!
- Are you developing a theme for a client? If so, you might find the Top 5 Best Practices when using Jetpack on client websites article useful.
Finally, we’d love to see what you’ve done yourself and what you think of Jetpack. If you have questions, comments or your own tips drop us a comment below! In addition to that, we’re always open to suggestions, so feel free to get in touch. Thanks for flying with Jetpack!


How to increase your blog’s traffic with Jetpack
Jetpack comes with a set of features specifically designed to help you increase your site’s traffic and grow your audience. That is after all the reason we build websites and blogs and write content – for people to see them, read them and enjoy them 🙂
Jetpack helps you tackle this along two fronts: attracting new visitors to our sites and encouraging the existing ones to keep coming back.
Getting more traffic
Its worth mentioning what countless people have said before: writing well-written, useful and targeted content is eighty percent of the job. Neither Jetpack nor any other plugin, is a silver bullet that can ever be a substitute for that. However, if you’ve got that nailed, these features will help you with the other twenty percent:
The Sharing feature, when enabled, places share buttons at the bottom of your blog posts. This allows (and encourages!) your readers to share your content with their own networks giving you broader reach. Currently we support Twitter, Facebook, Reddit, StumbleUpon, Digg, LinkedIn, Google +1, Print, and Email. Additionally you can define your own custom services.
Verifying your website with external services like Google, Bing and Pinterest. This means you will be rated as “safe” by these services (e.g. by getting a “Verified” badge) and gives you to access advanced features (e.g. Webmaster tools).
At WordPress.com we have a service called “Firehose” which is a stream of the public data (public posts, comments, etc.) that flow through WordPress.com as well as Jetpack blogs that enable Enhanced Distribution. The firehose in turn is used by companies and people to display your content at which point they are required to link back to your blog. This means that you get both traffic back to your site as well as building up quality back-links.
Keep them coming back
The other side of the coin is staying in touch with the visitors who’ve seen and read your content so that they don’t forget about you and come back to see what else you have to say. You may not necessarily want to use all of these of course as it depends a lot on the kind of site or blog you’re running. But because Jetpack makes it easy to turn these on and off some of our users opt to try things one at a time to test out their effect.
RSS is used by millions of people to keep track of blogs they like. When you enable Extra Sidebar Widgets in Jetpack you can show widget that allows you to add links to your blog’s RSS feeds in your sidebar. This makes it easy for your readers to stay updated when you post new content or receive new comments.
Easily allow any visitor to subscribe to all of your posts via email through a widget in your blog’s sidebar. Every time you publish a new post, WordPress.com will send a notification to all your subscribers. Depending on their preferences this notification will either show up on their WordPress bar (top right) or they will receive an email directly in their inbox.
Example of a comment Push Notification from the WordPress for iOS app
Finally, this last one is for you, the site owner. With Notifications enabled you will be instantly notified when somebody comments on any of your posts or previous comments. This means that you can instantly comment back making your interaction with your readers feel more personal and in real-time.
And of course, Jetpack also gives you great stats so that you can see the effect of your work! If you’ve not used Jetpack before, read our step-by-step installation guide here to try it out for yourself.
If you are a Jetpack user already please tell us what you think in the comments and, if you’d like to get involved by writing a guest post about Jetpack get in touch!