Support Home > Utilities > Contact Form (Classic Editor)

Contact Form (Classic Editor)

Note: These instructions are for the Classic Editor, and sites running WordPress 4.9.10 or older. If you are using the new Gutenberg editor in WordPress 5+, please refer to the instructions for adding a form block instead. 

For general features and FAQs, please see our information page.

How to Create a Contact Form

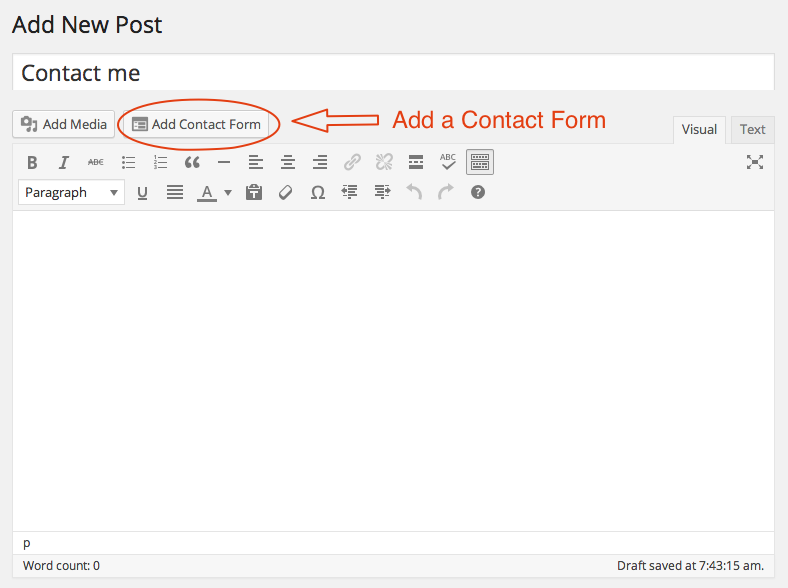
While editing a post or page, click the Add Contact Form button.

Note: If you do not see the Add Contact Form button, you need to turn on the Contact Form feature.

Add a Contact Form

The form will be inserted directly into your content:

inserted form

Handling the Form Results

You will receive an email notification for each contact form response (provided your WordPress email sending is working). All responses will also be listed in the Feedback section of the site’s WP Admin.

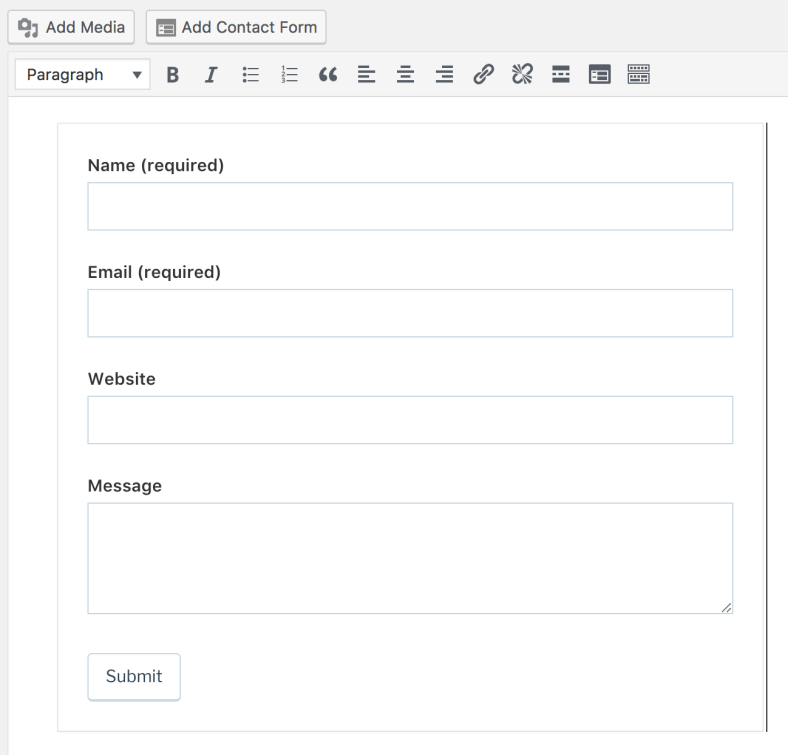
Click on the form and choose the pencil icon to edit it:

edit form

There, you can adjust all of the form’s settings, including the email address it’s sent to, the subject, and all form fields:

edit form settings

If you have the Akismet plugin installed and activated and have an active subscription, every form submission will be checked for spam.

embedded form

Adding a Contact Form with Shortcodes

You can add a basic contact form using a WordPress specific code called a shortcode. You can read more about shortcodes here.

To add a contact form using a shortcode, copy and paste the text below to any post, page, or text widget:

[contact-form]
[contact-field label="Name" type="name" required="true" /]
[contact-field label="Email" type="email" placeholder="Your Email Address" required="true" /]
[contact-field label="Website" type="url" /]
[contact-field label="Comment" type="textarea" required="true" /]
[/contact-form]

You can find more details and the full list of available contact for shortcode attributes here.

Pre-fill Form Fields with URL Parameters

You can create custom links to send visitors to a form that is pre-filled with default information. To do this, you’ll need to get the name of the form field, which will include the post or page ID and the field name that you assigned in the form editor. To create a link:

  1. Create the form, as described above.
  2. Open the page/post containing the form and use your browser’s Element Inspector to locate the field ID of the field you want to pre-fill. It will look something like this: id="g12249-name"
  3. Now you can append that field to the URL for the form page, and add the pre-filled entry by adding a ? after the URL and an = after the field ID, followed by the entry. So it will look something like this: https://yourjetpack.blog/contact-form?g12249-name=Jetpack
  4. If you’d like to pre-fill multiple fields, you can use & between fields: https://yourjetpack.blog/contact-form?g12249-name=Jetpack&g12249-name=support@jetpack.com
  5. You can then use this link wherever you like, and anyone who clicks it will see the pre-filled form rather than the default form. The form functionality will remain the same.

Tips for Using Your Form

Add to Pages, Posts, or Widgets.

Contact forms can be added to pages or posts, or if you copy the generated code, you can add your contact form to a text widget.

Forms are customizable.

Contact forms can be customized. You can add and remove fields, choose which fields are required, change the email address, or change the subject settings. The form’s appearance can be further customized with CSS.

Edit an existing form.

To edit an existing form, edit the post or page from WP Admin, then click “Add Contact Form.”

  • One per page – Each post, page, and text widget will only display one contact form.


One per page.

Each post, page, and text widget will only display one contact form.

Remember, email is not secure.

Do not use contact forms for sensitive information like credit card numbers, as the information will be transmitted by email.

Built-in spam filter.

We filter submissions through Akismet to fight spam, then add them to your feedback menu, which is accessible to Editors and Administrators on your site. We also email a copy to you.

Customization

Customize the Submit Button.

The following shows how to customize the submit button by editing the shortcode content:

[contact-form submit_button_text='YOUR CUSTOM SUBMIT BUTTON TEXT HERE']
[contact-field label='Name' type='name' required='1'/]
[contact-field label='Email' type='email' required='1'/]
[contact-field label='Website' type='url'/]
[contact-field label='Comment' type='textarea' required='1'/]
[/contact-form]
Customize the Notification Emails.

Jetpack allows you to customize the fields you add to the contact form, and also offers an option to change the subject of the email sent to you after each form submission.

You can add tokens to the subject field, like {city}, and Jetpack will replace the token with the value of the “City” form field (case insensitive, just make sure that the words match).


Troubleshooting

I don’t see the form interface, I only see code!

If you don’t see the form interface described above, make sure that you’re in the editor’s Visual tab and not the Text tab, from the top-right of the editor.

If you don’t see the Visual and Text tabs as described, go to Users > Your Profile in your site’s Dashboard and uncheck “Disable the visual editor when writing.”

The form interface will only work in the editor’s Visual tab.

I’m not receiving notification emails about my form submissions!

Jetpack, like other contact form plugins, uses a function named wp_mail() to send out emails. It’s the same function that is used by WordPress to send you comment notifications or notifications about new users registering on your site.

You can check if that function works properly by leaving a comment on your site and checking if you receive an email. Another alternative would be to use the Email Logs plugin. This plugin records a log of all e-mails sent out by WordPress once it is activated. If an email is listed in this plugin’s logs and you do NOT receive it, then the issue is likely either with your server or the recipient’s server.

If you find issues with that function, you could use an SMTP plugin to configure your WordPress installation to use a specific email service to send out emails.

If the function appears to work properly, it means that Jetpack’s emails are being filtered out before they can reach your inbox. A few possibilities:

  • They can be filtered out by your server before they even get sent out. Your hosting provider should be able to check their server email logs to find out if the emails were blocked.
  • They can be filtered out by your email provider. If you don’t find the emails in your spam folder, you’ll want to try sending out Jetpack emails to another email address and see if you keep experiencing issues.

If none of this helps, contact support for assistance.

Privacy Information

This feature is activated by default, although it does require a site author to explicitly add a contact form to a published post or page on the site. While there are no controls for it within the primary Jetpack settings area, it can be deactivated any time by following this guide.

More information about the data usage on your site
Data Used
Site Owners / Users


For activity tracking (detailed below): IP address, WordPress.com user ID, WordPress.com username, WordPress.com-connected site ID and URL, Jetpack version, user agent, visiting URL, referring URL, timestamp of event, browser language, country code.

Site Visitors


If Akismet is enabled on the site, the contact form submission data (IP address, user agent, email address, site URL, and comment) is submitted to the Akismet service (also owned by Automattic) for spam checking.The actual submission data is stored in the database of the site on which it was submitted and is emailed directly to the owner of the form (i.e. the site author who published the page on which the contact form resides). This email will include the submitter’s IP address, timestamp, name, email address, website, and message.

The IP address is included as an abuse prevention measure. And for sites using Akismet, it is required for providing proper spam defense.

Activity Tracked
Site Owners / Users


We track when, and by which user, the feature is activated and deactivated.

Site Visitors


None.

Data Synced (Read More)
Site Owners / Users


We sync a single option that identifies whether or not the feature is activated.

Site Visitors


We sync post and post metadata associated with a user’s contact form submission. If Akismet is enabled on the site, the IP address and user agent originally submitted with the comment are synced, as well, as they are stored in post meta.

  • Table Of Contents

  • Categories

  • Contact Us

    Need more help? Feel free to contact us.