Set up a paid newsletter and earn with paid subscriptions, gated content options, and one-time offerings. Reward your most loyal subscribers with exclusive content and turn your writing into income.
Creating a Paid Newsletter requires Jetpack Blocks. See our Jetpack Blocks article to learn about the available blocks and how to activate them.
Jetpack Blocks require the Block Editor (also referred to as the Gutenberg editor). If you’ve installed the Classic Editor plugin, you have a few options:
- Deactivate the Classic Editor: Go to Plugins → Installed Plugins in your WP Admin and deactivate the Classic Editor plugin.
- Enable both editors: If you prefer flexibility, navigate to Settings → Writing in your WP Admin (not the menu under Jetpack settings). Set Allow users to switch editors to Yes. You will only see these options if you have the Classic Editor plugin installed and active.
Some custom themes or plugins may prevent you from using the Block Editor. In that case, please contact the support team for the plugin or theme for further assistance.
For more details, see Using Blocks and the Classic Editor.
Get started
To set up a paid newsletter and start earning money, please follow these steps:
- Make sure your self-hosted website is publicly accessible with Jetpack installed.
- Activate Jetpack Newsletter.
- Access Monetize, and follow the instructions there to connect Stripe and create your Paid Newsletter payment plan.
Inviting subscriptions ahead of creating your content can set you up for success. Non-subscribers will still be prompted to subscribe to access your content based on the access restrictions you set, as described below.
The Paid Newsletter is price-based, meaning that if the old and new newsletter tiers have the same price, there won’t be any issues, even if the old tier has been removed. However, if the prices differ, subscribers on the old tier may not receive the paid newsletter.
Set up a payment plan
Now you can set a price for access to your paid newsletters, define the renewal frequency, and give your plan a name.
To add a new payment plan, follow these steps:
- Go to Jetpack → Newsletter in your WP Admin.
- Under the Paid Newsletter section, click Manage Plans.
- Click the Add a new payment plan button.
- Toggle the “Paid newsletter tier” option “on” and you’ll then have the options for adding a Monthly and Annual Price for your paid newsletter.
If you do not toggle the “Paid newsletter tier” option “on” you can choose the Renewal frequency and charge your subscribers on a monthly or yearly basis or just a one-time payment. - Fill out/review the following fields:
- A name for your plan. This name will be seen by your subscribers when they sign up.
- Amount (currency and price) you will charge subscribers.
- Welcome message: write a brief message to welcome your subscribers.
- Description (optional): Add a short summary of what this tier includes. Subscribers see this in the subscribe modal before they pay, so they know what they’re getting. You can use Markdown to format the text — bold, italics, bullet lists, and links are all supported.
The description is separate from the Welcome message, which subscribers receive only after they sign up. - Free tier description (optional): You can also add a description for the free subscription tier. This appears in the subscribe modal alongside any paid tiers, helping visitors understand what free subscribers get access to.
- Click “Advanced options” to reveal two extra options:
- Enable customers to pick their own amount (“Pay what you want”)
- Enable customers to make the same purchase multiple times (likely not suitable for paid newsletters)

Your new payment plan will appear under Payment Settings, where you can edit or delete the plan.
Enable or disable free subscriptions
When you create a paid newsletter tier, a free tier is created automatically. Free subscriptions let people subscribe to your newsletter at no cost and receive your general content, while your paid content stays limited to paid subscribers. You can customize the free tier or hide it so that new subscribers can only choose a paid tier.
To manage the free tier:
- Go to Jetpack → Newsletter in your WP Admin.
- Under the Paid Newsletter section, click Manage Plans.
- Click the Payment Settings tab.
- Find the Free tier in your list of payment plans.
- Click the ⋮ (three dots) menu and select Edit.
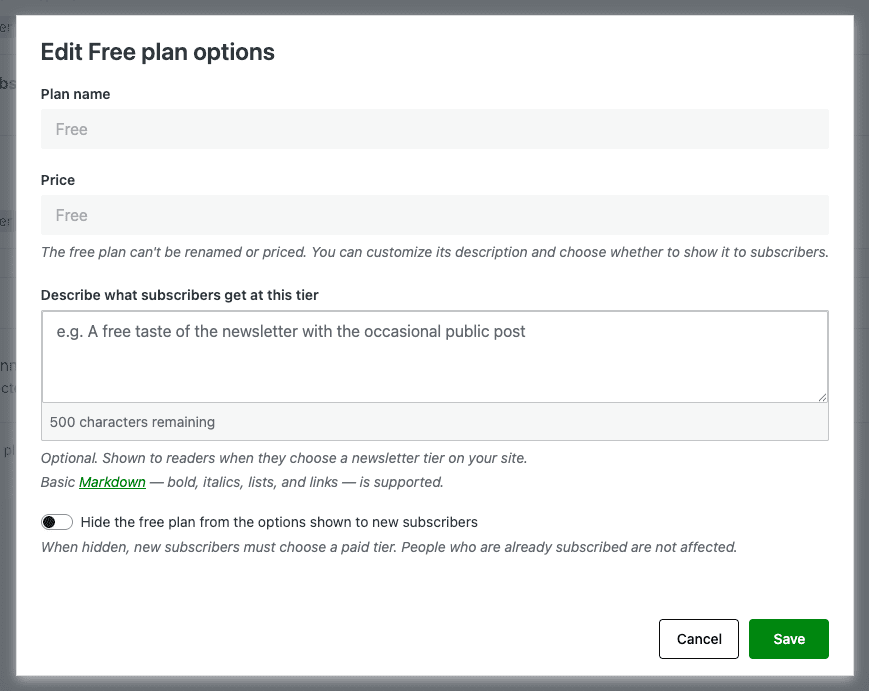
From here, you can:
- Add a description that is shown to potential subscribers in the subscribe modal. The description supports the same Markdown formatting as paid-tier descriptions (bold, italics, lists, and links). There is a 500-character limit.
- Hide the free tier from the subscribe modal by toggling on “Hide the free plan from the options shown to new subscribers.” When hidden, new subscribers must choose a paid tier to subscribe. People who are already subscribed for free are not affected.
Click Save when you’re done.
Note: The free tier options only appear when your site has at least one paid newsletter tier. Self-hosted Jetpack sites require Jetpack version 16.0 or later.
Give a complimentary subscription
You can give a subscriber free access to your paid newsletter by granting them a complimentary subscription. This allows them to receive all paid content without being charged, which can be useful for collaborators, team members, or VIP readers.
For full steps and additional details, see Manage Complimentary Newsletter Subscriptions.
Write your post
Next, start writing your post:
- Go to your site’s WP Admin.
- Navigate to Posts → Add New.
- Craft your post and add any images and other content using the WordPress editor.
To combat writer’s block, get some help from Jetpack AI Assistant block to get started.
Restrict access to your post
When published, a blog post is public by default. To limit visibility to paying subscribers, you have two options:
- Access Settings: Restrict full post access to any subscriber or only paying subscribers.
- Paywall Block: Display a portion of the post to all readers as a teaser, then restrict the remaining content to all subscribers or paying subscribers only.
Select a publish option
From the pre-publish sidebar, choose if you want to publish as Post & email, or as a post only. If you choose “post only” it will not be sent to your subscribers via email.
Select an access option
You can find Access options in the post settings, located on the right sidebar. If the Post Settings sidebar is hidden, click the top-right Settings icon, resembling a square with two uneven columns, to reveal it.
- Scroll to the Access section.
- Choose one of the following options:
- Everyone: the post will be visible to the public.
- Anyone subscribed: the post will be visible to your subscribers only. This includes free subscribers. Those who have not subscribed will see an option to subscribe.
- Paid subscribers only: the post will be visible only to subscribers who have paid through the payment plan you set up earlier.

Use the Paywall block
You can also use the Paywall block to give full content access to any subscriber or just paying subscribers while showing a preview to non-subscribers.
To add the Paywall block:
- Click on the + Block Inserter icon.
- Search for “paywall”.
- Select the Paywall block.
For more information, see how to add blocks in WordPress.
Place the Paywall block early in the post. Content before the block will be publicly accessible. Content after will be made accessible to any subscriber or paying subscribers, based on the block toolbar selection: “Anyone subscribed” or “Paid subscribers“:

Publish your post
Now that your post is ready and access restrictions are in place, it’s time to publish.
Click Publish to share your post with the selected audience, who will then receive an email newsletter in their inbox. When you publish the post, you will see the number of subscribers your post has been sent to based on your selected filter.
Manage plans, subscribers, and earnings
To manage your subscriptions, see customers, and monitor your revenue:
- Go to WordPress.com.
- Switch to your Jetpack-connected site from the left sidebar.
- Navigate to Tools → Monetize.
You will see your earnings and customers/subscribers on this page. You can manage and edit your existing payment plans from here. You can also disconnect your Stripe account from this page.
Note that subscribers are authenticated with WordPress.com and are not added locally as users on your site.
Related Fees
Jetpack charges a percentage of the fees you charge your readers; the amount depends on which Jetpack plan you have. Please see our help article about associated transaction fees.
Still need help?
Please contact support. We’re happy to advise.
