This guide covers the product-specific blocks, filter variations, and settings that Jetpack Search adds when WooCommerce is active on your site.
What WooCommerce unlocks
When WooCommerce is active on a site running Jetpack Search, the block editor has access to a set of product-specific blocks and filter variations that don’t appear on non-WooCommerce sites. These include filter blocks built exclusively for stores, product-aware variations of the existing checkbox filter, a product result format for the Results List block, product-specific sort options, and a price-range chip in Active Filters.
You don’t need to configure anything to make them appear. Once WooCommerce is active and Jetpack Search is enabled, the blocks show up in the inserter automatically.
WooCommerce-only filter blocks
Five blocks only appear in the inserter when WooCommerce is active:
- Filter by Product Attribute: Lets shoppers narrow results based on product characteristics like color, size, or material so they can quickly find items that match their preferences.
- Filter by Price: Helps shoppers by setting a minimum and maximum price range, either by entering values or adjusting a slider.
- Filter by Rating: Allows shoppers to show only products that meet a chosen rating threshold (★★★★ & up, etc.), making it easier to find highly rated items.
- Filter by Stock Status: Gives shoppers the option to view only items that are currently available for purchase.
- Product Filters: Provides a ready-to-use sidebar that combines multiple filters into a single, convenient interface for refining product results.
Each of these blocks has its own settings and setup steps. See WooCommerce filter blocks for Jetpack Search for the full guide.
Product filter variations for checkbox filters
Three variations of the Filter (Checkbox) block target WooCommerce-specific taxonomies. They work exactly like the standard checkbox filters (Category, Tag, Author) but are tailored to product data.
Filter by Product Category
Lets shoppers narrow product results by WooCommerce product category. Categories form your store’s primary department hierarchy (“Clothing → T-shirts”, “Decor → Wall art”) and are usually the first filter shoppers reach for.
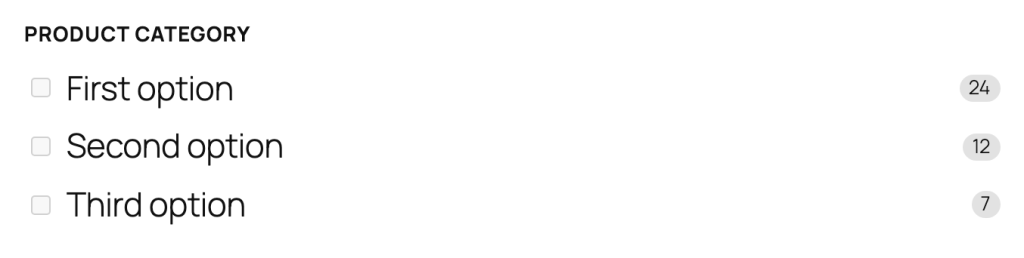
Typically placed near the top of your filter sidebar. Sort order set to “By count” keeps the most-stocked departments at the top. For deep category hierarchies, leave the display style on Checkbox list since chips break visually with long labels.
Filter by Product Tag
Lets shoppers narrow by WooCommerce product tags, which are looser, cross-category labels like “Sale,” “New,” or “Eco-friendly.”
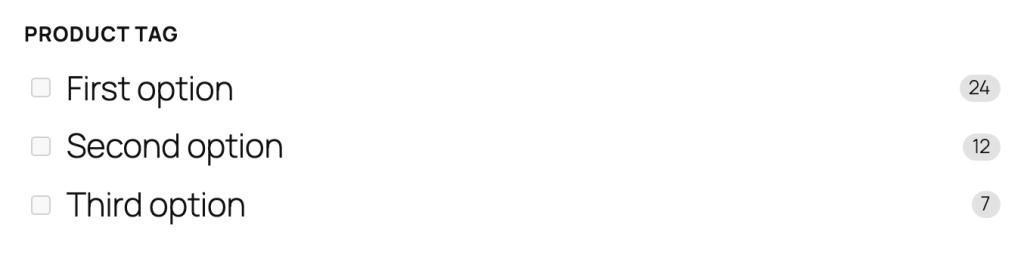
This filter is most useful when your store uses tags for labels that shoppers care about. Skip it if your tags are mainly internal or for SEO purposes. Tags often have short labels, so switching the display style to Chips gives a compact, tag-cloud feel.
Filter by Product Brand
Lets shoppers narrow by brand. This variation only appears in the inserter when the Product Brand taxonomy is available on your site, which is built into recent WooCommerce versions or registered by an extension like WC Brands or Perfect Brands. If the block is missing, create a brand in Products → Brands first.
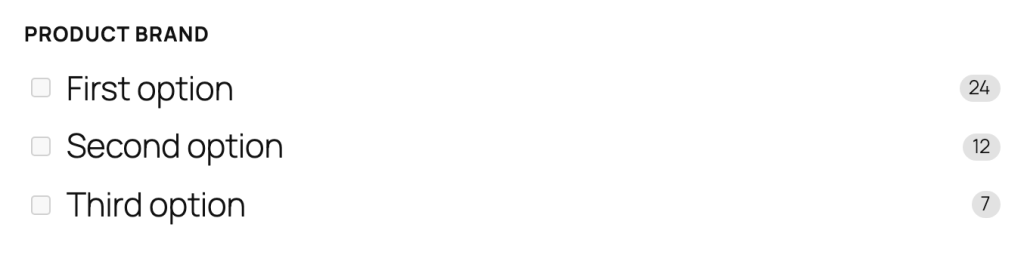
This filter works best for stores that carry multiple brands. Skip it for single-brand stores. Brand names are usually short, so Chips works well as the display style. Place brand filters below category filters since most shoppers browse by department first, then by brand.
Shared settings for Product Category, Product Tag, and Product Brand
All three variations share the same settings panel:
- Filter type: Determines how products are grouped, such as by category, tag, or another taxonomy, and lets you switch between filter types without losing your other settings.
- Label: Controls the heading shown above the filter options, helping shoppers understand what they’re filtering by.
- Show result counts: Displays how many products match each option, giving shoppers a quick sense of availability before selecting.
- Display style: Changes how the filter options appear; either as a list of checkboxes (better for longer labels) or compact chips (ideal for short values like sizes or colors).
- Maximum items: Limits how many options are shown at first, keeping the filter tidy while allowing shoppers to expand and see more if needed.
- Sort order: Controls how options are arranged, either by popularity (most matching products first) or alphabetically for easier scanning.
- Logic: Defines how multiple selections behave, showing products that match any selected option or only those that match all selections for more precise filtering.
Results List: product format
On WooCommerce sites, the Results List block gains a third result format option: Product (for WooCommerce stores).
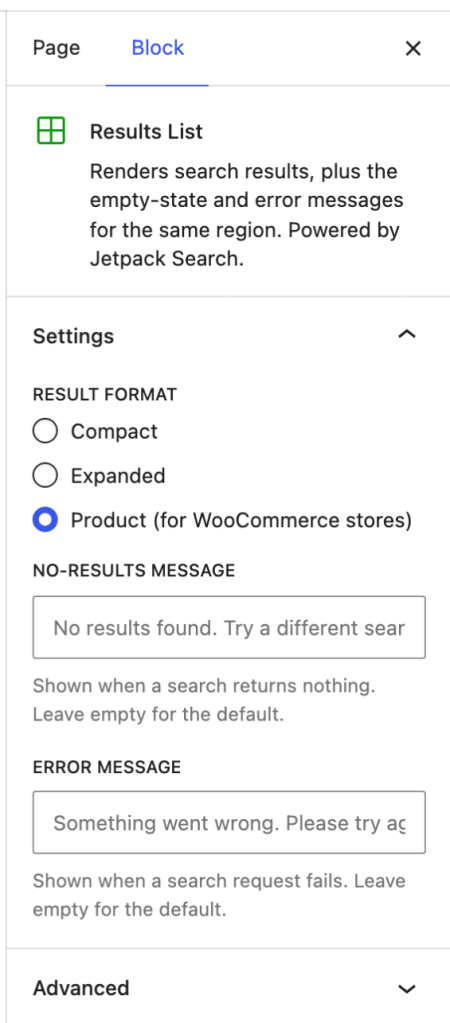
Each product result row shows the product image, title, price (with the original price struck through for sale items), a five-star rating with review count, and a match hint.
Use the product format for any page that searches exclusively products. Pair it with a Post Type Scope block inside a Product Filters container so non-product content doesn’t appear in results. Leave the format on Compact or Expanded for pages that mix products with posts since the product layout looks odd when results don’t have a price or rating.
If WooCommerce is deactivated later, the format silently falls back to Expanded.
Sort By: price and rating options
Three product-specific sort orders join the Sort By block on WooCommerce sites: Rating, Price: low to high, and Price: high to low. They appear in the Available options panel, unchecked by default.
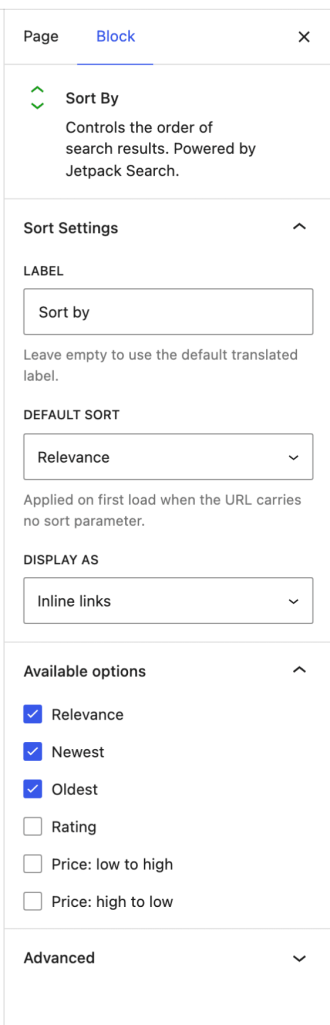
Three exposed options is usually the right number. Relevance plus Price: low to high and Price: high to low covers “what matches” and “by budget” without overwhelming the dropdown. Add Rating if your store leans on customer reviews. Skip it if your catalog doesn’t have meaningful rating data.
The three WooCommerce sort orders are URL-aware: a shopper landing on a URL with ?orderby=price_asc will have that sort applied automatically.
Active Filters: price-range chip
On WooCommerce sites, a price range set through Filter by Price appears as its own dismissable chip in the Active Filters block.
| Selection | Chip label |
|---|---|
| Both bounds set | Price: $10 – $50 |
| Minimum only | Price: $10+ |
| Maximum only | Price: Under $50 |
The currency symbol inherits from the Filter by Price block’s settings, which defaults to your store’s WooCommerce currency setting. Clicking the × clears both bounds at once without affecting other active filters.
Putting it together: a shop search page
A complete WooCommerce shop search experience typically combines:
- A search input.
- An Active Filters block, where the price-range chip appears when a range is set.
- A Product Filters sidebar containing Filter by Stock Status, Filter by Rating, Filter by Price, and at least one Filter by Product Attribute or Filter by Product Category block.
- A Sort By block with Relevance and the two Price sort orders enabled.
- A Results List block set to the Product format.
Still need help?
Please contact support. We’re happy to advise.
