Add a payment button, collect donations, or add paid content to any post or page using the Jetpack Payments Block.
Sell physical and digital products online with the Payments Block, taking both one-time payments and recurring income from subscriptions or membership websites.
Set the “Enable customers to pick their own amount” option to accept donations. Or use the Donations Block with advanced features for donations.
Requirements
The Payments Block is available on all Jetpack-connected sites. It is a part of the Jetpack Blocks suite and is activated by default. The Payments Block does not require a paid upgrade to use. See our Jetpack Blocks article to learn about the available blocks and how to activate them.
Jetpack Blocks require the Block Editor (also referred to as the Gutenberg editor). If you’ve installed the Classic Editor plugin, you have a few options:
- Deactivate the Classic Editor: Go to Plugins → Installed Plugins in your WP Admin and deactivate the Classic Editor plugin.
- Enable both editors: If you prefer flexibility, navigate to Settings → Writing in your WP Admin (not the menu under Jetpack settings). Set Allow users to switch editors to Yes. You will only see these options if you have the Classic Editor plugin installed and active.
Some custom themes or plugins may prevent you from using the Block Editor. In that case, please contact the support team for the plugin or theme for further assistance.
For more details, see Using Blocks and the Classic Editor.
Stripe supported countries and currencies.
The Payments block requires you to connect a Stripe account. To start accepting payments using a Stripe account, you must be a citizen or own a company in a country where Stripe payments are supported. Your customers can pay using a credit card issued anywhere in the world.
Set up a Payments block
Jetpack offers several different options for accepting payments via the Payments block. Get started collecting payments by following these steps:
- Add the Payments block by searching and/or selecting it from the Jetpack section of the block selector. (See Jetpack Blocks for detailed instructions on adding blocks.)
- Choose which type of payment you want to add: Donations Form, Payment Buttons, or Paid Content.
- Connect your Stripe account when prompted. Create a Stripe account if necessary.
- Once you fill out the Stripe form and connect it to your WordPress.com account, you’ll be taken back to the post/page you were editing, and you’ll see “Congrats! Your site is now connected to Stripe. You can now start accepting funds!”
For full instructions on connecting your Stripe account, adding new buttons, viewing related fees, and managing your buttons, visit our WordPress.com support article on this topic.
Any money you earn will go into your Stripe account using the Payments block. From there, you can move it to the personal account of your choice. WordPress.com never has any access to the money you earn.
Related Fees
Please see our support article for information about associated Jetpack Monetize transaction fees.
Payments Management
Monitor and grow your subscription base with Payments block’s suite of tools.
Earnings breakdown
You can view a detailed breakdown of your revenue in your WordPress.com dashboard by visiting My Site(s) → Tools → Monetize → Monetization Options.
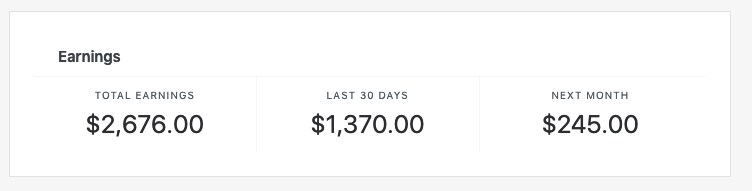
- Total earnings – shows all charges collected by any revenue-earning options on your site.
- Last 30 days – shows the revenue you’ve earned over the last 30 days.
- Next month – shows predicted earnings for the next 30 days. This assumes that nobody unsubscribes and does not include any new subscribers.
Subscribers list
Check the list of your paying subscribers at My Site(s) → Tools → Monetize → Supporters, where you can:
- Download a CSV file containing a list of your subscribers with their email addresses, subscription data, and other information. You can use that file to connect payments to any accounting or fulfillment systems you use.
- View or cancel a user’s subscription by clicking on the three dots menu next to their name.
Issue refunds
You can manage refunds yourself through your Stripe Dashboard.
Disconnect the Stripe account
You can disconnect Stripe from your WordPress.com dashboard by following these steps:
- Start at WordPress.com
- Navigate to My Site(s) → Tools → Monetize → Payment Settings section.
- Click “Disconnect Stripe Account”.
Disconnecting Stripe Account here will:
- remove Stripe from all your WordPress.com and Jetpack sites
- prevent visitors from purchasing a subscription
- block renewals of any existing payments subscribers
Still need help?
Please contact support. We’re happy to advise.
Privacy Information
The Payments Block is activated by default. You can deactivate it by turning off Jetpack Blocks.
Please note that payments are processed via Stripe, so we also recommend reviewing its privacy policy and documentation.
| Data Used | |
|---|---|
| Site Owners / Authors
In order to process a payment, the Stripe account ID, Amount being charged ( from product information ), Currency ( from product information ) is sent to Stripe. |
Site Visitors / Purchasers
To facilitate new signup and renewals, the following is sent to Stripe (governed by Stripe TOS):
Note: the credit card details are not stored by us. This data is collected and stored by Stripe. WordPress.com systems are fully PCI compliant. |
| Activity Tracked | |
| Site Owners / Users
Email-related events (you will receive an email from Jetpack when a payment has been completed) are tracked – sends, opens, and clicks. |
Site Visitors / Users
We will store anonymized analytics about which step in the purchase process was reached for the purpose of improving the user experience. Cookies may be stored to implement content blocking in the future. |
| Data Synced (Read More) | |
| Site Owners / Users
We sync the following meta around payments/products: all information regarding new products being created / edited. We also sync the following meta from Stripe with Oauth connection: Account ID, secret and public keys necessary to facilitate the payment, country, timezone, default currency, and the account name. |
Site Visitors / Users
We create a new WordPress.com account for the user, or use the account associated with the email customer gives us. An explanation of WordPress.com data used can be found here. History of signups and billing facilitated via this feature is stored on WordPress.com servers for accounting and subsequent renewal purposes. For the purpose of renewing subscriptions, on our servers we store:
Also, we connect the ID of the credit card to the WordPress.com user ID, which allows for one-click payments on other subscription products sold on the WordPress.com network. |
