
Brute force attacks happen when hackers try to access your site files by constantly trying new passwords. If they succeed, they could steal your private data, add malware, or even take down your website completely.
Fortunately, you can easily prevent these brute force attacks. By simply updating your login information or enabling two-factor authentication, you can make it harder for hackers to enter your website.
In this guide, we’ll explain what brute force attacks are and how you can prevent them. Then, we’ll recommend the best plugins for brute force protection.
Quick answer to brute force protection on WordPress
If you do only three things today, do these:
- Enforce strong passwords + remove the “admin” username.
- Require 2FA (two-factor authentication) for administrators and editors.
- Install a security plugin like Jetpack Security, with a built-in WAF (web application firewall) to stop bots before they hit wp-login.php and xmlrpc.php.
Below you’ll get a practical hardening checklist and a comparison of the best tools for blocking WordPress brute force attacks.
What is a brute force attack?
Brute force attacks happen when hackers use trial and error to access your website. This usually involves guessing your login information using automated software. Essentially, hackers will try many different passwords and username combinations until they find yours.
Other forms of hacking usually exploit vulnerabilities on your WordPress website. For instance, hackers can access your data through out-of-date software, plugins, or themes. Even an old PHP version can leave your site vulnerable.
On the other hand, brute force attacks rely on weak login credentials. If you have a guessable password like “123456,” hackers can use automated software to enter your site.
Brute force attacks are more common than you might think. In fact, they’re becoming more of a threat than ever before. Towards the end of 2021, the rate of brute force attacks increased by 160 percent.
If your website suffers from a brute force attack, hackers can:
- Steal your private data
- Add malware to your site
- Decrease your credibility and/or search rankings
- Remove your content completely
Needless to say, you’ll want to protect your website against these dangers. Although the default WordPress settings don’t offer extra protection against brute force attacks, you can take some steps to prevent them from happening.
What brute force attacks look like on real WordPress sites
On WordPress sites, login attacks usually come in waves: repeated POST requests to wp-login.php, XML-RPC login attempts to xmlrpc.php, and “credential stuffing” where bots reuse leaked passwords across many sites.
Tools that block attacks effectively do two things well: rate-limit login attempts and stop known bad IPs before they reach WordPress. For example, Jetpack Security’s brute force protection is designed to block both traditional and distributed botnet attacks, and Jetpack reports blocking thousands of brute force attempts over a typical site’s lifetime.
Quick log pattern to look for: a sudden spike in requests to wp-login.php or xmlrpc.php coming from repeating IPs or many IPs with the same user agent.
How to know if you’re under a brute force attack
Before you can stop an attack, you need to recognize the signs. Look for:
Sudden slow performance: Your site becomes sluggish or unresponsive because the server is overwhelmed with login requests.
High CPU usage alerts: Your hosting provider may notify you of excessive resource consumption.
Unfamiliar login errors: Users (including you) report being locked out of their accounts.
Review your server logs: Check your server’s access logs for a massive number of POST requests to wp-login.php from a few repeating IP addresses.
How to prevent brute force attacks on WordPress
Now that you know about brute force attacks, let’s discuss how to protect your WordPress website from them.
Step 1: Update your username
Since brute force attacks involve guessing login information, you can secure your WordPress website by updating your credentials. First, you should consider choosing a unique username.
In older versions of WordPress, the default username was “admin.” Now, new account holders can choose their usernames when they first log in. But you might need to update your username if you have an older account.
To see what your current username is, open your WordPress dashboard. Then, navigate to Users → Profile. You’ll find your username under the Name section.

If you already have a unique username, skip to the next steps. If you see admin as your username, you’ll likely want to change it. Unfortunately, you won’t be able to directly edit your profile in the dashboard.
One of the simplest ways to change your WordPress username is to create a new user. Then, you can assign it a unique username and give it the same administrative privileges. The only downside of this method is that you’ll have to use a new email address.
First, go to Users → Add New. On this page, create a new username and enter your email address. Be sure to set the user role as Administrator.
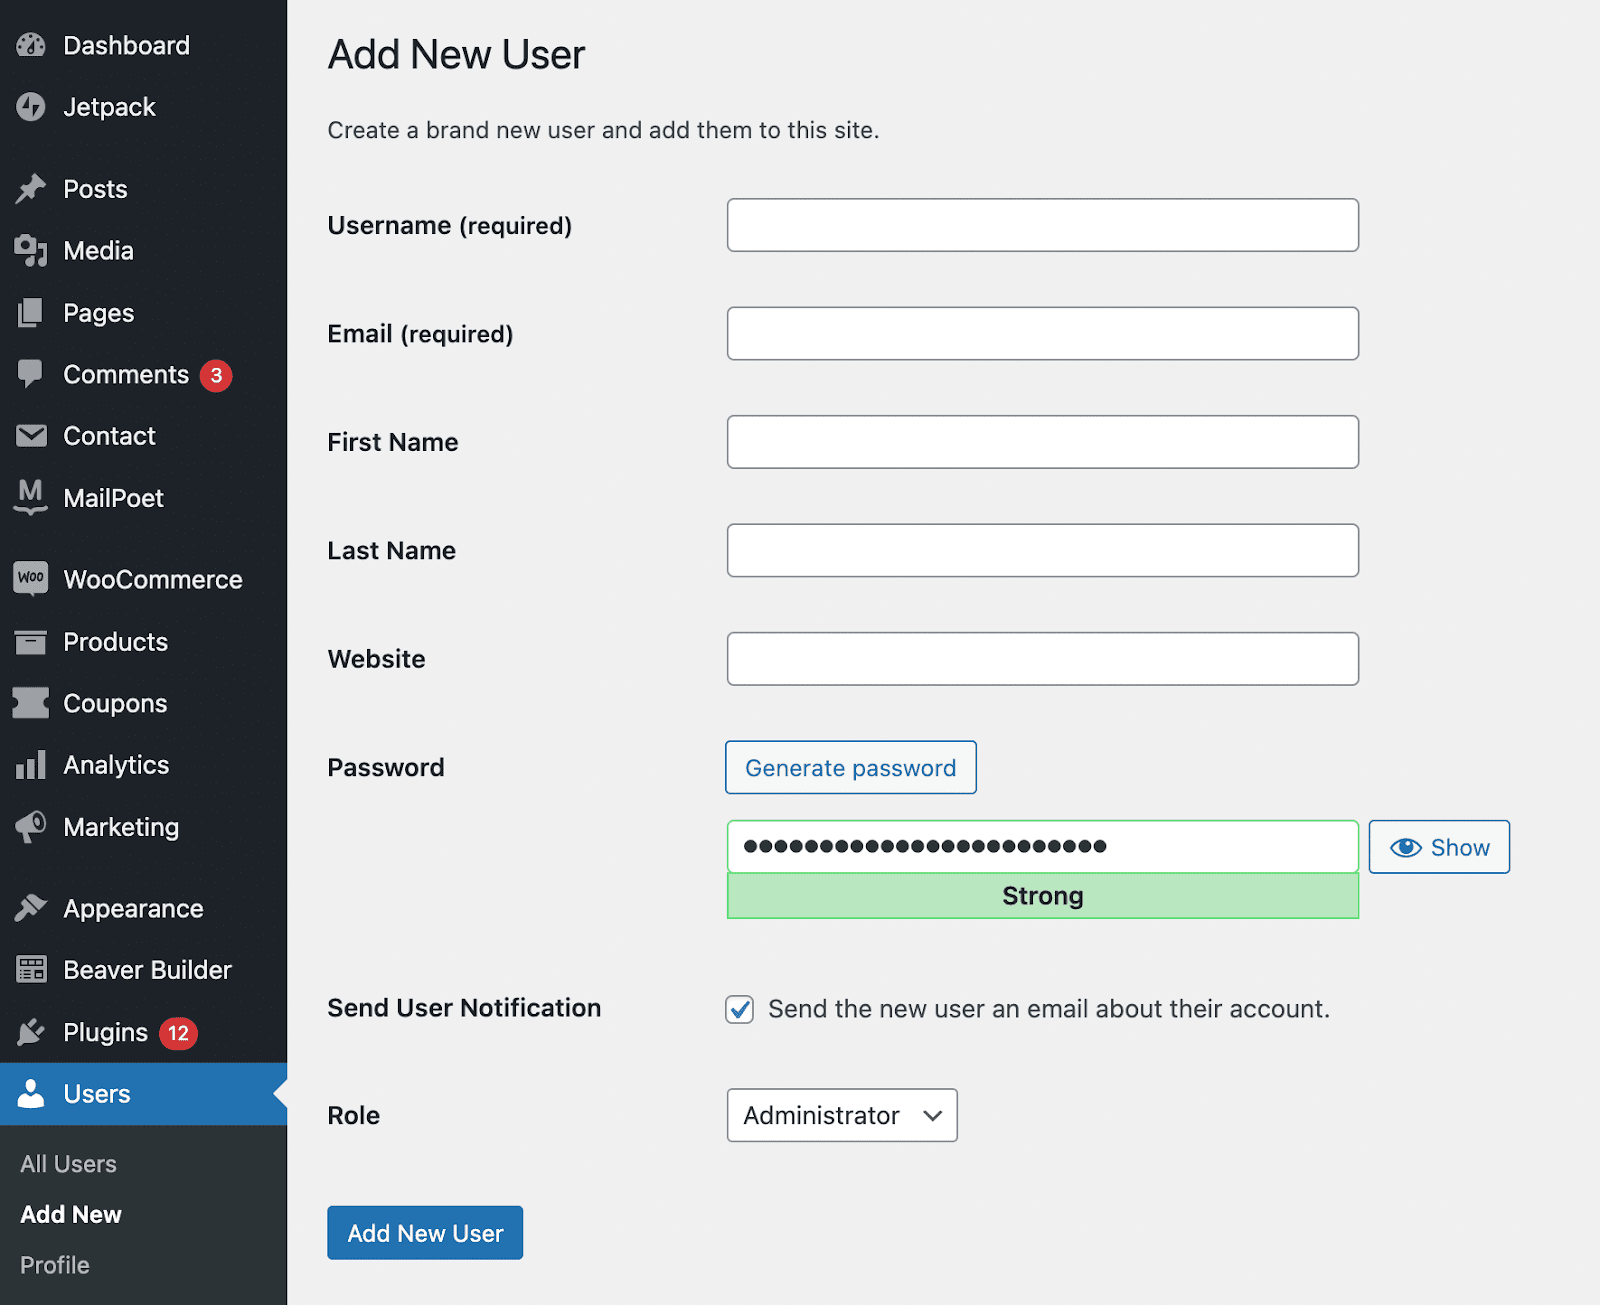
If you want to use the same email address, you can simply add a plus sign with additional letters after the username. For instance, if your normal email address is “exampleemail@gmail.com”, you can use “exampleemail+wordpress@gmail.com.” WordPress will consider this a new email address, but it will use the same inbox.
Next, you’ll need to log out of WordPress and use the new username to log back in. Then, go to the All Users page and click delete underneath the admin user role.
During the deletion process, you’ll need to move its content to the new username. To do this, select Attribute all content to [new username]. This is a critical step — otherwise your content will be deleted.
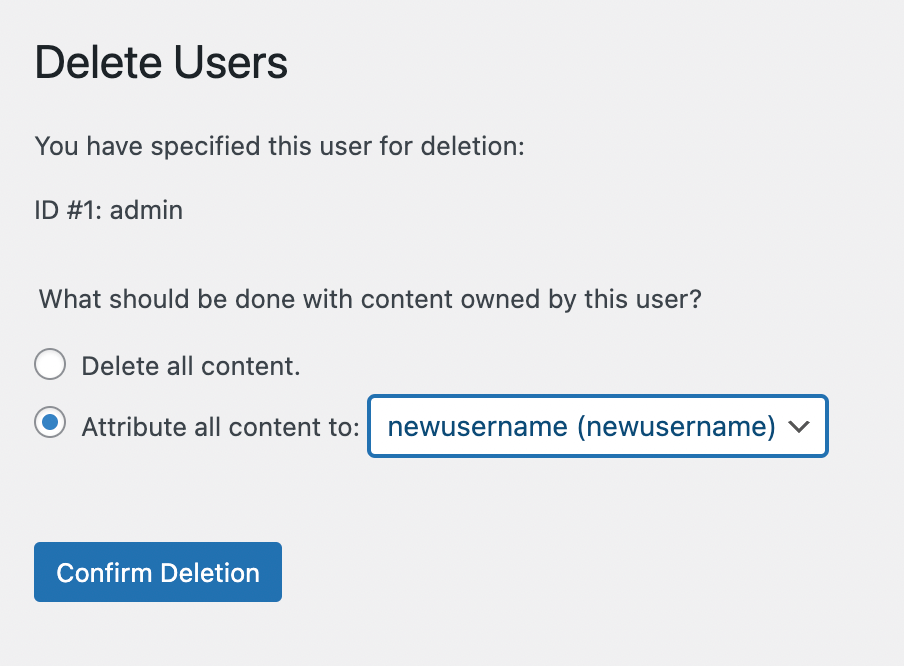
Finally, click on Confirm Deletion. If you want to start using the same email address assigned to the admin username, you can update that now.
If you want to change your existing username, you’ll need to do this through your WordPress database. Note that making changes to the database can be dangerous, so it’s best to do this if you already have experience in this area. To change your username, take the following steps:
- Click on the phpMyAdmin tool in the cpanel of your hosting provider. The exact location can vary based on your host.
- Click on your WordPress site’s database in the left-hand panel. This will open up your database tables.
- Click on the wp_users table. The prefix “wp_” is set by default, but your host may have changed it to something else. For example, the table may be called “janb_users.”
- Find the username you want to change on the right side — in this case, “Admin” — and click Edit.
- In the user_login field, type whatever new username you’d like to set.
- Click the Go button.
Now, you can log in with the new username!
Step 2: Use a strong password
Another way to protect your site against brute force attacks is to use a strong password. Since hackers use botnets (robot networks) to randomly guess passwords, it can help to have a one with a unique string of numbers and letters.
These are the characteristics of a strong password:
- It has between ten and 50 characters
- It uses uppercase and lowercase letters
- It uses numbers and special characters
- It’s unique from passwords used for other accounts or websites
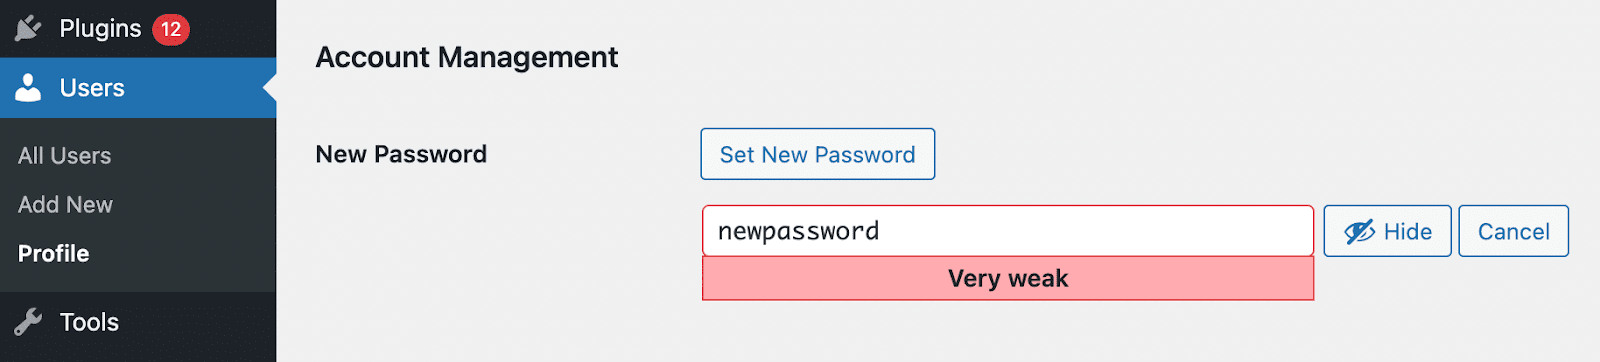
To update your WordPress password, navigate to Users → Profile. Then, scroll down to Account Management.
Next, click on Set New Password. Once you do this, WordPress will automatically generate a strong password for you. This will be a complex credential that’s hard to guess.
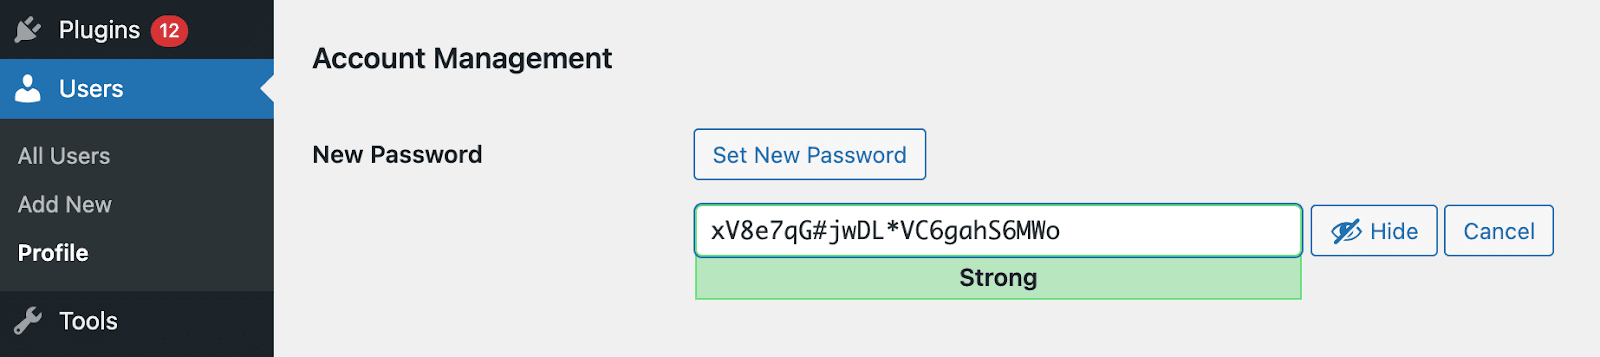
You can use this password or create your own. As you type, WordPress will indicate how strong or weak your new password is.
To make sure your new password is secure and random, you can use a password generator. This tool can automatically create a password with uppercase and lowercase letters, as well as numbers and symbols.
After pasting your new password into the text box, scroll to the bottom of the page. Click on Update Profile to save your changes. For maximum protection against brute force attacks, consider changing your WordPress password every four months.
Step 3: Add two-factor authentication
When you log in to your WordPress site with just a password, this is called single-step authentication. You can also implement two-step, or two-factor, authentication.
With two-step authentication, you’ll provide two forms of verification to log in to your site. You’ll still enter your password, but you must also confirm your identity on your phone or another device.
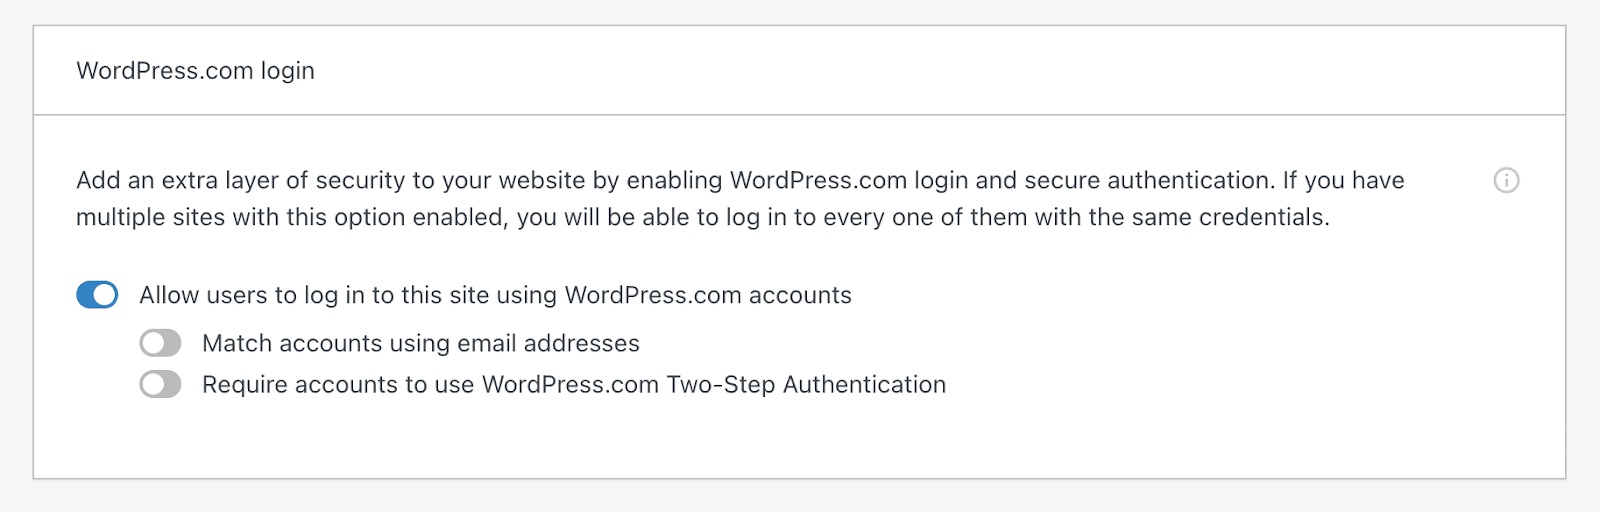
Jetpack makes it easy to add secure authentication to your website. First, install and activate Jetpack in WordPress. Then, in the Jetpack dashboard, click on Manage security settings.
Scroll to the bottom of the page and find the WordPress.com login section. Here, turn on Require accounts to use WordPress.com Two-Step Authentication.
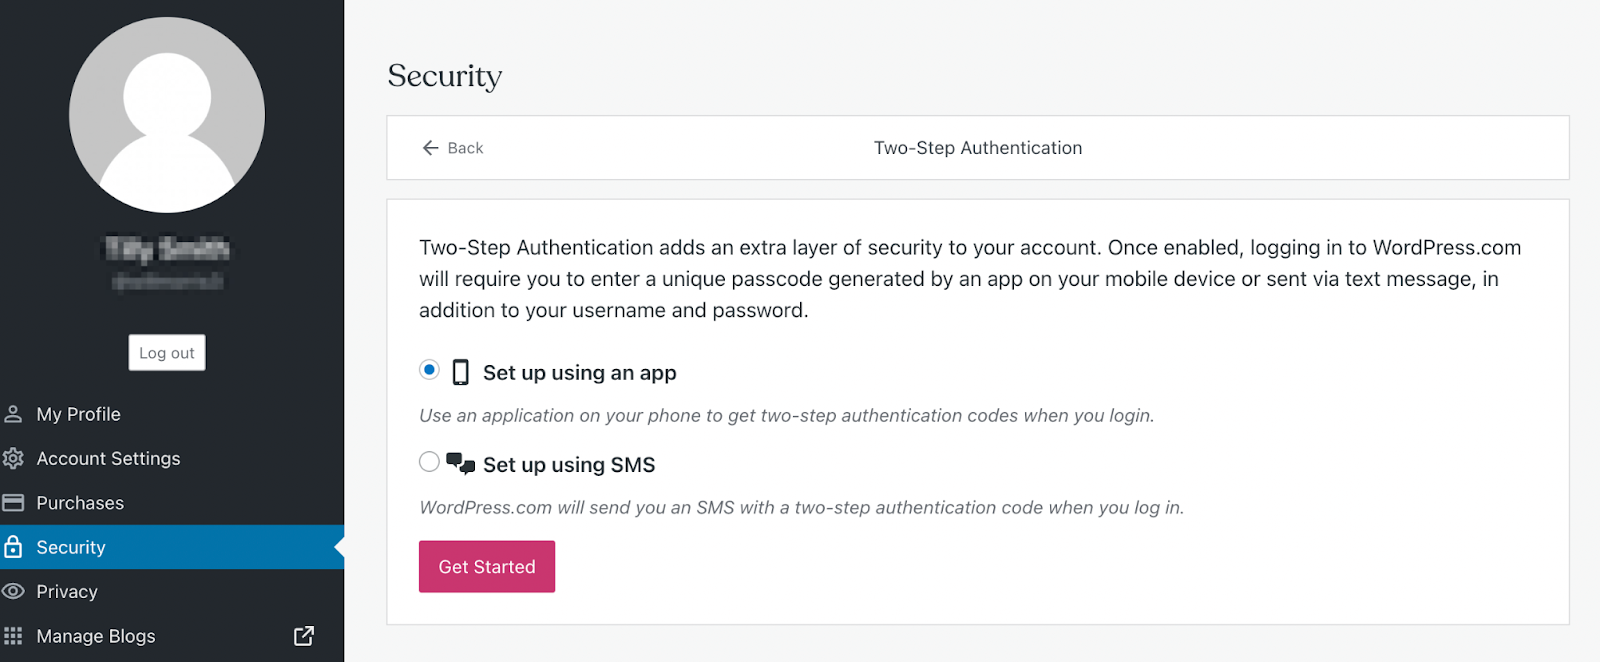
Then, find the Two-Step Authentication page in the Security tab. You can choose to set up your two-factor authentication with an app or SMS.
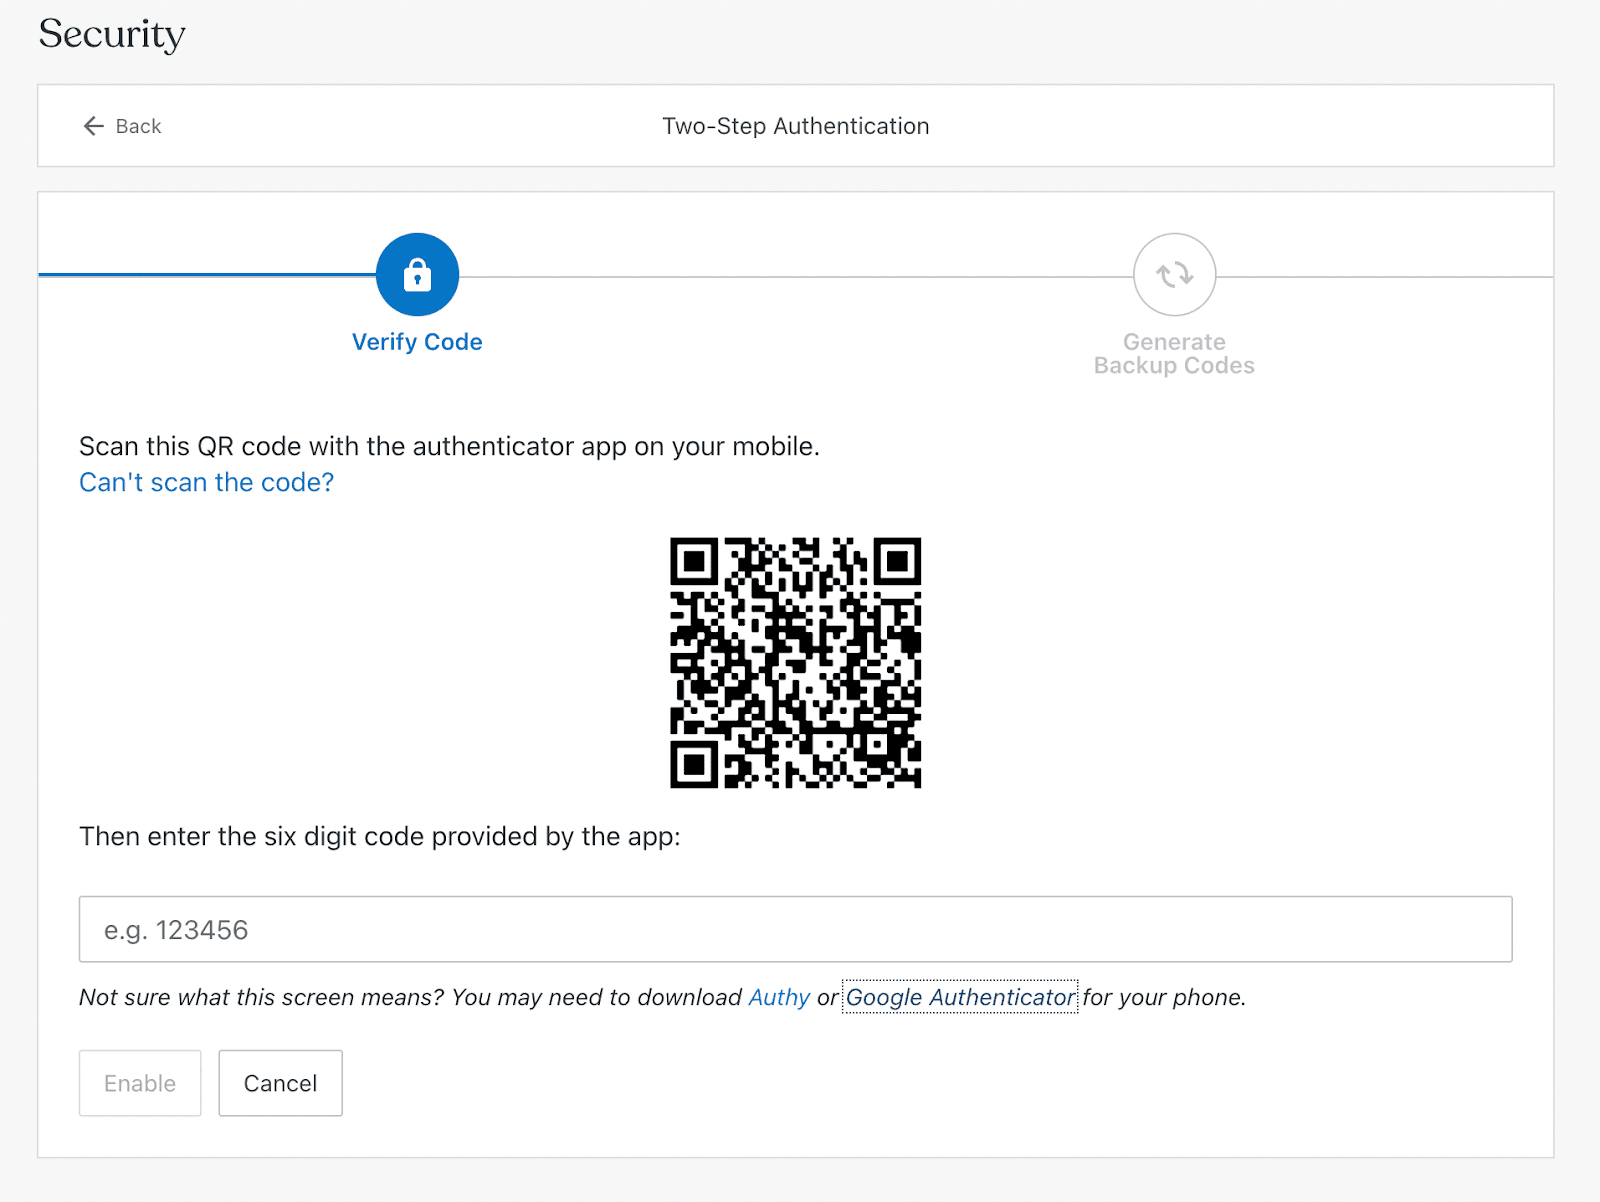
If you choose the first option, you’ll need to download an app like Google Authenticator (iPhone | Android). WordPress will provide a QR code, which you can scan with the app and then enter the generated code.
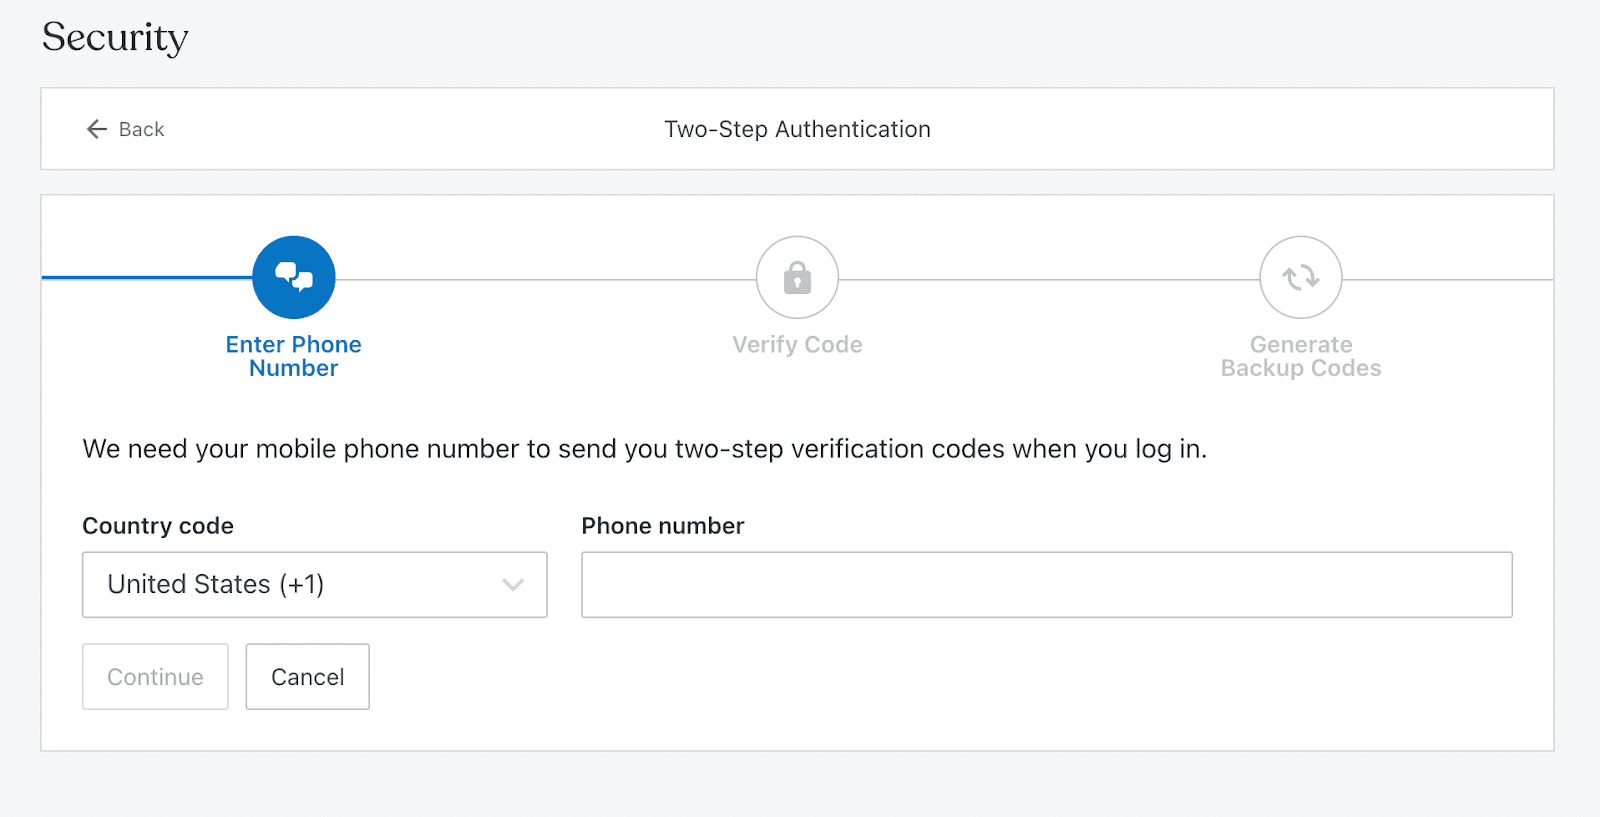
When you click Set up using SMS, you’ll have to enter your phone number. Once you verify the code sent to your phone, you can start using two-factor authentication.
Now you can verify your identity every time you log in to WordPress! This setup can offer increased protection against brute force attacks.
Step 4: Install a brute force attack protection plugin
After taking some basic steps to protect your login page, you can also benefit from installing a brute force protection plugin. The right tool can automatically block brute force attacks before they impact your site.
As you’re trying to choose the best plugin for brute force protection, you should keep a few factors in mind. To protect your website, you’ll want to find a plugin that works behind the scenes to prevent and stop brute force attacks.
Here are some basic features you should look for in a brute force protection plugin:
- Limited login attempts
- Web application firewall (WAF)
- Two-factor authentication
- A firewall
- IP address blocklisting
Additionally, many brute force protection plugins provide general security for your website. For example, Jetpack Security not only prevents brute force attacks but performs malware scans, creates automatic backups, and screens for spam.
Jetpack is also one of the easiest brute force protection plugins to configure. After installing and activating Jetpack, you can turn on Brute force protection in the dashboard.
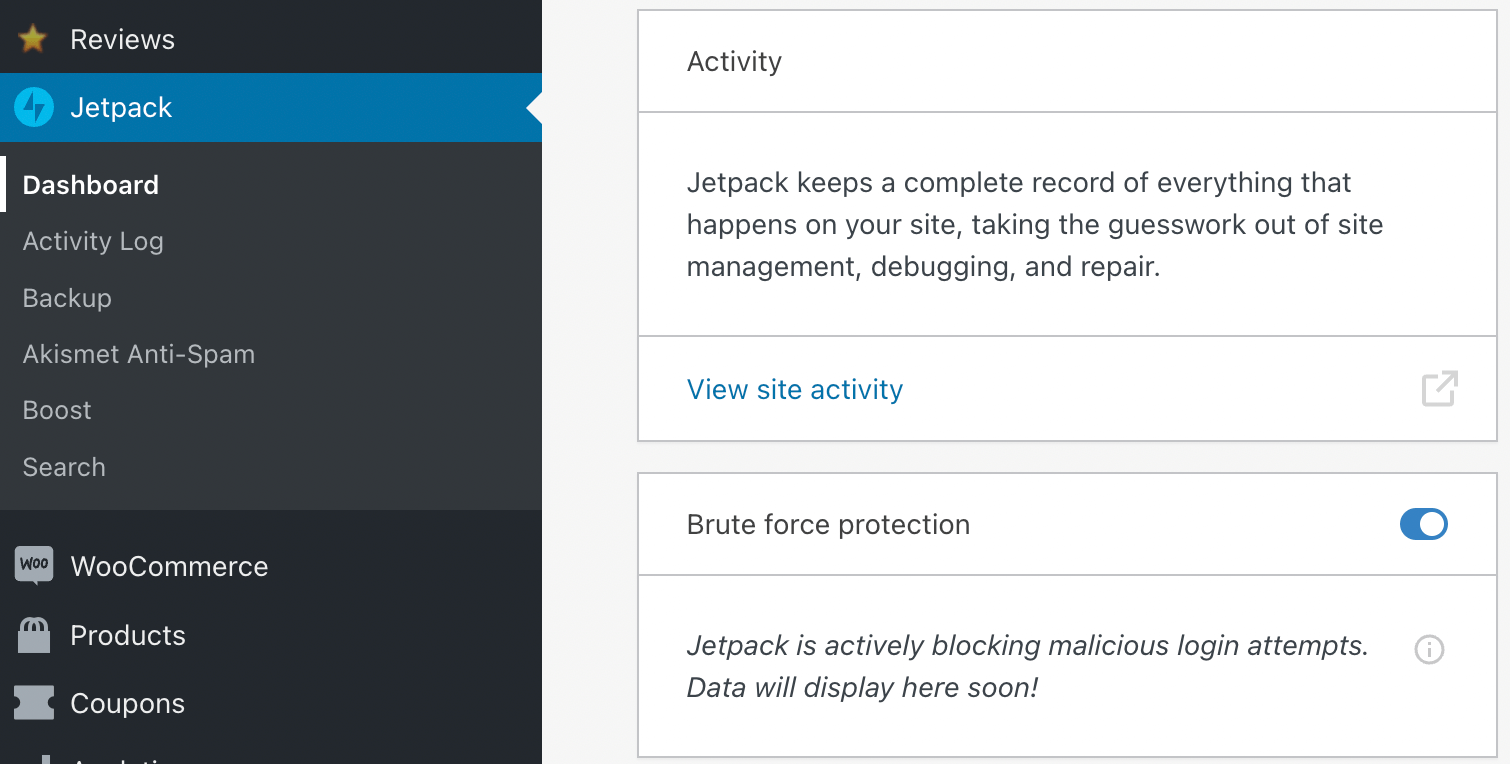
With this one click, you can enable Jetpack to prevent brute force attacks!
The four best WordPress plugins for brute force attack protection
Installing a plugin can be the most effective way to prevent brute force attacks. Still, you might not know which option is right for your website. Although there are many brute force protection plugins, four stand out as the best!
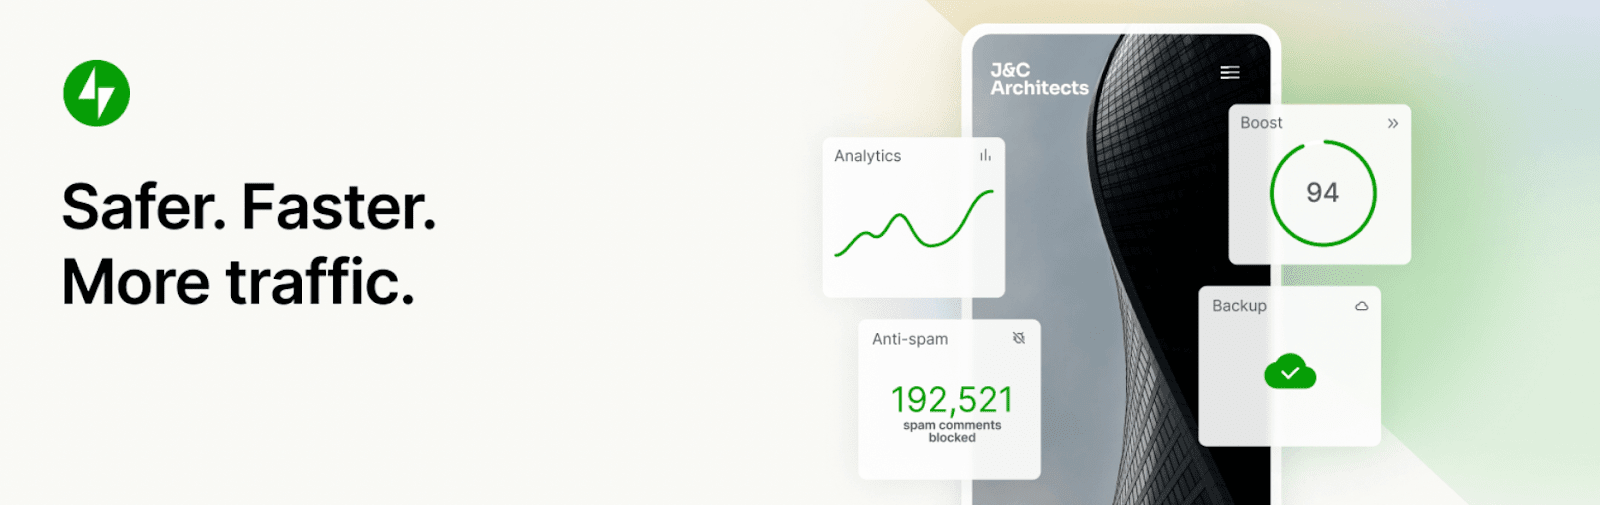
We guard your site. You run your business.
Jetpack Security provides easy‑to‑use, comprehensive WordPress site security, including real‑time backups, a web application firewall, malware scanning, and spam protection.
Secure your site1. Jetpack
When you download Jetpack, you can access brute force attack protection and many other security features. Jetpack also offers performance and growth tools, so you can choose a plan that’s perfect for your needs.
If brute force attack protection is all you need, the great news is that it’s completely free!
Key features of Jetpack’s brute force attack protection:
- One-click activation
- Allowed IPs
- The ability to see the number of blocked attacks
- Web application firewall
- Two-factor authentication
Pros:
- If you’re accidentally locked out of your login page due to Jetpack’s protection measures, you can send a special login link to your email address.
- Jetpack compares each new IP address to its global database of malicious addresses.
- With Jetpack, you can also access extended security measures, like downtime monitoring, site backups, and malware scans.
Cons:
- Jetpack requires you to connect to a WordPress.com account.
- If your server is misconfigured, it may not return an IP address, which can disable the brute force protection feature.
Ease of use:
With Jetpack, you can implement brute force attack prevention in a single step. After installation, just visit the main Jetpack dashboard to turn on the feature. Then, you can simply allow Jetpack to do the work without any maintenance.
Pricing:
Any WordPress user can start using brute force protection for free with Jetpack.
2. Sucuri
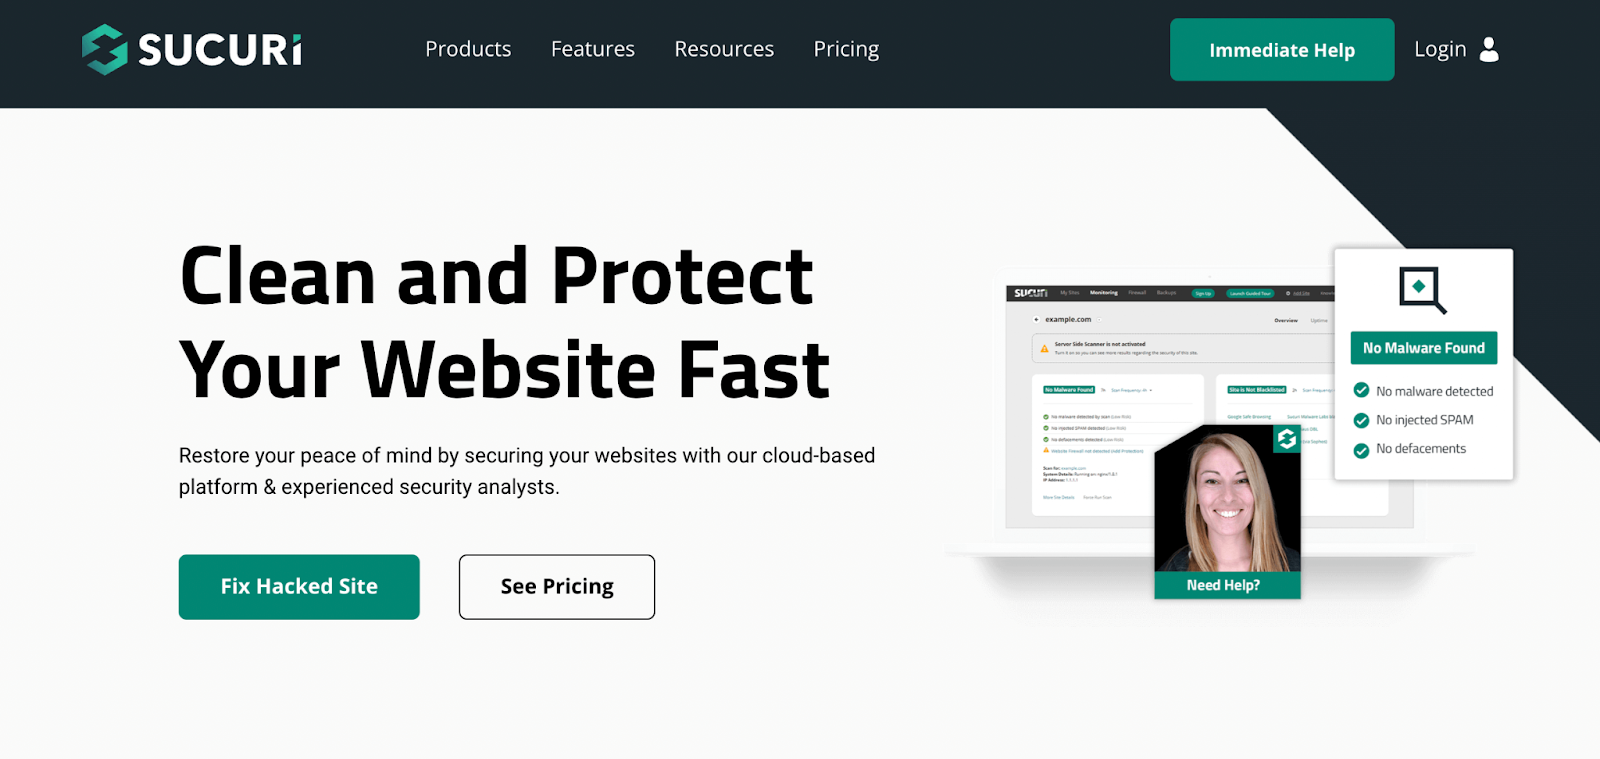
Sucuri is a tool specializing in website monitoring, protection, and performance. By implementing a Web Application Firewall (WAF), Sucuri can block brute force attacks on your website.
Key features:
- Web Application Firewall (WAF)
- Limits login attempts
- Automated tools to block bots
- Allowlisting
- Two-factor authentication, CAPTCHA, and passcodes
Pros:
- Sucuri includes geo-blocking so that you can block all visitors from specific IP ranges. This feature can prevent brute force attacks from certain countries.
- Sucuri’s firewall sanitizes traffic before it even reaches your WordPress website.
Cons:
- The free version of Sucuri does not provide brute force prevention. To access a WAF, you’ll need to purchase a subscription.
- Although Sucuri is an effective option for brute force attack prevention, it’s expensive. There are other free plugins with similar features.
Ease of use:
Compared to other plugins, Sucuri has a more complicated setup process. To start using Sucuri, you’ll need to purchase a plan and set up a firewall. This involves integrating your cPanel account and manually changing your DNS records.
Pricing:
With Sucuri, brute force protection requires a premium plan. This feature comes with all of its subscription options, which start at $199.99 per year.
3. Wordfence Security

Wordfence Security is a plugin that provides a firewall and security scanner all in one. This tool offers many forms of login security, including two-factor authentication, allowlisted IP addresses, and reCAPTCHA keys.
Key features:
- Limits login attempts
- Records successful and failed login attempts
- Continually updated IP blocklist
- Manual blocking tools
- Two-factor authentication and reCAPTCHA
Pros:
- Since it comes with a Web Application Firewall, Wordfence can identify and block malicious traffic on your site.
- If any administrative passwords are compromised, you can block any logins from that user.
- Wordfence performs scheduled security scans every three days when you’re using the free version.
Cons:
- For the free version of Wordfence, the generated data is delayed by 30 days. To receive real-time threat intelligence, you’ll have to upgrade to a paid plan.
- The free plugin also doesn’t let you manually schedule scanning.
Ease of use:
Wordfence provides a very simple setup process for first-time users. After installing and activating the free plugin, it will prompt you to enter an email address where Wordfence can send alerts. Then, you can add brute force protection by implementing a firewall and login security features.
Pricing:
Even the free version of Wordfence Security comes with built-in brute force protection for unlimited sites. If you need advanced support, you can purchase a premium plan. These start at $99 per year.
4. iThemes Security

iThemes Security ensures that you can start protecting your website from brute force attacks in under ten minutes. With this plugin, you can quickly customize your login page with two-factor authentication and password requirements. Plus, iThemes will automatically add your site to its Brute Force Protection Network.
Key features:
- Maximum login attempts for both hosts and users
- Local and network brute force protection
- Graphs of recent brute force attacks
- The ability to set password requirements for all users
- Two-factor authentication
Pros:
- One of the main benefits of iThemes Security is its Brute Force Protection Network. It records suspicious activity across one million different websites, identifying malicious IPs.
- You can set a maximum number of login attempts for your website, which can prevent automated login guessing.
Cons:
- If you want to add extra security features to your login page, like a reCAPTCHA field, you’ll need to purchase the premium plugin.
- The free plugin does not include real-time security reports.
Ease of use:
After installation, the iThemes plugin will take you through a step-by-step setup process. Here, you can enable both local and network brute force protection. You can also choose to add two-factor authentication for extra security.
Pricing:
iThemes Security is a free WordPress plugin. If you’d like to use the real-time security dashboard, you can purchase the premium version, starting at $80 per year.
Comparison of the top plugins that block brute force attacks
| Jetpack | Sucuri | Wordfence Security | iThemes Security | |
| Limit login attempts | Yes | Yes | Yes | Yes |
| Two-factor authentication | Yes | Yes | Yes | Yes |
| Real-time reports | Yes | Yes | Yes, with premium extension | Yes, with premium extension |
| IP blocking | Yes | Yes | Yes | Yes |
| reCAPTCHA | Yes | Yes | Yes | Yes, with premium extension |
| Network brute force protection | Yes | No | No | Yes |
| Ease of use | One-step activation | Requires manually changing DNS records | Simple tabs for managing your firewall, scans, and login security | Setup wizard to configure login security and user groups |
| Price | Free | $199.99-$499.99 per year | Free-$950 per year | Free-$199 per year |
Frequently asked questions (FAQs)
Now that you know all about brute force attacks and how to prevent them, let’s answer some questions!
How much does brute force protection cost in WordPress?
Brute force protection can be free if you download a brute force protection plugin like Jetpack. Other providers like Sucuri require a paid subscription.
How can I set up brute force attack protection in WordPress?
Setting up brute force protection will vary based on the provider you choose. Some options require you to configure a firewall, which can be complicated. Alternatively, Jetpack is a plugin that makes this process simple. After activation, you can turn on brute force protection with just one setting.
What else can I do to secure my WordPress site?
There are many general security measures you can take to protect your website. First, consider performing consistent updates for the core software, themes, and plugins. You can also keep your data secure by backing up your website.
Another simple security measure is blocking spam. It’s also a good idea to delete unused plugins and monitor your site activity. Finally, make sure you regularly scan for malware and take immediate action if anything is found.
If you’d like to automate all your security measures, some of the leading WordPress security plugins not only block brute force attacks, but also automate other security measures such as malware scans and site backups.
Secure your website against brute force attacks
Without the right protection, your website can fall prey to brute force attacks. Fortunately, a brute force protection plugin is a simple addition to your site. With the right security measures, you can stop hackers from stealing your data.
To review, here’s how to implement brute force attack protection in WordPress:
- Update your username.
- Use a strong password.
- Add two-factor authentication.
- Install a brute force attack protection plugin like Jetpack.
After following these steps, you’ll be able to keep your information private and secure! Then, it’s just a matter of keeping your software up to date, backing up your files, and monitoring your website for spam and suspicious activity.
We guard your site. You run your business.
Jetpack Security provides easy‑to‑use, comprehensive WordPress site security, including real‑time backups, a web application firewall, malware scanning, and spam protection.
Secure your site