
If you have a WordPress website, you may need to reinstall the core software at some point. For example, your site could get infected with malware that has to be removed, or you might decide to migrate to a new hosting provider. In these situations, knowing how to reinstall WordPress properly helps you prevent any data loss in the process.
There are multiple ways to carry out a seamless WordPress reinstallation. You might prefer to use a specialized tool or take a more hands-on approach and reinstall the software manually through the admin dashboard or a file transfer protocol (FTP) client.
In this guide, we’ll show you how to reinstall WordPress from scratch. Plus, we’ll cover a few essential pre-installation and post-installation steps, and troubleshoot some common issues you might encounter.
Common reasons to reinstall WordPress
WordPress is a commonly used content management system (CMS) that receives frequent updates and improvements. But it’s not impervious to issues or user error, so there may be scenarios where you need to uninstall WordPress and reinstall it on your website.
Let’s take a look at some of the most likely reasons you might have to do this.
1. Your site is compromised by malicious actors
If your site doesn’t have sufficient security measures in place, it can become compromised. For example, weak login credentials make it easier for hackers to access your site through brute-force attacks. Alternately, if you’re using an outdated version of WordPress, a hacker could exploit a known vulnerability in the software and inject malware into its code.
In either case, the attack could cause irreparable damage to your WordPress installation. As a result, you might need to remove it from your server temporarily, and reinstall it.
Of course, implementing security practices like two-factor authentication and auto-updates helps prevent such issues. You’ll also want to use a tool like Jetpack Security to protect your site against malware, harmful spam, and other common threats.
2. You experience database corruption
You might also need to reinstall WordPress if your site’s database becomes corrupted. This can be caused by a coding error, or a compatibility issue between a plugin and the core WordPress software.
A malfunctioning database can lead to data loss and impact your site’s functionality. If you’re unable to repair and recover the corrupted database, you’ll likely need to reinstall WordPress to resolve the problem.
A fresh installation will give you a clean and functional database. Of course, you’ll also have to transfer all of your site’s data to the new database, which is why it’s essential to keep a continuous backup of your site (more on this soon).
3. You want to migrate to a new server or hosting provider.
When you switch hosting providers, you’ll have to transfer your WordPress website to the new host’s servers. In some cases, you’ll be able to migrate your content without any issues.
But if the new server environment has different configurations and settings than the previous one did, a simple migration might not be enough. You may need to reinstall WordPress to ensure that your website integrates seamlessly with the new server. If you’re not sure, you can contact your new hosting provider to see if this will be necessary.
4. You’re experiencing persistent technical issues
Your WordPress website may simply experience a persistent issue that you’re unable to troubleshoot. This could include a conflict between themes and plugins, compatibility problems with WordPress core software, or other technical glitches.
By reinstalling WordPress from scratch, you’ll be able to reset the entire system. This can help remove any problems in the software and its configuration, and enable your site to function properly. It can also be a useful step if you’re unable to identify the root cause of the issue via basic troubleshooting steps.
Four steps to take before reinstalling WordPress
Before covering how to reinstall WordPress, let’s go over some essential pre-installation steps. Taking the time to perform these tasks first is essential to ensuring that the process goes smoothly.
1. Back up your website
First and foremost, you’ll want to back up your WordPress website. This involves saving your site’s content in a safe place, so you can easily restore it once WordPress is reinstalled.
Your web host may offer a built-in backup solution. But this won’t be sufficient to protect your site, since the backups may not be frequent enough, and are probably stored on the host’s own servers.
Instead, you can use a plugin like Jetpack VaultPress Backup to make secure, real-time copies of your website. This tool enables you to back up the following:
- Your WordPress database
- All files in your plugins, mu-plugins, themes, and uploads directories
- Data in your WordPress root directory that isn’t part of another WordPress installation
- Other files inside the wp-content directory
Note that VaultPress Backup does not save the following data:
- The core files of WordPress (although you can easily download them from WordPress.org)
- Files outside the plugins, themes, and other directories mentioned above
- Cache and backup directories
- Additional WordPress installs, like those found inside a subdirectory
This plugin stores your backups on servers located in secure data centers around the world. Then you can easily restore your content by logging into your account. Plus, you can use the built-in activity log to restore your site to a particular point.
2. Document any custom configurations
Before proceeding, you’ll also want to make note of any custom configurations on your current installation. These may include theme customizations, plugin settings, and any modifications made to the core files.
In addition, you might want to save any code snippets that you’ve added to your theme to style certain elements. This way, it will be easier to recreate your website’s look and feel when you reinstall WordPress.
3. Ensure that you have FTP or cPanel access
You may need to use File Transfer Protocol (FTP) to upload your saved files to your new WordPress installation. That means downloading and installing an FTP client like FileZilla if necessary.
You’ll also need to make sure you have the right FTP credentials — specifically the hostname, username, password, and port number required to access your website directly. You can find this information in your hosting account.
Additionally, you’ll need access to your hosting provider’s control panel to manage your directories and make additional modifications to your website. This should be located in your hosting account as well — it may be called cPanel, or it may be a custom solution offered by your provider.
4. Have your database credentials handy
Finally, you’ll want to make sure you have your database credentials readily available. This includes the database name, username, and password, as well as the host information.
You can usually find these details in the wp-config.php file of your existing WordPress installation. Alternatively, you can use the database management tool provided by your web host to locate them.
While you’re reinstalling WordPress, you’ll be asked to enter this information to establish a connection between your website and the database. Therefore, having it on hand will ensure a smooth process.
How to uninstall and reinstall WordPress, along with your content (3 methods)
Once the above steps are completed, you’re ready to get started. The following sections will cover how to reinstall a completely fresh version of WordPress. You’ll find three different methods, including a manual approach.
The methods in this section involve deleting your content as well, so you can restore a previous version from a backup or start from scratch — remember, you should definitely have a full backup of your site before following any of these instructions.
Now, connect to your website via an FTP client (like FileZilla). Then open your site’s root directory (typically labeled public or public_html, or sometimes named after your site) and delete all the contents within that folder.
You can also do this through the file manager in cPanel, or via whatever control panel your hosting provider offers.

If you want a fresh WordPress installation, you’ll also need to delete your database. In cPanel, for instance, look for the Databases section and click on MySQL Databases.

This will take you to a page with a list of databases in your WordPress installation.

Go ahead and delete them all. Now, you’re ready to reinstall WordPress from scratch.
Method 1: Reinstall WordPress manually via FTP
To reinstall WordPress manually, you’ll first need to download the software from the official website.

Once the download is complete, extract the ZIP file. Then open your FTP program again and locate your site’s root directory.
Upload the extracted files to that folder. If you get a message that says something like “Target file already exists”, make sure to select the Overwrite option.
When you’re ready, open a web browser and visit your website. Then follow the on-screen instructions to run the WordPress installer, and enter your database credentials (which you saved earlier) when prompted.
Method 2: Use a one-click installer
You may also be able to reinstall WordPress using a one-click installer, like Softaculous. This kind of tool is often included in your hosting plan.
If your web host provides this feature, locate the installer (referencing the host’s documentation if needed) and select the WordPress option.
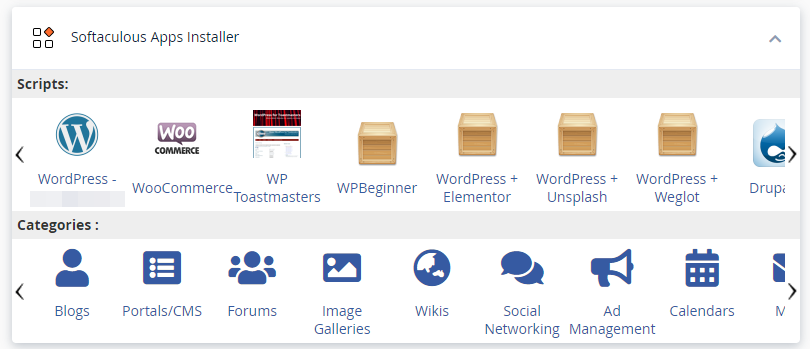
Then hit the Install button, and follow the on-screen instructions.

You’ll be prompted to choose the domain where you want to install WordPress, set up an administrator account, and configure some basic settings. Note that this will overwrite any existing installations and settings.
Method 3: Use a specialized plugin
Alternatively, you could use a plugin to reinstall WordPress. For instance, WP Reset will reset your site’s database to its default installation values, without changing any files.
You can also configure this tool to delete all customizations and content, or just specific parts like your theme settings.

Similarly, Advanced WordPress Reset enables you to reset your entire WordPress installation (or parts of it). Exactly how this process works will vary depending on which plugin you choose, but it’s usually straightforward.
Note that you will need to purchase the premium versions of these plugins to fully complete a WordPress reinstallation. Therefore, you might want to consider using one of the other methods outlined above if possible (which are completely free).
How to reinstall just WordPress core (without deleting any content)
The above processes will create a clean WordPress installation, overwriting or deleting any content that’s already on your site. If all you need is to reinstall the core WordPress software, rather than resetting your site entirely, here are a few methods for doing so.
Method 1: Reinstall WordPress core in your admin dashboard
The easiest way to reinstall the WordPress core software is through your site’s admin dashboard. Simply go to Dashboard → Updates and select the Re-install button.

That’s it — WordPress will now automatically download and reinstall the latest version, without affecting any of your site’s content.
Method 2: Reinstall WordPress core manually via FTP
You can also reinstall WordPress without losing data via FTP. As shown earlier, you’ll need to download WordPress to your computer and extract the ZIP file. But this time, you’ll want to remove the wp-content folder, since you won’t be uploading it to your website.
In FileZilla, open your root folder and delete all of its contents, except for the wp-content folder. That folder contains all of your site’s files, including media, plugins, and themes. Therefore, you’ll want to keep it intact.
Then, go ahead and upload the contents of your downloaded ZIP file to the root folder. When the process is complete, you should have a freshly installed copy of WordPress core, and your content should be untouched.
Method 3: Reinstall the core software through WP-CLI
You can also reinstall WordPress core using WP-CLI. This is a command line tool for managing different aspects of your WordPress installation.
This method requires some technical knowledge, as you’ll need to install WP-CLI on your site’s server first. The process will vary depending on your web host, but it might already be included in your hosting account.
To reinstall WordPress through WP-CLI, you’ll just need to enter the following command:
wp core download --skip-content --forceThis will reset your WordPress installation without affecting your themes and plugins.
Four important post-reinstallation steps you should take
Now that you’ve successfully reinstalled WordPress, it’s time to carry out some essential post-installation steps. This will ensure that everything is working properly.
1. Restore your backups and verify their integrity
If you made any backups before uninstalling and reinstalling WordPress, you can now go ahead and restore them. How you do this will depend on your chosen backup tool.
With Jetpack VaultPress Backup, the process is all automated. All you need to do is open your site’s Activity Log and select a date range and/or the items you’d like to restore (e.g., plugins, posts, and pages).
Then, simply hit the Restore option, and the plugin will do the rest. Once the process is complete, check the restored content to make sure it’s all there (and that everything works the way it should).
2. Reconfigure any custom settings
Next, you’ll reapply any custom WordPress configurations. These are the settings that you may have saved during the pre-installation steps.
You’ll want to revisit your themes and plugins, and re-add your customizations (as relevant). You’ll also need to insert any custom code snippets that were removed during the reinstallation process.
3. Test your site’s functionality
It’s also important that you test your site’s functionality to make sure there are no glitches or missing elements after the reinstallation process. What you check will depend on your site’s contents, but here are a few things to consider:
- Any interactive elements, like forms and comment sections
- How your page layouts and design appear across different devices
Additionally, it’s a good idea to check your site for broken links, missing images, and browser compatibility. The more thorough you are with this process, the more likely you’ll be to catch any unexpected issues.
4. Ensure and strengthen your site’s security
Finally, this is a perfect time to boost your site’s security. This is especially important if you’ve suffered a recent hack, since it will help prevent you from having to reinstall WordPress again due to a cyberattack or malware.
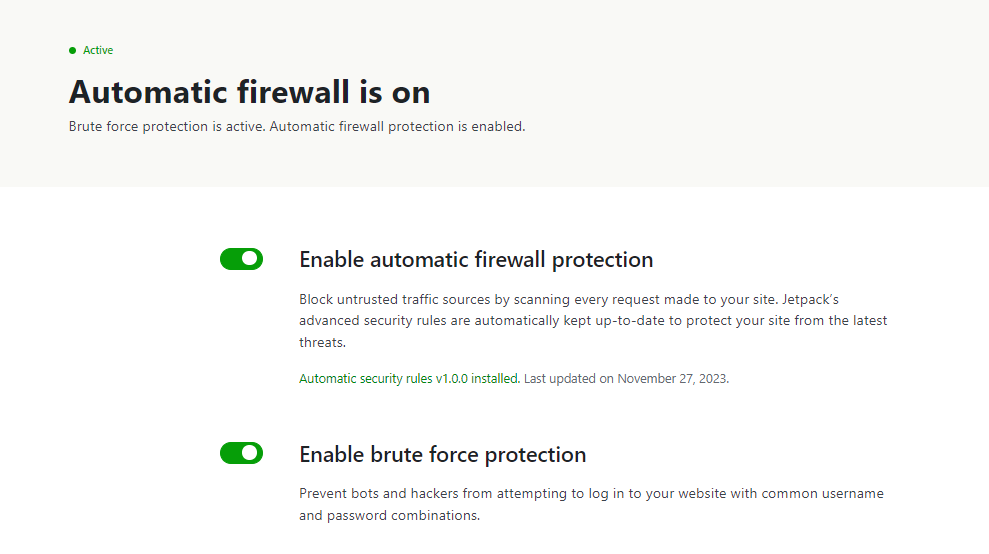
As mentioned earlier, Jetpack Security is an all-in-one solution for protecting your WordPress website. You can enable measures like a firewall and brute force protection with a single click.
You can also improve your site’s security by enforcing a strong password policy, limiting user permissions and access, and keeping your plugins and themes up to date.
Troubleshooting common reinstallation issues
Reinstalling WordPress can sometimes lead to unexpected issues, which may impact the functionality or appearance of your website. Here’s a guide to troubleshooting the four most common problems.
1. White screen of death (WSoD)
The white screen of death is when you (or visitors) encounter a blank page when trying to access your website. It can have several causes, like:
- PHP errors in your code or theme files
- An exceeded memory limit
- Incompatibility issues with plugins or themes
To determine the cause of this error, you can start by enabling debugging mode in WordPress. To do this, open your wp-config.php file and enter the following code:
define('WP_DEBUG', true);

define('WP_DEBUG_LOG', true);

define('WP_DEBUG_DISPLAY', false);
This can help you (or your developer) identify any errors in your site’s code.
Alternatively, you can try deactivating and reactivating your site’s plugins and themes, one by one. Make sure to use a staging site, and refresh the page each time, so you can see if the error disappears. If it does, you’ll know what plugin or theme was to blame, and you can update or replace it.
If your WordPress site memory limit may be the issue, you can try to increase it. Open the wp-config.php file and paste in the following code:
define('WP_MEMORY_LIMIT', '256M');You can change ‘256M’ to your preferred value. Some web hosts might not allow this type of change, though, so you may have to contact your provider for help.
2. 500 internal server error
As the name suggests, the 500 internal server error indicates that there’s a problem with the website’s server. Possible causes include:
- Incorrect file permissions
- A corrupted .htaccess file
- Incompatible plugins or themes
You can start by checking your file permissions to make sure they’re set correctly. Directories should typically have a permission of 755, and files should be set to 644.
You might also need to generate a new .htaccess file. This file may have become corrupted during the reinstallation process.
As mentioned above, it’s also a good idea to deactivate and reactivate your plugins and themes one by one. This can help you identify any compatibility issues with your installed tools, so you can correct them.
3. Missing theme or plugin files
As you test your new WordPress website, you might notice that one or more of your themes or plugins is not working properly. This is because some of their files may have become ‘lost’ during the reinstallation process.
If this is the case, you’ll need to delete and reinstall the affected plugin or theme. Before doing so, make note of any settings and configurations so you can re-apply them afterward.
4. Permalink issues
Finally, after reinstallation, you might notice that your WordPress permalinks look off or your site has the wrong URL structure. This can be due to incorrect .htaccess configuration. Additionally, your permalink structure may have failed to update during the installation process.
To resolve this issue, you can try generating a new .htaccess file. Alternatively, you can reset your URL structure by navigating to Settings → Permalinks in your WordPress dashboard.
Best practices for a seamless reinstallation process
Reinstalling WordPress should be an easy and smooth process, especially if you opt for a method like using a one-click installer. But there are a few things you may want to do to ensure a seamless reinstallation.
1. Test the process on a staging site first
If you’re worried about how the reinstallation will go, you might want to try it on a staging site first. This will enable you to familiarize yourself with the process before carrying it out on your live website. Plus, you can try different reinstallation methods in a safe environment, and choose the one you feel most comfortable with.
Using a staging site will also give you the opportunity to troubleshoot any issues that may arise. This way, you’ll know exactly what you need to do if you encounter any problems on your live website.
2. Monitor your site’s health after the reinstallation
Once you’ve completed the reinstallation process, you’ll want to keep a close eye on your site’s performance. As discussed earlier, this includes testing its functionality and making sure its pages look good across different devices.
But you might also want to run a performance test, using a tool like PageSpeed Insights. If your site gets a poor score, you’ll want to take a close look at the suggestions in the results. For instance, you might need to compress your images again.
If you’re using a caching or optimization plugin and your site’s health is still poor, you might want to check that particular plugin’s settings as well. It’s possible that it wasn’t configured properly after the reinstallation was completed.
3. Keep an activity log for reference
There are several issues that might prompt you to reinstall WordPress, including a cyberattack, a persistent glitch, or a misconfiguration. But it’s important to identify the root cause of any issues, so you can keep them from happening again.
That’s why it’s a good idea to use an activity log. Jetpack’s activity log for WordPress provides a complete record of all events on your website. This includes actions like configurations, new posts, updates, and more.
Each event will have a timestamp. It will also show you the user who made that change on your website. Therefore, you should be able to trace the last change made to your site before it encountered a problem or cyber threat.
You can then take the necessary steps to resolve the issue and prevent it from happening again in the future. For instance, you might need to restrict a user’s permissions, or remove a particular plugin to keep your site performing smoothly.
4. Back up your site in real time
Finally, you’ll want to start backing up your site in real time. This is particularly important if you have an active site and you’re constantly updating it.
With VaultPress Backup, every change you make to your site is immediately saved. These changes include adding a new product, updating a page, or processing a new order.

These backups are all automated, so you don’t need to do anything on your end. Plus, they’re stored on Jetpack’s secure servers.
If anything goes wrong, you’ll be able to quickly restore your site to the latest version. Therefore, any changes that were made before your site was hit by a cyberattack or malfunction will be saved (and retrievable). This can ensure that you don’t have to reinstall WordPress in the future.
Frequently asked questions
This guide has covered all the essentials you’ll need to know when reinstalling WordPress. If you still have any questions about the process, check out these common questions.
Do I need technical expertise to perform a reinstallation?
No, a WordPress reinstallation can be carried out by just about anyone, depending on the method you choose. If you lack technical expertise, you might opt for an easy option like reinstalling the latest version of WordPress through the dashboard, or using a one-click installer like Softaculous.
If you’re a little more technically inclined and want a hands-on approach, you might prefer to reinstall WordPress through FTP. This gives you more control over the files and data that are reinstalled.
What precautions should I take before reinstalling WordPress?
Before you reinstall WordPress, it’s essential to make a recent backup of your site. Fortunately, VaultPress Backup can automate that process for you.
This plugin makes copies of your site in real time and stores them in an offsite location. Once you reinstall WordPress, you can simply restore all of your content.
Note that VaultPress Backup doesn’t back up WordPress itself, so if you need to reinstall the core software, that will need to be done separately. What it does save is your site’s content (comments, products, posts, etc.), so you won’t lose your data.
Additionally, you’ll want to make note of any custom configurations on your site. If you’ve added some code snippets to customize your theme, for instance, you’ll need to save those so you can easily re-add them later.
What should I do after the reinstallation is complete?
There are a few steps you should consider taking once you’ve reinstalled WordPress. Most importantly, you’ll want to add a security plugin to your site, if you don’t already have one.
A comprehensive security tool is a must-have for any website. It can help prevent common cyberattacks and keep your content safe. Without it, your site may become infected with malware. Even worse, a hacker could break into your site and steal sensitive information.
Jetpack Security is a powerful tool that offers protection against various types of threats. It comes with a firewall, a malware scanner, an anti-spam tool, and other essential security features. This kind of solution can prevent many issues that might otherwise require reinstalling WordPress.
Jetpack Security: Protect and back up your site in real time
If your website has been compromised, you might need a clean WordPress installation. This can also be a solution for various persistent glitches and technical issues.
Fortunately, the process is straightforward if you use automated tools to make backups and reinstall the software. The most important thing to remember is that you’ll have to protect your new installation with a comprehensive security tool like Jetpack. This gives you access to real-time backups, easy restores, and a wealth of security tools (including a firewall and malware scanner).
Are you ready to protect your WordPress website? Get started with Jetpack Security today!
