Insert your videos directly into posts and pages on your website; they’ll be automatically uploaded to VideoPress hosting.
Using the the VideoPress block requires an active Jetpack Complete or VideoPress plan. If you are using the Classic Editor plugin, please refer to this guide instead: Add a Video Using the Classic Editor.
The VideoPress block is a part of the Jetpack Blocks suite. See our Jetpack Blocks article to learn about the available blocks and how to activate them.
Jetpack Blocks require the Block Editor (also referred to as the Gutenberg editor). If you’ve installed the Classic Editor plugin, you will need to switch back to the Block Editor either by:
- Deactivating the Classic Editor: Go to Plugins → Installed Plugins in your WP Admin and deactivate the Classic Editor plugin.
- Enabling both editors: If you prefer flexibility, navigate to Settings → Writing in your WP Admin. Set Allow users to switch editors to Yes.
See Using Blocks and the Classic Editor for more details.
It may happen that an editor that comes with a custom theme or plugin prevents you from using the Block Editor. In that case, please contact the respective plugin or theme author for further assistance.
Insert the VideoPress block into a post or page
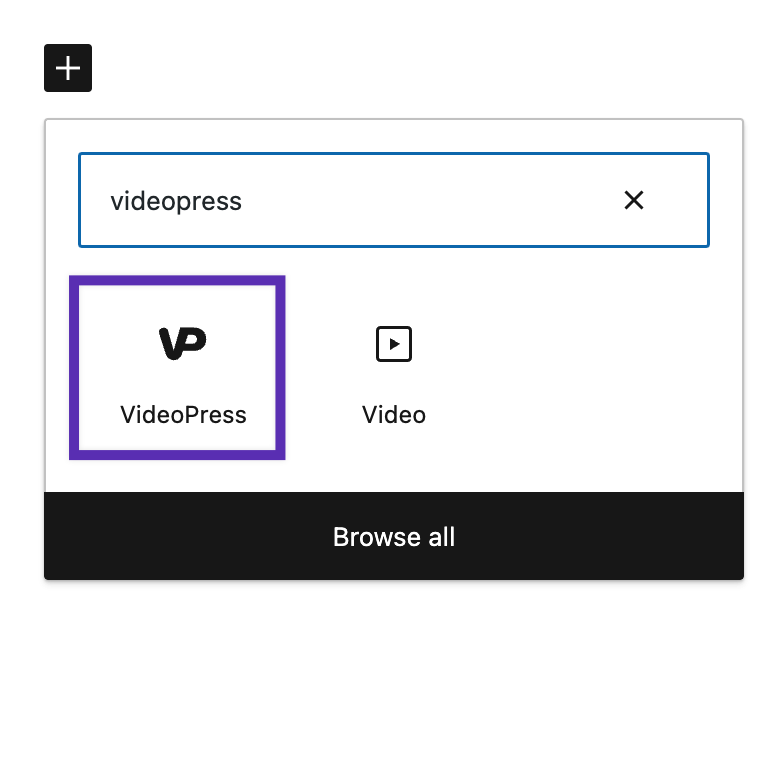
- Add the VideoPress block by searching for and selecting it within the block selector on a post or page on your site. Alternatively, you can type
/videopressdirectly into the content of the page or post, then select the block from the drop-down that appears. To unlock all VideoPress features, please be sure to select the VideoPress block and not the Video block.

Select a video
- Drag your video directly to the block within your post or page to upload it. Alternatively, you can use one of the three options: Upload, Media Library, or Insert from URL. Each option is outlined below:
- Upload: Upload a new video file from your computer. See our article Uploading a Video to Jetpack VideoPress for recommendations on file size and format for your videos.
- Media Library: Select any VideoPress file that’s already been uploaded to your library.
- Insert from URL: Insert the video URL directly.
- Once the video successfully uploads, you’ll see the ‘Upload complete!’ notification. When you are happy with your Video Title and Thumbnail, click Done and you’ll see your video embedded into your post or page. From there, you’ll be able to set a caption for your video and access the Block Toolbar.
Adjust your video’s settings
- Access video settings options either from the VideoPress Block toolbar or the block’s sidebar settings for maximum control over how your video plays, and for whom. These different settings areas are outlined below.
The VideoPress Block toolbar will hover above the block in the editor.

Every WordPress block has settings available in the editor sidebar. If you do not see the sidebar, click the ‘cog’ icon next to the Publish button, and it will appear. These settings include adjusting how your video plays for visitors (playback settings), progress bar color customization, and privacy options.

Video settings
Video alignment
Change the alignment of your video to left justify, center justified, or right justified in the VideoPress Block toolbar.
Add video captions or subtitles
Add text tracks (captions or subtitles) in the VideoPress Block toolbar.
Edit video poster image
In the VideoPress Block toolbar, edit the poster image to change the thumbnail image that will be displayed before a video is played:
- Choose an appealing image that’s most indicative of the video’s content.
- While there isn’t a minimum required size for your poster image, we recommend that the image be at least the size of your video.
- For example, if your video is a 1080p video, you should use a poster image that is 1920 x 1080 pixels.
Video title and description
Title and description:
- can be modified in the block sidebar settings
- can improve SEO (search engine optimization) and accessibility
- can also be used to add chapters to your video.
Video playback Settings
The following video playback settings can be modified in the block sidebar settings:
- Autoplay: Set your video to automatically play when someone visits your page or post. Some browsers do not respect this setting. You may need to enable mute for autoplay to work in those instances.
- Loop: Choose if the video repeats automatically after it plays through.
- Muted: Choose if the video has sound when it plays. Users can still unmute the video from the player controls. It’s recommended to use the muted option if you choose to have your video autoplay.
- Show Controls: Show or hide the playback controls on the video. This option is turned on by default.
- Play Inline: Play your video inline within the element’s playback area. Not selecting this option doesn’t mean that your video will always be played fullscreen.
VideoPress Progress Bar Colors
Adjust the color of the VideoPress progress bar in the block sidebar settings:
- VideoPress will automatically default to the Dynamic color setting, which will make the progress bar adapt to the video as it plays.
- If you toggle off Dynamic color, you’ll see three color sections to change: Main, Loaded, and Progress.
- After you select your desired Progress Bar colors, the player on the page will update automatically.
- Preview the colors you have selected before publishing or updating a page or post.
- When you publish or update your page or post, these color changes will be live on your selected video.
Video privacy and rating
Video privacy and ratings can be adjusted in the sidebar block settings:
- Rating: Select a rating for the video, based on its content.
- Privacy: Decide who gets to see your videos: site members only (private), or all visitors to your site (public). For more information, check out our VideoPress: Privacy article.
- Allow Download: Control whether the VideoPress player should include the option for users to download the video.
Advanced video player settings
Add a CSS class to your block in the Advanced section of the sidebar block settings, so you can write custom CSS and style the block as you see fit.
The VideoPress video player is embedded in an iframe, meaning it’s not possible to style the video player itself. Only the <div> which contains the video player can be styled with CSS.
You can also add an HTML anchor to the block, to create a link directly to that section of the page.
Troubleshooting
If you’re having trouble with videos, please refer to the article on Uploading a Video to Jetpack VideoPress or Troubleshooting Video Hosting Issues.
Still need help?
Please contact support directly. We’re happy to advise.