
One of the biggest benefits of WordPress is the ability to create a beautiful, compelling website with little to no coding knowledge. With hundreds of professional themes and the flexible, drag-and-drop block editor, it’s an excellent solution for DIY website owners.
But what if you want to go a step further and make more in-depth visual customizations? CSS is one of the fastest ways to change your website’s appearance.
What is CSS?
CSS (Cascading Style Sheets) dictates the layout and visuals of your website — colors, fonts, margins, sizes, etc. With a few CSS basics, you can change the appearance of all your pages and posts, or hone in on individual pieces and make one-off changes.
Basic CSS syntax looks like this:
| selector { property: value; } |
The selector is the element you want to style: a headline, a paragraph, a page, an image, a link, etc.
The property is the category that you want to change: for example, font color, size, border, or background. You can apply multiple properties to each selector.
The value defines the property: the specific color, particular font size, exact size of the border width, etc.
Notice the format: the property and value are separated by a colon and contained inside of curly brackets. Each value is followed by a semicolon.

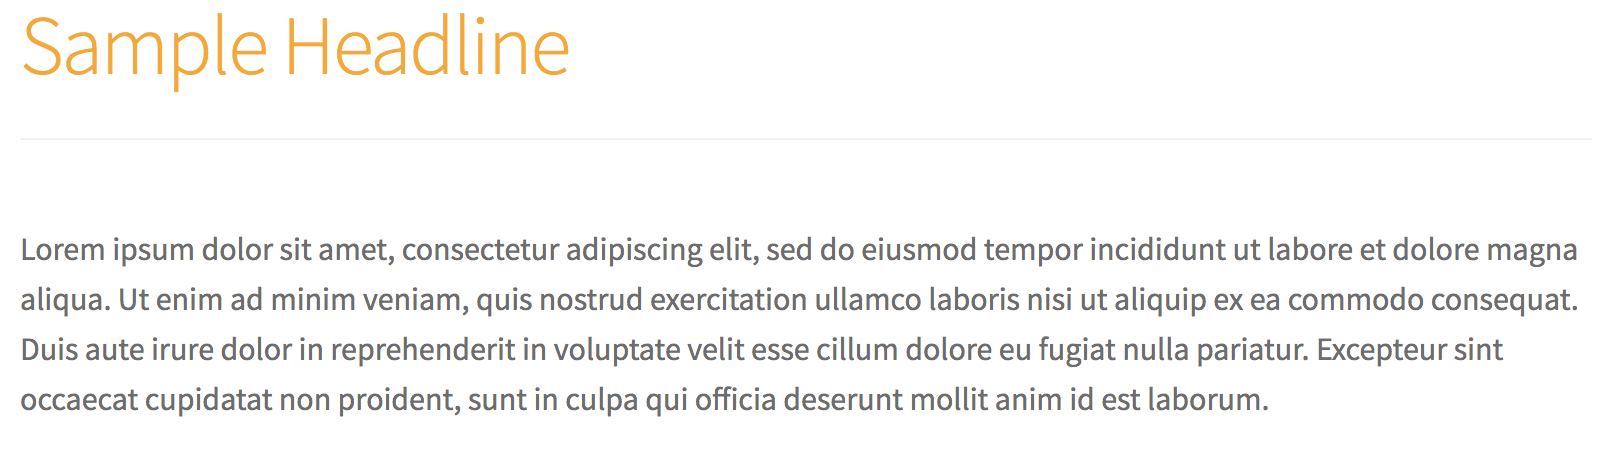
In practice, to change the color of the headline above, which is an <h1> tag, from black to orange, you would use:
- Selector: h1
- Property: color
- Value: orange
| h1 { color: orange; } |
How to apply CSS to your site
If you don’t have much (or any) CSS experience, that’s fine! You can accomplish a lot with a basic understanding of the fundamentals. And with Jetpack’s Custom CSS feature, you won’t need to worry about modifying theme files or breaking your website.
To enable Custom CSS, navigate to Jetpack → Settings → Writing in your site’s dashboard. Scroll down to the Theme Enhancements section and toggle on the Enhance CSS Customization Panel option.
To add CSS, go to Appearance → Customize → Additional CSS. Here’s where you’ll type in the actual CSS you want to add. To help, Jetpack’s CSS editor uses color to make it easier to differentiate selectors, properties, and values.
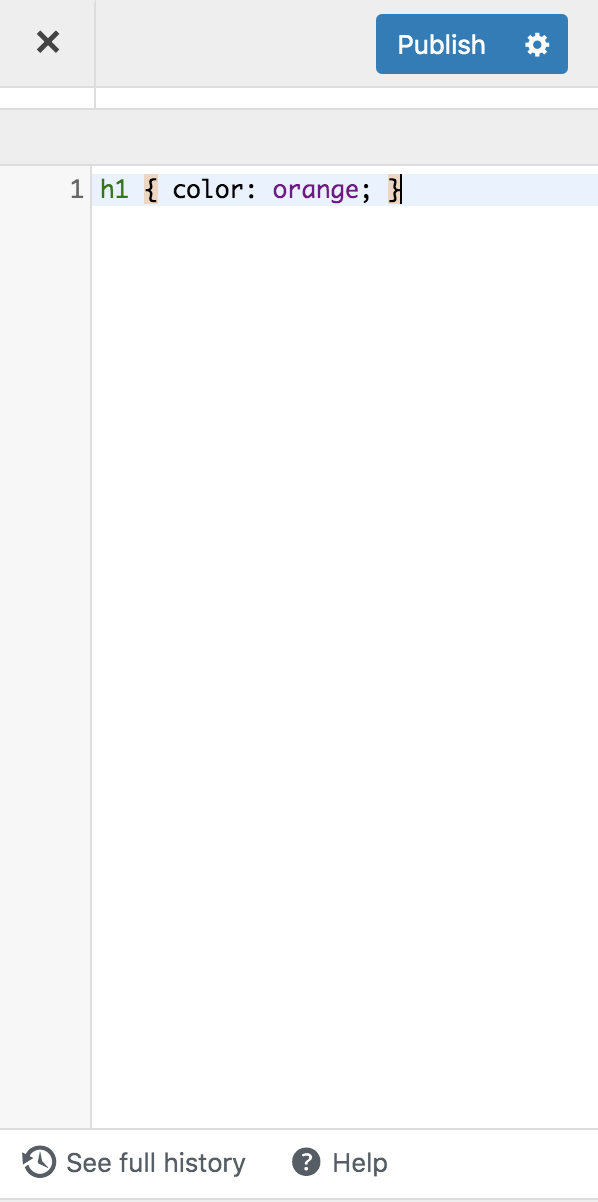
When adding or editing CSS, you can preview changes before saving, so you know exactly what they’ll look like before applying them to your live website. And Jetpack stores the last 25 CSS revisions, so you can revert to a prior design if you don’t love your new look. Learn more about using Custom CSS.
Five ways to customize your site with CSS
Every single item on your website has a selector, so you can use CSS to change just about anything. If you want to learn how to find selectors, this is a great tutorial — but here are five changes you can make right now, with the CSS already provided.
Typography
One of the most common CSS uses is for styling your site typography, or fonts. To change both the color and size of titles (Heading 1, Heading 2, etc.) across your site, use this code and modify the values as desired:
| h1 { color: #FF5733; font-size: 36px; } |
The example above just modifies Heading 1. If you want to change the color and font size of a different heading, like Heading 3, swap the h1 selector with h3 and make the appropriate adjustments to size and color:
| h3 { color: #FF5733; font-size: 25px; } |
To change the color of multiple headings, separate the selectors with commas:
| h1, h2, h3, h4, h5, h6 { color: #FF5733; } |
And to make all your headings uppercase, for more impact, use this:
| h1, h2, h3, h4, h5, h6 { text-transform: uppercase; } |
Links
Hyperlinks should stand out from normal text so that site visitors immediately know which text is clickable. Make your links pop by editing their color and adding an underline:
(Don’t want to underline your links? Just delete “text-decoration: underline;” below.)
| a { color: #63B892; text-decoration: underline; } |
If you want your link to change color when someone hovers over it, add “:hover” to the selector:
| a:hover { color: #FF5733; } |
Lists
If you use a lot of bulleted lists in your blog posts and pages, try a little CSS to make them stand out even more from the rest of your content.

To make the bullet point a circle and change the font weight, color, and size, use this code:
| ul { list-style-type: disc; color: #9663B8 ; font-size: 25px; font-weight: bold; } |
If you just want to change one of these properties, only include the line that relates to what you want to modify.
Want even more options? CSS-Tricks.com outlines all the style choices for lists (like using squares or images for the bullet points) along with extra tips and shortcuts.
Menu items
Many themes provide multiple main menu options, so you can choose the best fit for your site. But what if you want to customize your menu style even more?

In the above example, we used CSS to add a custom green background to menu items and change the text color when a user hovers over each one:
| .site-header .menu li:hover { background: #eff3ec; } .site-header .menu li:hover a { color: #fff; } |
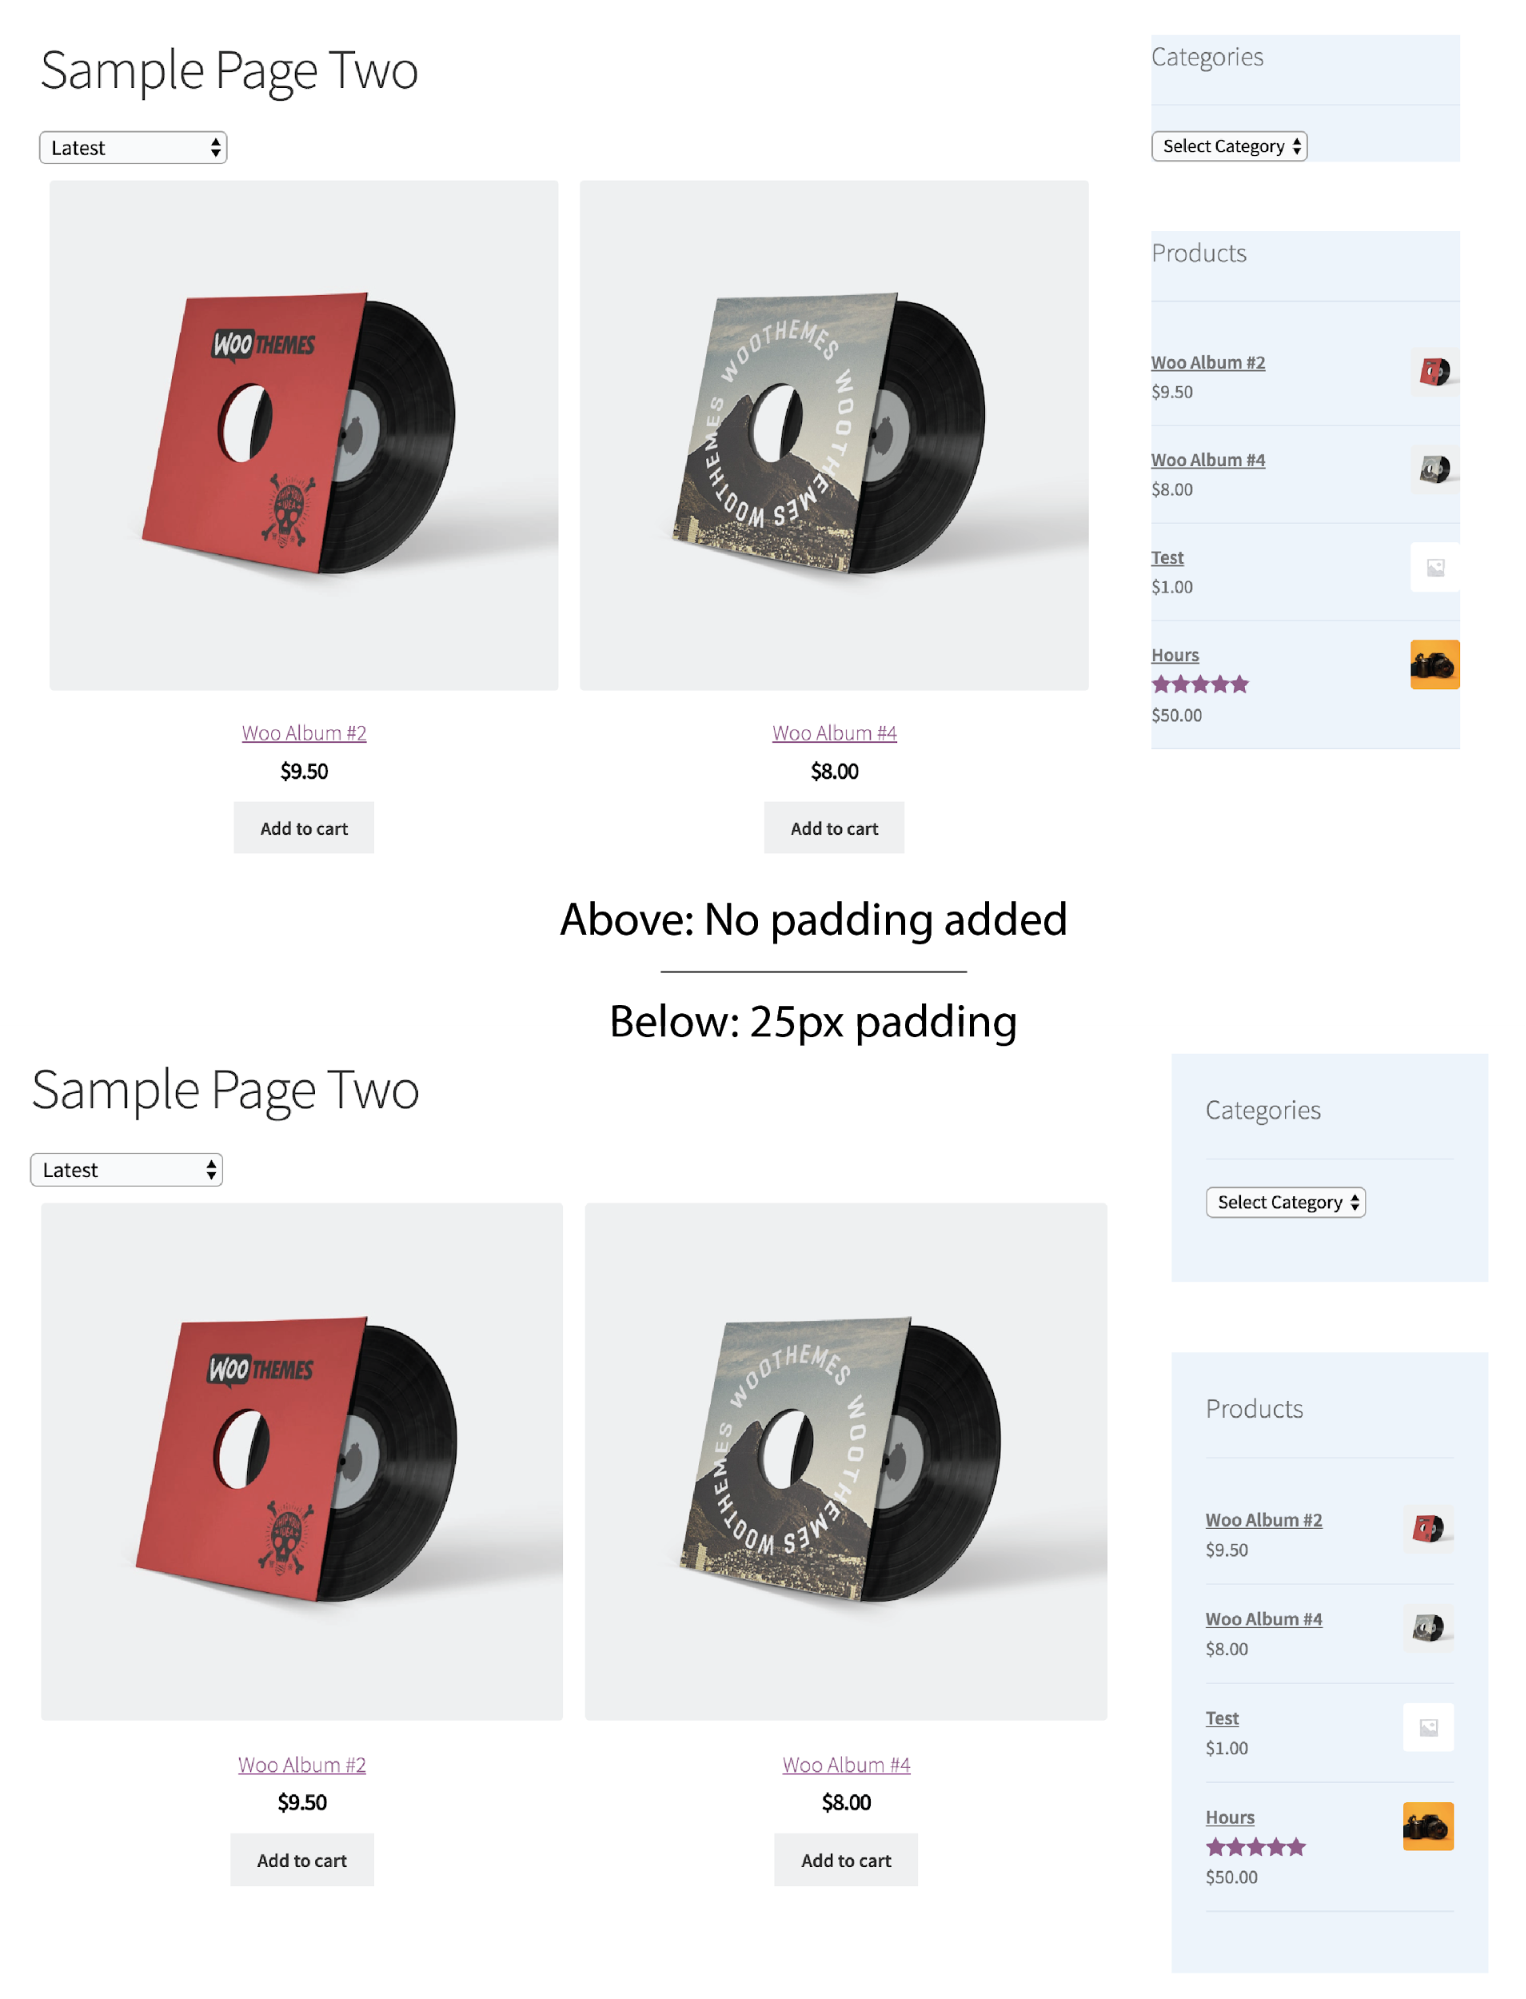
Sidebar widgets
Sidebar widgets are a great way to showcase helpful content, so you may want them to stand out from the rest of your site. Use the following code to add a background behind sidebar widgets and padding (extra space) around the text:
| .widget { background: #e8f2fd; padding: 25px; } |
Apply CSS to specific pages instead of your entire site:
All of the CSS snippets above apply sitewide — they’ll modify those items on every page, and in every single place they appear. What if you only want to apply CSS to one specific page or post?
WordPress assigns each page and post a unique ID, which you can find in your WordPress dashboard:
- Navigate to the page or post you want to customize and click Edit Page in the black bar at the top of the dashboard.
- In the URL bar, find something that looks like “?post=74.” The number
“74”, however, will change as it’s specific to your post or page ID.
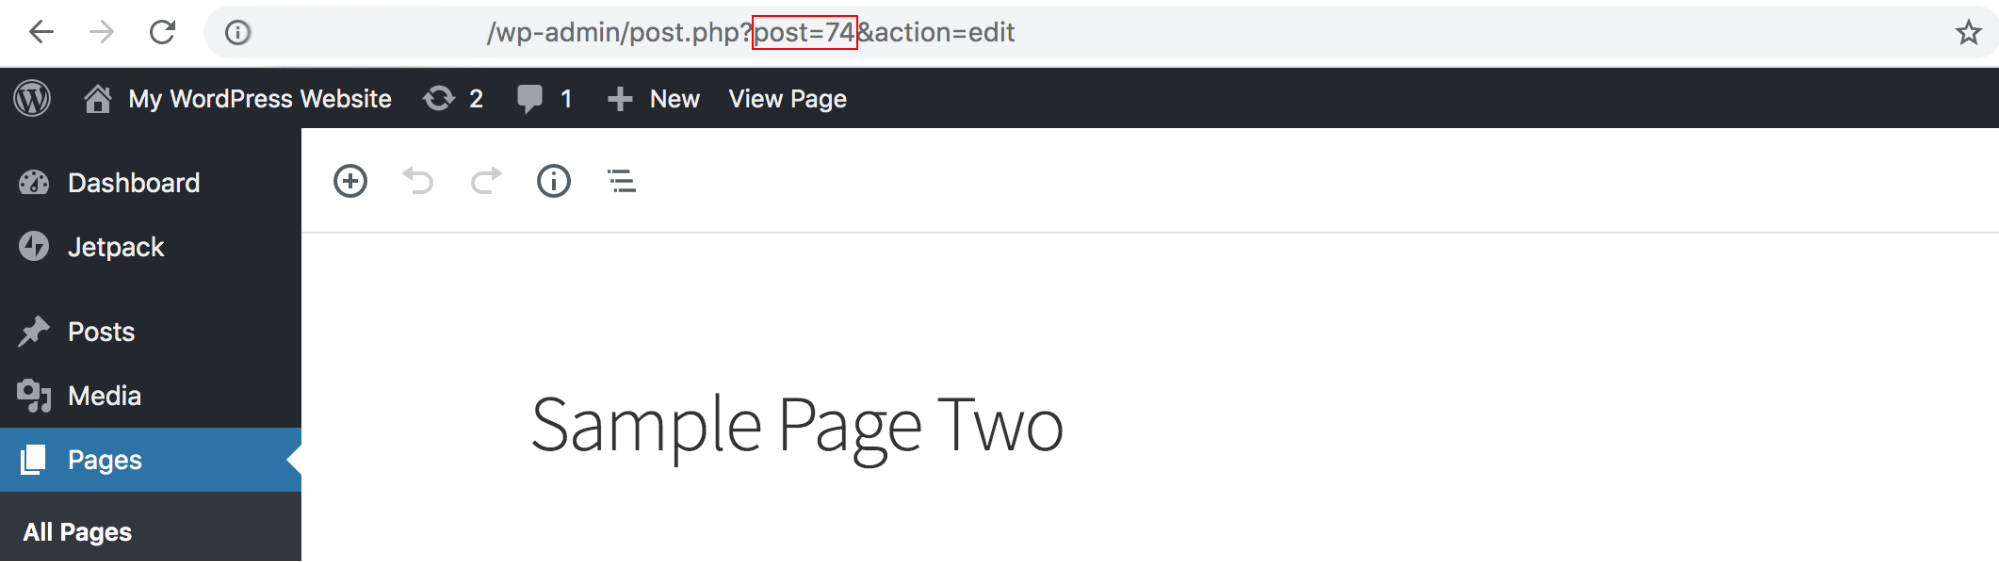
To apply CSS to the specific page or post, add the number to your CSS along, with “.page-id-”. To change the Header 1 font color only on this page, you’d use the following:
| .page-id-74 h1 { color: #FF5733; font-size: 36px; } |
Remember: Preview is your friend!
If you don’t have much experience with CSS, you may be nervous about making changes that could mess up your site. Don’t worry! A preview of the changes will appear in real time, as you edit.
Play around with the code and make any edits that you’d like. Click Save and Publish when you’re satisfied with how your updated CSS looks!
There’s also a CSS history feature that records every time you save changes. That means, if you change your mind, you can quickly revert back. To do this, click See Full History at the bottom of the Customizer. Choose the date and time you’d like to revert back to and click the Restore This Revision button.
Additional CSS resources
- A hex code specifies the color you’d like to use when modifying fonts or backgrounds. If you’re not sure which one to use, HTML Color Codes provides a great solution. Explore their color picker to find the perfect shade, then copy and paste the hex code it generates.
- CSS-Tricks.com offers CSS code snippets ranging in difficulty from beginner to expert. You can also find tutorials, videos, and guides to learn even more.
- W3Schools is a handy resource for CSS examples and walkthroughs.
- WordPress.com provides information about CSS basics and using media queries to set CSS based on specific devices.
- Upwork.com is a WordPress partner, offering freelance specialists who can help with CSS projects.
Start customizing your WordPress site
The best way to learn basic CSS is to start experimenting. All of the code listed above can be customized or tweaked to meet your needs — use it as a base, and then start switching colors, changing font sizes, or making any other modifications you’d like!
With Jetpack’s Custom CSS Editor, you can dive head first into customization without worrying about breaking your site, thanks to preview tools and rollback features. For extra protection, enable Jetpack Backup, which automatically backs up your work in real-time and includes one-click restores.
Find out more about other Jetpack design features and get started with Jetpack Custom CSS.
