
As your site traffic increases, you’ll want to ensure that things continue to run smoothly. If visitors have to wait more than a few seconds for your page to load, they’ll likely leave your site and may never come back.
Fortunately, there are some simple tests to evaluate your performance and, if improvements are needed, there are solutions that can almost immediately improve your loading times.
In this post, we’ll discuss one aspect of site performance: First Input Delay. You’ll learn what it is, why it’s important, and how you can measure and improve the FID score on your WordPress site.
An introduction to first input delay
First Input Delay (FID) is the loading time a visitor experiences after interacting with your website for the first time. Essentially, when someone clicks on a link or taps a button, they have to wait for their browser to respond. If your site has a high FID score, visitors wait for longer periods.
FID is one of the main metrics of Core Web Vitals. Created by Google, this report measures the performance of web pages.
Here are the three main performance metrics that are included in the Core Web Vitals report:
- Largest Contentful Paint (LCP): this measures the time it takes your website to load after a user requests the URL.
- First Input Delay (FID): this is the time it takes your website to respond after a visitor interacts with a page.
- Cumulative Layout Shift (CLS): this measures all the layout shifts that occur while a page is loading.
Although all of these metrics evaluate your website’s user experience, your FID score is one of the most important. If your page doesn’t load quickly, it can leave a poor first impression. In fact, a one-second delay can decrease visitor satisfaction by 16 percent.
Here are some benefits of improving your FID score:
- A boost in your visitors’ average time on page
- A reduction in your bounce rate
- An increase in conversions
Potential causes of a poor FID score
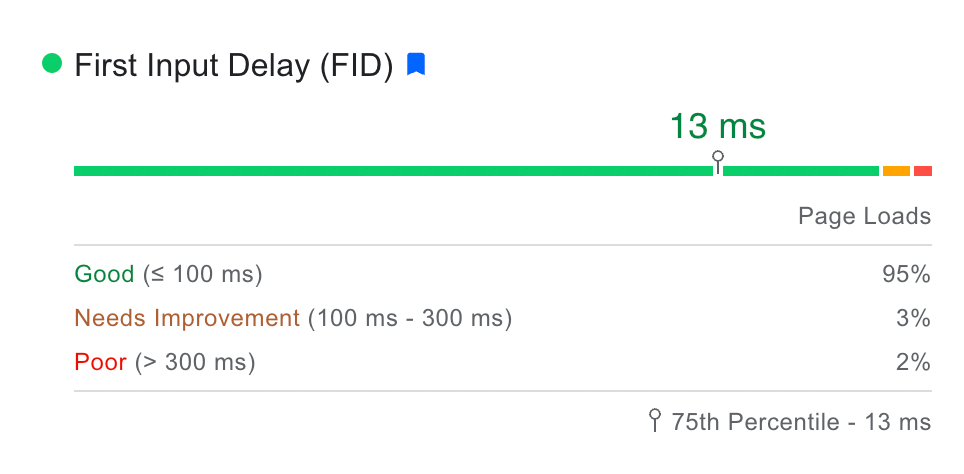
When you run a Core Web Vitals test, the report will give you a First Input Delay score. An acceptable FID is 100 milliseconds or less.
A poor FID score is anything higher than 300ms. This can be caused by a few different factors.
One of the most common causes of high First Input Delay is heavy JavaScript code. If a browser has to execute a large JavaScript file, it can be too busy to execute other requests.
Having too many JavaScript-based plugins can negatively affect your loading times. Similarly, some themes can have complex files that cause the same problem.
Another factor can be third-party scripts. If your website has many third-party analytics codes and tags, this can increase your page’s latency. Sometimes, browsers can prioritize these scripts, delaying the loading of other content on your site.
How to measure your website’s FID score
Now that you know what First Input Delay is, it’s time to put your website to the test.
There are several Core Web Vitals tools you can use to check your FID. If you receive a poor report from any of these tools, you can take action to improve your website.
1. PageSpeed Insights
One well-known tool you can use is PageSpeed Insights. This enables you to assess your website’s performance on a variety of factors.
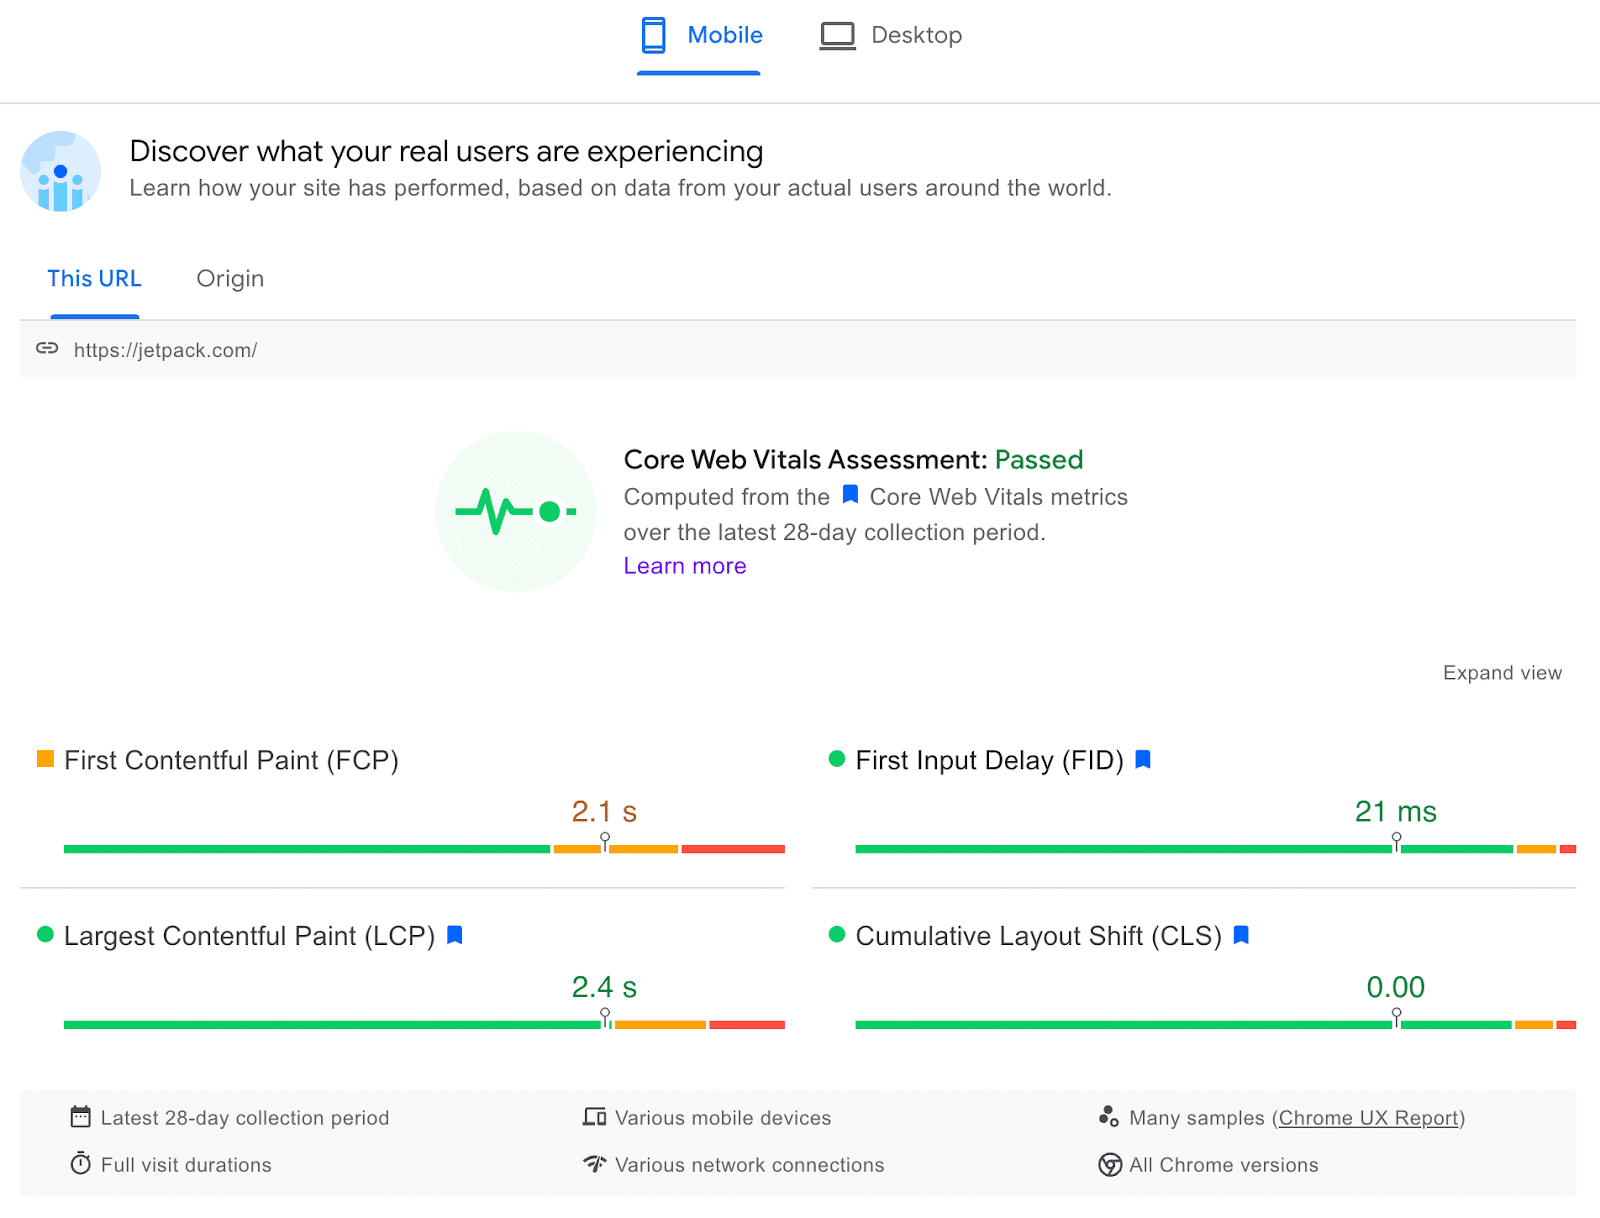
After you enter your website’s URL, PageSpeed Insights will give you a detailed performance analysis. At the top of the page, you can see whether your site has passed the Core Web Vitals assessment.
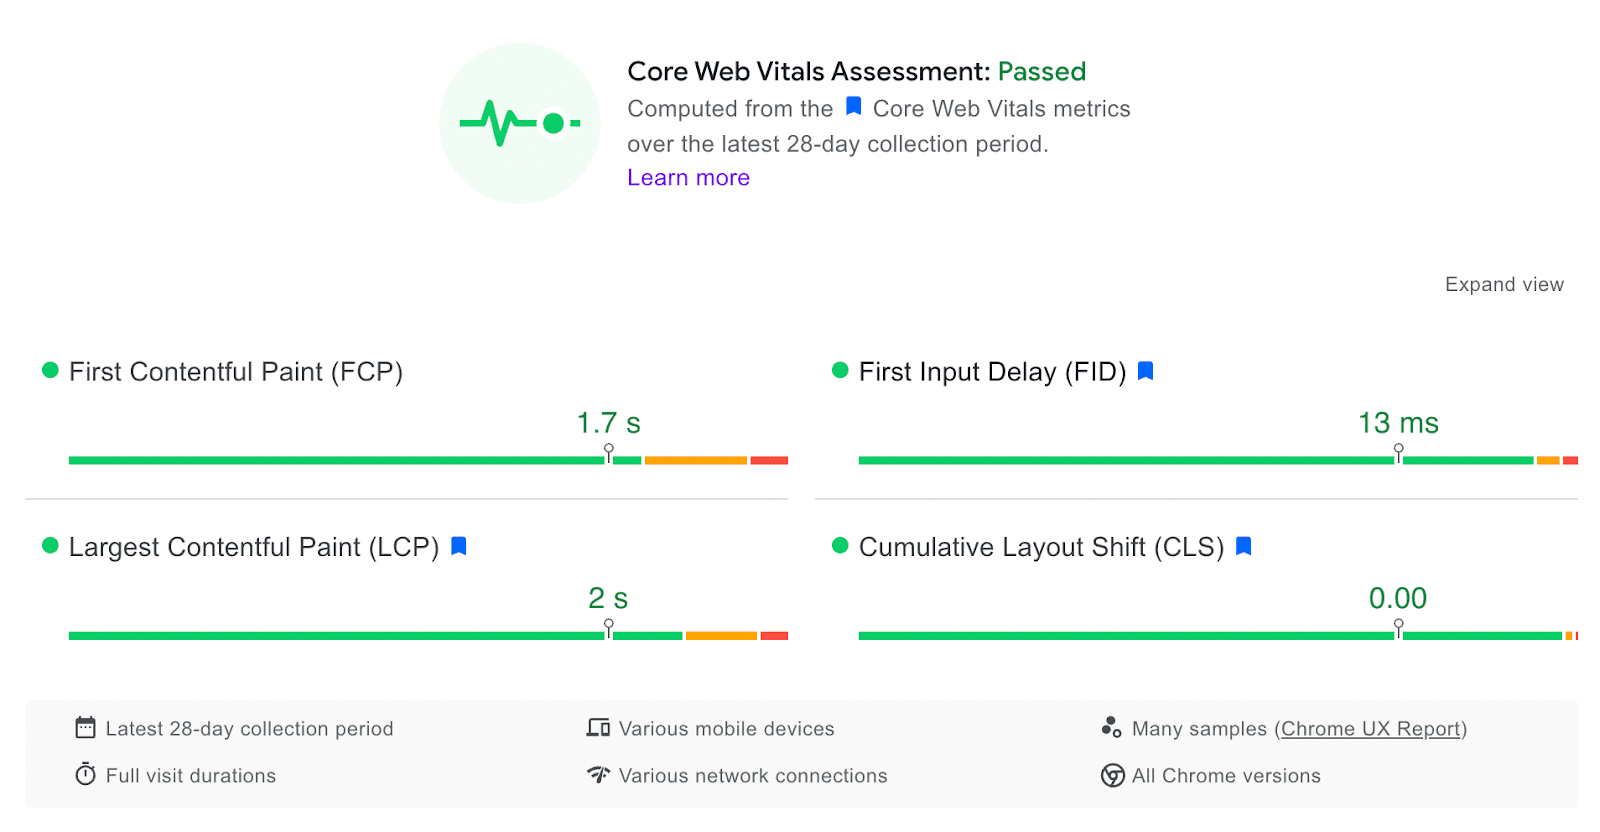
Using this report, you can review your website’s FID score, which will be measured in milliseconds. As we mentioned earlier, any score under 100ms will pass the test.
Note that you’ll need to check your site’s performance for both mobile and desktop browsers. You might notice slight differences in your FID score on these two devices.
This is one of the fastest ways to measure the First Input Delay on your website. If you need a quick overview of your web performance, this could be the right tool for you.
2. Google Search Console
Similar to PageSpeed Insights, Google Search Console is a free tool that you can use to evaluate site performance. With this service, you can view traffic data for your site and troubleshoot specific issues like First Input Delay.
To start using Google Search Console, you’ll have to verify your website ownership. There are several ways to do this, but we’ll outline the HTML file upload method. Start by entering your domain or URL prefix.

Then, download the HTML file that has been generated for you. You’ll need to upload this file to your site’s root directory before you can employ the features of Google Search Console.
After verification, you’ll be able to access your dashboard. Here, you can navigate to the Core Web Vitals tab.
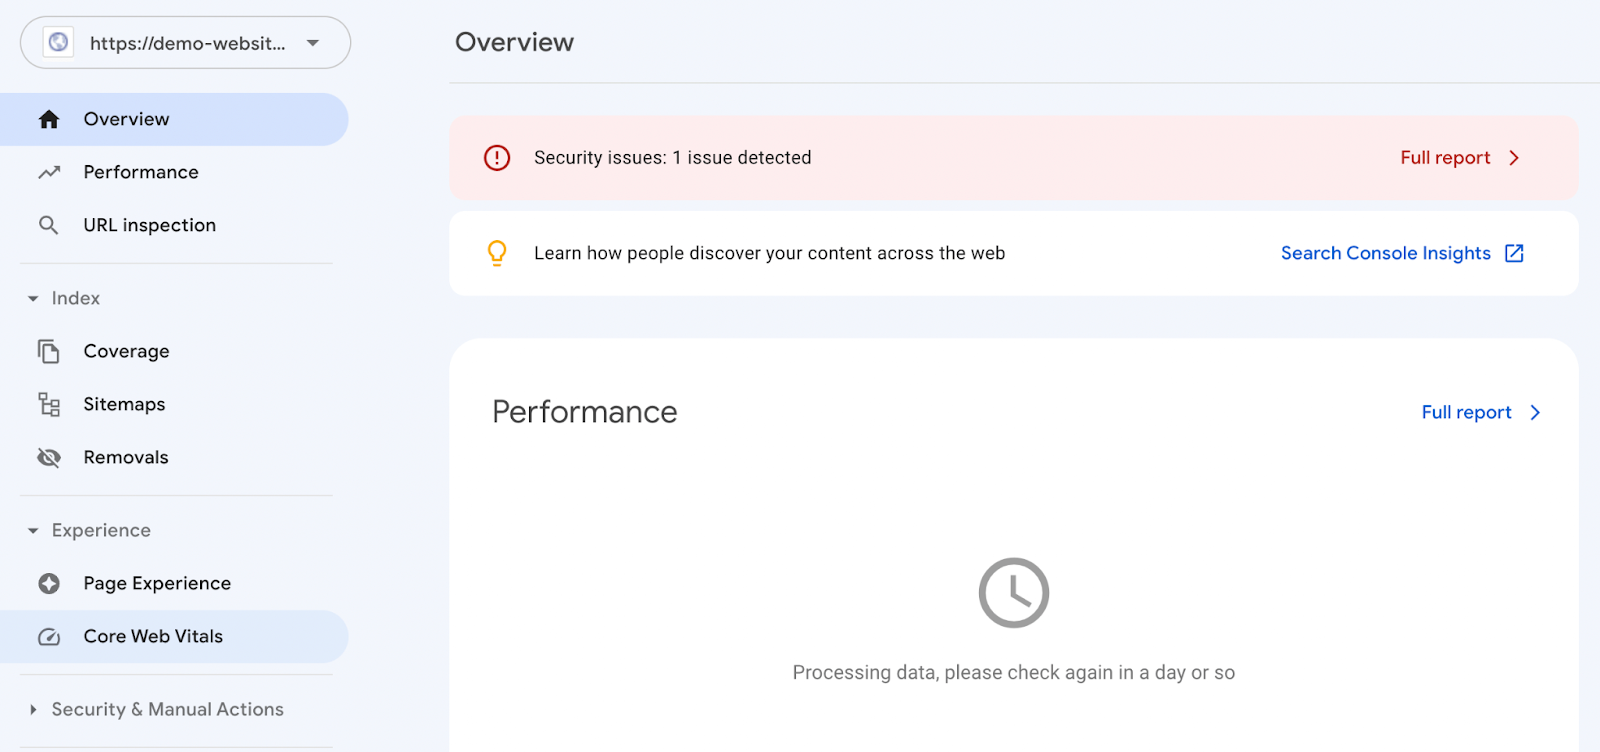
Unlike PageSpeed Insights, it may take some time to access your report if you’re new to this tool. Also, you may not be able to see a report if your site doesn’t get enough visitors.
Google Search Console can give you similar metrics on your FID score. You’ll receive an evaluation of Poor, Needs Improvement, or Good based on real-world usage data.
3. Lighthouse
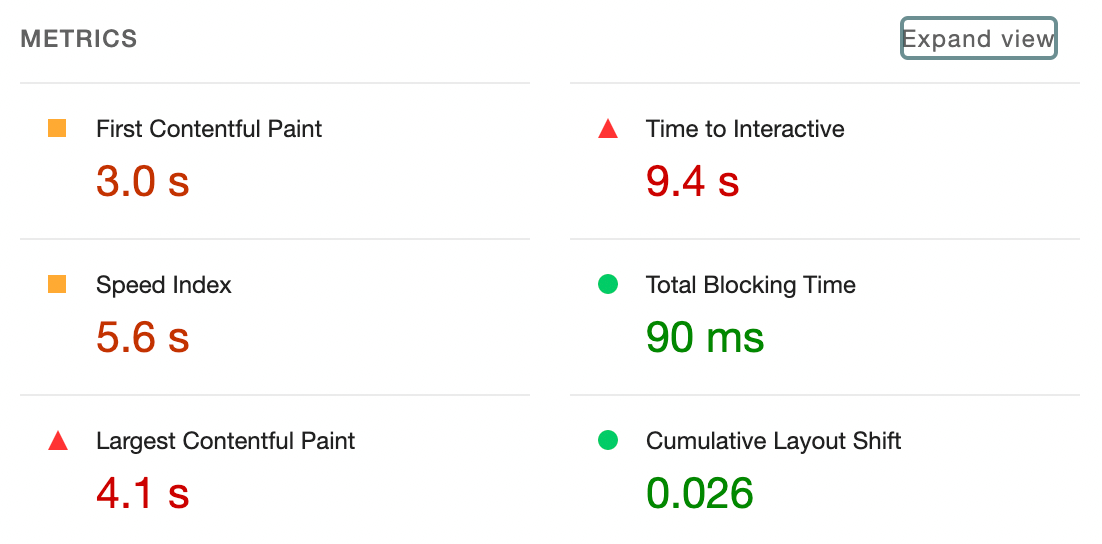
Lighthouse is a web development tool that you can use to audit the performance of any web page. Although it doesn’t directly measure First Input Delay, it will give you the Total Blocking Time (TBT). You can use this as a proxy for FID.
Put simply, TBT evaluates how well your site responds to user input. It measures the total time your browser is too busy (completing tasks like running JavaScript or parsing CSS) to respond to user input between FCP and TTI.
To view Lighthouse’s report on your website, you’ll need to right-click on your web page. Then, choose Inspect.
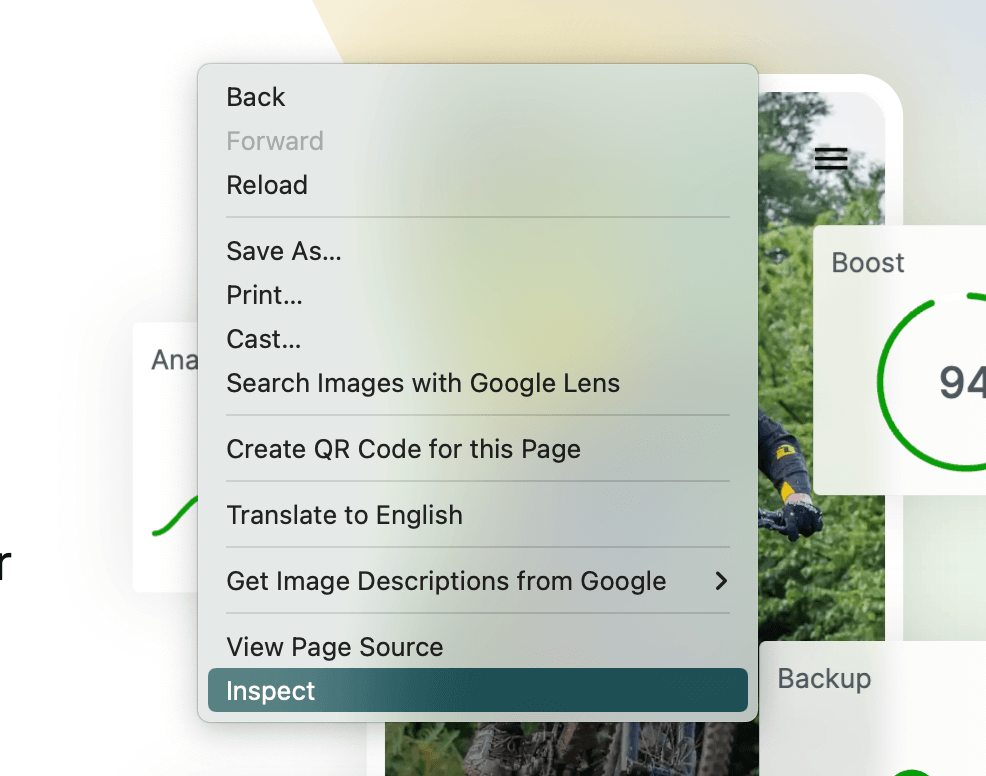
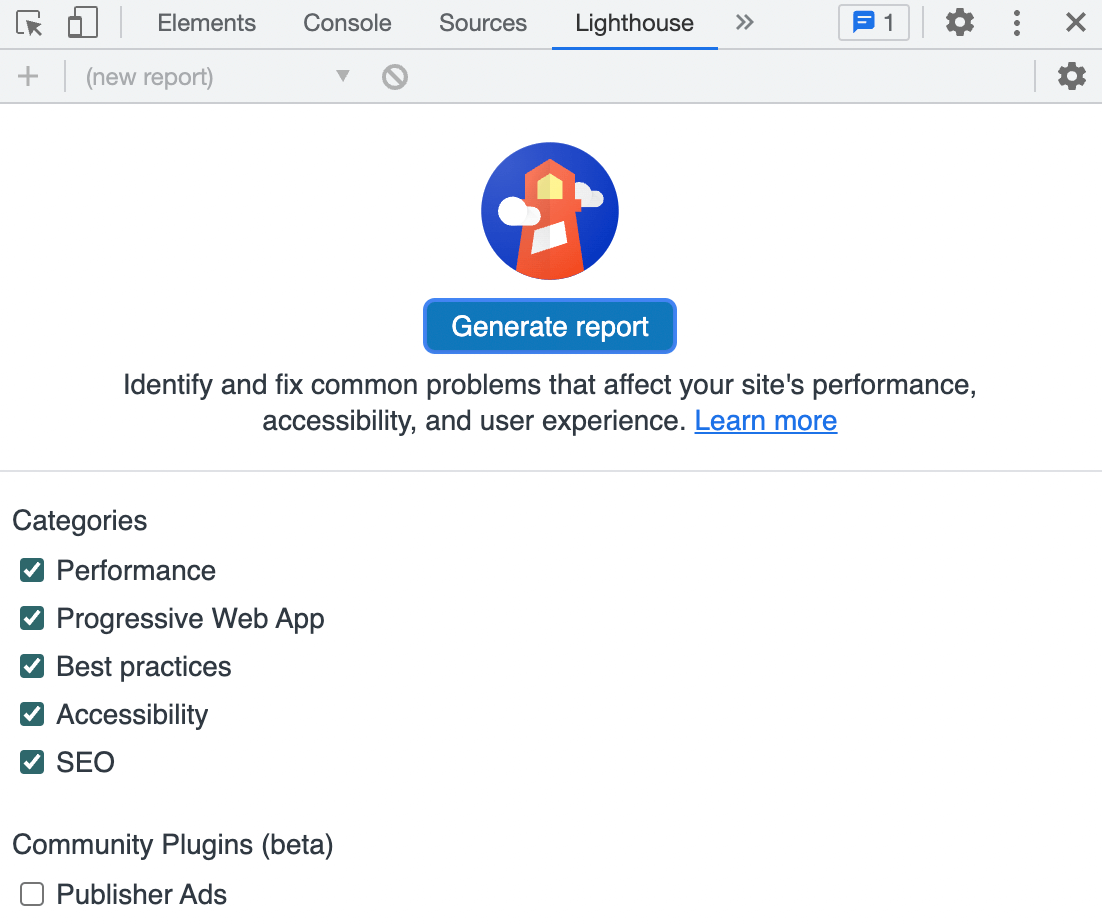
At the top of the generated code, find the double arrow icon. Then, click on it and select Lighthouse.
On the next page, you’ll see an option to generate a report. When you click on this, Lighthouse will audit your website.
After the audit is complete, you can view detailed analytics on your site’s performance. You’ll also see reports on your SEO and web accessibility.
Then, scroll down until you see Metrics. In this section, you’ll see your Total Blocking Time.
Although TBT and FID are similar, it’s important to note that FID is a field metric. Since it’s based on users in real-time, it can’t be measured in a lab setting.
Lighthouse is a lab metric tool, so its Total Blocking Time metric won’t assess real interactivity. Fortunately, improving your TBT score can also improve your First Input Delay.
How to reduce first input delay in WordPress
When you test your website using one of the above tools, you might receive a poor First Input Delay score. Fortunately, you can improve your score by implementing a few effective strategies.
Let’s look at how to reduce First Input Delay in WordPress.
1. Install an optimization plugin
An easy way to get started is to install a plugin that focuses on Core Web Vitals. By doing this, you can improve your First Input Delay without any heavy lifting.
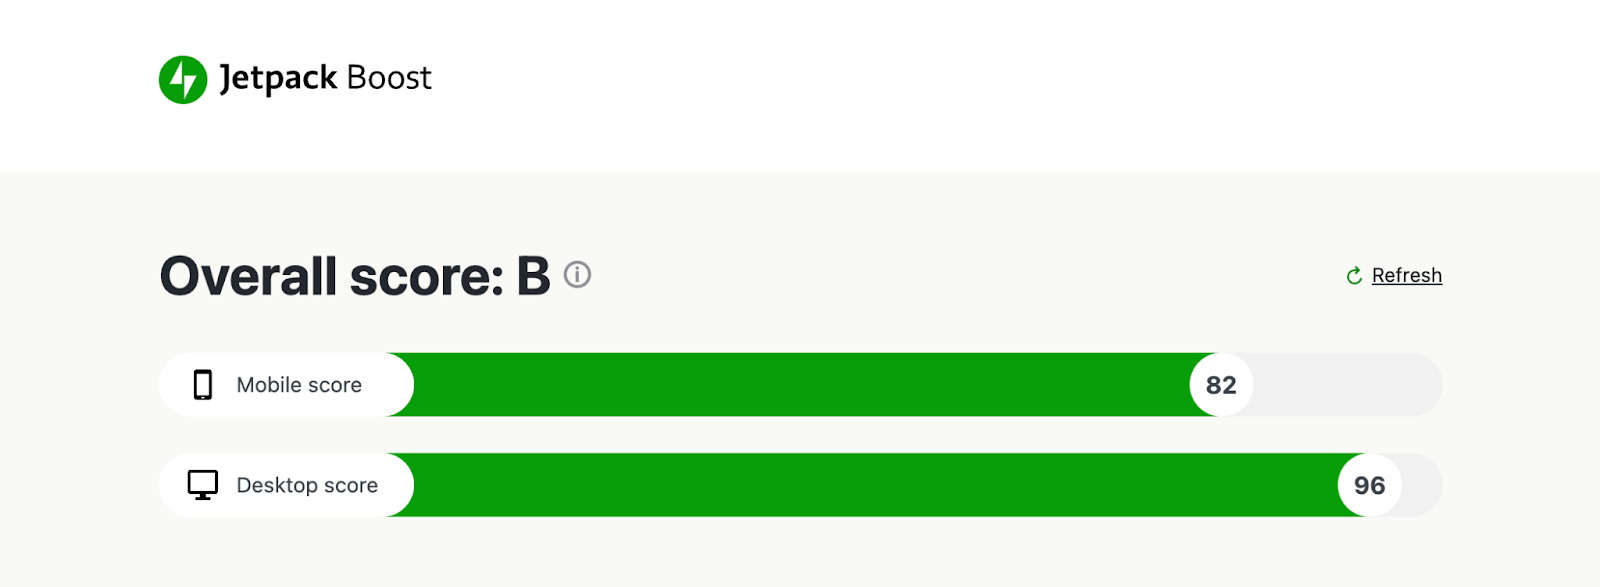
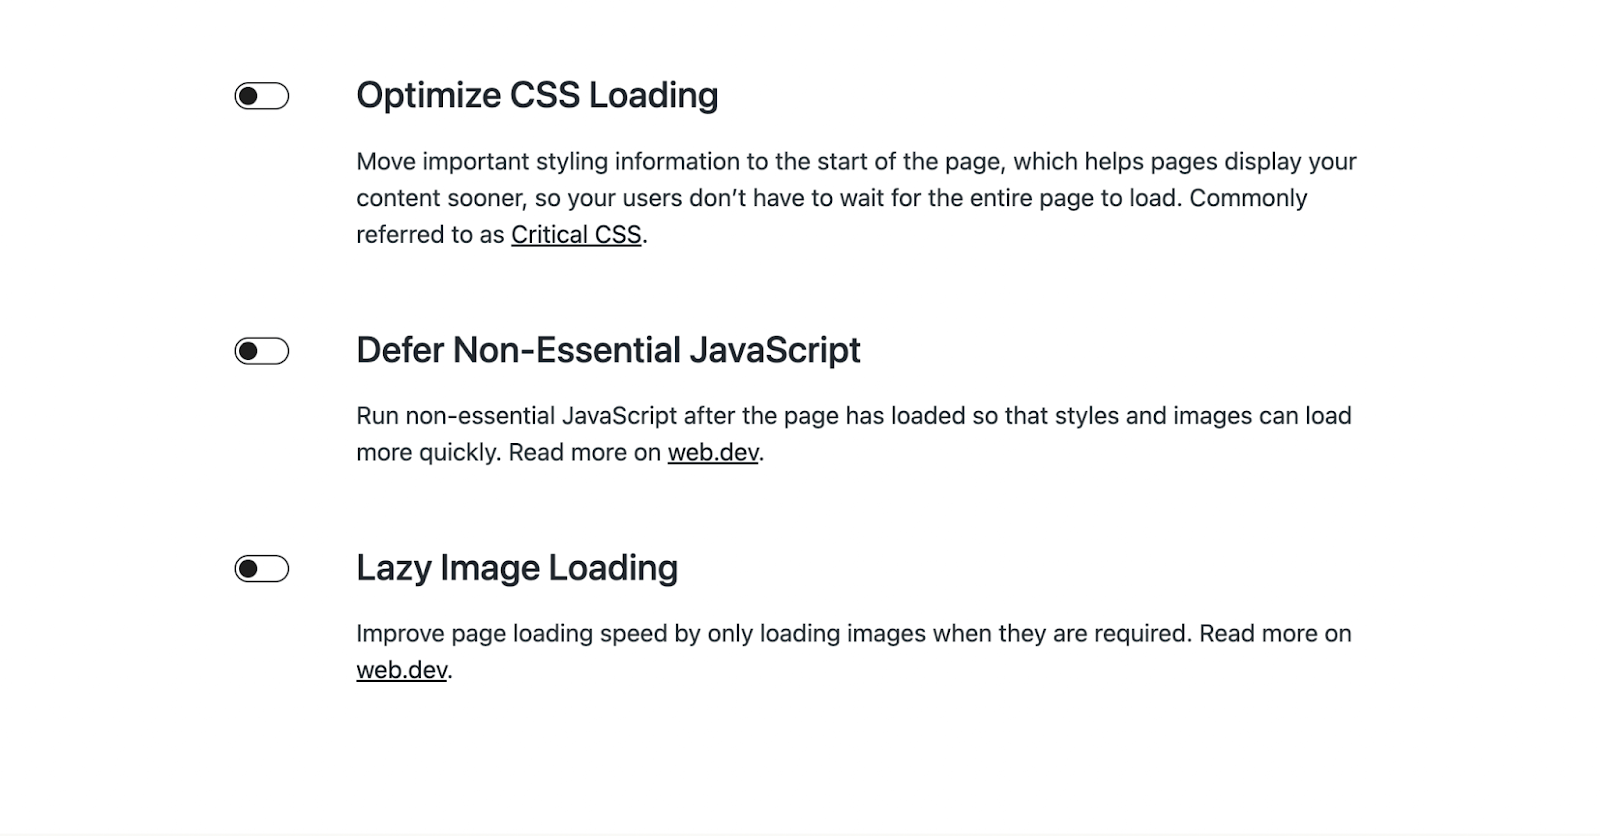
Jetpack Boost is a powerful, easy-to-use plugin that you can use to optimize your Core Web Vitals. It provides many ways to boost your web performance and improve your FID score.
After activating Jetpack Boost, the tool will automatically give your site a performance score. You can view how fast your pages load on both mobile and desktop views.
Then, you can customize its settings to optimize your files for fast loading. Deferring JavaScript will likely be the most effective in improving FID, though optimizing CSS may also save parsing some large CSS files in certain circumstances. Enable both of these, and you’re likely to see an improvement in your FID score.
Jetpack Boost is a free plugin. If you already have Jetpack installed on your WordPress website, you can activate Jetpack Boost from the dashboard.
2. Defer render‑blocking JavaScript
Another effective way to optimize your FID score is by deferring render-blocking JavaScript. By default, all JavaScript on your website is render-blocking. This means that a browser will stop loading a certain page until it can download and execute these scripts.
In this case, you can defer JavaScript execution. This will tell the browser to render the most relevant content first.
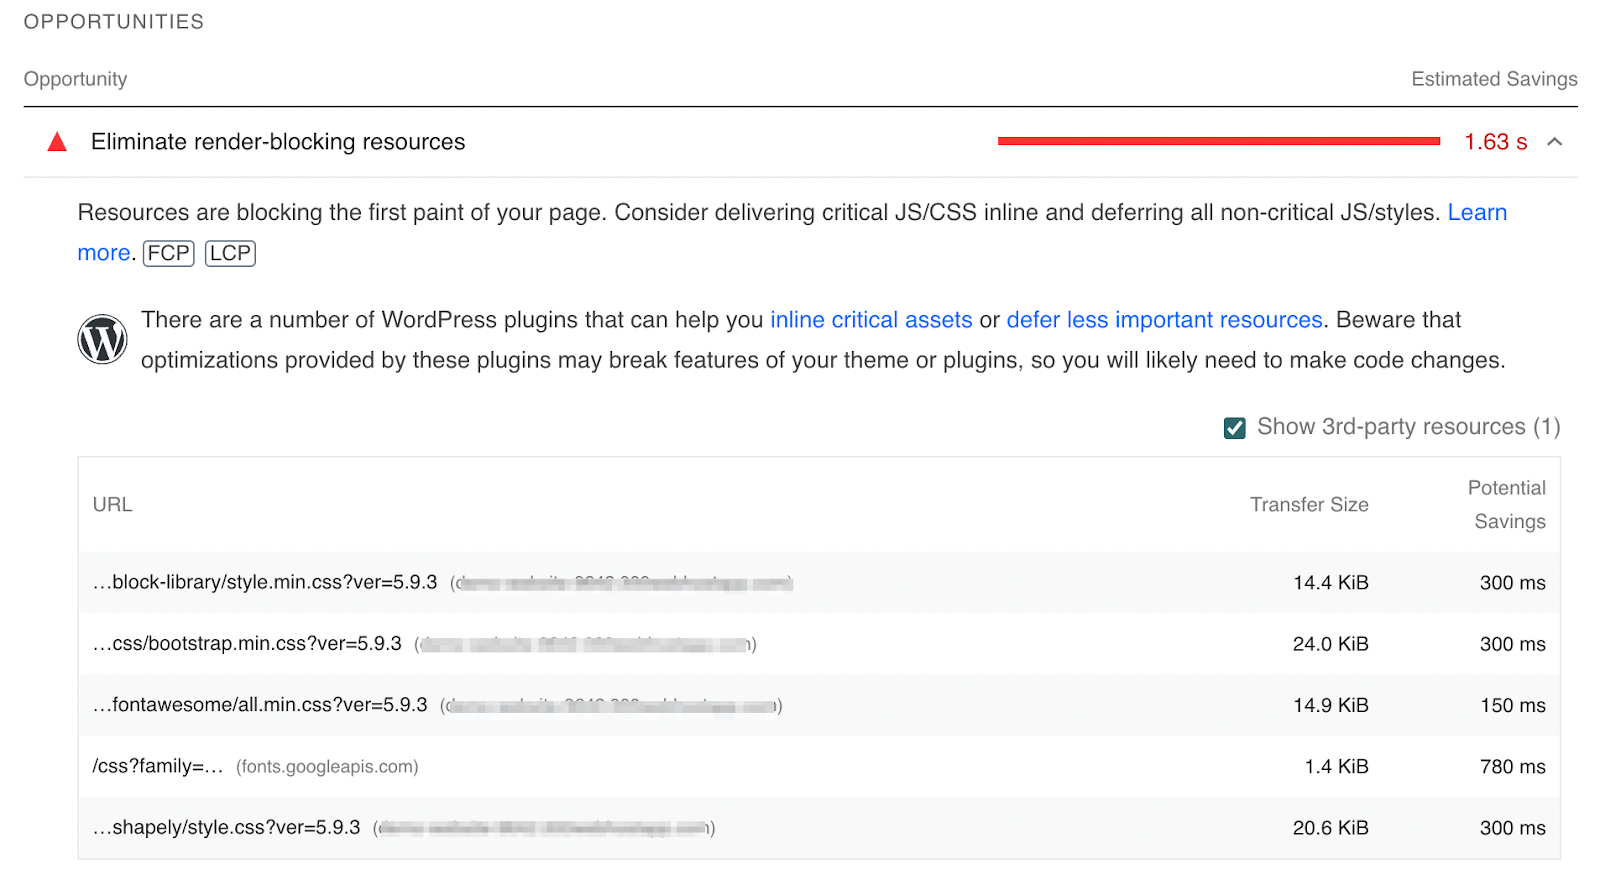
To identify this render-blocking JavaScript, you can use PageSpeed Insights. First, type your website’s URL into the search bar.
Then, scroll down to the Opportunities section. Here, you’ll see suggestions for improving your web performance. Find where it says Eliminate render-blocking resources.
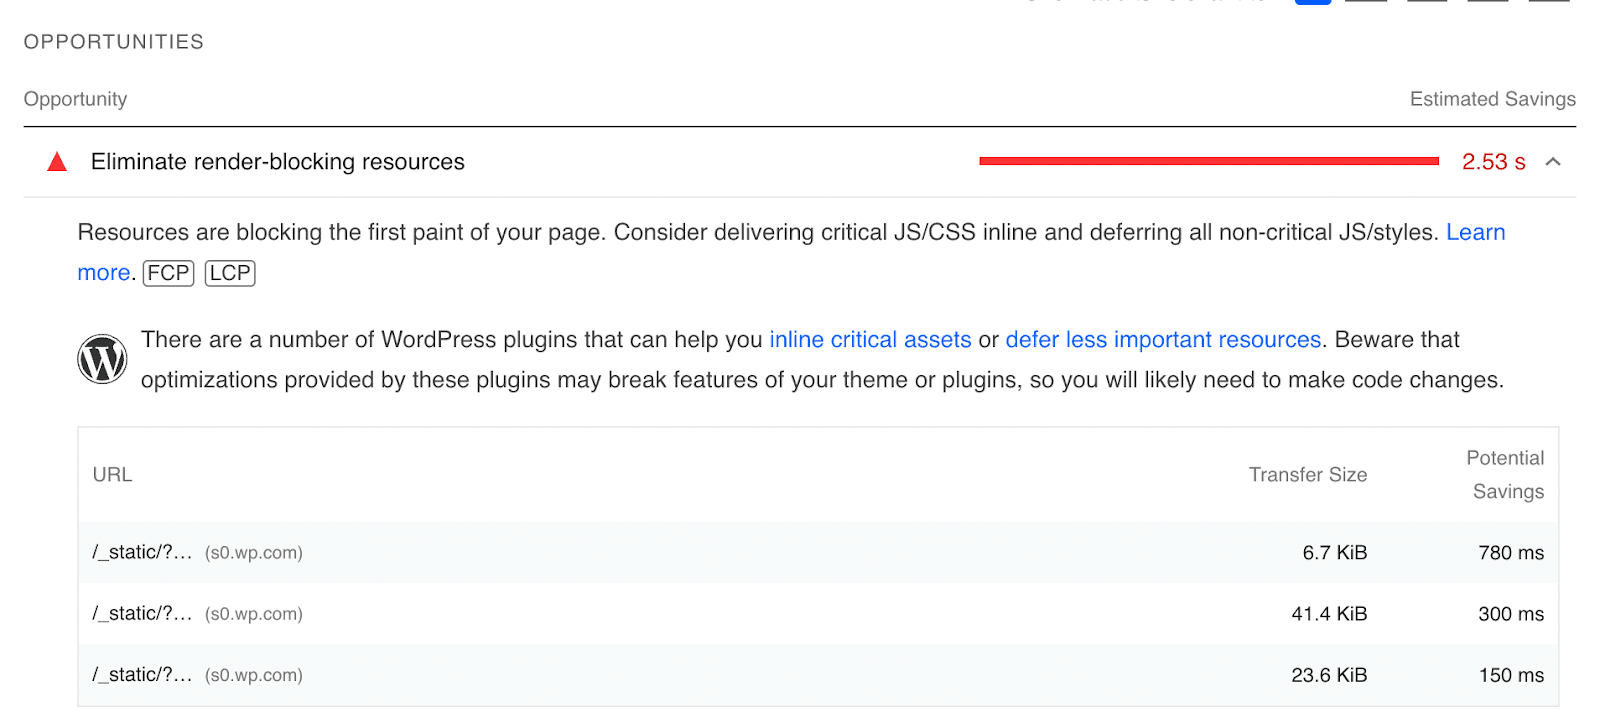
When you expand this section, there will be a list of resources that you can defer or eliminate altogether. On the right-hand side, PageSpeed Insights will show you how these changes can impact your loading time.
Once you decide to defer non-essential JavaScript on your website, you can use a plugin to make this process simple. With Jetpack Boost, you can do this in just one step.
In your WordPress dashboard, navigate to Jetpack → Boost. Then, find the setting labelled Defer Non-Essential JavaScript.

Finally, turn on this feature. When implemented, the switch will turn green. Now, try running your website through PageSpeed Insights again to see if your FID score has improved.
3. Defer non‑critical CSS
When you evaluate your website in PageSpeed Insights, you may also see other render-blocking resources. Similar to JavaScript, certain coding can prevent your page from loading while the browser reads them.
Just like with JavaScript, you can defer non-critical CSS. Start by running your website through a performance tool to see if your CSS needs to be optimized.
Then, you can use the Jetpack Boost plugin to optimize your CSS. In your WordPress dashboard, navigate to Jetpack → Boost. Then, find the setting labelled Optimize CSS Loading.
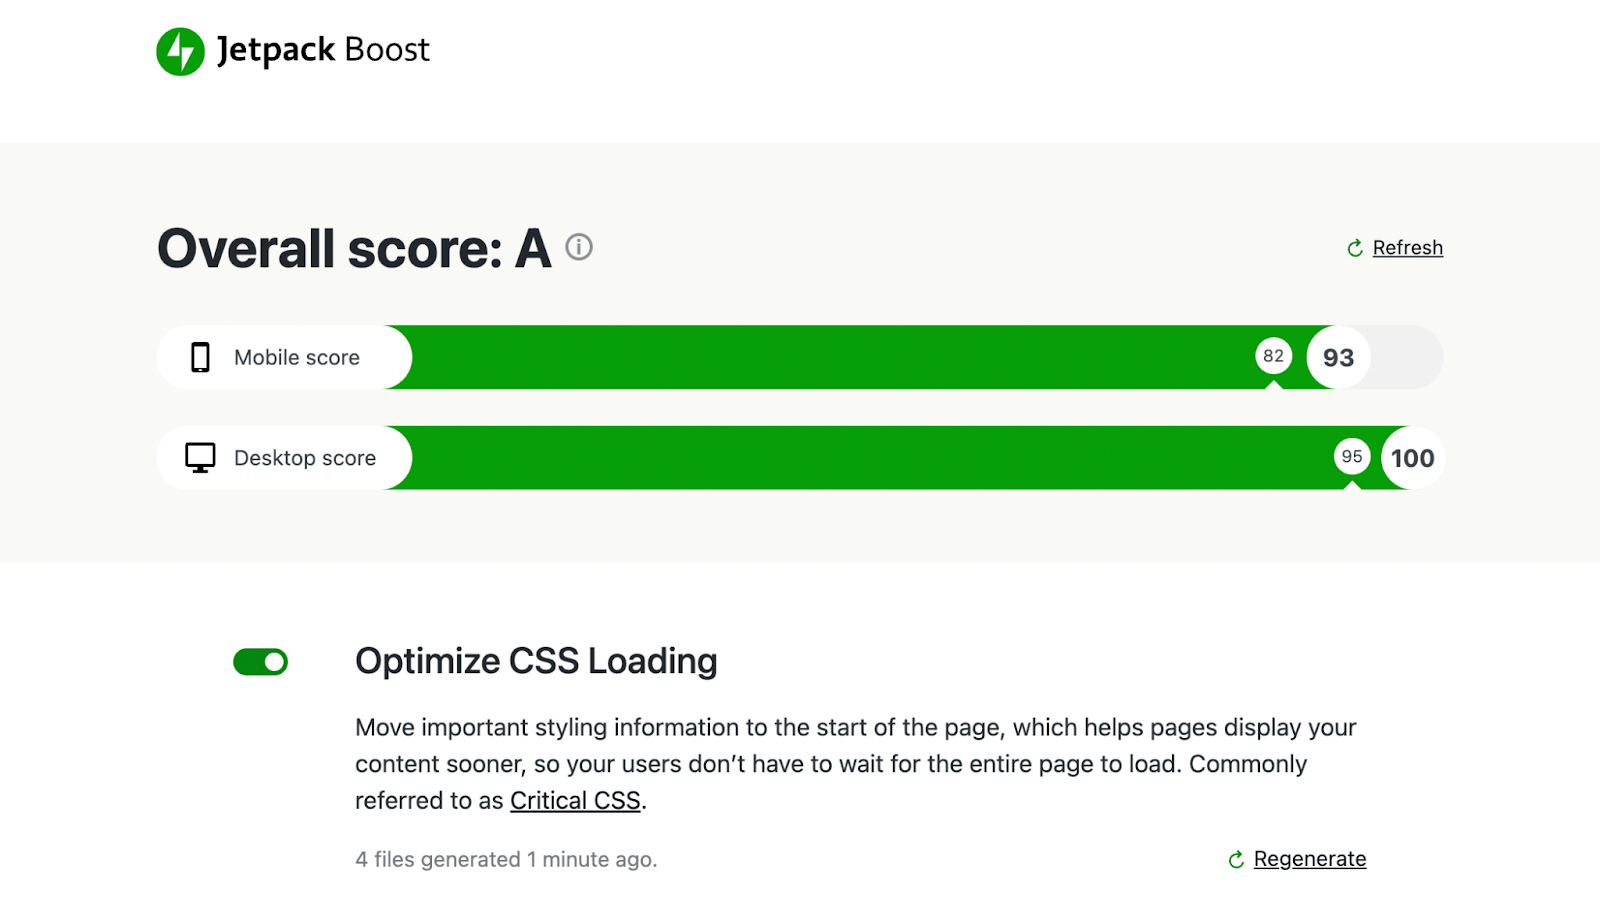
After you click on this option, the plugin will automatically generate the critical CSS for your website. It will move this important information to the beginning of the page, which can help your content load faster.
Deferring non-critical CSS can enhance your overall performance. In some circumstances, it could also improve your FID score on PageSpeed Insights.
4. Eliminate unnecessary JavaScript
If you installed a lot of plugins or a complex theme, your website could be running too many scripts. If a browser needs to execute a long list of scripts to load your website, it can lead to slow speeds.
Many scripts are necessary to display your website, but chances are, you have some unnecessary CSS and JavaScript. If you’re not certain how to tell the difference, you can go back to PageSpeed Insights.
Like you did with the first three methods, scroll to the Opportunities section. This time, look for unused JavaScript and CSS.
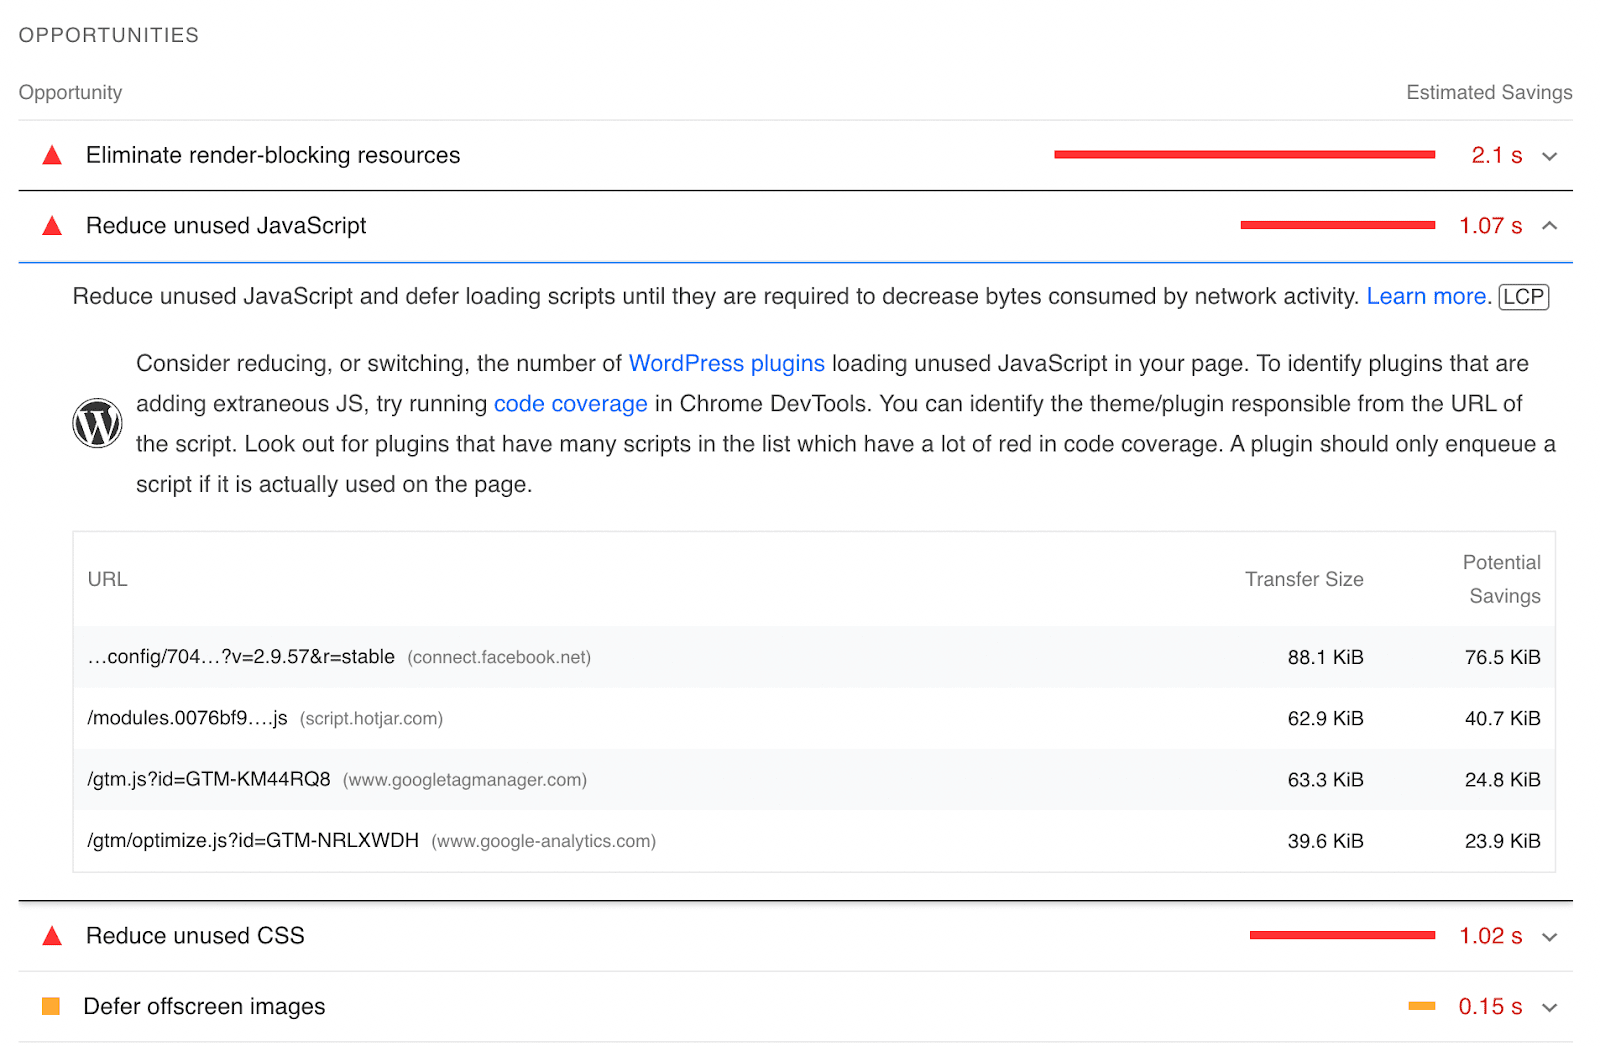
Next to each unused script, there will be a URL that tells you where it’s coming from. In this example, Google Analytics and Google Tag Manager were creating some unnecessary JavaScript.
If you know which theme or plugins are causing the problem, you might consider deleting them. Then, you can install different versions that are well-coded and more lightweight.
Alternatively, you can use a plugin like Asset CleanUp to remove unused CSS and JavaScript. This tool can eliminate render-blocking resources to decrease your site’s number of HTTP requests.
Once you’ve installed and activated Asset Cleanup on your site, go to Asset CleanUp → CSS/JS Manager in your dashboard. On this page, you can select different elements of your website to view its CSS and JavaScript.
For example, you can click on Homepage, and it will display all the loaded files on this page.
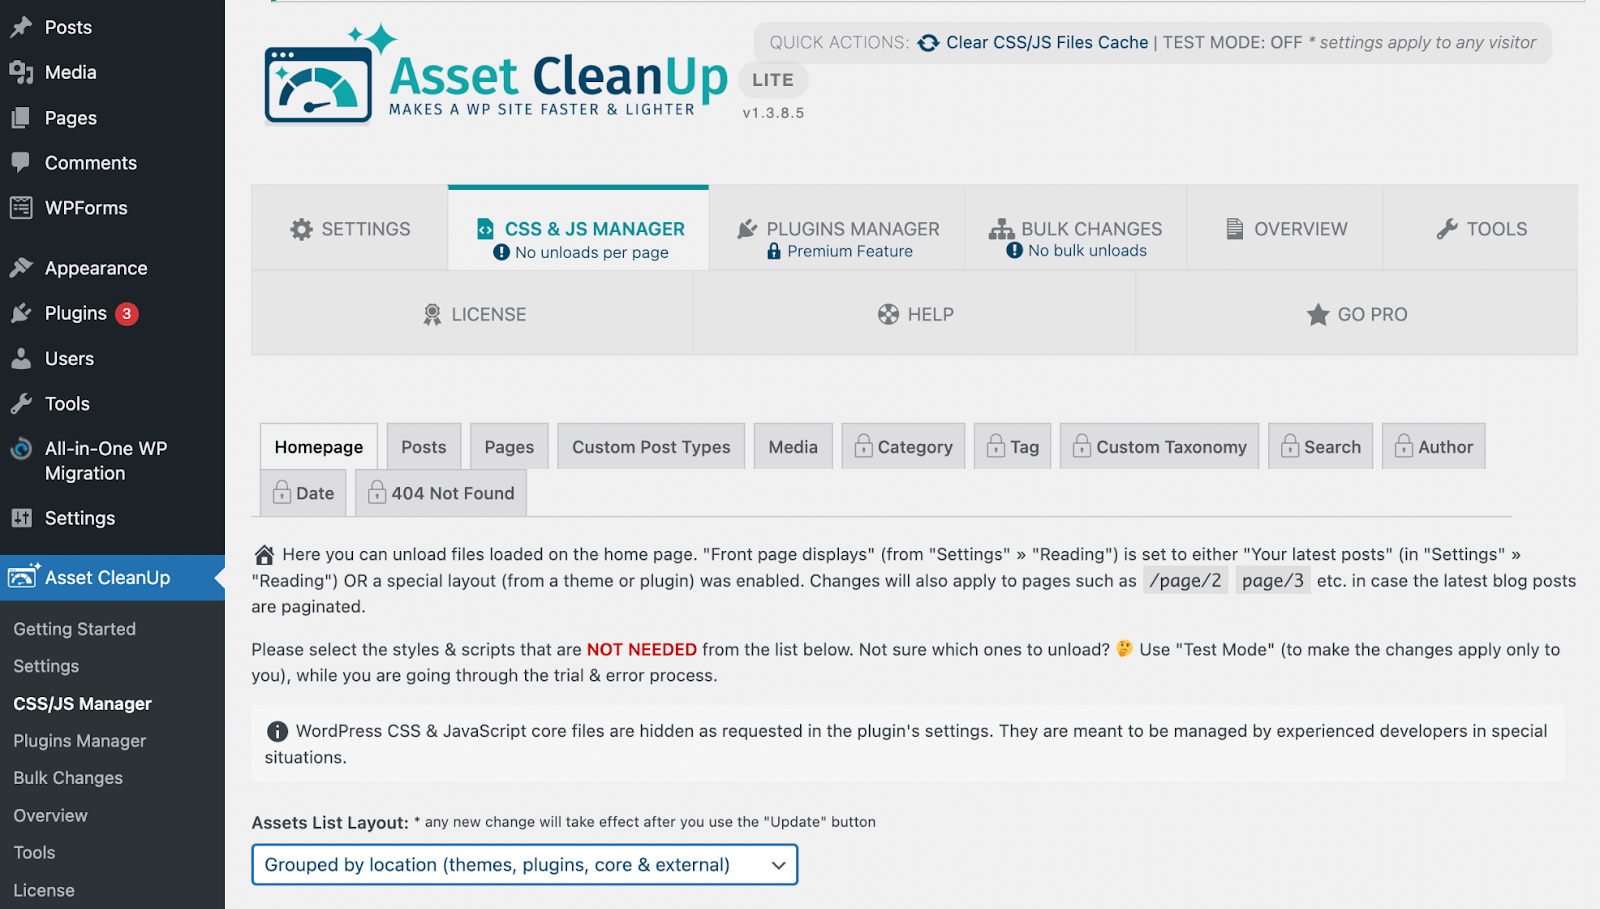
This information will be listed based on location. You can scroll down the page to see scripts from your plugins, themes, core software, and third-party sources.
There are two ways to remove a piece of script. You can unload it on this specific page or site-wide.
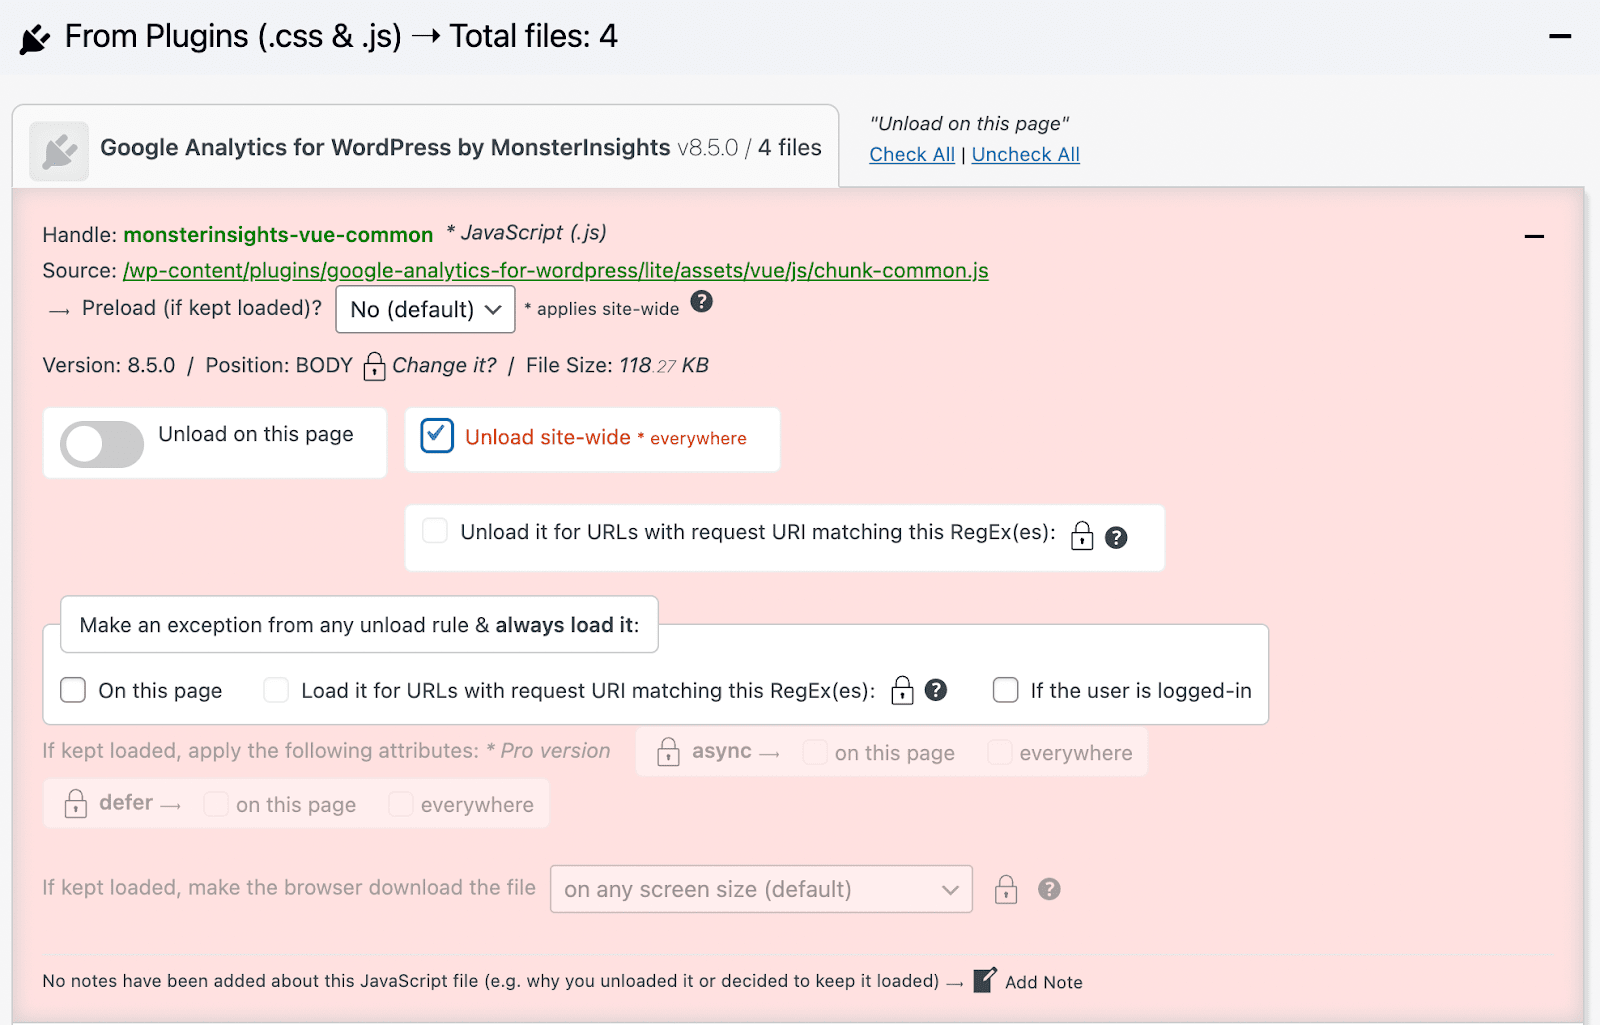
Once you remove unused scripts, click on Update. After this, you can clear your cache to immediately apply these changes.
5. Minify CSS and JavaScript
Although you can easily remove scripts from your site, you’ll only want to get rid of the ones you’re not using. For necessary CSS and JavaScript, you can simply minify them instead.
Jetpack Boost makes this process easy, with toggles that you can just turn on. After installing and activating the plugin, go to Jetpack → Boost in your WordPress dashboard.
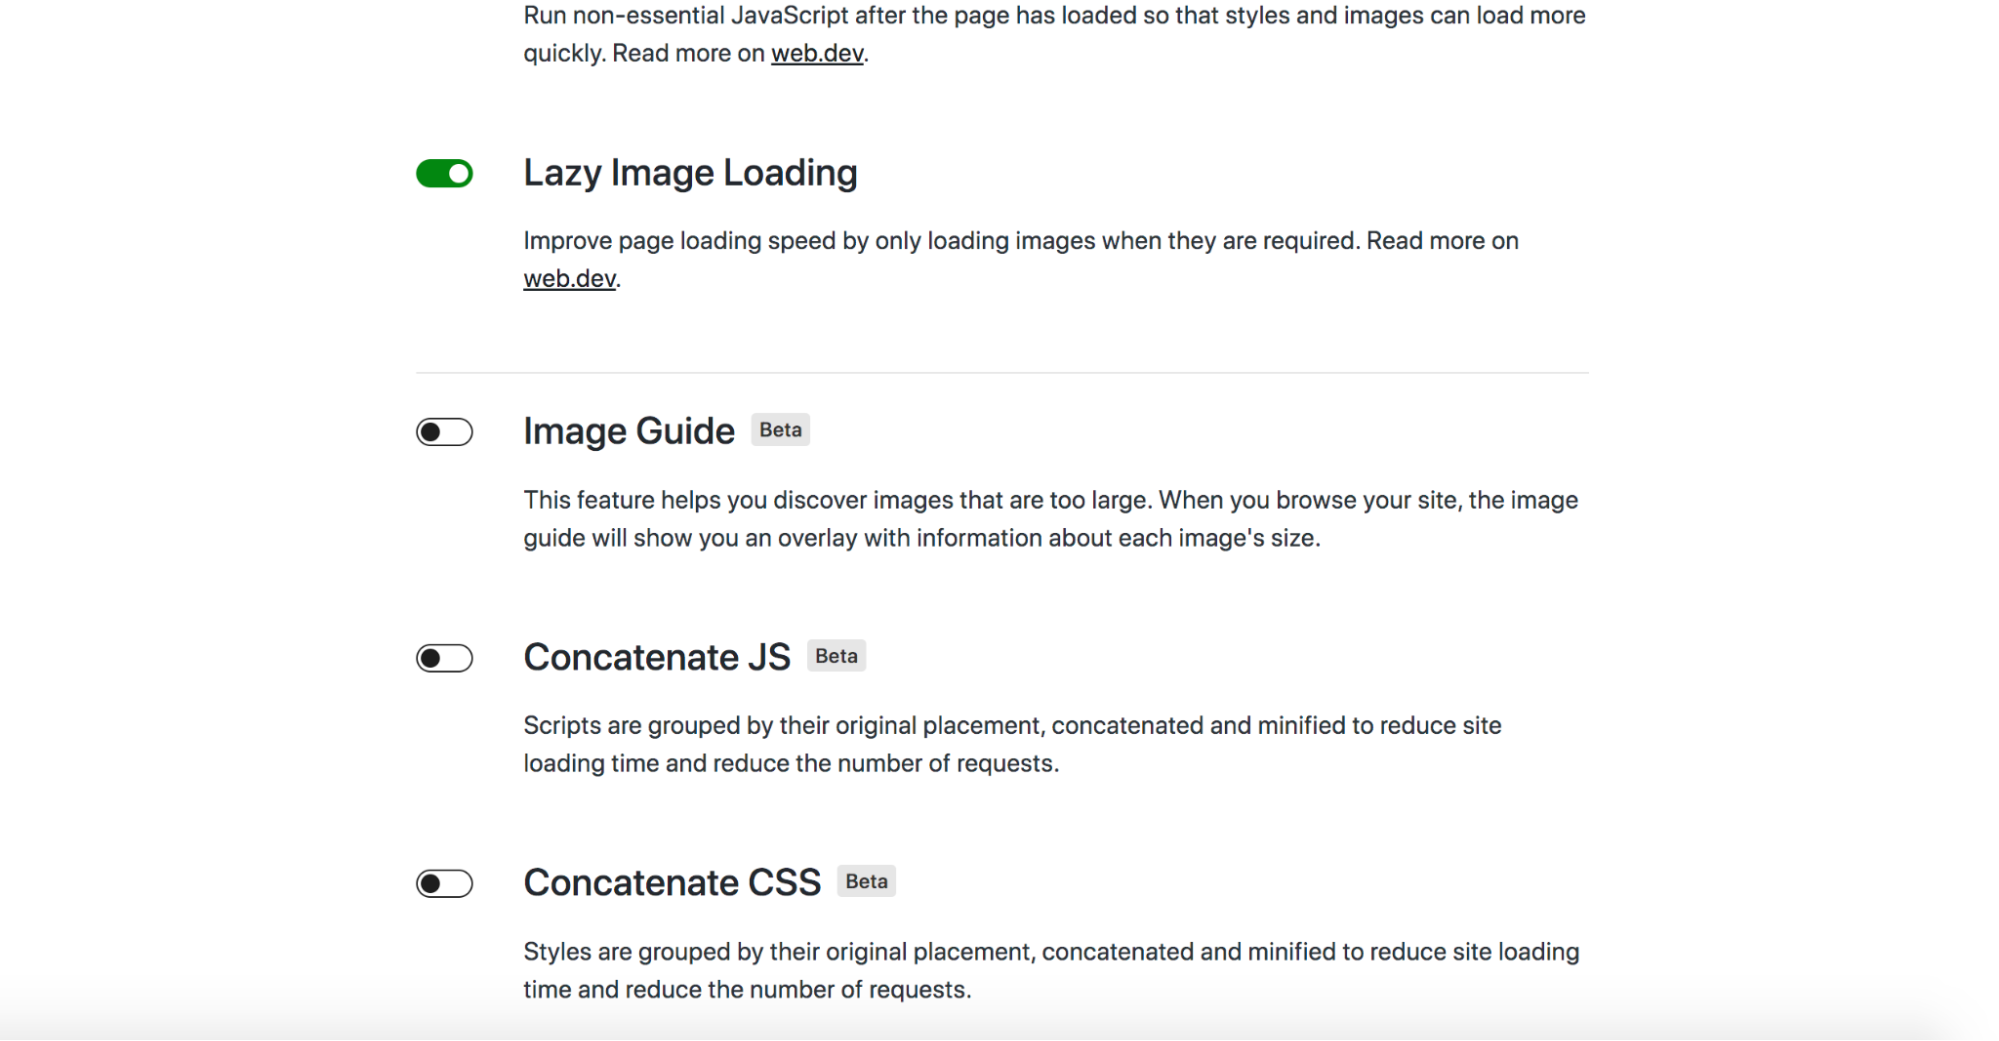
Then, turn on the options for Concatenate JS and Concatenate CSS. These tools will group your code and minify it for optimal performance.
6. Delay JavaScript execution time
To optimize your JavaScript even further, you can delay its execution time. This involves telling the browser to only load the JavaScript after a user interacts with your content. Unless a visitor scrolls down the page or clicks on a button, these scripts won’t be processed.
Note: This could potentially have the opposite effect (while helping improve your LCP score) so you may want to try other tips in this article first. If you do proceed with this, check your score right away and determine if it’s improved before proceeding with other optimization tasks.
To do this, you can use a plugin like Flying Scripts. With this tool, you can delay the execution of JavaScript files until there’s visitor activity on your site.
After you activate Flying Scripts, go to Settings → Flying Scripts. This will open the settings page for the plugin, where you can start implementing JavaScript delays.
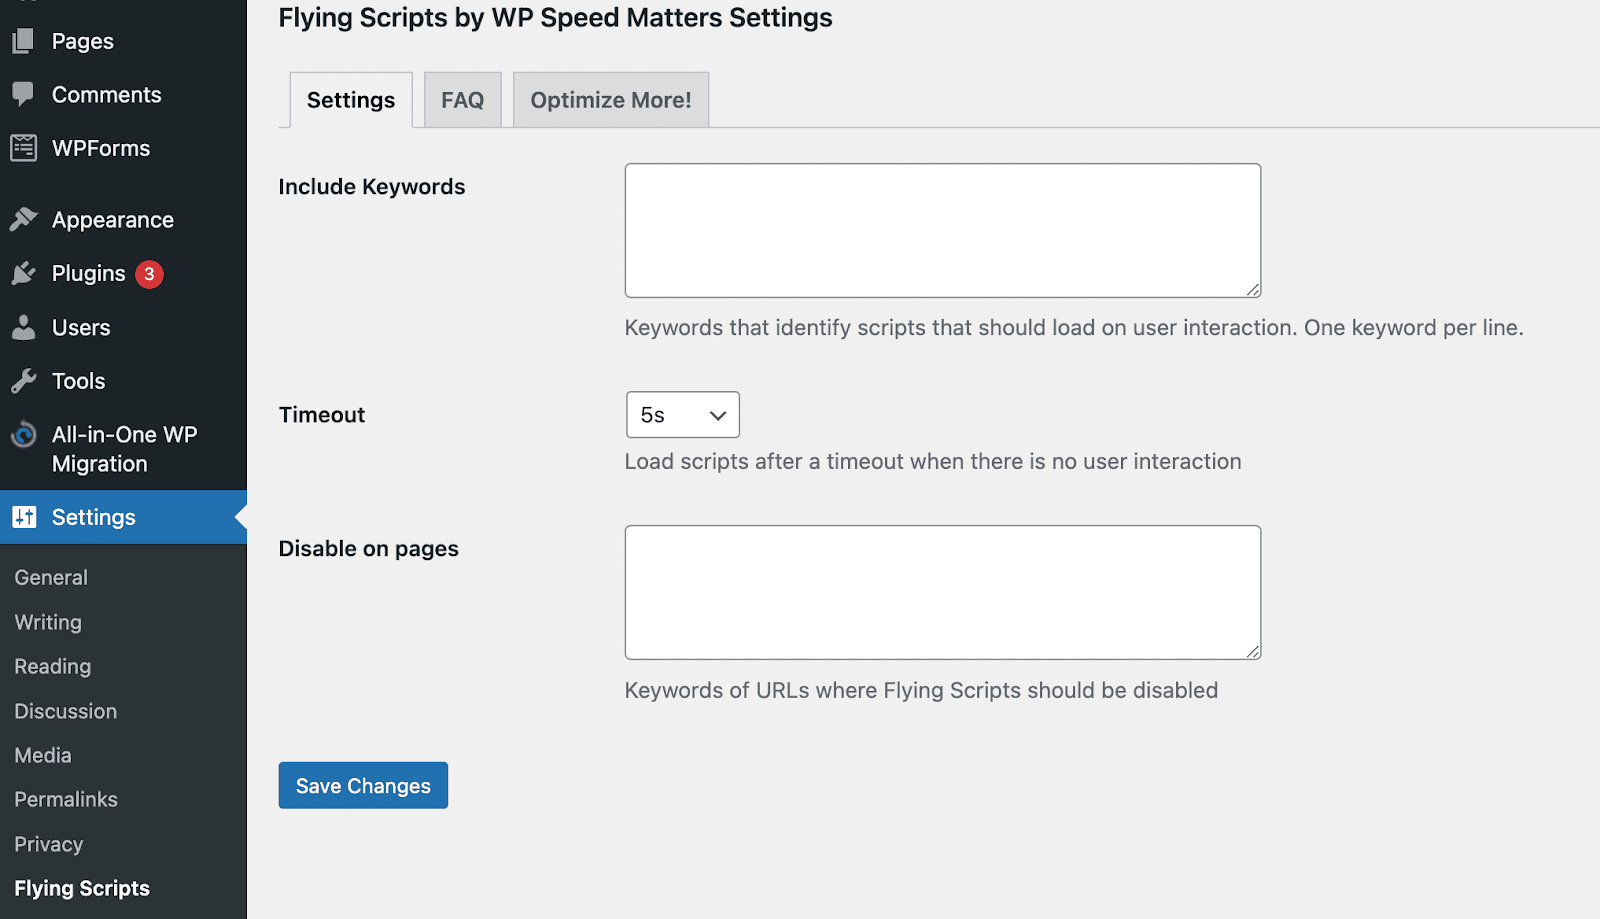
Start by writing keywords that identify the scripts you want to delay. For example, you can use “gtag” for a Google Tag Manager script.
Then, you can implement a timeout. Essentially, this will execute the JavaScript when there has been no activity for a certain period of time. You can set a timer for up to ten seconds. Once you’re finished, click on Save Changes.
7. Implement a content delivery network
Another effective option for improving your First Input Delay is to use a Content Delivery Network (CDN). This is a group of connected servers that can distribute your online content to users across the world.
When using a CDN, you can decrease the distance between your server and online visitors. This is because when someone visits your site, the content is delivered from the server that’s closest to their location. If you only have a single server in one location, it can take a long time to send data to international users.
Luckily, sites that utilize Jetpack already come with a free CDN. If you navigate to Jetpack → Settings → Performance, you can turn on the Site Accelerator.
Jetpack will optimize your images and static files. Unlike with other CDN providers, there’s no file limit. Plus, you won’t have to worry about extra monthly fees or a complicated management process.
Frequently asked questions about First Input Delay
So far, we’ve looked at how First Input Delay works and how you can improve your score. Now, let’s look at some common questions about FID.
How can I measure my WordPress site’s FID score?
You can easily measure your website’s First Input Delay score using a tool for Core Web Vitals. PageSpeed Insights is an easy-to-use option. All you have to do is enter your site’s URL and the tool will generate a detailed report on your site’s performance.
Google Search Console functions very similarly. After you verify that you own a website, you can view your FID report based on real-world visitor data.
You can also use Lighthouse. This tool gives you your site’s Total Blocking Time (TBT). Although this won’t display results from real visitors, it can give you a better understanding of your page responsiveness.
What is a good FID score?
Put simply, your site will fall into one of three scores:
- Good: 100 milliseconds or less
- Needs Improvement: ranges from 100ms to 300ms
- Poor: greater than 300ms
After you measure your FID score, any results over 100 milliseconds will require some adjustments.
How can I easily optimize my FID score?
You can improve your FID score by optimizing the scripts on your website. Usually, complex JavaScript and CSS files will prompt a browser to stop loading until it processes them. By removing, deferring, or minifying scripts, you can boost your site’s speed.
Although you can use different tools for this process, Jetpack Boost can help you implement multiple solutions at once. Using this plugin, you can optimize your CSS structure and defer non-essential JavaScript.
Improve your first impression
When a new visitor interacts with your website, they expect their browser to respond quickly. If your site has a high First Input Delay (FID), it can cause users to leave the page without reading your content. By focusing on your site’s response time, you can improve the user experience and retain more visitors.
Your website can have a poor FID score due to heavy and inefficient JavaScript and CSS coding. Fortunately, you can easily identify these issues using a tool like Google’s PageSpeed Insights. Then, you can install a plugin like Jetpack Boost to minify or defer CSS and JavaScript.
