
Speed and reliability are undeniable priorities for any website. Consumers expect online stores to load in less than two seconds, and a one-second delay in load time reduces page views by 11 percent. Moreover, with search engines increasingly prioritizing load times, maximizing your site’s speed is crucial for search engine optimization (SEO).
While there are a variety of ways to improve website speed, one of the most effective solutions is to use a content delivery network (CDN). By integrating a CDN, you can reduce the stress on your server and enable visitors to load pages on your website faster.
In this article, we’ll explain what a CDN is and discuss its main benefits. We’ll also show you how to use Jetpack’s WordPress CDN. Let’s get started!
What is a CDN?
Most web hosts serve page requests to all of your visitors from a single server, regardless of their location. If your website’s server is located in North America and a visitor from Australia tries to access it, all of the data needs to travel a long distance to reach them. The longer the distance, the more time it can take for your website to load.
A CDN is a network of servers strategically distributed around the world. It takes the strain off of your server by downloading assets — images, videos, and CSS — from your website and serving them through its own network.
If your usual hosting company’s server is in San Francisco and a user visits your site in London, a CDN would load your website from the closest server (which may be in London itself) rather than all the way from the U.S. A CDN provides higher uptime, media optimization, and faster asset delivery.
There are plenty of benefits to using a CDN, but it’s worth noting that, in most cases, CDNs aren’t free. Some platforms offer limited free CDN functionality, but if you want access to their full range of features, you’ll need to pay for it.
Four benefits of using a CDN
Almost any website can benefit from integrating a CDN, whether you’re using WordPress or not. Here are four main benefits of using a CDN:
1. Faster pages
Page speed is one of the biggest indicators of the quality of user experience a website offers. If a page takes three seconds or longer to load, you’d likely start losing visitors.
These days, most users have access to relatively high-speed internet connections. This means their devices can load complex pages in a matter of seconds. If a page takes too long to load, the problem usually isn’t on the visitor’s end. Instead, it lies within your server or website setup.
There are several reasons why a server might take too long to serve data when a visitor tries to access your website:
- Long distances between the visitor and your server’s location. The longer the distance between a user and your server, the more time your pages can take to load.
- The server is overwhelmed with requests. If your website is getting too many visitors simultaneously, the server can start dropping requests or take too long to display data.
- Your pages have too many unoptimized media assets. High-quality images and videos can have massive file sizes, so media-heavy pages can take longer to load.
Using a CDN can solve all three problems in one fell swoop. With a CDN, you get access to a global network of data centers that can cache your website. When a visitor tries to access your website, the CDN intercepts that request and re-routes it to the closest data center.
In doing so, the CDN reduces the distance that data has to travel to reach a user. Most CDNs can also cache and optimize media assets, which means that pages take less time to load.
Finally, CDN data centers are optimized to deal with massive amounts of traffic. If you’re using shared hosting plans, server response times can slow down drastically if you get even a moderate amount of traffic.
If you start encountering performance issues with your website, you may want to consider upgrading to a better web host or plan. By adding a CDN to the mix, your website will be even more prepared to handle increased traffic while offering a better user experience.
2. Built-in optimization for media files
A lot of CDNs automatically optimize your website’s media assets before caching them. If you’ve ever used a WordPress media optimization plugin, you’re probably familiar with the process:

Image compression tools take graphics and compress them using either “lossy” or “lossless” approaches. Lossless compression preserves all of the image’s quality, but you often get fewer savings in terms of file size. Lossy compression, on the other hand, can somewhat diminish an image’s quality, but you get far smaller file sizes.
Ideally, you should optimize every single image that you upload to WordPress. Modern websites tend to use a large number of images. If those files are all high-quality and high resolution, they can increase your page loading times dramatically.
Since 2017, the average page size has gone up from around 1.3 MB to 2.1 MB. This is mainly due to the increased complexity of modern websites and the use of more media files:

The more media files you use on your website, the more you can benefit from a CDN. Even so, if you’re going to have video files on your website, you’re better off hosting them on a dedicated platform. If you’re using Jetpack CDN, you get access to an ad-free video hosting service that enables you to serve media files from our servers.
3. Protection from Denial of Service Attacks (DDoS)
Denial of Service Attacks (DDoS) are when a coordinated network of bots bombards a server with a very high number of requests all at once. These attacks increased by 55 percent from 2020 to 2021. Some surveys say that up to 35 percent of online businesses experience these attacks at one point or another.
There are plenty of ways to mitigate DDoS attacks. Some web hosts are proactive about security and automatically block suspicious IP addresses or attempts to break into your site. Sadly, a significant DDoS attack can often be enough to bring even powerful dedicated servers to their knees.
If your website is under attack, visitors might not be able to access it. At best, they’ll experience much longer load times and there’s little you can do except wait out the attack or reach out to your web host to see if they can help.
By using a CDN, you add a layer of security between the rest of the web and your site. CDNs are built to withstand massive amounts of traffic. Simply by integrating a CDN, you’re already taking a big step to protect your website.
4. Increased website uptime
Most reputable web hosts offer near-perfect uptime. It’s not uncommon to see web hosting services with uptime data that shows their servers are available 99.9% of the time.

If you’re stuck with a poor hosting service, downtime can be more frequent. One of the many advantages of using a CDN is that the service caches copies of your website throughout its data centers. If your server is suddenly unavailable, visitors will still be able to access those copies of your site thanks to the CDN.
In a way, a CDN can serve as a backup while you work with your web host to get your website up and running again. The same applies if you run into a WordPress error that prevents users from accessing your site. Thanks to the CDN, you can troubleshoot errors at your own pace without losing out on traffic.
Who should use a CDN?
1. WordPress websites with a global audience
Most of your traffic might come from the USA, so it makes sense to host your website there. If a good portion of traffic comes from Europe, Asia, or Oceania, a WordPress CDN would improve load times by serving website assets from a server that is geographically close to each individual person. That way, every visitor gets an excellent user experience, no matter where they are.
In most cases, your audience won’t be limited to a single country. A quick look at your analytics can give you insights into your visitors’ locations.
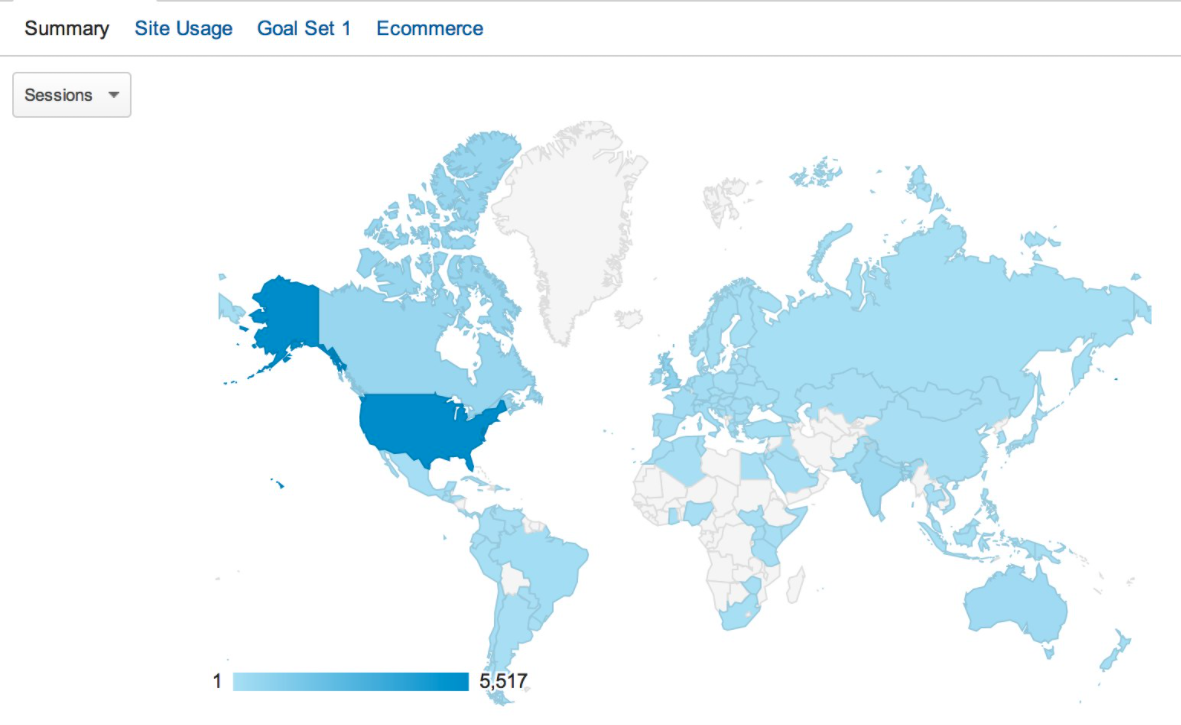
Even if only a small part of your audience isn’t “local”, you still get plenty of benefits when using a CDN. Users close to your server’s location will still experience better load times.
2. Websites with a large library of media files
Jetpack offers effective ways to optimize your website, but its CDN might just be the star of the show. That’s because it can help you cache your biggest files, including images.
A CDN not only improves load times by serving assets from distributed servers, it also automatically resizes images for mobile devices. Phones and tablets are particularly prone to poor or unreliable internet connections, so fast-loading, optimized images are critical for a good user experience.
Jetpack also includes lazy loading. This means that it only loads images that are on the screen, while loading other images as you scroll down the page. This can drastically decrease initial page load times.
3. Websites that experience traffic spikes
It’s every company’s dream — you land an interview on a major television network, a top celebrity tweets about your brand, or the video you created goes viral. But if your site can’t handle the sudden influx of traffic, it may load slowly or crash altogether, turning off potential new fans or costing you sales.
Small businesses are particularly vulnerable, as individual customers turning away from a temporarily broken website can harm your bottom line far more significantly than it would that of a well-established company.
CDNs balance site requests across their entire distributed network of servers. This allows you to accommodate more visitors at one time, by spreading them out across multiple locations.
Your site might also see a sudden traffic spike because of more nefarious reasons: DDoS attacks. CDNs act as a type of DDoS protection and are therefore a key part of any good site’s security features.
How much does a CDN cost?
Costs vary from provider to provider, but typically CDNs charge per gigabyte of data transfer, with different pricing per region (e.g. Asia may cost more than North America). A lot of CDNs also charge you a monthly fee.
To give you an idea, monthly CDN charges start at around $20 on average for a small website that doesn’t get a lot of traffic. As your website grows, those charges will go up. It’s not uncommon for a CDN to cost hundreds or even thousands of dollars per month if you run a popular website.
One of the most common reasons that some users don’t invest in a CDN is that they can be costly. In many cases, a CDN can be more expensive than a hosting plan, but it offers so many benefits. These range from faster loading times to increased site security.
With Jetpack, you don’t have to worry about complex pricing structures. Jetpack’s WordPress CDN is available for any WordPress website. All you have to do is install the plugin and connect to your account (which we’ll show you how to do in a minute).
Unlike other free CDNs, Jetpack doesn’t offer limited features. The CDN can cache every page on your website, help you deliver media files faster, and protect your website from brute force attacks.
What makes Jetpack the best CDN for WordPress sites?
Jetpack is a WordPress plugin that offers a free CDN. You’ll benefit from optimized delivery of photos and static files, but without having to worry about creating push and pull zones, redirecting assets, or any of the other technical steps required to set up most other CDNs.
Even though Jetpack CDN is free, it surpasses many paid competitors in terms of features and ease of use.
Here are five reasons Jetpack is the best WordPress CDN:
1. It’s easy to set up
Traditionally, integrating a CDN with WordPress can be a time-consuming process. You might need to alter your domain’s nameservers, disable caching tools on your site, and spend time checking that your pages load correctly afterward.
Jetpack does things differently. Since it’s a WordPress-focused service, all you have to do is install a plugin. Once the plugin is active, you can turn on Jetpack’s CDN functionality at any time without leaving the WordPress dashboard.
2. You get access to the WordPress.com data centers
Jetpack delivers content from high-speed, dedicated data centers, the very same network that powers thousands of the best WordPress.com sites and is trusted by millions of users.
Even if you have a self-hosted WordPress site, you can still benefit from using Jetpack CDN. The only caveat is that you’ll need a WordPress.com account to access Jetpack’s functionality (although you can choose a free one).
With a free account, you can enable Jetpack on your WordPress website and start enjoying decreased page load times and security in a matter of minutes.
The easiest speed optimization plugin for WordPress
Jetpack Boost gives your site the same performance advantages as the world’s leading websites, no developer required.
Boost your site for free3. It can reduce your hosting fees
Besides distributing website content across multiple servers, a CDN also offloads static files. This means that images, as well as any CSS and JavaScript, are loaded from the CDN’s network, not your server.
A lot of web hosts will try to convince you to opt for more expensive plans based on increased storage capacity and bandwidth allocation. By using a CDN, you can get the same performance (or even better) while still paying for a relatively cheap hosting plan.
That’s because CDNs like Jetpack take on a lot of the heavy lifting from your server. They can load the images and other media files that visitors see, and serve cached copies of your website from their data centers.
To be clear, you still need to pay for hosting even if you’re using a CDN. But over time, Jetpack CDN will save you a ton of money over upgrading your hosting plan.
4. It’s unlimited and free
There’s no limit to the number of files you can serve with Jetpack. Whether your site has five pages or five thousand, ten images or ten thousand, Jetpack has you covered.
Most CDNs charge you depending on how much traffic you get, as well as a monthly fee. Those fees can add up to the point where you’re paying more for a CDN than you do for hosting. With Jetpack, you don’t have to worry about complex pricing tiers or overage charges.
5. It’s built for WordPress
Instead of needing to configure a third-party CDN to work with your WordPress site, Jetpack was designed specifically for WordPress. You don’t have to guess which settings are best for your exact scenario — Jetpack takes care of that for you, whatever themes or plugins you’re using.
Other CDNs require you to configure their settings. Depending on what settings you use, you might see better or worse results when it comes to performance tests. With Jetpack, you don’t have to worry about complex configuration settings.
Jetpack CDN has been around since Jetpack 2.0 (released in 2012) when it was called Photon. It’s time-tested and proven to effectively speed up your site.
How to set up your own CDN
There are many CDN providers, all with different costs, features, and setup procedures. In most cases, setting up a CDN to work with your website is a complex process that can take hours.
Moreover, you need some technical knowledge to configure a CDN to work with WordPress. At the very least, you’ll need to read the service’s documentation to ensure that you’re doing everything by the book.
Setting up a CDN typically includes the following steps:
- Sign up for a CDN service. There are many options. Amazon Cloudfront, KeyCDN, and MaxCDN are some of the most common.
- Create a pull zone. To create a pull zone, you need to give the zone a name and then set a URL that the CDN should “pull” content from. You typically don’t need any File Transfer Protocol (FTP), but instead should use the URL of your website. Pull zones may also have more advanced options, like enabling a Secure Sockets Layer (SSL) certificate.
- Create a push zone. It’s unusual to have any images, CSS, or JavaScript files that are above 100 MB, but if you have videos that need to be delivered via a CDN, then a push zone may be necessary. To push files, you’ll usually need to use a third-party client.
- Create a custom URL for your CDN. CDNs will often provide a URL for you (e.g. user54334.thecdn.com/yourasset.css), but most people would prefer this to be a subdomain of theirs. In this scenario, you would need to edit your DNS settings and create a CNAME that points from your chosen subdomain to the CDN-generated domain.
- Test your new URL. To test, simply take the web address of a known asset (e.g. yourjetpack.blog/picture.jpg) and replace it with the CDN URL (e.g. cdn.yourjetpack.blog/picture.jpg). If the link loads, then your URL is working properly.
- Redirect your assets. At this stage, your website is still pointing to non-CDN URLs. You’ll need to find all of your non-CDN URLs and replace them with CDN URLs.
In many cases, you might set up a CDN perfectly but the service won’t update its cache after you make changes to your website. If that happens, you’ll need to clear your CDN’s cache manually.
Most CDN providers enable you to configure how long it takes for the service to clear its cache and store new copies of your website. Ideally, that should happen daily, but your options will vary depending on what CDN you’re using.
If you’re using WordPress, a lot of CDN services will offer special instructions on how to configure their services to work with the CMS. You also have the option of using a CDN that’s built with WordPress users in mind, and which doesn’t require you to go through a complicated setup process.
How to set up Jetpack CDN
If you’re already using Jetpack for automated, real-time backups, brute force protection, or some of the other available features, you can enable its CDN right away. If you’re not using Jetpack yet, start by logging into WordPress and going to the Plugins → Add New tab.
Use the search bar to the right to look for the “Jetpack” plugin and click on Install Now next to the first option:
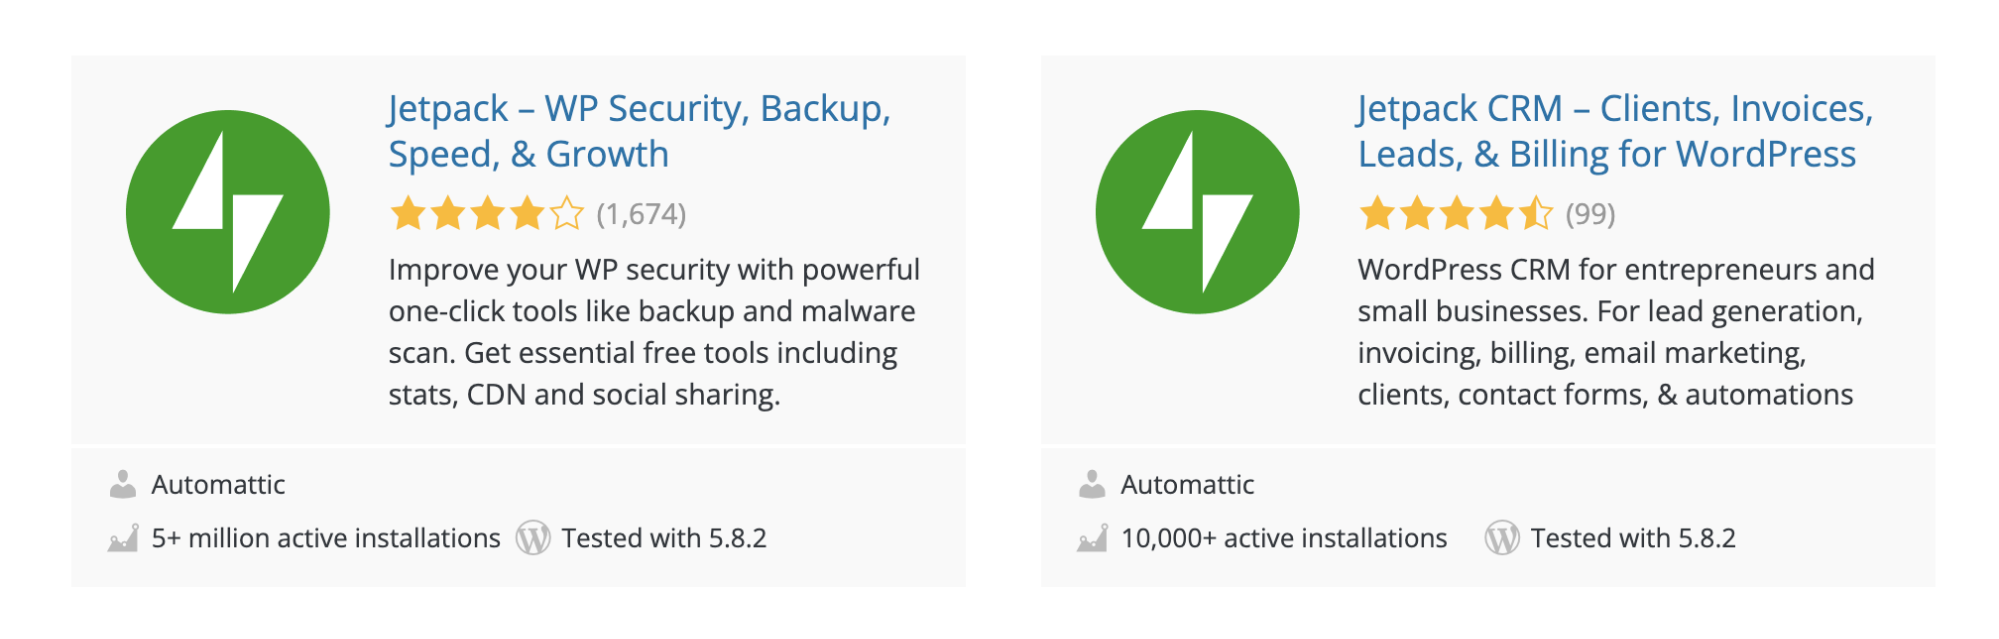
Once WordPress finishes installing the plugin, select the option to activate it right away. After installing Jetpack, it will prompt you to sign in to a WordPress.com account or register a new one.
Once you’ve done so, take the following steps:
- Navigate to Jetpack → Settings in your WordPress dashboard menu.
- Click on the Performance tab.
- Choose Enable Site Accelerator.
Here’s what the Performance tab looks like when configuring Jetpack settings:

This will take a few seconds to load, after which your site will start to serve images and other static files, like CSS and JavaScript, from the global CDN. Enabling Jetpack’s CDN will also turn on the settings for speeding up image and static file loading times. You can also choose to turn either setting on individually if you don’t want to take advantage of Jetpack’s full suite of CDN features.
Additionally, you can enable the lazy loading feature from the Performance tab. That way, images will load as visitors scroll down each page on your website, instead of loading all at once. Lazy loading can drastically improve load times for media-heavy websites, so we recommend that you use it.
That’s it! There’s no cost, no hard setup, and no risk of downtime — just accelerated assets loaded from a global CDN.
Additional features of Jetpack include:
- Automatic links to CDN URLs. There’s no need for complex rewrites; Jetpack does all of that for you.
- Image resizing. This is a quick way to reduce the size and load time of a website.
If you’re hosting video content, consider using VideoPress, which includes unlimited WordPress video hosting. When using this feature, all of your videos will be on the same global network as your other assets.
CDN speed tests
The most compelling reason for using a CDN is that it can improve your website’s performance drastically. With that in mind, we wanted to show you the difference between a website that doesn’t use a CDN and one that does.
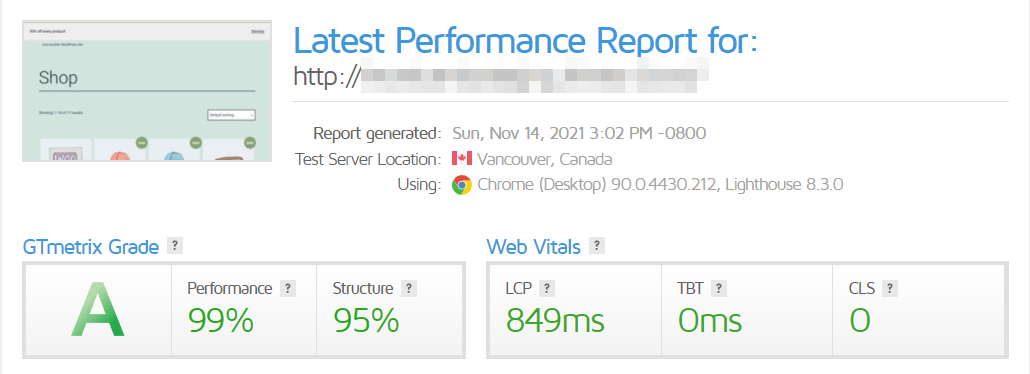
We set up a test WordPress website on one of our favorite web hosts. Here’s a quick look at how that site measures up from a performance standpoint before activating Jetpack CDN:

Our test website already loads relatively fast without any optimization. Overall, the Largest Contentful Paint (LCP) is 1.8 seconds. Typically, any LCP that’s less than 1.2 seconds is ideal. If you cross that line, your website’s bounce rate will begin to climb. So, we’d like this to be lower.
Now, let’s take a look at what happens after we enable Jetpack CDN:
Aside from enabling Jetpack CDN, we made no changes to any part of the website or its configuration. Enabling the CDN means that Jetpack will cache all the media and static files on the website. This leads to a decrease of one second in LCP.
It’s important to note that using a CDN is merely one of the many ways that you can optimize your site’s performance. This means if you’re getting fantastic load times with a CDN, you can improve them even further if you’re willing to dig into your website’s settings and perhaps consider switching to a new web host.
On that same note, the results that you get when using a CDN may not be the same as ours. Most WordPress websites will see a noticeable increase in performance from using Jetpack. Your results will vary depending on your site, its configuration, and what web host you’re using.
Another reason you should consider using a CDN is that it’ll enable your website to maintain peak performance even when it’s under stress. Depending on what web host and plan you use, your site’s pages might load quickly, but only if you’re not getting that much traffic.
With that in mind, we decided to run our test website past a stress test while using Jetpack CDN. Without a CDN, your load times will vary as the number of users trying to access your site simultaneously increases. With a CDN, results should hold fairly steady.
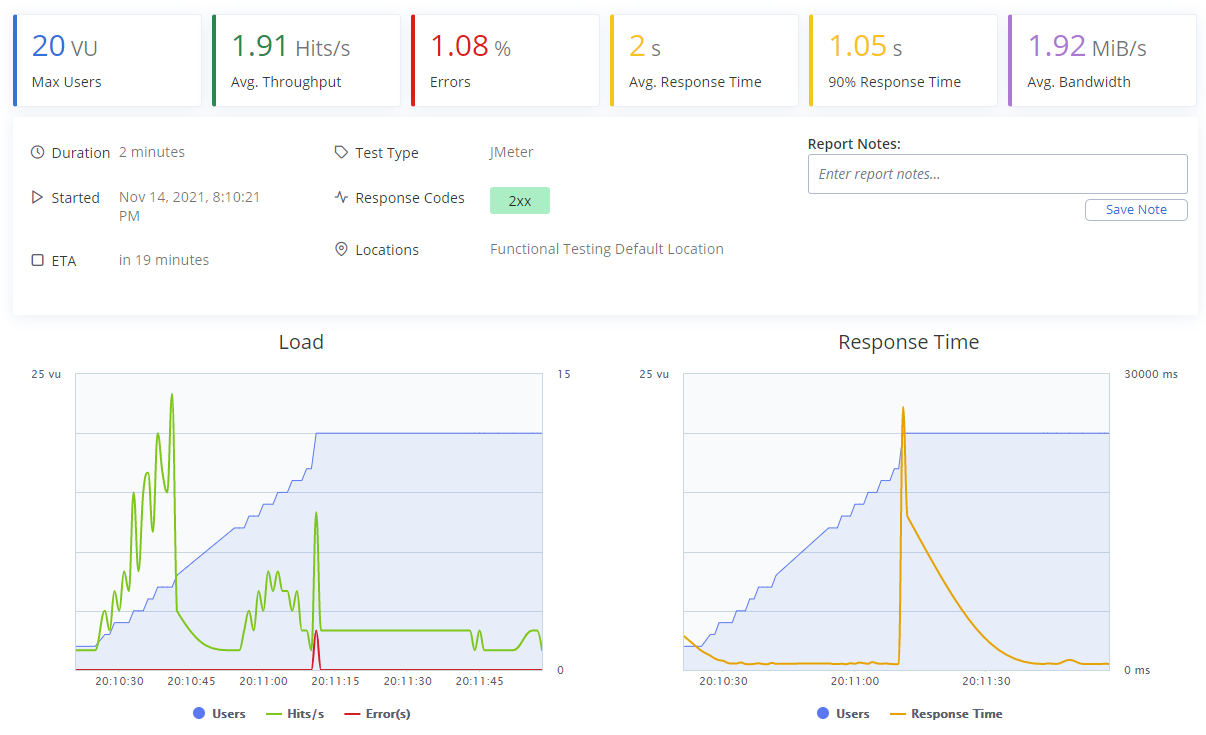
During our tests, we saw average loading times of 1.05 seconds. That’s a bit more than the numbers we saw during regular page speed tests. But that’s to be expected, considering we used a different testing location and that we placed the website under stress by configuring 20 bots to access it simultaneously.
Overall, using Jetpack CDN drastically improved our site’s load times and the results remained similar when placing it under stress. All of that while using a basic hosting plan.
Frequently asked questions about content delivery networks
One of the biggest advantages of using Jetpack is that it simplifies the entire process of choosing and setting up a CDN for WordPress. Even so, it’s important that you understand how CDNs work in general.
With that in mind, we put together a list of some of the most frequently asked questions regarding CDNs in general to ensure that you have all the information that you need.
1. How can I tell if my site is already using a CDN?
Most CDNs don’t offer free services. That means you’ll know that you’re using a CDN if you’re getting a bill for it. With Jetpack, you get access to full CDN functionality for free. The plugin doesn’t remind you that you’re using a CDN, but you’ll notice it due to faster load times and better performance across the board.
If you’re using Jetpack, you can check if the Site Accelerator CDN functionality is enabled by accessing the plugin’s settings. The plugin lets you turn on the CDN by toggling a switch, which makes it easy to see when it’s working.
Or you can use the waterfall feature of your favorite speed testing tool, like GTMetrix or Pingdom Page Speed. When testing your website speed, glance at the static file URLs that are being loaded — if a CDN is active, they should be the URLs that you set up or the default URLs from your CDN.
2. How can I test my CDN’s performance?
The best way to test a CDN’s performance is through daily usage. After you enable a CDN, you might see a decrease in your site’s bounce rate due to fewer users leaving while pages load. If you already have a low bounce rate, you’ll still benefit from lower load times for you and your visitors.
Other ways to test a CDN’s performance include using tools like PageSpeed Insights or GTMetrix. These free services enable you to check how long it takes for pages within your site to load. They’ll also offer suggestions on ways that you can improve performance across the board (aside from using a CDN).
3. How do I check for errors with my CDN?
A lot of CDNs will show custom error screens if you run into a problem with their services. Here’s an example of what a CDN error screen might look like:
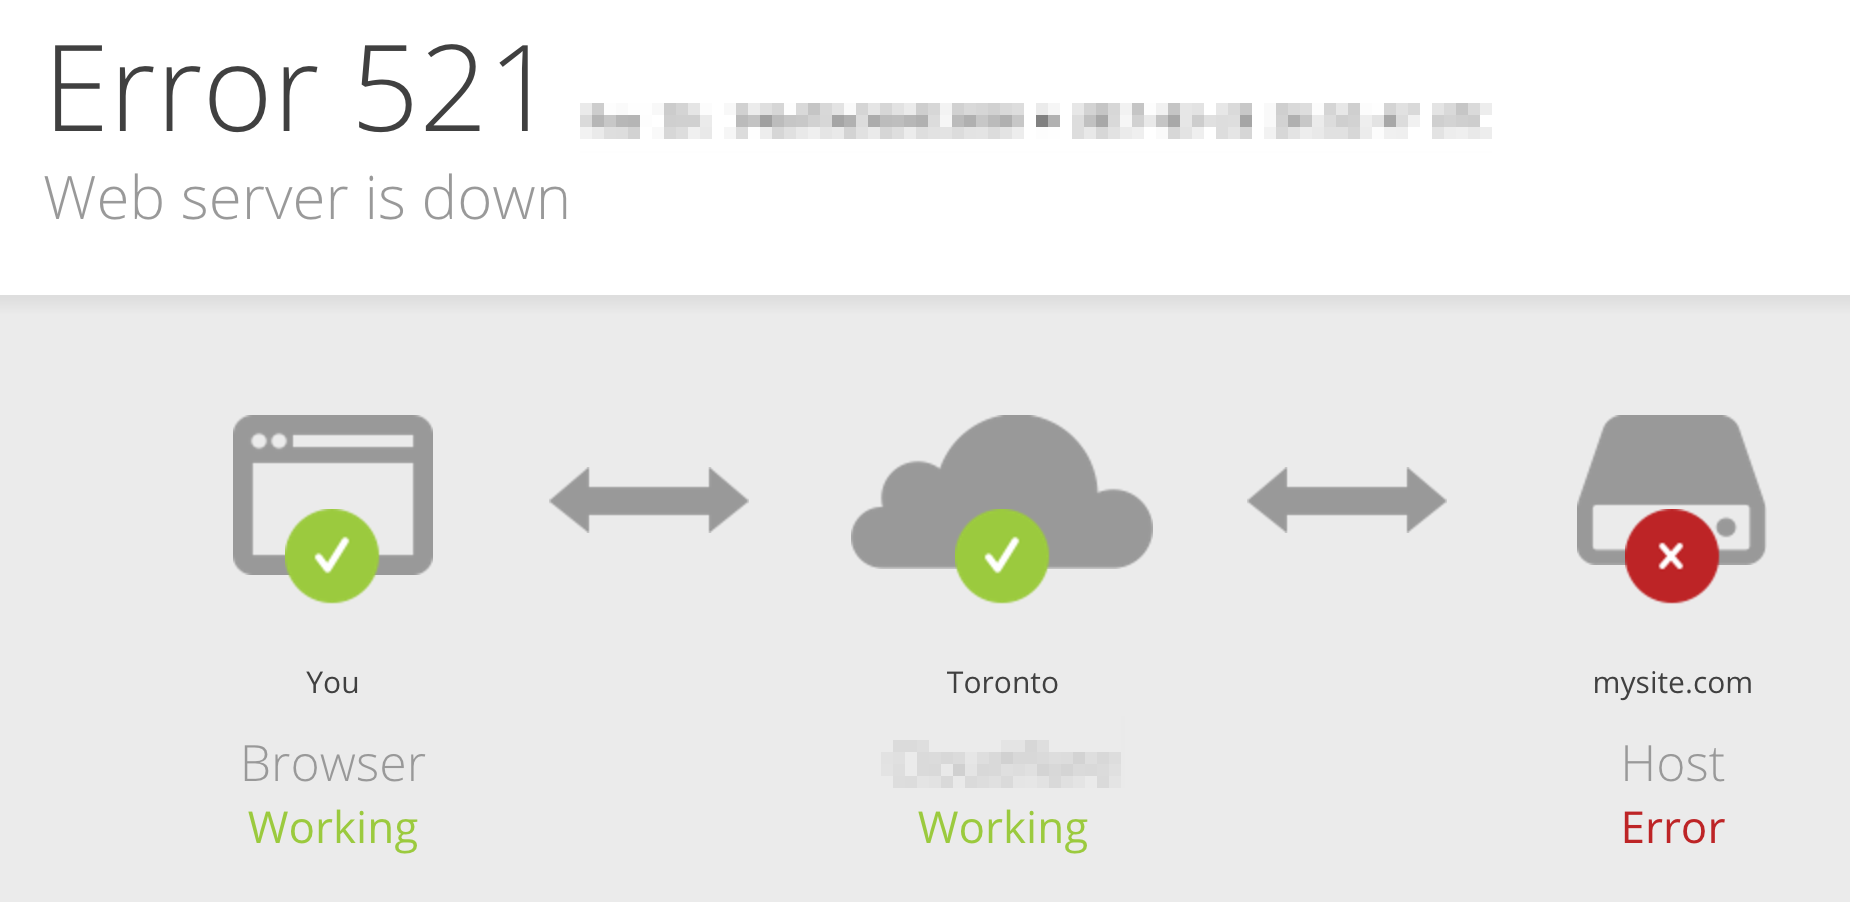
If you encounter an error, checking your CDN’s documentation should yield information on how to fix it. With Jetpack, it’s uncommon to run into errors as the plugin takes care of configuring the CDN to work perfectly with your WordPress website. Unless the WordPress.com servers go down (which is something that doesn’t happen), you shouldn’t experience any CDN issues with your site.
Note: Occasionally, a theme or plugin won’t be compatible with your CDN, especially if it’s used for static file creation. However, this is pretty rare.
4. Should I use a CDN for a small local website?
There’s no website that can’t benefit from using a CDN. Even if you only get moderate traffic, using a CDN will improve the user experience drastically. That, in turn, should translate to increased engagement and conversions.
Plus, it also improves your core web vitals, which recently became a ranking factor for Google.
The only caveat when it comes to using a CDN is cost. A lot of CDN services charge steep monthly fees plus additional costs, depending on how much traffic you get. For a small website, those can match and even exceed what you’re already paying for hosting.
With Jetpack, you get access to free CDN functionality that leverages the WordPress.com data centers to improve your site’s performance. Once you take cost out of the equation, there’s no reason not to use a CDN with WordPress.
5. When should I not use a CDN?
In Iran, Sudan, Syria, or Cuba, using a CDN could cause your content to be blocked due to government restrictions. So, if your target audience is in one of those countries, you may want to avoid using one.
Otherwise, there’s rarely a reason not to use a CDN for your website. CDNs improve site performance across the board and they help you serve pages and files to your visitors faster.
When using a CDN, it’s possible that you may run into issues while making changes to your website. The CDN can store old versions of your site and fail to update those cached copies after you edit your site. Fortunately, that’s something that you can easily fix by forcing the CDN to clear the cache manually.
Alternatively, we recommend that if you’re making changes to your website, you do so using a staging environment. That way, you can edit your site in peace and clear the CDN’s cache once you push those changes to production.
When using Jetpack, caching issues aren’t a problem. The plugin automatically clears the cache when you make changes to your WordPress website.
6. Why do URLs for static files change when using a CDN?
The best CDN providers not only cache your website, but also store copies of your media and static files in their data centers. The original files remain on your server, but when a visitor accesses a page, the CDN loads its own copies.
Since those files are on the CDN’s servers, they have their own URLs which will not include your original domain. From a practical standpoint, most users won’t even notice the change, but they’ll benefit from faster load times.
Improve site speed with Jetpack CDN
If your site loads slowly, has a global audience, or anticipates traffic spikes, Jetpack CDN could make all the difference. Install Jetpack and follow the helpful getting started guide to have it set up in minutes!
Since the CDN is completely free, you have nothing to lose, and you’ll benefit from Jetpack’s many other security, speed, and performance benefits. Installing and activating Jetpack is simple and you’ll start seeing improvements in your site’s performance almost immediately.
The easiest speed optimization plugin for WordPress
Jetpack Boost gives your site the same performance advantages as the world’s leading websites, no developer required.
Boost your site for free
I am on WordPress managed host business plan and do i still need to set up external CDN like Cloudflare to improve the performance of my website? Kindly advise.
LikeLiked by 1 person
Yes, if you’re using a WordPress.com Business site, you do not need to set up Cloudflare. Jetpack CDN is set up already for your site.
LikeLiked by 1 person