“Immutable Real-Time Objects” ensure that certain data, which Jetpack VaultPress Backup considers “unchangeable,” stays the same whenever you restore with Jetpack VaultPress Backup. For WooCommerce users, this means that specific important information won’t be altered or lost during the restore process.
Imagine restoring your site to a state from a week ago. With our immutable feature, your website would revert back to how it was one week ago, but all of the orders placed and any product modifications made over the past seven days would remain intact and unaltered. This ensures you never lose an order even if you restore the other content of your site.
How Does It Work?
A simplified explanation is when Jetpack Backup receives an update, it determines whether the change is immutable and keeps it if so. It locates these changes by considering the item’s characteristics, such as the type of object or post.
All recognized immutable changes are then conserved and applied during Jetpack VaultPress Backup’s restore process, seamlessly and without any need for special configuration on behalf of the user.
While the Immutable Real-Time Objects feature is powerful, it has some limitations.
Data not treated as immutable
These following will not be treated as immutable (or “unchangeable”):
Your site’s stock/inventory
Images added to a product description
Custom events triggered from purchase are not immutable. Items such as subscriptions may need to be reactivated after the restore.
Potential limits with restored products
Products that are restored by Jetpack may not be instantly ready for use in your WooCommerce store. Instead, they serve primarily as a reference point and may require additional configuration and verification before they can be used on a live site.
Real-time Requirement
Because the immutable feature is conditional upon receiving updates in real-time, any data that is not supplied in real-time cannot be treated as immutable.
High-Performance Order Storage (HPOS)
On sites using WooCommerce’s HPOS, Jetpack VaultPress Backup will backup orders in real-time. However, these orders will not appear in a site’s Activity Log.
Use Jetpack VaultPress Backup to clone your WordPress site from one server to another when moving to a new hosting provider.
This feature requires a paid Jetpack VaultPress Backupplan. The plan must be active on the site you’re migrating from (the original source site).
Jetpack VaultPress Backup can’t be used to migrate sites hosted on WordPress.com.
What should I do before migrating my site?
Make sure the site you’re copying has an active Jetpack VaultPress Backup plan before starting the migration.
When preparing to move your site to a new host, please check the following:
Your source site (the current live site) should be online and accessible.
Do not make any DNS changes yet.
Your destination site (the site at your new host) should not yet be using the original site’s domain or have the DNS records changed yet. The destination site should use a temporary staging URL for now. The domain will be pointed to the new site later, after the migration is done.
You will not need to manually update any URLs in your WordPress database after cloning the site. The cloning process automatically updates all your site’s URLs.
What information do I need before migrating?
Choose and set up your new hosting plan by following these steps:
Ensure that your new host has adequate resources for your specific site, including disk space, bandwidth, memory, and CPU. Not sure what you need? Check with your hosting provider.
You need a working WordPress installation at the new host. A fresh WordPress installation is highly recommended, as the migration process will not delete any files currently on the destination WordPress site.
Before you start cloning, there are a few things you’ll need on hand:
Your login credentials for your DNS host. This will usually be your domain registrar but could also be a standalone DNS provider such as Cloudflare.
The DNS records for your new server. You can obtain this from your new hosting provider.
What happens to my email accounts?
Jetpack’s clone feature transfers your WordPress site and its data to a new server but will not transfer other services, such as email accounts. If you have email set up with your old hosting provider, now might be a good time to migrate this to a dedicated email host (like G Suite or Microsoft 365), which typically offers more features than standard hosting email. At the very least, make sure you have a plan for any email accounts you have set up.
When is the best time to migrate my site?
Plan to migrate your website when:
You aren’t going to be publishing any new content.
Your site isn’t too busy, so there’s minimal interruption to visitors.
If you use Jetpack Stats, check the Insights Dashboard for information that can help you decide when to migrate.
Click Enter credentials for a new destination site.
Enter your destination site URL. This is the new host you’re cloning to — in most cases, you’ll need to enter your temporary/staging URL rather than your original site’s domain name.
Enter your new server credentials. Jetpack will use these to clone your site from your current host to your new host. If you’re unsure, check with your new host for the right information.
Enter the destination WordPress path. If you’re unsure of this, your new host can provide this information.
Click Confirm credentials.
Jetpack will test the credentials to confirm they work to connect to your new site. If there are any errors, you’ll see them on the next screen with some troubleshooting suggestions. If all tests pass, click Continue.
Select Clone from the latest point to clone using the most recent backup. To clone from an earlier backup, scroll down and find the backup in your Activity Log, then click Clone from here.
You will see a confirmation screen where you can choose the content in the backup you want to clone. If you’re migrating your site to a new host, you will usually want to leave all the boxes checked. Select the items you wish to clone and click Confirm configuration.
A final confirmation message will appear to confirm that you want to overwrite all content on the destination site with the content from your backup. Click Yes, Continue to begin the cloning process.
You can follow the cloning progress from the Jetpack Cloud dashboard or click Go to Activity Log to return to your site’s Activity Log.
If the clone fails before finishing, or if you experience other problems, get in touch with our support team to help you troubleshoot the issue.
How can I check if the cloned site works properly?
Once the site move is finished and before pointing your domain name to the new host, check the new website. Ensure that your content is loading as expected and that all functionality works properly. Don’t rush this step. Be thorough and take your time.
What should I do after the site is migrated?
To complete the migration, you’ll need to point your domain to your new host. Once satisfied that the migration was successful, you’ll need to change your DNS settings to point your domain name to your new server. The specific process for this depends on your provider, but here are the typical steps:
Log in to your domain registrar or DNS provider and locate the area to update your DNS settings. The exact steps will vary based on your provider, but they should supply clear documentation. You can also ask your provider to make this change for you. Important: Don’t remove, edit, or delete any other DNS settings unless you are certain you no longer need them.
Once you’ve saved your settings, you must wait for the DNS changes to propagate. DNS changes can take up to 48 hours to update around the world. For this reason, it’s important not to cancel your old hosting immediately until you’re confident that propagation has finished. You can verify propagation with tools such as DNS Checker.
After migrating your site, you’ll be prompted to log in to your new site. For that, use the WP-Admin username and password for the site you copied from. The cloning process overwrites everything, including the WP Admin user information.
Important: After logging in to the new site, the Jetpack Safe Mode prompt will be shown everywhere in your WP Admin. More information about Safe mode.
You can add FTP/SFTP/SSH server credentials for Jetpack VaultPress Backup and Jetpack Scan.
When you purchase a plan that includes Jetpack VaultPress Backup or Jetpack Scan, we will back up and/or scan your site right away as long as Jetpack is properly connected.
In some cases, we may require remote server credentials. Adding them helps ensure:
Backups and scans continue even if Jetpack gets disconnected.
Site restores work if an HTTP restore fails.
Backups run as efficiently as possible.
Jetpack Scan can fix threats when an HTTP-based fix fails or your setup doesn’t support it. Note: Auto-fixes over HTTP require the Jetpack Protect plugin v4.2 or higher.
Add your remote server credentials
To add your FTP/SFTP/SSH remote server credentials:
Get remote server credentials from your web host settings. You may need to ask your web host’s customer support team for help if you can’t find them in your hosting account.
Navigate to WordPress.com or Cloud.Jetpack.com
Select the Jetpack-connected site you want to add server credentials for.
Go to Settings → Jetpack on WordPress.com or just Settings in Cloud.Jetpack.com.
Click on your hosting provider if listed. If not, or you already have your server credentials, click I don’t know / my host is not listed here / I have my server credentials.
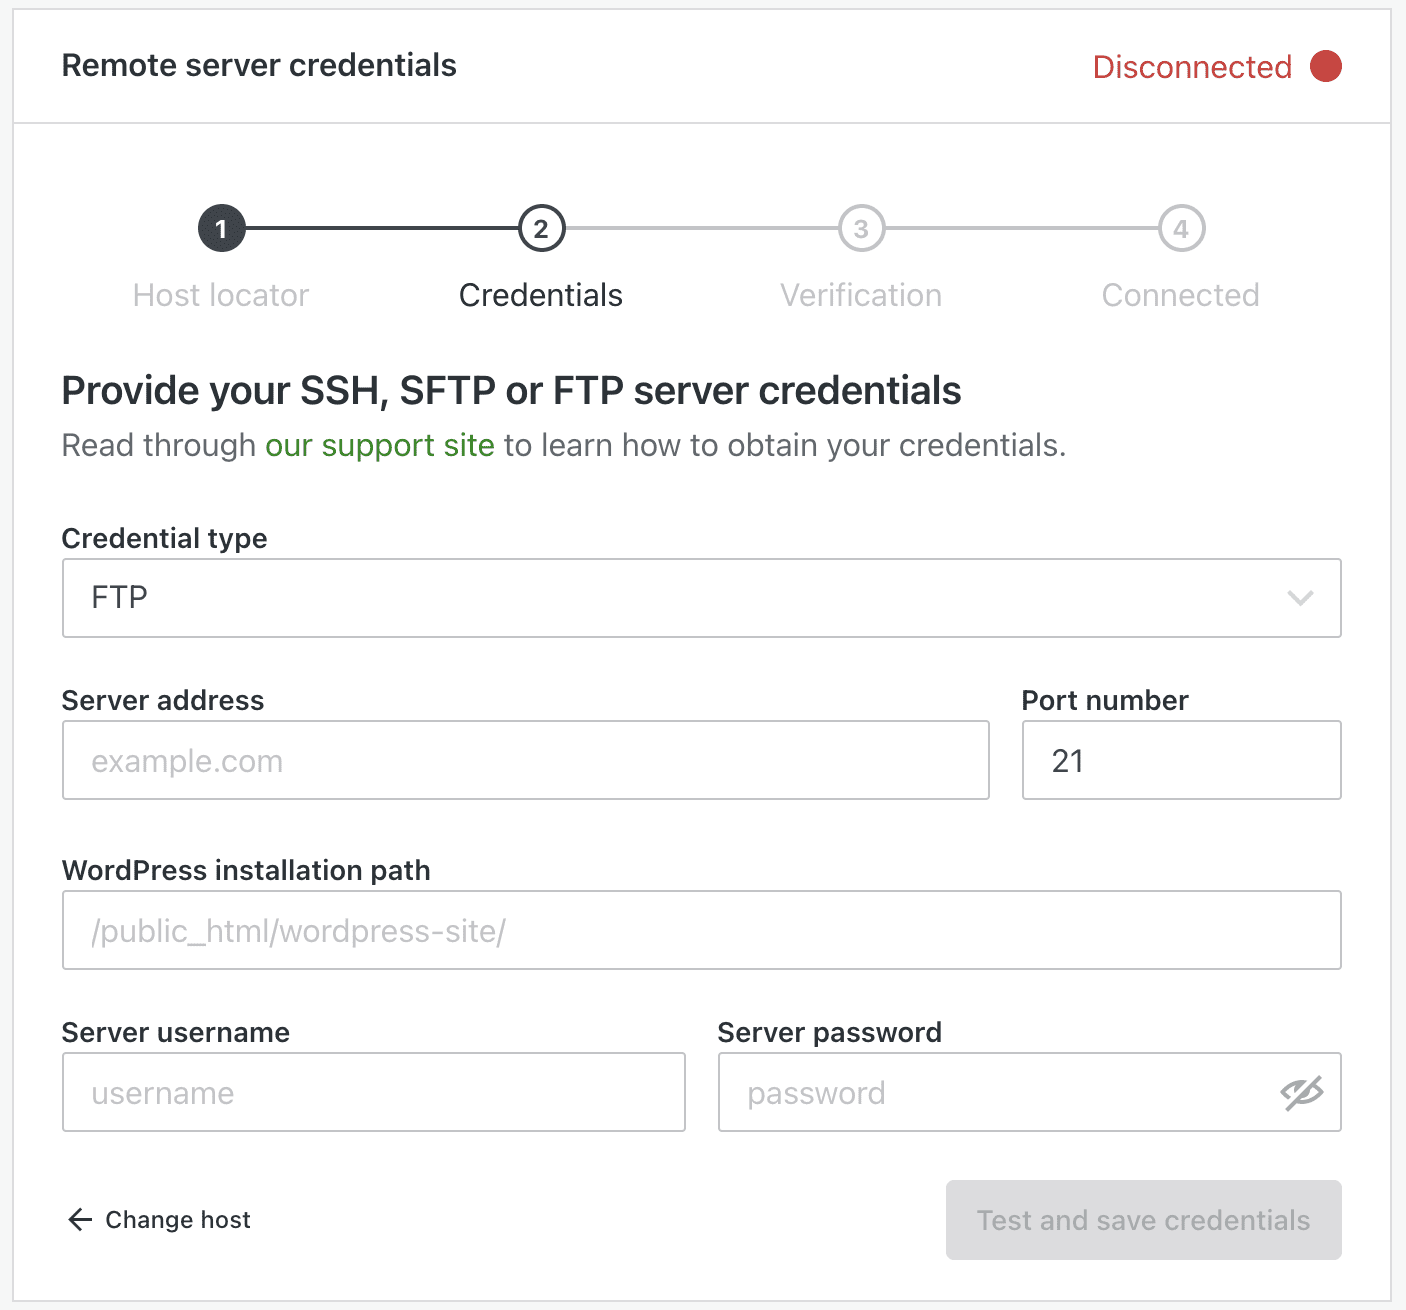
On the next screen, enter your credentials. See below for more details about each field.
Click Test and save credentials. Once the site is connected, Jetpack will start your first backup.
Note: If your site is hosted at Pressable, we can automatically detect these credentials for you. In that case, you will see a message asking for your approval to grant Jetpack permission to use credentials to back up your site.
Details about remote server credentials
The information below explains what to enter into each field, based on the type of remote server credentials you’re adding.
Credential type: FTP or SFTP/SSH
Server address: Often your site URL, but some hosts require you to use a special domain or an IP address. Note: If you’re using Cloudflare with your website, always use the server’s IP address where your site is located.
Port Number: Typically 21 for FTP and 22 for SFTP/SSH. Check with your host to make sure.
WordPress installation path: The directory on your server where your WordPress installation is located.
Server username: This username should have read and write (rw) access to your WordPress directory. Note: the root user cannot be used.
Server password: Make sure this password is secure and is different from other passwords you use. How to select a strong password.
If you are unsure about any of this information, contact your hosting provider for assistance.
Add SSH credentials with private key
To use SSH with a private key instead of a password, please follow these steps:
Generate a private/public key pair on your server.
Copy the private key and add it to a text file somewhere on your computer.
You’ll need the following information:
Server password: This field is optional if you’re using a private key. If you enter one, Jetpack will try both the private key and the password. Make sure this password is secure and is different from other passwords you use. How to select a strong password.
SSH Private key: Make sure that it is not password protected and using OpenSSH/RSA format. Password protected private keys and/or keys in PuTTY format are not supported.
If you are unsure about any of this information, please contact your hosting provider for assistance.
If you see an error message when you click Test and save credentials, click on the More details toggle for more information about the error; below are the most common issues.
If you see an error of Can't save credentials for an invalid public host, please make sure the credentials are correct by following these steps:
Check for typos, or extra spaces before or after what you entered.
Try to connect to your server using an FTP client (such as FileZilla) or a command line (if you are comfortable with that). If the connection fails, contact your hosting provider and check for the correct credentials with them.
This could also indicate that there is malware on your site which is preventing the credentials from being saved.
If you see an error of Could not open connection with given credentials please check that your host is not blocking our access, by following these steps:
Try to connect to your server using an FTP client (such as FileZilla) or a command line (if you are comfortable with that). If the connection fails, contact your hosting provider and check for the correct credentials with them.
If you are able to connect via an FTP client or command line, but the connection via our interface fails, please contact your host and ask them to allow connection from the IP addresses listed here.
If you see an error of We looked for wp-config.php in the WordPress installation path you provided but couldn't find it, please follow these steps:
Contact your host to confirm that you add the correct path. It should contain your wp-config.php file.
Try to connect to your server using an FTP client (such as FileZilla) or a command line (if you are comfortable with that).
Make sure that you can connect to your server and see your WordPress installation files.
If you only see .ftpquota this indicates that your FTP client does not have required read and write permissions; please contact your host for help with the correct permissions.
Manually restore a Jetpack VaultPress Backup to any host on any server anywhere.
Have you tried an automatic restore?
Before getting started with a manual restore, it is often possible to restore your site with a click of a button, using Jetpack VaultPress Backup. If you haven’t already attempted our one-click restore, please check out our documentation about Restoring with Jetpack VaultPress Backup.
Jetpack Support Scope doesn’t cover assisting with manual restores beyond the guidance provided in this documentation. If you need further assistance, please contact your hosting support for help.
Download your backup and manually restore your site
Your backup files are stored on our servers and can be downloaded from the Jetpack Cloud interface.
To manually restore your website from a backup, please follow these steps:
Go to the Jetpack Activity Log for your site, either via WordPress.com →Jetpack → Activity Log or cloud.jetpack.com → Activity Log. If the Jetpack connection is broken to the point that you cannot access the Activity Log, please contact support directly with the details about the backup you want to use. We will generate a download link for you.
Locate the backup you would like to download. You can do this by using the filters at the top of the Activity Log.
Click Download or Actions→Download Backup. The download will be a compressed file with a tar.gz file extension.
Unzip the file. On Mac OS you can double-click the file. In Windows, use an archiving tool such as 7-Zip. The resulting folder will contain your data, divided into the following sub-folders: wp-content (plugins, themes, and uploads) and .sql.
Transfer your plugins, themes, and uploads folders via FTP or a File Manager tool to the wp-content folders on your WordPress site.
Import your .sql files into your MySQL database in a few different ways. It’s easiest to use something like phpMyAdmin or a desktop tool like Sequel Pro. If you have direct access to MySQL via the command line, you can run the following command:
mysql --user="username" --password="password" --hostname="mysql.yoursite.com" database_name < file_name.sql
If you’re restoring to an empty database, it’s often easier to join the .sql files into a single file.
In OS X: Launch Terminal.app and run the following command: cat *.sql > backup_db.sql
In Windows: Use the command prompt and run the following command: copy /b *.sql newfile.sql
You may see 2 files for each table in the sql folder: something like wp_posts.sql and wp_posts-updates.sql. If you are importing one-by-one, you should do the primary table first (wp_posts.sql) then the table labeled -updates. If you’ve concatenated them all together as explained in step 7, there’s no need to worry about this.
Manually restore your site to a new domain
When restoring your site to a new domain, you’ll need to update the siteurl and home values in your wp_options table. You can either edit the SQL (.sql) export file, or import the SQL and edit your database using phpMyAdmin or a desktop tool like Sequel Pro.
Troubleshoot problems with downloading a backup
If you are having any issues with downloading a backup, please contact support directly, with details of any errors you see.
Jetpack VaultPress Backup and Jetpack Scan Support Articles
Use Jetpack’s backup feature to automatically create backups and restore your site with a single click. Track every change, go back in time, and rest assured your content is always safe. Jetpack’s backup feature uses WordPress.com’s servers to back up your site, so you never have to worry about losing your content, Woo products, and Woo orders.
What do I need to do to use Jetpack VaultPress Backup?
At least one theme or plugin on your site from the WordPress.org theme or plugin repository. The theme can be a child theme, and the plugin can be a mu plugin.
Your first backup
Your first backup is created as soon as you complete your purchase and Jetpack is connected.
The first backup can take some time to complete. You can see your backup progress by going to Jetpack → Backup in the WordPress.com dashboard. Future backups should take less time.
Realtime backups
In addition to daily full backups, Jetpack also does real-time backups: quick synchronizations of specific changes that occur on the site. The following events will trigger a realtime backup:
Posts published or updated
Pages published or updated
Comments
Changes to media
Changes in themes and plugins
Changes in settings
Changes to users
Realtime backups and WooCommerce orders
WooCommerce orders and products are backed up in real-time in an immutable way; which means if you need to restore to a point before an order occurred, the order will not be lost.
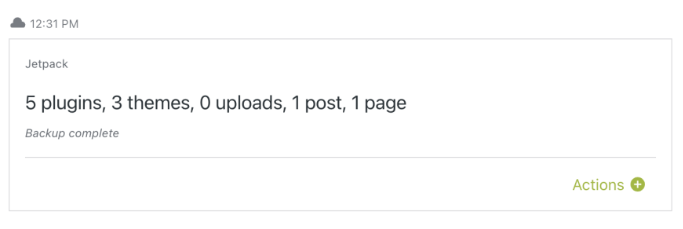
You’ll see the most recent completed backup there, with information about the date and time of the backup, and what was included. If a backup hasn’t happened yet today, you’ll see the schedule for the next one.
Click the Backup now button to run a backup on demand at any time.
Click the Actions button to show the options to restore the backup, download the backup, or browse the backup files, via View Files. You can also download individual files from there.
If you ever wish to stop Jetpack VaultPress backups, please contact support for assistance.
Add server credentials to Jetpack
At the top of the Backup page, you may see a prompt to set up server credentials. You can also access the server access credentials settings from Cloud.jetpack.com at https://cloud.jetpack.com/settings/yourjetpackblog.
Server credentials allow our system to communicate with your site. They are used to back up and restore your site as an alternative to the Jetpack connection and are especially helpful when the Jetpack connection isn’t working correctly. Note: your server credentials will not help you access your backup files stored on our servers.
If you don’t see a notification at the top of the Latest Backup section in Jetpack Cloud indicating that a backup is running, try adding credentials to start backups.
If we lose contact with your site and backups stop running, we’ll let you know by email after the second attempt so you can take action quickly.
Scheduling your backups
You can configure the time of day when your daily full backup will run. You may wish to schedule your backups during off-peak hours or other low-traffic times.
To configure your daily backup time schedule, follow these steps:
Under the Daily backup time schedule, you’ll see the timeframe selector. If you haven’t configured a timeframe, it will be set to a default range.
Select your chosen timeframe using the dropdown selector. You’ll see that the timeframe has now been set.
When you view your latest backup, you’ll see information about when your next backup will run. You can also adjust the setting by clicking on the Modify link.
Frequently asked questions (FAQs)
What data is included in a Jetpack VaultPress Backup?
The backup data includes all the unique and irreplaceable data you have stored in WordPress, and everything properly integrated into the WordPress installation. Jetpack VaultPress Backup backs up the following data:
Your WordPress database. This includes any tables that begin with your WordPress database’s table prefix and also have a unique key or primary key.
All files in the plugins, mu-plugins, themes, and uploads directories.
Everything in your WordPress root directory that isn’t part of another WordPress installation.
Certain other files inside the wp-content directory.
WooCommerce products and orders
When does a backup occur?
Jetpack VaultPress Backup will back up your site at least once a day. We also back up your site after certain events, like a post or page published/updated, theme and plugin installations and updates. These are called “real-time backups.”
Adjustments to the automatic daily backup frequency are not possible (for instance, it’s impossible to configure backups to run either on an hourly or weekly basis).
By default, backup timing is handled automatically by our system to balance server load, and normally happens about 24 hours after the previous backup. If you prefer, you can designate a specific time of the day for the backup process to occur. See the Scheduling your backups section above for more details.
Also, you can manually start a backup anytime you would like to, by clicking the Backup now button on your Jetpack Backup Dashboard.
What data is not included in a Jetpack VaultPress Backup?
Database tables that don’t look like they belong to WordPress.
Database tables whose rows have no unique identifier.
Cache, logs, and backup directories.
Empty directories.
Additional WordPress installs, such as ones that are included inside a subdirectory.
What is /jetpack-temp/ folder and what are these jp-helper files?
Jetpack creates a /jetpack-temp/ directory in the root of your WordPress installation. During each backup process, Jetpack writes a temporary helper file to this directory. The file is named like so jp-helper-xyzxYzXYZ.php. It is removed after the backup is complete.
What kind of backups does Jetpack run: full, incremental, or differential?
Jetpack VaultPress Backup performs all three types of backup on your site. The first backup is a full backup of your site. Subsequent backups are incremental, backing up only the files and/or database tables that have been changed since the last backup was saved. Finally, differential backups are the “real time” backups, saving the data that was introduced or changed since the last complete backup.
Does Jetpack VaultPress Backup work on a multisite installation?
No. The Jetpack VaultPress Backup feature doesn’t currently support websites built on WordPress multisite.
Can I use one Jetpack VaultPress Backup plan for multiple websites?
Each Jetpack VaultPress Backup plan supports one WordPress site. If you want to back up another site, you’ll need to purchase a separate backup plan for it.
If you’re running a multisite, Jetpack VaultPress Backup is not a suitable option — it does not support WordPress multisite.
Where are the backups stored?
The Jetpack VaultPress Backup plugin stores your backups on servers in our secure data centers around the world.
While it isn’t possible to restrict data storage to a particular geographic location, what we can provide is the Standard Contractual Clauses, which we include in our Data Processing Agreement (DPA). DPAs are contractual tools for websites and companies to make commitments to their customers, vendors, and partners that their data handling complies with the law, including transferring data out of the EU.
If you are interested in having a DPA with us, you can request one from the Privacy Settings page in your dashboard at https://wordpress.com/me/privacy.
Can I stop a Jetpack backup that is already in progress?
There is no way to interrupt a Jetpack VaultPress backup once it has started. If there’s some reason you need to stop an in-progress Jetpack backup, or if you want to disable Jetpack backups entirely, please contact support for assistance.
Why does it say that the VaultPress plugin is deprecated?
The notice regarding the deprecation of the Jetpack VaultPress plugin refers to our legacy Jetpack VaultPress plugin. If you see the notice that the VaultPress plugin is deprecated or no longer actively supported for new customers, you are looking at our legacy plugin. Make sure to opt for Jetpack VaultPress Backup instead (the plugin that has the “Backup” keyword in its name). It’s important to note the distinction between these two plugins. They are both available in the WordPress plugins repository. If you check the plugin slug – the one is jetpack-backup as opposed to vaultpress.
We currently back up the following data: WordPress database tables (any tables which begin with your WordPress table prefix and also have a unique key or a primary key). We also back up the files in your plugins, themes, and uploads directories, as well as select files from your WordPress root directory and `wp-content` directory. This includes all the unique and irreplaceable data in WordPress, as well as everything properly integrated into the WordPress installation.
In addition to the data that we back up and store, we also use (and store) your server access credentials (if provided): SSH and/or FTP/SFTP. These credentials are explicitly provided by you when activating Jetpack VaultPress Backups.
For feature usage tracking (detailed below): IP address, WordPress.com user ID, WordPress.com username, WordPress.com-connected site ID, user agent, referring URL, timestamp of event, browser language, country code, and user site count.
We track several events around the usage of this feature: backup requests/downloads/confirmations, restore requests/confirmations/cancellations, date-picker changes/expansions, and backup storage upgrade requests or indications of interest.
We’ve developed Jetpack VaultPress Backup with WooCommerce in mind. You can safely restore your site to any past state — all orders and products will be kept current.
There are various ways to restore your site:
Restore your website to a particular event;
Restore your website to a particular day;
Restore specific files or plugins;
Download a backup and restore it manually.
You can restore your site either at Cloud.Jetpack.com or the WordPress.com dashboard, depending on which interface you typically use.
Before You Restore
To restore with Jetpack VaultPress Backup, you will need:
During restore, existing files with the same name will be overwritten, but files with unique names will not be removed. We do not delete anything but our helper files, which we must add to the site during the restore process.
However, it is important to note that your website’s database is completely replaced with the database from the backup you’re restoring from. So, any posts, pages, or other content you’ve added since the restore point date would be lost. You should make an export of this content before using our restore feature; then, you can import it back to your site after the restore.
It is not possible to interrupt or stop a restore once it starts. If you initiate a restore in error, please wait for it to complete, and then restore it again to the desired version.
The length of time for a restore to finish depends on many factors, such as the number of files in your site.
Restore via Cloud.Jetpack.com
To restore your website from the Cloud.Jetpack.com dashboard, please follow these steps:
Open the site’s Activity Log if you are looking for a particular event and/or date range.
Use the filters to search by Date Range and/or Activity Type (for example Plugins, Posts and Pages) you’d like to restore.
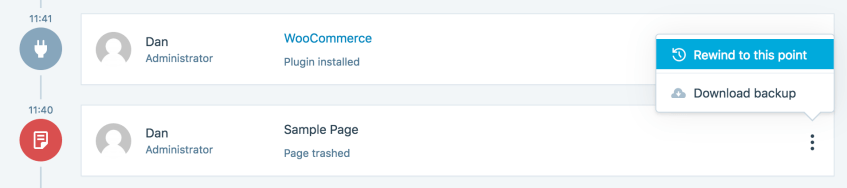
Click Actions > Restore to this point, which will open the restore site dialog box.
Alternatively, you can also navigate to VaultPress Backup. You’ll see the latest backup for your site or the scheduled time of your next one.
From the restore dialog box, uncheck any boxes for items you don’t wish to restore. If you want to restore everything, leave all of the options checked and click Restore now.
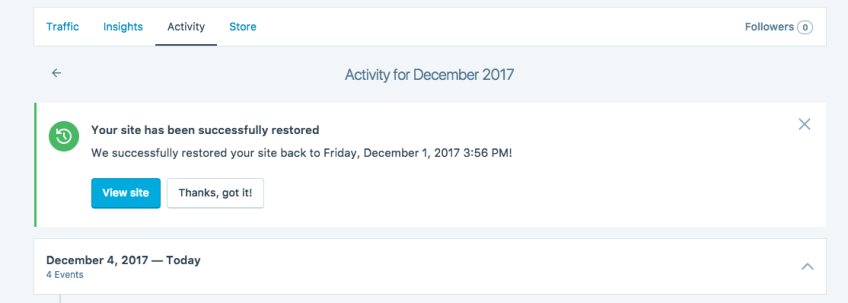
Your restore will begin, and a progress bar will appear on the page. You will also receive email updates on the progress of your restore. When the restore has been completed, you’ll see a confirmation message.
Restore specific files
Want to revert back to an older version of only specific files? Or roll back to a previous version of a plugin? Perform a granular restore in these cases.
Navigate to a daily Jetpack Backup in the Activity Log or in the Backup page.
Click on the Actions(+) and then View files.
Browse all the files and select which ones you want to download or restore by checking the corresponding boxes.
Confirm.
Exclude specific files from a restore
As well as restoring specific individual files from a backup, you can also choose which files you don’t want to restore.
Navigate to a daily Jetpack Backup in the Activity Log or in the Backup page.
Click on the Actions (+) and then View files.
Check the box at the top to select all files and folders.
Browse files and folders and deselect the ones you want to exclude from the restore by unchecking the corresponding boxes.
Click Restore selected files.
Restore when your site is completely down
If the website you want to restore is down or showing a fatal error, you can try these steps:
Revert to a fresh installation of WordPress. Your host may have this option in the cPanel, but you may need to ask your host the best way to do this.
Connect Jetpack.
Attempt a Jetpack Restore by following the above steps.
If that still does not work, you can will most likely have to proceed with a manual restore.
Download a Backup for manual restore
In the event that a one-click restore is not possible, you can download a backup for a manual restore like this:
Use the filters to search by Date Range and/or Activity Type you’d like to restore.
Click Download to open the backup download box.
Uncheck any boxes for items you don’t want to include in your download. If you want to download everything, leave all of the boxes checked and click Create download.
Jetpack will begin preparing your selected download. At the top of the Activity Log, you can follow the progress of your download.
A message will appear at the top of the Activity Log when your backup download is ready. Click Download to download the backup. You will also receive an email with a link to the download when it’s complete.
Access the full list of management events that occurred on your site via the Activity Log.
The Jetpack Activity Log is available to all users, including those on the free plan. From the Jetpack Activity Log, you can access a detailed record of site activities, including core WordPress and Jetpack events. Check this page’s general features for more information about the Activity Log.
View Activity Log
To see your site’s Jetpack Activity Log, please follow these steps:
Select the site for which you’d like to see recent activity. Please note that you can view Activity for sites where you are an Administrator. Accounts with the Editor role and below cannot view any activities.
Click on Activity Log.
Activity Log history by plan
The Activity Log is available on all Jetpack sites. The length of event history visible in your log depends on your plan:
For Jetpack Complete, a maximum of 1,000 events will show in the feed. You can filter the events by date range and activity type, and the feed will also show up to 1,000 events from that filtered range.
Types of activities recorded
You can check the following events stored in your site’s Activity Log:
The Activity Log is activated by default. There is currently no way to deactivate this feature.
Data Used
Site Owners / Users
To deliver this functionality and record activities around site management, the following information is captured: user email address, user role, user login, user display name, WordPress.com and local user IDs, the activity to be recorded, the WordPress.com-connected site ID of the site on which the activity takes place, the site’s Jetpack version, and the timestamp of the activity. Some activities may also include the actor’s IP address (login attempts, for example) and user agent.
Site Visitors
None.
Activity Tracked
Site Owners / Users
Recorded site management activities include: login attempts/actions, post and page update and publish actions, comment/pingback submission and management actions, plugin and theme management actions, widget updates, user management actions, and the modification of other various site settings and options. See Complete List.
All core WordPress and Jetpack option/setting update actions are synced. This includes the current and previous state of a site’s options. Successful and failed login attempts (these include IP address and user agent) are synced.
Site Visitors
Successful and failed login attempts, which will include the actor’s IP address and user agent.
Since version 13.8, Jetpack no longer provides its own Custom CSS feature. Instead, it relies on the WordPress implementation.
The Site Editor is the best tool for customizing your site if you have installed a block-based theme. If you have installed a classic theme, you can add additional CSS from the Customizer.