
Losing your website data can be devastating. Whether due to a server crash, a hacking attempt, or a simple error, not having a recent backup can lead to lost revenue and hours of stressful rebuilding.
This guide covers four reliable ways to back up a WordPress site: (1) a backup plugin, (2) your host’s backup tools, (3) manual backups via cPanel/FTP + phpMyAdmin, and (4) command-line backups via SSH/WP-CLI. You’ll also learn how to verify a backup and how to restore quickly if something breaks.
By the end, you’ll be able to choose and implement the right backup strategy for your site’s needs.
In this detailed guide, we’ll walk you through:
- What is a WordPress backup?
- How to back up your WordPress website
- Which manual backup method is the best for WordPress?
- Why make a backup of your WordPress site?
- WordPress backup FAQs
What is a WordPress backup?
A WordPress backup is a complete copy of everything that makes up your site. You can use it to restore your website to a previous state if it becomes corrupted or damaged, or to migrate from one host to another. Your backup should include:
- WordPress core files. These are all the files included when you install WordPress on your server. The main folders include wp-admin, wp-content, and wp-includes and a number of files in the root folder of your server like wp-config.php, htaccess, user.ini or php.ini, and index.php.
- Your database. Your database is a system of tables, columns, relationships, and permissions that stores dynamic and searchable information from your website. Some of that information includes user account data, page and post content, customer orders, form entries and other user inputs, and data generated by plugins.
- Theme files. WordPress uses theme files to assist the layout and aesthetic of a website. A theme may also have components that influence functionality.
- Plugins. Think of plugins as add-ons you install on your WordPress site to provide functionality beyond what WordPress core or your theme provides. Plugins contain specific programmed functions that can add new features to your site and extend its capabilities without requiring you to edit any code.
- Uploaded files. Images, videos, documents, and other files that you or other site users uploaded to the WordPress Media Library or wp-content folder.
It’s critical that all these elements are included in each backup you create so that your website can be properly restored if something goes wrong.
4 proven methods to back up your WordPress site
1. WordPress backup plugins
There are a variety of plugins that allow you to back up your WordPress site either on-demand or at scheduled times. However, some of these backup plugins involve complicated setup processes. Others store the backups on your own server, which can weigh your site down and cause slow load times or leave you without recourse if the problem stems from your server itself.
Jetpack VaultPress Backup is an excellent option for hassle-free, real-time, easy and automatic WordPress backups that don’t bog down your site. Here are some of the advantages:
- Easy setup: Just install Jetpack or the dedicated VaultPress Backup plugin, purchase a plan, and you’re all set.
- Real-time backups: Many backup plugins only offer daily backups. But if you regularly change your site or run an online store, real-time backups may be crucial in preventing data loss. Jetpack saves a copy of your website whenever something happens on your site. So every change, order, comment, or form submission is safe.
- Off-site storage: Storing backups on your server can slow your website down. Worse yet, if your server goes down, you won’t be able to access your backups at all! Or they may be compromised in the event of a hack. Jetpack securely stores your backups off site so you can always access them, whether you can get into your site or not.
- Manual downloads: While Jetpack stores your backups on their servers, you can also download them to your hard drive and upload them to cloud storage platforms like Google Drive, Dropbox, or Amazon S3. Redundancy is never a bad thing with backups, as long as you have the storage space.
- Superior customer support: The Jetpack team is made up of WordPress experts. Rest assured that your website and backups are in good hands.
2. Automatic backups through your hosting service provider
Many hosting companies offer daily site backup plans for their customers — often included for free with your hosting service. Sounds like a great deal, right? Not necessarily.
Here are four important reasons not to rely on your host for WordPress backups:
- Short, inflexible archive windows: Most web hosts keep your backups for 15 to 30 days with no options for extending that archive period.
- If your host goes down, your backups are inaccessible: If your hosting provider experiences an outage, your server is down, you may lose access to all your backups.
- Backups may not be their responsibility. Make sure you read the fine print in your service agreement. Many hosts include disclaimers that state they will make good faith efforts to back up your data regularly, but that these backups are intended for internal use only. They cannot guarantee that any given backup will be available upon request or that restored backups will work correctly. Most hosts’ terms explicitly state that it is ultimately your responsibility to back up your own site.
- If your site is compromised, your backups could be too. If someone hacks your site, they may also gain access to your server. If your backups are stored there, they could also be compromised.
When signing up for your hosting service, you agree to these terms. While some hosts may offer great backup and restore services, others do not. In most cases, you shouldn’t rely solely on your host for WordPress backups.
3. Manual WordPress backups
WordPress sites are built using a database, WordPress core files, themes, plugins, and any other files you choose to upload. Not only will you need to back up all these WordPress-related files, but you’ll also need to back up the database. The most common ways of backing up these components of your site include:

Back up your WordPress site with cPanel
cPanel is a widely-used graphical user interface (GUI) that simplifies server management. From cPanel, you can set up websites, manage your file structure, change your domain settings, create backups of your site, and more.
1. Log into your hosting account and then open cPanel
If you’re not sure how to find cPanel in your hosting account, you can contact your host or look through their knowledge base for help.
2. Create your site backup
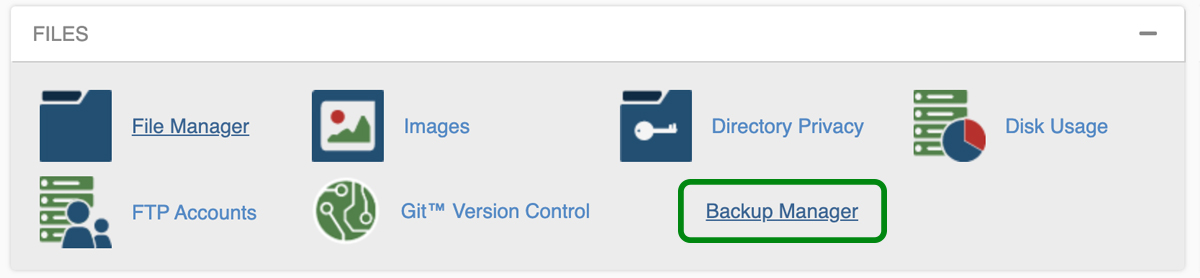
Under the Files section, click Backup Manager.
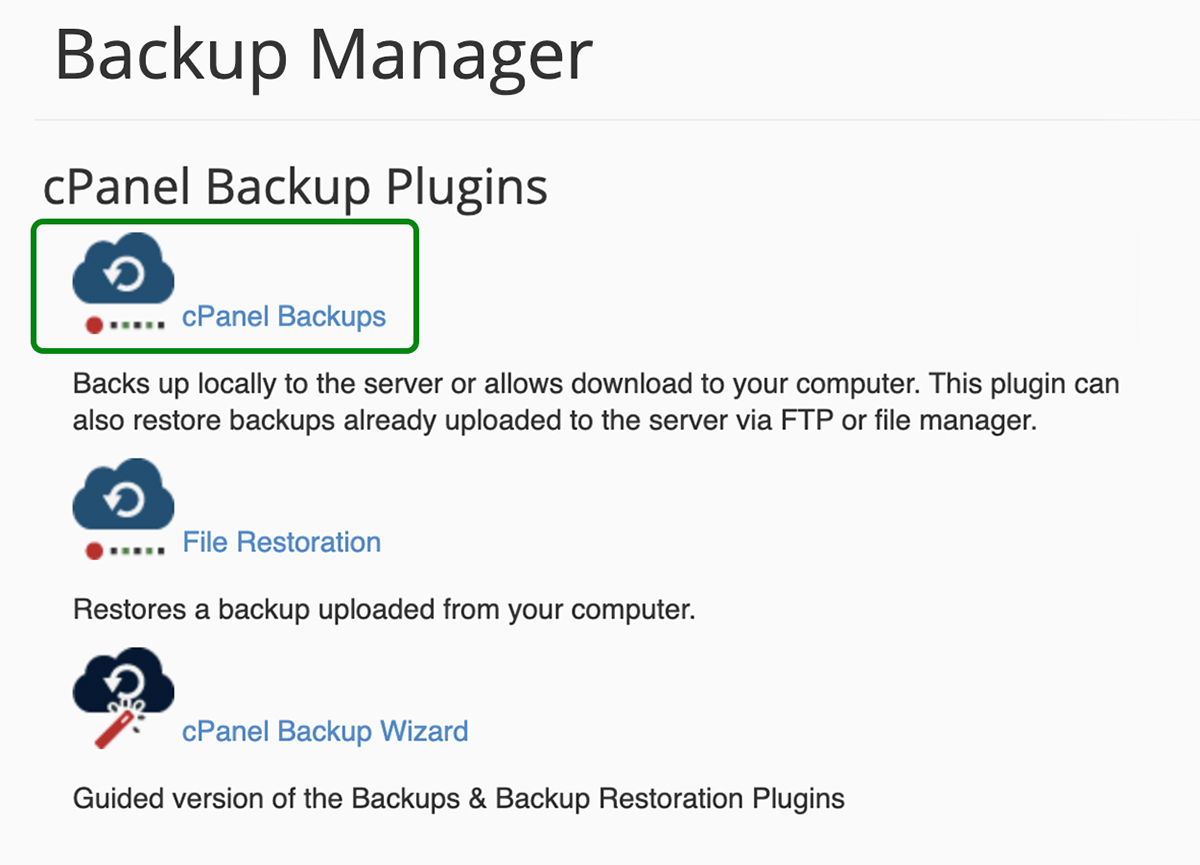
In Backup Manager, click on cPanel Backups. If you want a guided version, you can use the cPanel Backup Wizard.
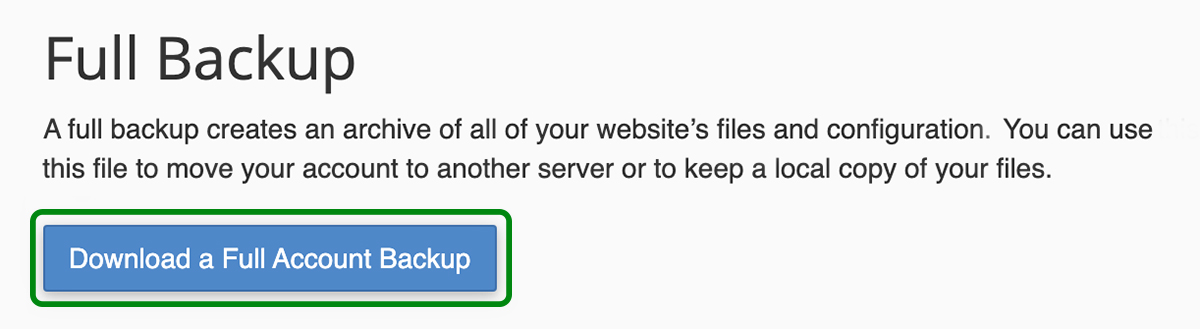
In the cPanel Backups screen, under Full Backup, click Download or Generate a Full Website Backup.
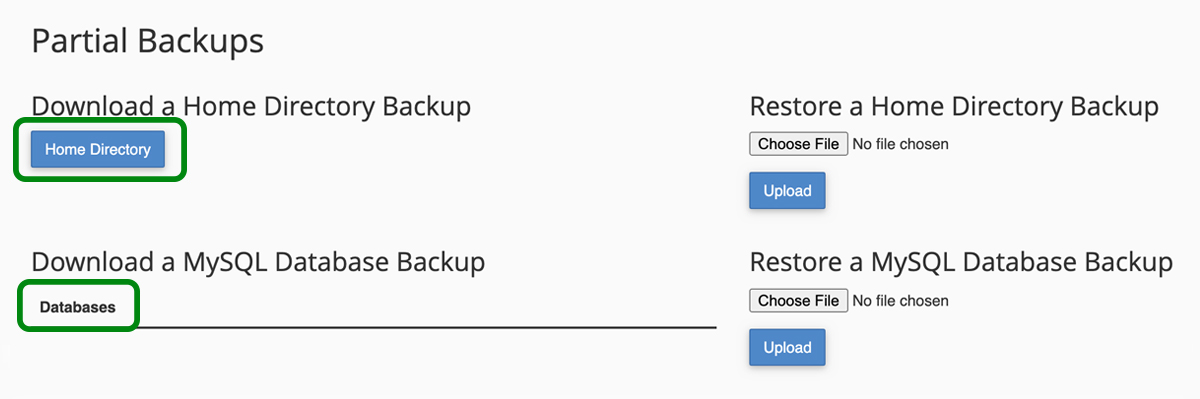
If you want to download your files and database separately, you can choose those options under Partial Backups. Make sure you select the correct database from the Databases field if you’re downloading the database separately.
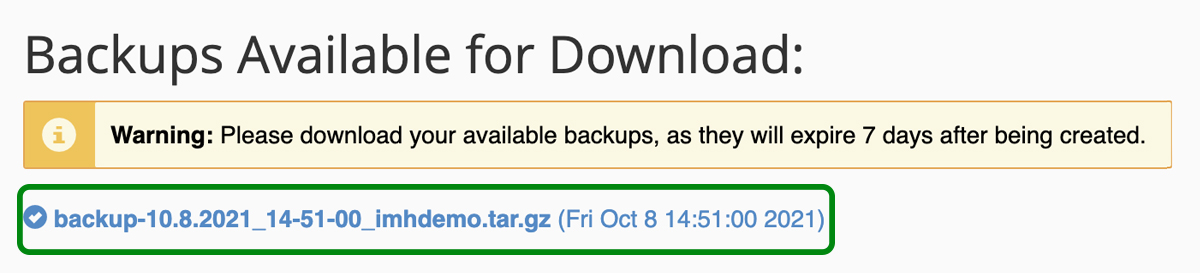
Once you’ve selected the download option you prefer, you’ll be taken to a screen letting you know that your backup is in progress. You can click Go Back to be taken to your available downloads.

Your backups will be listed with a little blue checkmark next to them on the Backups Available for Download page. Click your backup to download it to your computer and you’re all set!
Not every web host offers cPanel access for their customers, so making a backup this way may not be an option for you. For instance, managed WordPress hosts don’t use cPanel.
If you’re using managed WordPress hosting, and you want to access your site’s file directory to make a backup, you’ll need to use secure file transfer protocol (SFTP) or a plugin that grants folder-based access to your site’s files. While your managed WordPress portal will not include a cPanel-like file tree, it should include a link to phpMyAdmin for database access.
Back up your files using FTP/SFTP
You can manually back up your WordPress site’s files using a file transfer protocol (FTP) client. An FTP client is a program that connects your computer to your website’s server so you can upload, download, and manage files.
There are several different FTP clients available for free, like FileZilla, Cyberduck, and Classic FTP. For this walkthrough, we’ll use FileZilla:
1. Find your FTP credentials in your hosting control panel.
The location of your FTP credentials may vary from site to site, so if you have trouble finding them, reach out to your host for help. You’ll need the following information:
- Host address: This is usually the server IP address or might be a URL.
- Username: This is your FTP username. It’s specific to your FTP connection and should not be the same as your hosting account username.
- Password: You may be asked to generate a new FTP password when attempting to access your credentials. If so, you’ll want to write this password down somewhere. Some hosts don’t save FTP passwords on your account, so if you try to retrieve it later, it will prompt you to generate a new one. This can get annoying if you have FTP settings for a website saved on multiple installations of your FTP client — laptop, desktop, co-worker’s laptop, etc.
- Port number: You’ll want to connect to your server via SFTP (secure) vs FTP (insecure). SFTP ports are usually 22 or 2222. If your account credentials don’t mention the port number, you can always check your host’s help documentation for this information.
2. Log into your FTP client
Use the credential information determined above and then click Quickconnect.

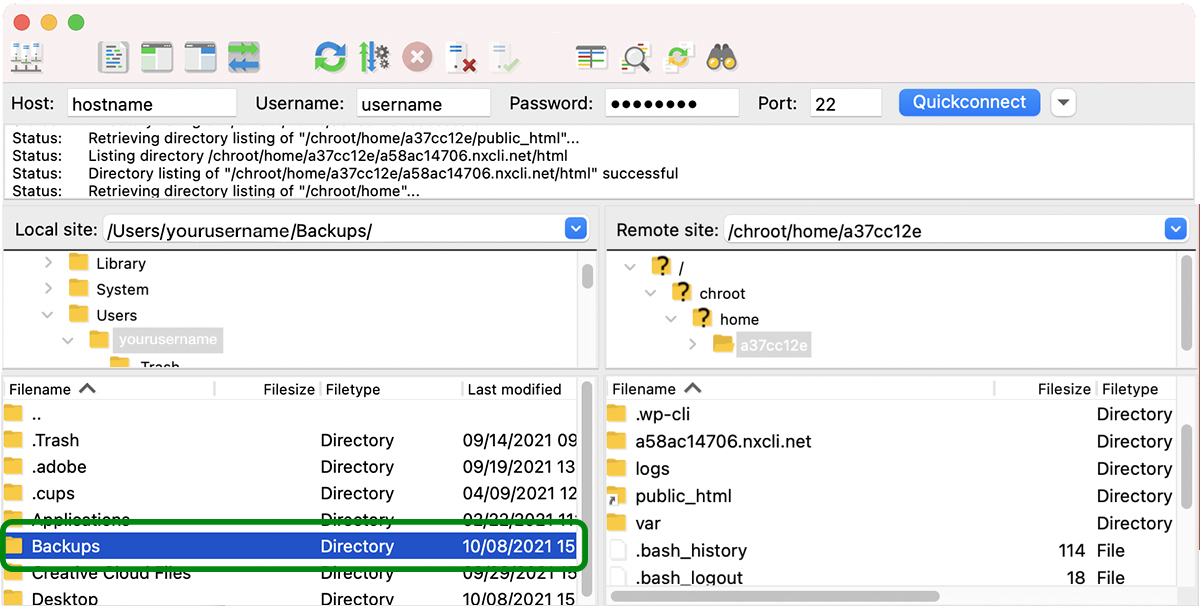
3. Select a folder where you want to save your backup
The left side of your screen will show the files on your computer. The right side of your screen shows the files on your web host’s server. Navigate to the folder on your computer where you want to save your backup and click on it. You’ll see its contents in the bottom left window.
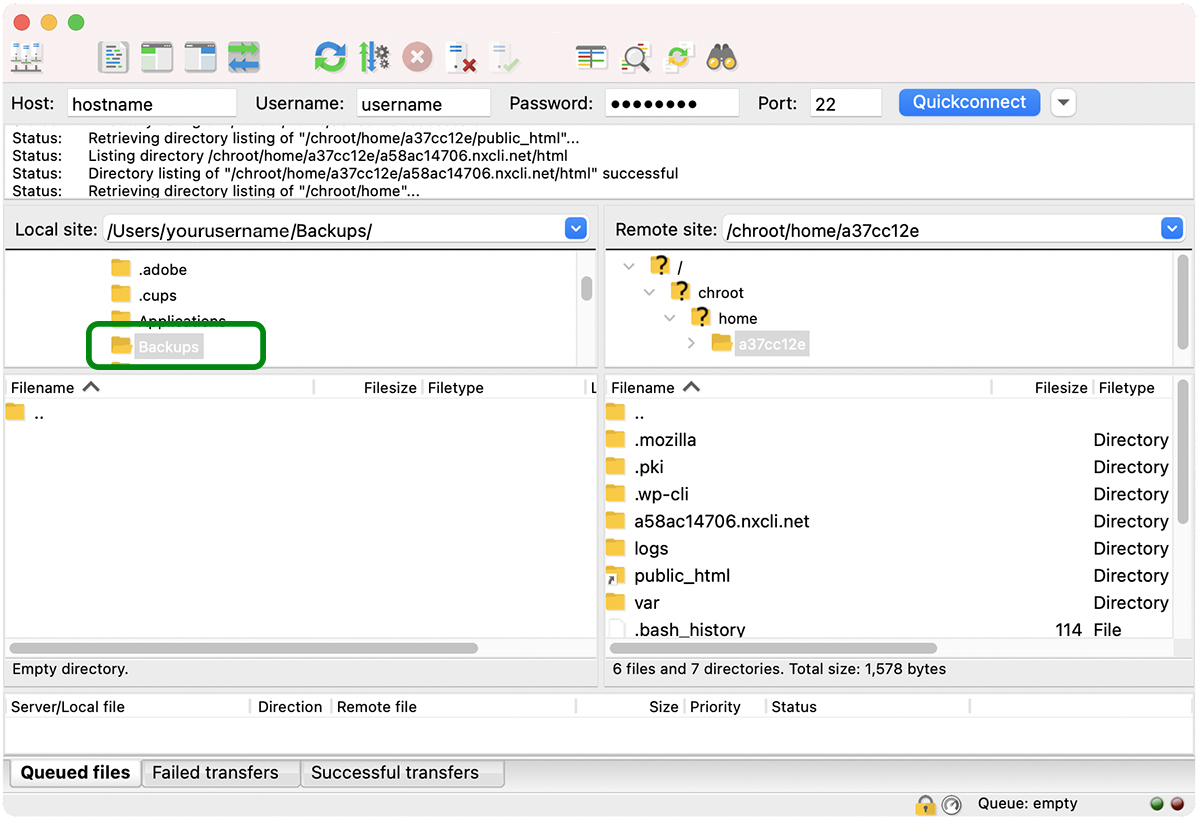
Optionally, you can right-click to create a new directory.

If you’re creating a new directory, enter its name and click OK.

Your new folder (named Backups in our example) will be visible in the bottom left window. Double-click the folder to open it.
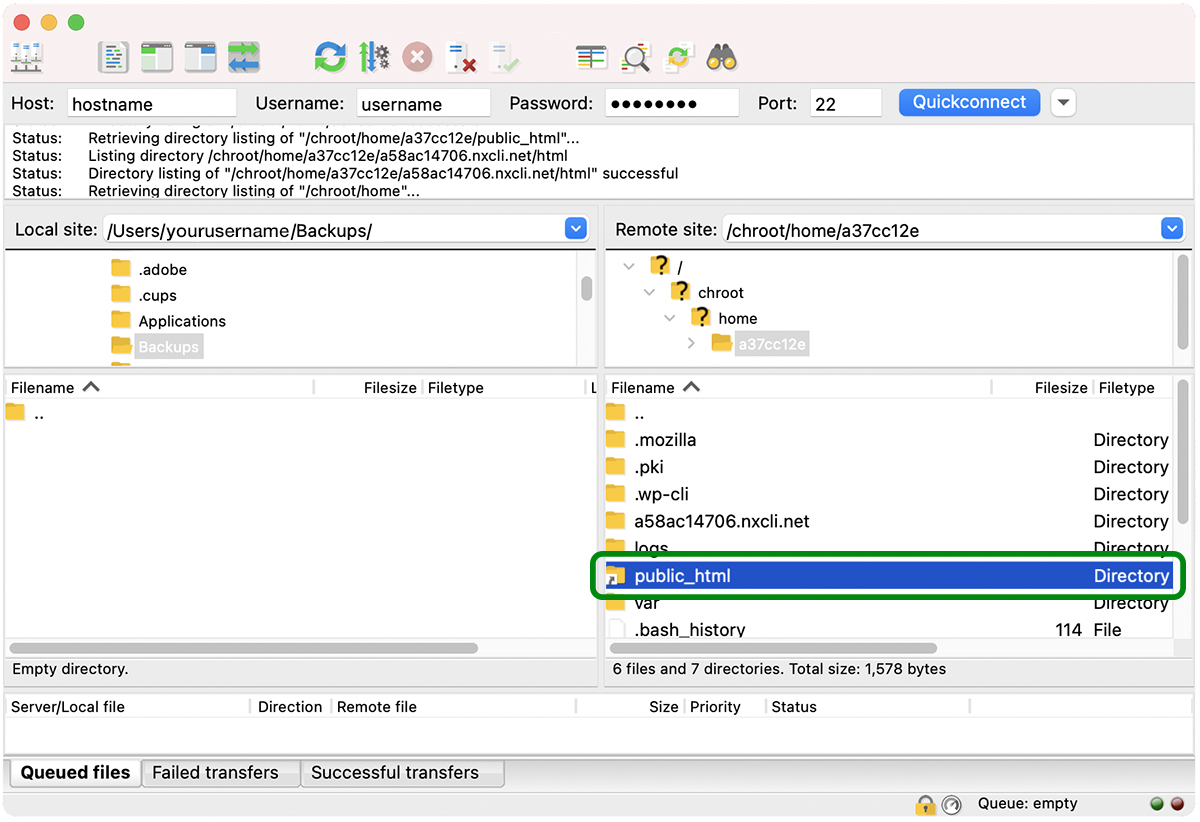
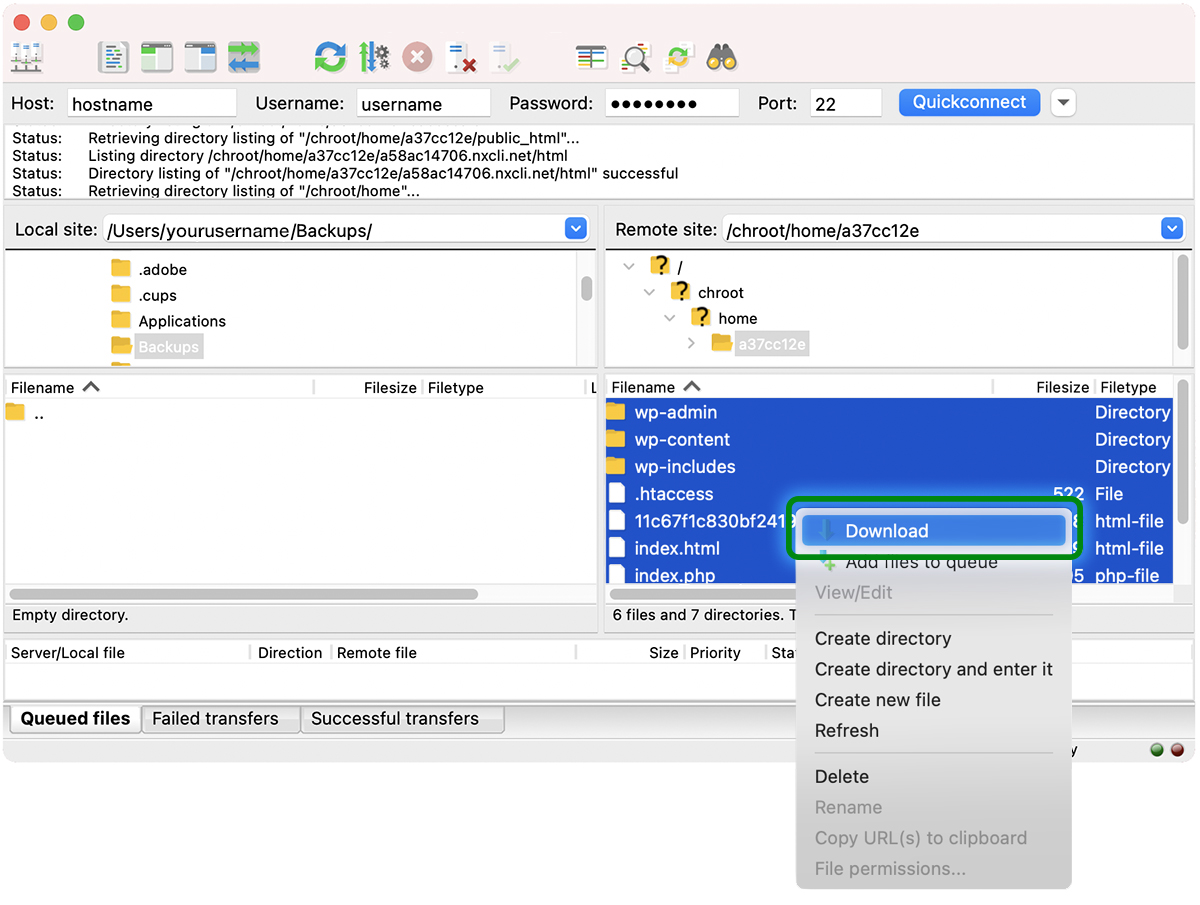
4. Navigate to your site’s root directory on the right-hand side of the screen
It’s usually called html or public_html. It may have another name, depending on your host, but the important thing is that you’ll know you’ve found the right directory if it contains the wp-admin, wp-content, and wp-includes folders.
5. Download your site’s files from the root directory
Select all the files and folders in your site’s root directory.

Right-click and select Download. You can also select all the files and folders and just click and drag them to the open folder window on the left-hand side of your screen.
Your files will now be downloaded to your local device. Make sure to upload them to cloud storage like Google Drive or Dropbox and save another copy on an external hard drive.
Don’t forget: This process only backs up your site’s files. It does NOT back up your database. You’ll also need to back up your database, which you can do via phpMyAdmin or SSH.

Create a WordPress database backup with phpMyAdmin
phpMyAdmin is an online software used for the administration of MySQL and MariaDB databases (the database types used by WordPress). It has a GUI that makes navigating and managing your database much easier than trying to do it all from the command line.
It can still be a bit scary to poke around in your database if you don’t know what you’re doing. Fortunately, exporting a backup of your database in phpMyAdmin is fairly straightforward:
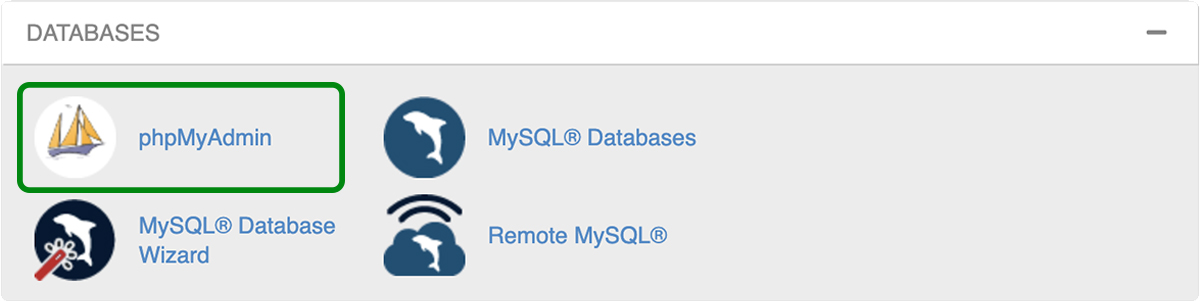
1. Log into cPanel or your managed WordPress portal in your hosting account
If you’re in cPanel, you’ll see phpMyAdmin listed under Databases. If you’re using a managed WordPress host, there should be a link to phpMyAdmin in your portal. If you can’t find it, contact your host or search their documentation for help.
2. Click on the phpMyAdmin icon to launch the phpMyAdmin window in your browser
3. Select your database
If your database name isn’t selected already, click on the database you want to export. Once your database is selected, you’ll see a list of all the tables included.

3. Click on the Export tab
You’ll find this at the top of your phpMyAdmin screen, outlined below:

4. Select export method and format
You can then choose from a Quick or Custom export. The Quick export will export your entire database. If you want to review the tables being exported and exclude some, select the Custom export option.

phpMyAdmin should show the database output option as “SQL” by default. If for some reason “text” or some other option is selected, switch it to “SQL.”
5. Click Go
That’s it! phpMyAdmin will export the database as a ZIP or GZIP file and prompt you to download it to your computer to use as your database backup.
Make a site backup using SSH
SSH (Secure Shell or Secure Socket Shell) is a network protocol that provides secure access from one computer to another over an unsecured network. Mac OS and Linux include the SSH client Terminal. Windows 10 includes an SSH client option, but it is not installed automatically and must be downloaded and enabled separately.
Other Windows versions don’t include an SSH client, so you’ll need to download one from a third party, like PuTTY.
Most SSH clients don’t have a GUI and rely on text-based commands to connect to and perform functions like uploads, downloads, deletions, file name changes, and more on a remote host. Unlike SFTP, you can back up both your site files and your database using SSH. Here’s how:
1. Find or create SSH credentials in your host’s control panel.
This exact process will vary based on your hosting provider, so check their documentation or reach out to their support team for help if necessary. You’ll need the following information:
- Host IP address
- Username
- Password
- Port number
You may also need to generate an SSH key, depending on your host’s requirements. For this example, we’ll just use host, username, password, and port number.
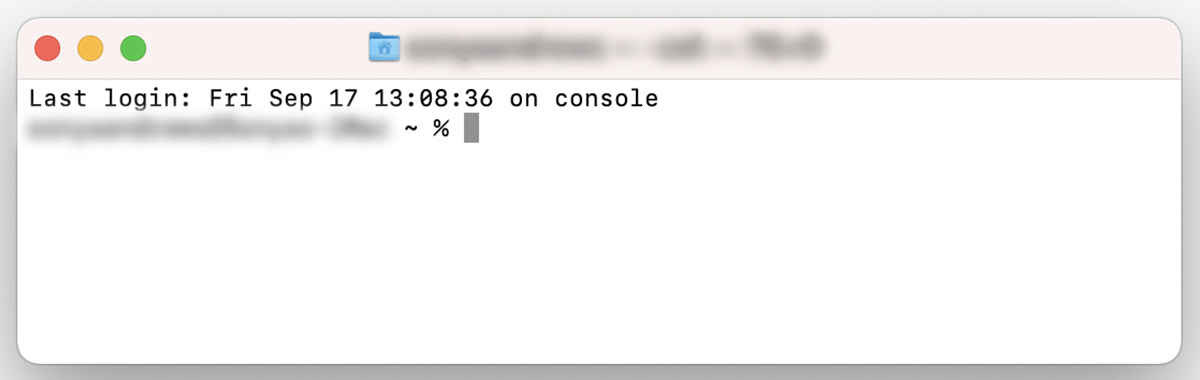
2. Find your SSH application and open it.
On Mac OS, you’ll go to Applications → Utilities → Terminal. On Linux you can press CTL + ALT + T. If you’re using Windows, you’ll use whichever SSH client you installed.
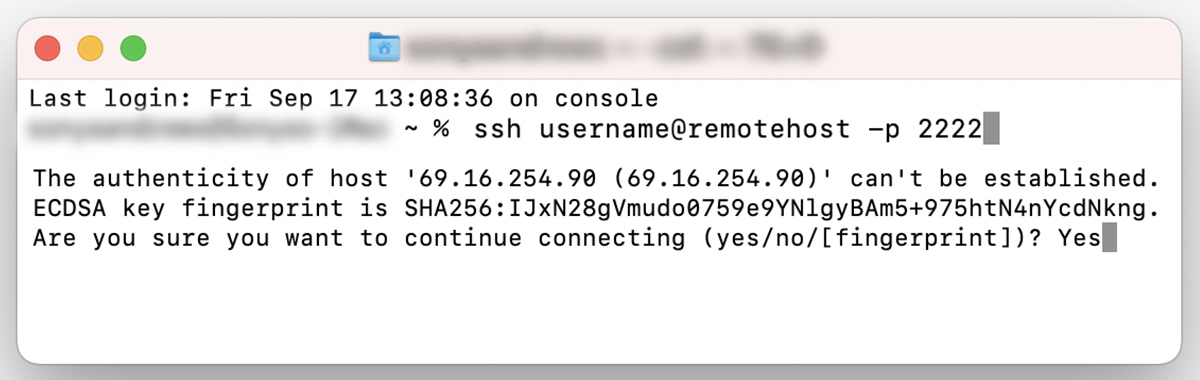
3. Type this command: ssh username@remotehost -p 2222
Replace “username” with your username, “remotehost” with your host’s IP address, and “2222” with your host’s port, then press Enter.

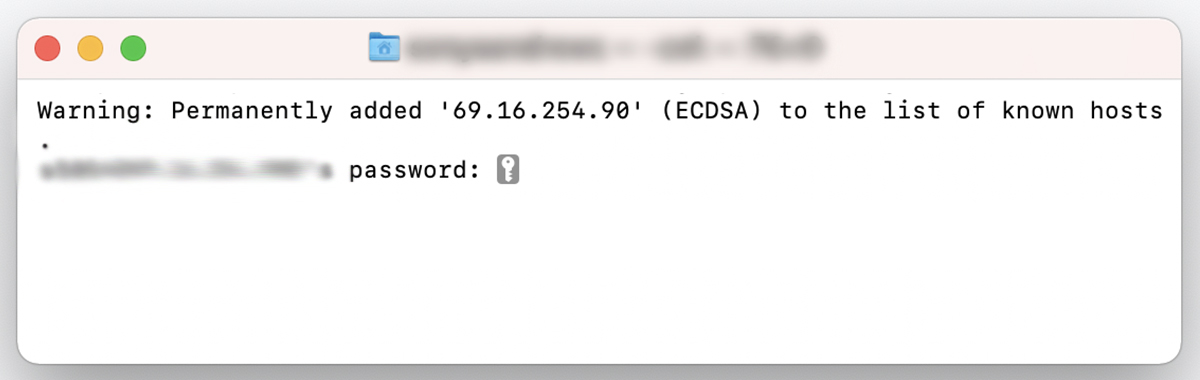
If this is your first time connecting to the server, you’ll be asked if you want to continue connecting. Type “yes” and press Enter. You’ll receive a warning that your server’s IP address has been permanently added to the list of known hosts. You won’t see this message again if you’re connecting from the same machine.
4. Type your password and press Enter.
You’ll be prompted for your password. Copy and paste it at the command prompt. You will not see the password or any other feedback displayed. This is normal. Press Enter.
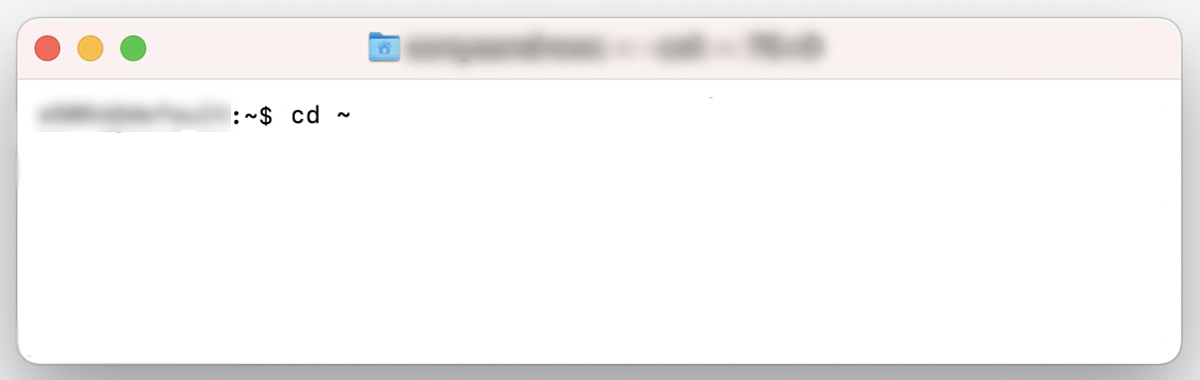
You’re now connected to the remote server. It’s time to back up your site.
5. Type the following at the command prompt: cd ~
6. Type this command to make a backup of your site files: tar -zcf backup.tar.gz directory_name
Replace “directory_name” with the name of the directory you want to back up. This should be the directory that the WordPress folders and files wp-admin, wp-content, and wp-config are in. If your site’s root directory is public_html, then your command will look like this:
tar -zcf backup.tar.gz public_html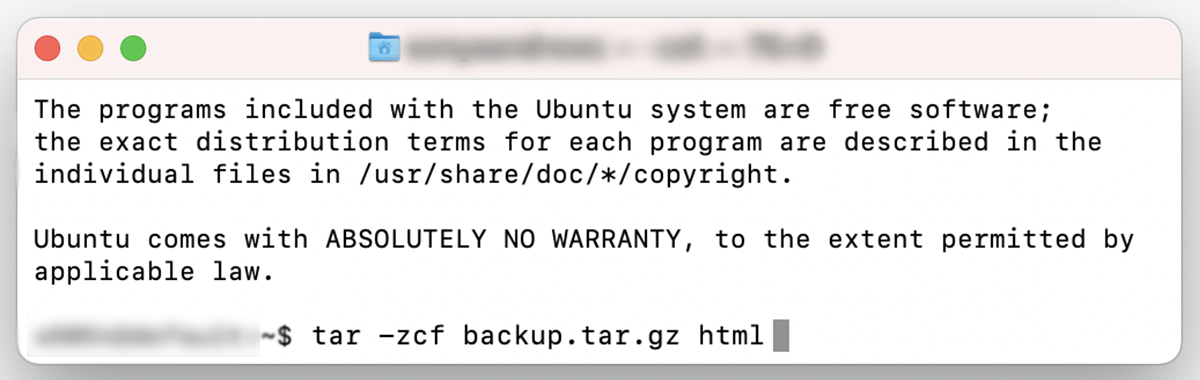
Your backup is complete, but is still sitting on your server. You’ll need to download it from your server so you can keep your backup stored safely off site.
The best real‑time WordPress backup plugin
Save every change and get back online quickly with one‑click restores from VaultPress Backup.
Get VaultPress Backup7. Download the backup of your site files.
Type the following at the command prompt:
scp -P 2222 username@remotehost:/directory_name/backup.tar.gz directory_nameReplace “2222” with your port number, “username” with your username, “remotehost” with your server’s IP address, “directory_name” with the directory name your site’s files are in, and the second “directory_name” with the directory on your computer that you want to download your backup to. Then hit Enter.

Your files should now download from your server to your computer.
8. Download your database.
You’re not done yet! You still need to download your database. You’ll need the following information:
- Database username. This is different from your SFTP or SSH username and is assigned only to your database.
- Database name. The name of your database.
- Password. Your database password, which should be different from your SFTP or SSH password.
You can find this information in your hosting account. If you have trouble finding it, contact your host for assistance or browse their help documentation.
If you’re still logged in to your server via SSH after downloading your site files, you’ll enter the following command at the prompt:
mysqldump -u USERNAME -p DATABASE > database_backup.sqlReplace “username” with your database username and “database” with your database name.

You’ll then be prompted to enter your database password. Type in your password and press Enter.
Your database will be exported as “database_backup.sql” in your current directory. To download it to your local machine, enter the following command:
scp -P 2222 username@remotehost:/directory_name/database_backup.sql /directory_name
Replace ‘2222’ with your port number, “username” with your username, “remotehost” with your server’s IP address, “directory_name” with the directory name your site’s files are in, and “/local/dir” with the directory on your computer that you want to download your database to.
Then hit Enter.

9. Delete backups from your server (optional)
Keep in mind that the backups you made are still on your server. If you don’t want to keep them there, you can remove them using the following commands:
Site files:
rm backup.tar.gzDatabase:
rm database_backup.sqlWhich manual backup method is the best for WordPress?
Making your WordPress backup through cPanel is the easiest way to perform a manual backup, but not all web hosts use cPanel. If you don’t have access to cPanel through your host, your next best bet for a relatively painless manual backup would be to download all your site files using SFTP and back up your database through phpMyAdmin.
Why make a backup of your WordPress site?
The primary reason you need to keep backups of your WordPress site is to prevent data loss.
Whether you’re running a complex ecommerce store or maintaining a simple landing page, you don’t want to lose the work that you’ve put into it and have to start over from scratch if your site experiences a problem.
You may have to restore your WordPress site from a backup if:
1. Your website was hacked
If your website gets hacked, you’ll want to restore your site to a version before it was compromised. Don’t forget to change all of your passwords and make sure you’ve installed a WordPress security plugin to prevent future attacks.
2. A plugin, theme, or WordPress core update caused an issue on your site
When updating to the newest version of a plugin, a theme, or WordPress core, you may occasionally get error messages. These errors might result in the dreaded white screen of death, but sometimes you might experience less obvious problems. Your site may still load, but display an error script that appears on the front or back end. Or you might experience subtle functionality issues that could take longer to discover.
By restoring from a backup, you can roll your site back to its most recent working version. You can also use it to create a staging site so that you, a plugin or theme author, your host, or another developer can troubleshoot the problem. If your hosting company provides a one-click staging option, it will make the process that much easier.
3. You added a malicious or badly‑coded plugin to your site
There are thousands of WordPress plugins available, and it can be difficult to know if the one you’re installing is well-built or even legitimate. Choosing plugins from reputable sources like WordPress.org, widely used paid online marketplaces, or consulting our curated list of essential WordPress plugins is your best option.
Why? Because there are review processes the plugins must go through before they are approved and made available to the public. However, poorly-coded plugins can still make it past the review process, and installing them on your site can cause major havoc.
In a case where you can’t fix the issue by simply uninstalling the offending plugin, you’ll want to be able to restore your site.
4. Your host made an error
If your host accidentally deleted an important directory or made other problematic changes to your server, your site may go down or experience functionality issues. You’ll need to restore your site from a backup made before your host caused the problem.
5. You’re migrating your site from one host to another or changing your domain name
If you need to move hosts, or you’ve decided to change your domain name, you’ll want to make a backup of your site. A lot can happen during the migration process or when making changes to your website’s root URL, so make sure you have a backup before starting either process.
6. You’re making major design changes to your site or implementing a new theme
While it’s best to make big design changes or switch themes on a staging site instead of your live site, you’ll want to keep a backup either way. Your staging environment may be different than your live environment, so your staging site might work well but your live site might experience problems. Being able to roll back to a previous version will reduce any downtime or problems visitors might experience while you troubleshoot the issue.
7. You made a mistake while making changes to your site
Let’s say you want to work on your website’s page speed and decide to remove unused images that are hogging space on your server. Whether you do this manually or use a plugin, you run the risk of accidentally deleting important images from your website. Back your site up before you start deleting anything so that you don’t potentially lose critical images and other files forever.
8. You regularly delete certain data to save space
If you run a site that has a lot of users, you may need to periodically delete data to prevent performance issues. Ecommerce stores, forums, and websites where users submit their own posts or media can quickly grow large and cumbersome. You may delete inactive users or customers, old orders, or other information to keep your site’s performance optimized.
At some point, you may need to retrieve that deleted information, though. Perhaps a customer wants to order a product again, and they can’t remember what size or color they purchased. If you deleted that order, you may need to look in a backup of your database to find that information. Or maybe an inactive forum member wants access to their comment history, but you deleted their account. Being able to retrieve that information from a backup will allow you to restore it for the user.
3 common WordPress backup mistakes to avoid
Relying Only on Host Backups: As we mentioned, host backups can be unreliable and inaccessible when you need them most. Always maintain your own off-site backup.
Forgetting the Database: A common beginner error is to back up only the WordPress files via FTP, forgetting that all your posts, pages, and user data live in the database. A full backup must include both.
Storing Backups on the Same Server: Storing your backup files on the same server as your website is a huge risk. If the server is hacked or fails, you lose both your live site and your backup. Always store backups off-site (example: on your computer, Google Drive, or an automated service like Jetpack Backup).
Make backing up your WordPress site a priority
No matter what method you choose or the frequency of the schedule — make backups a priority. Don’t risk your hard work and important data by procrastinating this aspect of running your site.
If you’re putting off backups because it seems like a chore, Jetpack VaultPress Backup makes the process easy and painless. Keep your data safe in less time than it takes to submit a ticket to your host’s tech support team. In the long run, you’ll save money, time, and file recovery headaches if and when something goes wrong.
Frequently asked questions
How often should I back up my WordPress site?
The short answer is: regularly. But depending on how often your site is updated with new content, you may want to back it up daily or in real time. A static website that isn’t updated with new content very often may only need daily backups. A busy ecommerce site, on the other hand, should have real-time backups to minimize loss of customer or product data.
Where should I store my WordPress backups?
Keep your backups off site (somewhere other than your web server) and in at least two places — preferably three. If you keep your backups on your own server, it can seriously slow down your website. Plus, if your server goes down, you may lose access to all your backups — which defeats the purpose of making them in the first place.
Jetpack VaultPress Backup keeps your backups off site, and you can periodically download your site archives to your local machine. From there, you can copy them to an external hard drive and upload another copy to a cloud storage service like Google Drive, Amazon S3, or Dropbox.
Even though your hosting company can’t necessarily be relied upon for backups, it doesn’t hurt to choose a plan that includes at least 30 days of daily backups. In addition to your own due diligence, this should ensure that you have the best possibility of restoring your site.
How do I know that I haven’t missed any files when performing a manual backup of my WordPress site?
As long as you’ve backed up your database and your entire site directory on your webhost, you can be pretty sure that you’ve backed up everything you need. However, with manual backups, you may not get any error messages if a resource fails to download or becomes corrupted during the process. So there’s always the chance your backup may be missing a file or might include a damaged file.
When manually backing up all your site’s files, you’ll want to download the full contents of your site’s root folder.
If you aren’t sure what folder on your server is your site’s root folder, it’s usually called html or public_html, but it may have another name. You can either ask your host or click around in the file directory until you find the folder that contains wp-admin, wp-content, and wp-includes — that’s your root folder.
If you host any of your site’s content — like images or video — on another server, you’ll want to make sure to make backups of those, too.
If you want to be certain that your backup worked, you can install it on a staging site and test it to make sure everything is there and that the site backup is functioning correctly.
How many backups should I keep?
You should keep at least a year’s worth of backups.
The number of backups you keep really just depends on how likely you think it is that you’ll need to access data from a certain date, or at what point you feel that content is not worth holding on to. Additionally, you may be subject to legal requirements that dictate that website data must be retained for a certain number of days or years, or destroyed after a specific period.
What is the difference between a database backup and a file backup?
A database backup saves all your content, while a file backup saves your site’s structure and functionality. Your WordPress database stores all your posts, pages, comments, user information, and plugin settings. Your WordPress files include the core software, your themes, your plugins, and your media uploads like images and videos. A complete website backup requires both parts. If you only back up the files, you will lose all your written content. If you only back up the database, your site will not function because the theme and plugins are missing.
Can I back up my WordPress site for free?
Yes, you can back up your WordPress site for free using several methods. You can perform a manual backup by downloading your website files with an FTP client and exporting your database with a tool like phpMyAdmin, both of which are usually provided by your hosting company. There are also free backup plugins available in the WordPress directory, such as UpdraftPlus. These free plugins often provide basic backup scheduling and can send your files to a remote storage location. While they may lack some advanced features of paid versions, they are a very effective starting point for any site owner.
Are my web host’s backups good enough to rely on alone?
Relying only on your web host’s backups is not a complete safety strategy. While having backups from your host is useful, they often have significant limitations. These backups are usually stored on the same server as your website. A serious server problem could destroy your live site and your backup file at the same time. Restoring from a host backup can also be a slow process that requires you to contact the support team. For full protection, you must maintain your own independent, off-site backups. Use your host’s backup as a secondary safety measure, not your primary one.
How do I restore my WordPress site from a backup?
The restoration process depends on how you created the backup. If you used a backup plugin, it will typically have a “Restore” button that guides you through the process automatically. This is the easiest method. If you created a manual backup, you will need to reverse the steps. First, you upload your website files back to the server using an FTP client, replacing the old files. Then, you import your database file using a tool like phpMyAdmin, which will overwrite the existing database. Always be very careful when performing a manual restore, as mistakes can cause further problems.
Will a WordPress backup plugin slow down my website?
A well-coded backup plugin should not slow down your website for your visitors. Most modern backup plugins are designed to run as a background process with minimal impact on server resources. They often perform the backup during times of low traffic or break the process into smaller chunks to avoid overloading the server. Some poorly configured or low-quality plugins could cause performance issues. To avoid this, choose a reputable plugin, schedule your backups for off-peak hours like the middle of the night, and make sure your hosting plan has enough resources to handle the process.
What are incremental backups and do I need them?
An incremental backup is a smart type of backup that only saves the changes made since the last backup was performed. The first backup is a full copy of your entire site. After that, each new backup file is much smaller because it only contains new or modified files and database entries. This method uses significantly less server space and processing power compared to running a full backup every single time. You need them if you have a very large website or are on a hosting plan with limited resources, as they make the backup process much more efficient.
What is the difference between real-time and scheduled backups?
Real-time backups save changes to your website instantly as they happen. Every time a post is updated, a comment is made, or a product is sold, that specific change is immediately saved. This offers the highest level of protection, ensuring almost zero data loss. Scheduled backups run at specific intervals, such as once per day or once per week. This is sufficient for most websites. Real-time backups are most important for highly dynamic sites like busy ecommerce stores or membership sites where losing even a few minutes of transaction data would be a serious issue.
The best real‑time WordPress backup plugin
Save every change and get back online quickly with one‑click restores from VaultPress Backup.
Get VaultPress Backup