
By default, the login page seen by visitors on your site is the same as the one used by admins. While this page is functional, its design is very basic, with a lot of white space and the WordPress logo front and center. It doesn’t do much to support your branding or offer visitors a user-friendly experience.
Creating a custom login page is a relatively easy improvement you can make to your WordPress site. Depending on the kind of site you run, many of your visitors may interact with this page at some point, so a custom WordPress login page presents an opportunity to improve their experience.
In this guide, we’ll talk about the advantages of a WordPress custom login page, cover several methods for creating one, and explore some best practices for user experience and security.
Why you might need a custom WordPress login page
Customizing your WordPress login page doesn’t have to be a complicated project. Tweaks as simple as swapping the WordPress logo for your own and changing the background can go a long way.
Custom login pages can be more:
- User friendly
- Professional
- Visually appealing
- Informative
- Secure
Plus, making these improvements is quick and simple. By spending a little time on this now, you can improve your login page for every visitor who uses it in the future.
The benefits of customizing your WordPress login page
Now, let’s look a little closer at some of the advantages we’ve outlined above, so you can see why this is worthwhile. The default WordPress login page is pretty barebones:

If you’re the only one who ever sees it, then the default login page does the trick. But if your audience regularly uses it to sign in, there are definitely some quick upgrades you could make.
Adding branding to the login page will make it feel like it belongs on your site and provide a more professional appearance. Visitors should recognize it as a natural and intentionally-built part of your site — not an afterthought.
This page can also be a great opportunity to share news and other information with your audience. For example, you could include a section where you post updates for visitors to skim while logging in — news about your organization, new products, testimonials, or anything else you want to share about your company.
The important features of a good login page
While a login page for one website might look very different than another, they all tend to share some common features. Obviously all login pages require a way for visitors to log in, whether that’s through a traditional username and password combination or third-party authentication.
Having a link to reset a password or look up a username is standard practice, too. This link usually takes people to a different page, where they can enter their email address to receive instructions for retrieving or resetting their information. The Forgot Password? link is usually located near the data entry fields and Log In button.
In order to protect you and your visitors, it’s also smart to put some basic security features in place. For instance, you may want to change how admins log in to your site in order to prevent unauthorized attempts.
If your site collects any personal information from its users, you’ll want to give extra care to secure and protect your WordPress site from bots and hackers. CAPTCHA technology, Two-Factor Authentication (2FA), and anti-phishing notices are a few things you can do to protect your users. We’ll discuss these options in more detail later on.
How to create a custom WordPress login page (3 methods)
Fortunately, creating a WordPress custom login page is much easier than you probably imagine. In a matter of minutes, you can add your logo and make other simple changes. In a matter of hours, you can have a fully–customized login page that will improve the experience for your visitors.
Here are three popular methods for creating a customized WordPress login page:
1. Create a WordPress custom login page with SeedProd
The SeedProd plugin is an intuitive way to customize your login page. You can also create a custom 404 page, Maintenance Mode page, “Coming Soon” page, and other landing pages.
Note that the 404 page and login page modules require a SeedProd Pro plan. To build your login page, just follow these steps:
Step 1: Install and activate SeedProd Pro
First, go to the Plugins page in your dashboard and select Add New. Search for SeedProd and install it for free. Once the installation is complete, click on the Activate button.

Next you’ll need to upgrade to a premium plan. To do this, click on Get Pro in the SeedProd tab. This will redirect you to their website, where you can purchase an activation key for the premium version.
Step 2: Create a landing page using the login page template
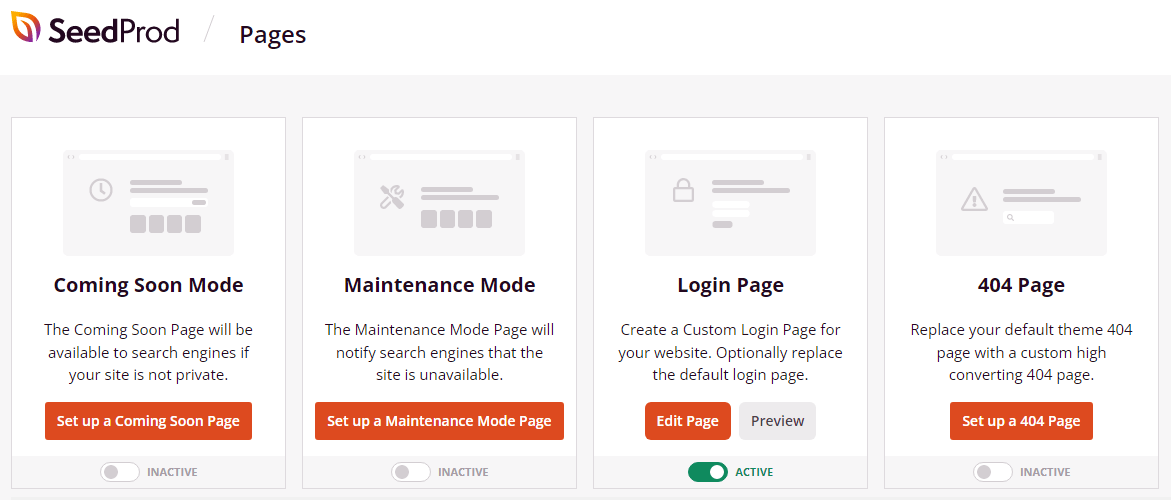
Once you’ve activated SeedProd Pro, hover over the SeedProd tab and select Landing Pages. On the following screen you’ll be presented with four templates.
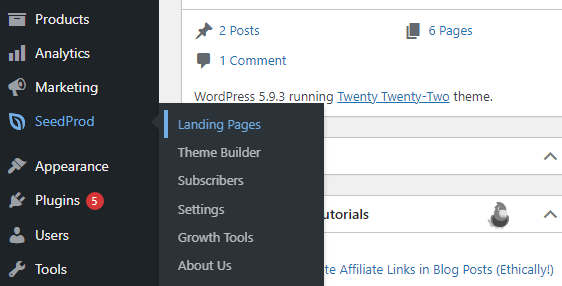
Choose Set up a Login Page to customize your new login page using a pre–built template. You’ll then be taken to the editor where you can design your new login page.
The SeedProd editor behaves much like the WordPress Block Editor, allowing you to easily add and modify aspects of the page. Since you selected the login page module, you’ll already have all the necessary features of a login page built in.
These include the username and password entry boxes, Remember Me checkbox, Password Reset link, an image, and a background.

You can use the Block Editor to add additional text, images, forms, and more, just like you would with a normal post. Simply customize this page to your liking, and then click on the Save button in the top right corner of the screen.
Step 3: Activate your new login page
Once your design is saved, back out of the editing screen and return to the SeedProd Landing Pages screen in the dashboard. Flip the switch in the Login Page module to Active to replace the default login page with your newly-designed one.
Now, log out and return to see it in action! Test the reset password link and other features before logging back in. Imagine that you’re a new visitor, and consider whether there’s anything you can do to improve the experience further.
Other considerations
SeedProd makes it very easy to add images and other elements, just like with the Block Editor. It’s important to consider all of the available options, to see if there are any elements that would be effective on your login page.
Your login screen also doesn’t have to stay the same over time. You might consider posting updated sales images or featured content suggestions regularly. As people return to log in, you can use the opportunity to suggest new or popular content.
Of course, you’ll also want to use your company’s color palette and fonts to keep everything consistent with the rest of your site. With SeedProd, you can easily swap out the page’s background, so feel free to create a few designs and rotate through them seasonally or as you see fit to keep the experience fresh.
2. Modify your login page using LoginPress
If you’re looking for something more budget–friendly and straightforward, LoginPress is a handy free plugin you can use to customize your login page. It lacks some of the features and polish of SeedPod Pro, but adds functionality to the WordPress Full Site Editor that allows for easy customization of your login page. Simply follow these steps to use it:
Step 1: Install and activate the LoginPress plugin
From the Plugins page in your dashboard, select Add New and search for “LoginPress.” Install and activate the plugin to get started.

There’s no need to upgrade LoginPress at this stage, although there are some premium features you can opt in to later. For most login pages, the free version will suffice.
Step 2: Modify your login page using the Customizer
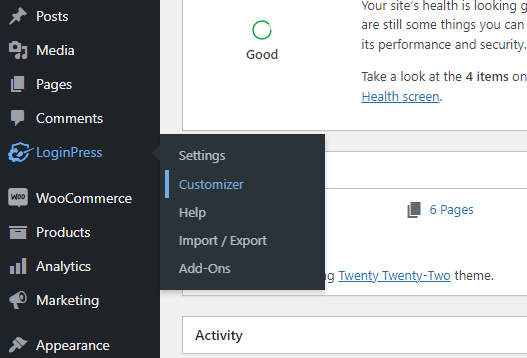
Once you’ve installed and activated LoginPress, you’ll see a new tab on the left-hand side of your WordPress dashboard. Hover over the LoginPress tab and select Customizer to modify your login page.
You’ll be taken directly to the login page within the Full Site Editor. You’ll see icons for the following capabilities:
- Change logo
- Customize form (Username and Password)
- Customize button (Log In)
- Customize navigation (Lost your password?)
- Change footer
- Change template
- Change background
Simply select the corresponding pencil or paintbrush icon to modify that element. You can easily swap out the logo, upload your own background, or change the form and login button with just a few clicks.

You won’t have the full freedom to edit this page as you do with the Block Editor in SeedProd Pro, but this should be enough customization for the vast majority of login pages. In the left–hand menu you’ll notice a new LoginPress tab in the Full Site Editor that adds even more features.
We guard your site. You run your business.
Jetpack Security provides easy‑to‑use, comprehensive WordPress site security, including real‑time backups, a web application firewall, malware scanning, and spam protection.
Secure your siteStep 3: Explore additional features and consider upgrading
Some features are only available with LoginPress premium plans, like the reCAPTCHA module. For most small- to medium-sized WordPress sites, the free version is sufficient to create a custom login page.
The features provided allow you to easily change many of the facets of your login page quickly and without any coding. You’ll always have the option to upgrade to the Pro version in the future, so feel free to start with the free version and see if it suits your needs.
Suggested edits
If you opt for this method of customizing your login page, swapping out the logo will probably be the first thing you’ll want to do. Just click on the blue pencil icon next to the default logo to upload your own.
Next, you can try out some of the other templates to see if any of them fit your style. If not, you can always upload your own or simply create a background using your brand’s primary color.
Then you might consider changing fonts or text within the actual form to be consistent with the rest of your site. You’ll also want to be sure that any links are working.
3. Modify your login page using custom code
Finally, if you’d prefer not to use a plugin, you can also customize your login page using code. This requires more technical know-how, but does offer the most flexibility.
Exactly how you go about tweaking your login page with custom code is up to you. Let’s look at one example of a simple change you might want to make.
Let’s say you’d like to manually replace the WordPress logo on the login screen with your own graphic. This may seem intimidating for beginners, but isn’t difficult for anyone familiar with accessing their website’s files and basic code manipulation. Just follow these steps:
Step 1: Back up your site
Any time you manually modify files or folders on your site, it’s a good idea to create a backup. One accidental key press could break your site.
Periodic full-site backups are always a good idea, although you should at the very least make copies of any files you plan to modify. In this case, you’ll be making changes to your functions.php file.
Step 2: Create and upload your logo
You will, of course, need an image of your logo to replace the default one. Upload the image you wish to use to your Media Library.
While you can theoretically make the image any size, dimensions of roughly 300 pixels wide fit nicely atop the default login form. We’ll be using a 300×300 pixel example for a square placeholder image.
You can resize your image outside of WordPress, or do so within your Media Library. To do the latter, simply click on the image once it is uploaded and select Edit Image on the right, near the thumbnail. You can select your dimensions and click on Scale to resize it. Then save the image and continue.

You’re going to need the image’s URL for the next step, so click on the Copy URL to clipboard button or leave this window open.
Step 3: Modify the functions.php file
Next, you’ll need to locate your functions.php file. To do this, access your theme’s folder via File Transfer Protocol (FTP). This folder should have the same name as your theme and be housed in the wp-content folder for your site.
To swap the WordPress logo on the login screen, add this code to the functions.php file within. To avoid putting it in the middle of another script, you can simply insert this snippet at the very end of the file beneath the rest of the code:
function wpb_login_logo() { ?>
    <style type="text/css">
        #login h1 a, .login h1 a {
            background-image: url(YOUR IMAGE URL HERE);
        height:300px;
        width:300px;
        background-size: 300px 300px;
        background-repeat: no-repeat;
        padding-bottom: 10px;
        }
    </style>
<?php }
add_action( 'login_enqueue_scripts', 'wpb_login_logo' );
Paste the URL you copied from the last step in place of the “YOUR IMAGE URL HERE” placeholder. This will replace the WordPress logo with your image. Be sure to save the functions.php file after you make these changes.
Step 4: Visit your login page
Log out to return to your login page. If you’re already on your login screen, you’ll need to reload the page to see the changes.
You should see your logo in place of the old one. If the sizing looks off, you can easily tweak the size dimensions by changing the height, width, and background px values in the code snippet.
If anything seems amiss, simply restore your backup to revert the changes. You can also overwrite your functions.php file with the backup copy you created earlier.
How to secure your WordPress login page
When implementing a custom login page, there are a few things you need to be aware of for the security and health of your website. The login page is a primary target for hackers and bots, so it’s vital to lock it up tightly. Here are a few ways to do that:
Two–Factor Authentication (2FA)
Two–Factor Authentication (also known referred to as 2FA) greatly reduces the chance of account hacking. With 2FA, in addition to needing a username and password, a second form of authentication is required when visitors attempt to log in from a new or unregistered device.
For example, if a hacker is able to obtain the login credentials for one of your users, they could simply log in to the account and cause havoc. Sometimes hackers can merely guess a password based on a username. With 2FA implemented, a second form of verification would also be needed.
Usually this is in the form of an email or text that’s sent to the account holder in order to confirm that they’re attempting to sign in. Since it’s unlikely that the hacker would also have access to the user’s email or device, this all but ensures that the user is genuine.
2FA can usually be expedited by allowing users to register a device so login attempts from that source don’t need verification every time. There are a number of plugins available that allow you to set up 2FA on your site. This is especially important to consider if your site handles any sort of sensitive or financial information.
CAPTCHA and reCAPTCHA
One method for guessing login credentials is to brute force attack your site with bots. In other words, programs will automatically attempt to guess common username and password combinations until they succeed. This may seem like a difficult task for humans, but bots can do this quickly and automatically, guessing thousands of common passwords without human intervention.
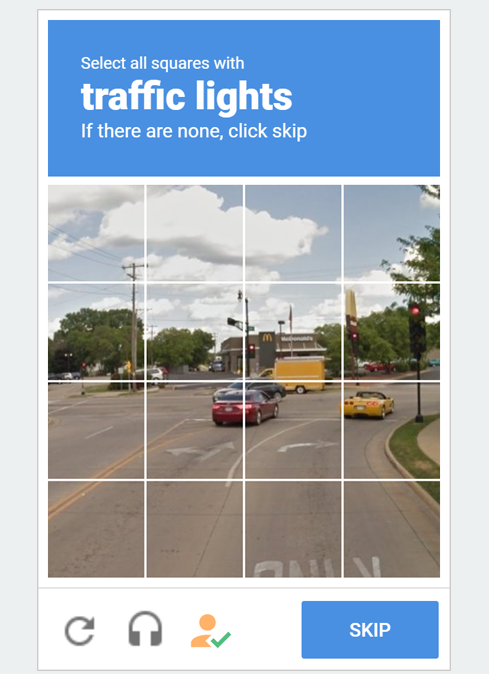
The purpose of adding CAPTCHA to WordPress is to thwart these bots from making login attempts. You have probably encountered these tests. They used to come in the form of distorted words that you would have to decipher and type into a box.

More modern CAPTCHAs involve selecting pictures that include a specific object like cars or chimneys. These tests are difficult for bots to solve, and therefore effective at deterring brute force hacking attempts.
reCAPTCHA is an advanced form of this technology that can deter bots with little to no input from human users. LoginPress includes reCAPTCHA technology in its Pro version, or you can find CAPTCHA applications included in specific plugins or more comprehensive security tools.
Anti-phishing notices
A low-tech strategy for stealing login credentials is to mimic an authoritative source and simply ask for them. This is known as phishing.
For instance, someone could create an email address using the name of you or your company, and send out an email asking for login credentials in order to fix a problem. If the email and address are convincing, some people might take the bait and respond, giving away their account information.
One way to prevent this is to post anti-phishing notices announcing that you and your company will never request such information. Any such emails or messages should be considered spam and ignored. A simple notice on your login page could mean the difference between successful phishing attempts and secure accounts.
To learn more about securing your login page, see our WordPress login security guide.
Putting your best foot forward
While it’s easy to overlook it and focus on other aspects of your website, customizing your login page is a worthwhile project. A custom login page can improve the user experience, give your site a more professional feel, and be used to share vital information.
You can change your WordPress login page using the following methods:
- Create a brand new login page with a plugin like SeedProd.
- Modify your login page with a free tool like LoginPress.
- Use custom code to make manual changes, like swapping out the default logo.
To get the most out of your login screen, plugins make it easy to customize the page exactly how you want. In some cases, this is one of the first pages visitors will see, so it’s important for it to look its best!
We guard your site. You run your business.
Jetpack Security provides easy‑to‑use, comprehensive WordPress site security, including real‑time backups, a web application firewall, malware scanning, and spam protection.
Secure your site