

Custom taxonomy filter mapping
This guide explains how to map a site-specific custom taxonomy to one of Jetpack Search’s reserved index slots, so the Filter (Checkbox) block returns accurate results for taxonomies that aren’t in the default search index.
Custom taxonomies and Jetpack Search
The Filter (Checkbox) block includes a Custom taxonomy option that lets you pick any registered taxonomy on your site, such as genre, mood, or series. While WordPress lets you create and use any taxonomy you like, Jetpack Search only indexes a specific set of taxonomies on the WordPress.com side. If your taxonomy isn’t on that list, the search indexer skips it. The filter looks correct in the editor, but returns zero results on the front end.
To bridge this gap, Jetpack Search reserves ten “slot” taxonomies (jetpack-search-tag0 through jetpack-search-tag9) that the indexer always accepts. You can assign posts to these slots directly, and the Filter (Checkbox) block will return results as expected. The downside is that authors have to work with slugs like jetpack-search-tag1 everywhere: in the editor, REST API requests, URL parameters, and theme code.
The jetpack_search_custom_taxonomy_map filter removes that trade-off. It creates a transparent link between your taxonomy and a reserved slot. Authors continue to work with genre in the editor and across your site. Behind the scenes, the system mirrors every term assignment onto the slot automatically. On the front end, URL parameters and filter labels display your taxonomy name, not the slot slug.
You can learn more about how custom taxonomies interact with search indexing in the Jetpack Search FAQ.
When to use the mapping filter:
- Your taxonomy slug appears in places beyond the editor, such as REST API contracts, URL parameters, theme templates, automation, or third-party plugins, and switching all of those surfaces to a slot slug isn’t practical.
- You want authors to keep seeing a meaningful name like “Genre” in the editor rather than “Search Tag 1.”
When to use the slot taxonomy directly:
Use the slot taxonomy directly when your workflow already assigns posts to a slot taxonomy such as jetpack-search-tag1, for example through a custom import pipeline or manual tagging. This approach is simpler and avoids duplicating dat
Requirements
Before you begin, make sure your site and workflow meet the following requirements:
- An active Jetpack Search plan. The free tier is sufficient.
- Your custom taxonomy already registered and attached to the relevant post types.
- One of the ten reserved slots (
jetpack-search-tag0throughjetpack-search-tag9) not already in use on your site. - WP-CLI access (needed for the backfill step if posts were tagged before the mapping was added)
Setting up the mapping
Follow these steps to map your custom taxonomy to a Jetpack Search slot. This process connects your existing taxonomy to the search system without changing how it appears to authors or how it is used elsewhere on your site.
1. Register your taxonomy
If your taxonomy is already registered and working in the editor, skip to step 2.
If you still need to create one, register it using the register_taxonomy() function in a plugin or your active theme’s functions.php. The taxonomy needs to be attached to the post types you want to filter, and it needs show_in_rest set to true so it appears in the block editor. For a full walkthrough, see Working with custom taxonomies in the WordPress Plugin Handbook.
2. Choose an unused slot
Pick one of the ten reserved slots (jetpack-search-tag0 through jetpack-search-tag9) that isn’t already claimed on your site. Each site has exactly ten slots, and they may already be in use by other Jetpack Search features or other mappings. Check what’s in use before claiming one.
3. Add the mapping filter
Add the following to a mu-plugin or your active theme’s functions.php. Replace genre with your taxonomy slug and jetpack-search-tag1 with your chosen slot:
add_filter( 'jetpack_search_custom_taxonomy_map', function ( $map ) {
    $map['genre'] = 'jetpack-search-tag1';
    return $map;
} );
Once active, the mapping handles everything automatically:
- It registers the slot as a private shadow taxonomy on the same post types as your custom taxonomy.
- It mirrors every term write, removal, and deletion from your taxonomy onto the slot in real time.
- It routes the Filter (Checkbox) block’s results through the slot and maps them back to your taxonomy before they reach the front end.
4. Backfill existing posts
If posts were already tagged with your custom taxonomy before you added the mapping, run the backfill command once to sync existing assignments to the slot.
Run this WP-CLI command from your site’s root directory:
wp eval '\Automattic\Jetpack\Search\Custom_Taxonomy_Slot_Mapping::backfill();'
This walks every post that has at least one term in your taxonomy and sets the slot’s assignments to match. It is safe to re-run. The command returns the count of post-and-taxonomy pairs that were mirrored.
If the slot has drifted out of sync (for example, the mapping was disabled, terms were removed during the gap, and then the mapping was re-enabled), use rebuild mode instead:
cssCopy codewp eval '\Automattic\Jetpack\Search\Custom_Taxonomy_Slot_Mapping::backfill( "rebuild" );'
Rebuild mode deletes everything in the slot taxonomy first, then re-mirrors from scratch. It is slower than the default mode but ensures a clean sync.
5. Add the filter block in the editor
- Insert a Filter (Checkbox) block on the page where you want the filter to appear.
- Set the filter type to Custom taxonomy.
- Pick your mapped taxonomy from the dropdown. It appears with a (mapped) label to indicate it is routing through a slot:
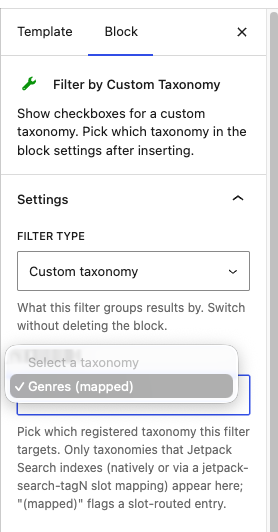
- Click Save.
From this point on, all term assignments on your custom taxonomy automatically mirror to the slot. Authors never see the slot slug.
Before you enable the mapping
This is an advanced feature with trade-offs worth understanding before you turn it on:
- Don’t change the slot after you’ve mapped to it. Once a mapping is active, the slot taxonomy accumulates synced data on WordPress.com. If you switch your taxonomy from one slot to another, old data remains in the original slot while new writes go to the new one. Filters against the new mapping only see new data, and old assignments stay orphaned in the original slot until you clean them up. If you must move to a different slot, run a rebuild backfill immediately after switching.
- The mapping duplicates data. Every assignment on your custom taxonomy is mirrored to the slot, which creates extra rows in the
term_relationshipstable and extra entries in the sync queue. On most sites this is negligible, but on high-volume sites with millions of posts and many terms it can add up. Plan for the extra storage and sync load before enabling.
Still need help?
Please contact support. We’re happy to advise.

