
Every WordPress installation has a selection of “core” files. These are the files behind critical functionality, and one of them is .htaccess. It includes configuration options for your web server. In other words, it’s extremely important.
If you know how to find and edit .htaccess, you can change your site’s permalink structure, set up redirects, increase security for the dashboard, and make many more tweaks. You don’t even need to know how to code if you follow instructions carefully.
On this page, we’ll talk about the .htaccess file and how it works. We’ll show you how to locate, access, and edit the file. Finally, we’ll wrap up with some frequently asked questions.
On this page- What is .htaccess?
- Where to find .htaccess
- 3 ways to edit (FTP, cPanel, Plugin)
- How to create a new .htaccess file
- Default .htaccess code (single & multisite)
- Useful rules to add to your .htaccess file
- Common errors and how to fix
- If your host uses NGINX
- Frequently asked questions
What is an .htaccess file?
.htaccess or Hypertext Access files aren’t unique to WordPress. Every Apache web server has an .htaccess file that contains configuration settings for the server. In the case of WordPress, the file also includes instructions for your website’s permalink structure.
Here’s how the file looks by default on most websites:

We say “most websites” because some hosts customize their clients’ .htaccess files to include additional functionality. Still, the file is always located in the WordPress root directory.
If you have access to the server, you can locate and edit .htaccess to make critical changes to your site’s functionality. Some of the changes you can implement include:
- Adding redirects. Implement redirects at the server level.
- Changing the permalink structure. When you change your WordPress permalink structure, these changes are reflected in .htaccess. You can use the file to manually change the URL structure instead of doing so in the WordPress admin panel.
- Preventing resource hotlinking. If you don’t want other websites to use images or other elements from your website, you can disable hotlinking by modifying the .htaccess file.
- Configuring access to the website. .htaccess enables you to password-protect directories, whitelist IP addresses for access to the dashboard, and more.
It’s important to understand that .htaccess is an incredibly delicate file. Since it lets you configure server-level rules, changing the file can break your website if you’re not careful.
You don’t need to know a specific programming language to edit .htaccess, although PHP knowledge can help. If you follow instructions and copy the necessary code snippets, you can easily modify the file.
If you’re not comfortable using code, several plugins can edit .htaccess for you. Most security and redirect plugins work by editing the file without you having to open it. Depending on the changes you want to make, you may be able to use a plugin to edit .htaccess.
Where is the .htaccess file located in WordPress?
The .htaccess file is located in the WordPress root directory. This directory contains all of your WordPress core files (like wp-config.php), as well as everything that you upload to your website.
You can’t access the root directory from the WordPress dashboard. To get access to .htaccess and other similar core files, you’ll need to connect to your server via File Transfer Protocol (FTP) or your hosting control panel.
Since WordPress is open-source software, you can freely edit all the files in any way you want. In the next section, we’ll show you how to make changes to .htaccess safely (and the same advice applies to all other WordPress core files).
How to edit your WordPress .htaccess file (3 methods)
Editing the WordPress .htaccess file requires access to the root directory. But before making any changes, we highly recommend downloading a backup of your .htaccess file. Since .htaccess deals with server configuration settings, any errors in the file’s code can render your website inaccessible. If that happens, you’ll need to restore a previous version of .htaccess, remove the incorrect code, or create a new .htaccess file to reaccess your site. With that in mind, it’s best to play it safe and have a recent backup available.
Thankfully, backing up the .htaccess file is a pretty simple process. Start by accessing your server’s files via either your host’s file manager or file transfer protocol (FTP) software like FileZilla. Navigate to your website’s root folder, typically called public_html, www, or your website name. Here, you’ll find the .htaccess file.
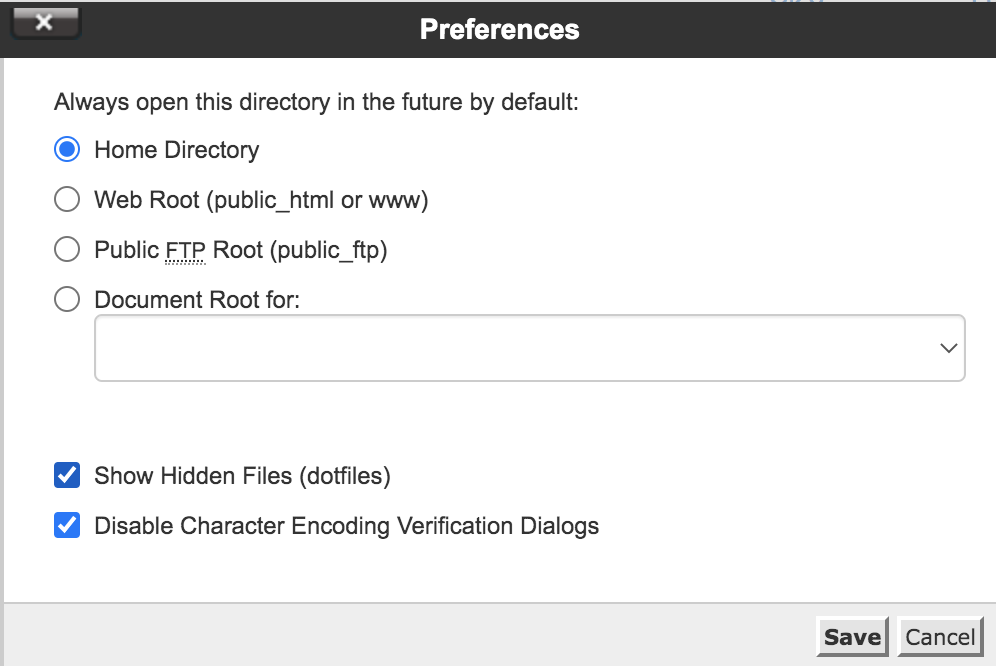
If you don’t see that file, you may need to turn on a setting that enables you to view hidden files. This will depend on your host or FTP software. If you’re using cPanel, click the Settings button at the top right, followed by Show Hidden Files (dotfiles) and Save.
With FileZilla, you’ll need to toggle this setting before you connect to your server. All you have to do is go to Server → Force showing hidden files.

Once you’ve found the .htaccess file, download it to your computer and rename it to something you’ll remember, like .htaccess_before-changes. Then, if you do need to revert any changes that you’ve made, you can simply copy the code from this file and paste it into the live version on your server.
Overview of the 3 methods we’ll explore to edit your .htaccess file:
| Method | Best For | Pros | Cons |
| FTP Client | Developers, high control | Full control, use your own editor, reliable | Requires FTP credentials, less beginner-friendly |
| cPanel File Manager | Quick edits, no extra software | Universally available on cPanel hosts, easy to access | Clunky editor, easy to make mistakes, file may be hidden |
| WordPress Plugin | Beginners, specific tasks | Safest option, guided interface, no server access needed | Limited to plugin’s features, can add bloat, less control |
1. Using an FTP client
The best way to access the .htaccess file is with an FTP client. FTP clients tend to be easier to navigate than file managers in hosting control panels, and they provide more control for interacting with your site’s directories and files.
It’s up to you which FTP client you use. But you might consider the open-source FileZilla option if you haven’t used FTP before.
To connect to WordPress, you’ll need your site’s FTP credentials. You should have received these when signing up for a hosting plan. If not, you can find them in your hosting control panel.
Once you have the right credentials, connect to your website via FTP. Navigate to the folder that says www, public_html, public, or your site’s name. Those are the most common names for the WordPress root directory.
Open the directory, and you should see a collection of files and folders that looks like this:

The file we’re looking for, .htaccess, is located in this top-level directory. Once you find it, right-click on the file and select View/Edit (the name of this option may change depending on which FTP client you use). This will open the file using your default text editor.
Again, before taking this step, make sure you download the file to a safe location so you can restore the code if you make a mistake.
Any changes that you make to this file need to come before the “# END WordPress” line. To keep things organized, we recommend adding new snippets of code with a line of separation from others.
If possible, also add comments like this to identify what each snippet does:
# This is a comment
That way, if you return to the file to remove part of its code, you’ll know precisely what each snippet does. When you’re ready, save the changes to the file and close it.
The FTP client will ask if you want to update the file on the server. Choose the option that says Yes, and that’s it. The changes that you made to .htaccess should be live now.
2. Using your cPanel
Editing a WordPress .htaccess file using cPanel is relatively simple since the software includes file manager functionality. But keep in mind the text editor included with the file manager is very bare bones. We recommend using an FTP client instead if you can.
If you prefer using cPanel, login to the hosting control panel and look for the File Manager option under the Files section.

On the next screen, look for a directory called www, public_html, public, or your website’s name. That is your WordPress root directory, and it contains the .htaccess file.
Right-click on .htaccess and select the Edit option. This will open the file manager’s text editor and enable you to make changes to the file. Again, make sure you have a current version of your .htaccess file on hand that you can restore if needed.

We included instructions on how to edit .htaccess safely in the previous section. Make sure to review those instructions before adding code to the file to prevent any problems with your server.
3. Using a WordPress plugin
If you don’t want to use an FTP client or cPanel to access the .htaccess file, some plugins provide this functionality from the WordPress dashboard. One example is Htaccess File Editor by WebFactory.

This plugin adds a new WP Htaccess Editor tab to the dashboard. From here, you can use a basic text editor that works only with .htaccess.

The advantage of using a plugin to edit .htaccess over a regular text editor is that you may get access to functionality like testing the file before saving. You might also be able to restore backups in case of an error.
Other plugins that let you edit .htaccess include Redirection and Htaccess File Editor. In most cases, we recommend using FTP over plugins. But a plugin might do the trick if you only plan on making minor changes to .htaccess.
How to create a new WordPress .htaccess file
Creating a new WordPress .htaccess file is relatively simple. Sometimes, you won’t see the .htaccess file if you go to the root folder of your WordPress website. This can happen because WordPress hasn’t generated the file yet.
Sometimes, WordPress doesn’t generate an .htaccess file until you make changes to your site’s default permalink structure. To do this, go to Settings → Permalinks. The default permalink structure for WordPress is set to Plain. But you might want to change that structure to another, more user-friendly option, like Post name or Month and name.

When you change the permalink structure from Plain, WordPress will generate a new .htaccess file. It will contain the instructions for the new structure that you choose.
After saving the changes to your site’s permalink structure, return to the WordPress root folder. There should be a brand new .htaccess file inside, ready for you to start editing it.
Default .htaccess code (single & multisite)
The default wp htaccess setup is what WordPress generates automatically when you change your permalink structure. If you want to restore the .htaccess file to its original contents (restore the default wp htaccess), you can either delete all custom code or replace it altogether.
In many cases, replacing the file is the easier option. That applies particularly if you run into an error and are unsure which part of the code is causing it.
Before moving forward, download a copy of your existing .htaccess file, just in case.
First, you’ll need to make a new copy of a default .htaccess file. To do so, create a new file called .htaccess on your computer (including the period).
Then, open the new file using a text editor and paste the following code within:
# BEGIN WordPressRewriteEngine OnRewriteRule .* - [E=HTTP_AUTHORIZATION:%{HTTP:Authorization}]RewriteBase /RewriteRule ^index\.php$ - [L]RewriteCond %{REQUEST_FILENAME} !-fRewriteCond %{REQUEST_FILENAME} !-dRewriteRule . /index.php [L]# END WordPress
That is the default code for the .htaccess file, and it should work with every website. The only exception is if you’re using a Multisite installation. In that case, the default .htaccess file should look like this, with a subdirectory setup:
# BEGIN WordPress Multisite# Using subfolder network type: https://wordpress.org/support/article/htaccess/#multisiteRewriteEngine OnRewriteRule .* - [E=HTTP_AUTHORIZATION:%{HTTP:Authorization}]RewriteBase /RewriteRule ^index\.php$ - [L]# add a trailing slash to /wp-adminRewriteRule ^([_0-9a-zA-Z-]+/)?wp-admin$ $1wp-admin/ [R=301,L]RewriteCond %{REQUEST_FILENAME} -f [OR]RewriteCond %{REQUEST_FILENAME} -dRewriteRule ^ - [L]RewriteRule ^([_0-9a-zA-Z-]+/)?(wp-(content|admin|includes).*) $2 [L]RewriteRule ^([_0-9a-zA-Z-]+/)?(.*\.php)$ $2 [L]RewriteRule . index.php [L]# END WordPress Multisite
Alternatively, if you’re using a subdomain setup for Multisite, the code will look like this:
# BEGIN WordPress Multisite# Using subdomain network type: https://wordpress.org/support/article/htaccess/#multisiteRewriteEngine OnRewriteRule .* - [E=HTTP_AUTHORIZATION:%{HTTP:Authorization}]RewriteBase /RewriteRule ^index\.php$ - [L]# add a trailing slash to /wp-adminRewriteRule ^wp-admin$ wp-admin/ [R=301,L]RewriteCond %{REQUEST_FILENAME} -f [OR]RewriteCond %{REQUEST_FILENAME} -dRewriteRule ^ - [L]RewriteRule ^(wp-(content|admin|includes).*) $1 [L]RewriteRule ^(.*\.php)$ $1 [L]RewriteRule . index.php [L]# END WordPress Multisite
In any case, save the new .htaccess file and upload it to the WordPress root directory. You can follow our earlier instructions on accessing the directory using FTP or cPanel. Once you’re inside, delete the existing .htaccess file and upload the new one, or simply upload and overwrite it.
Five examples of rules you can add to your .htaccess file
There are several ways to edit the .htaccess file and add new functionality to WordPress. Each code snippet is known as a “rule” because it tells the server what to do.
In this section, we’ll introduce you to several rules you can implement in the WordPress .htaccess file and explain what they do!
1. Redirect all traffic via HTTPS
Once you add a Secure Sockets Layer (SSL) certificate to WordPress, you’ll want to configure the website to load over HTTPS. There are several plugins you can use to implement this change, but you can also do so by adding a new rule to the .htaccess file:
RewriteEngine OnRewriteCond %{HTTPS} offRewriteRule ^(.*)$ https://%{HTTP_HOST}%{REQUEST_URI} [L,R=301]
This rule implements 301 redirects that will process every HTTP request over HTTPS. If you see security errors in the browser after implementing this rule, there might be an issue with your site’s SSL certificate.
2. Add a password to a directory
.htaccess enables you to password-protect specific parts of your website. The password prompt doesn’t appear as a login screen, but as a pop-up window directly through the browser. The server will block your access to the page if you don’t enter the correct password.
In this example, we’re using code to password-protect the WordPress admin dashboard:
<Files /wp-admin>AuthName "Prompt"AuthType BasicAuthUserFile /wp-adminRequire valid-user</Files>
You can change which page you want to add a password to by editing the part of the snippet that comes after the “/”. For example, you can add a password prompt to /wp-login.php to protect the login page further.
Note: Requiring a password to access the homepage will break Jetpack’s connection. So, if you’re using any of Jetpack’s tools, you won’t want to implement this rule.
3. Disable access to specific files
On top of disabling access to parts of your website, you can block every user from being able to access specific files. This rule can come in handy for core files, since you don’t want anyone else to be able to download or edit them.
For this rule, we’re using code that tells the server if a visitor tries to access a file that matches one of the names you specify, it should block that connection:
<FilesMatch "^.*(error_log|wp-config\.php|\.[hH][tT][aApP].*)$">Order deny,allowDeny from all</FilesMatch>
You can add more files to that list by separating them with a “|”. Keep in mind that there should be one final “|” symbol right before the slash in the first line within the rule.
4. Blocklist an IP address
One of the most useful functions in .htaccess is the ability to blocklist specific IP addresses. If you include an IP address using a blocklist rule, it won’t be able to access any of your site’s pages. Here’s what that rule looks like:
order allow,denydeny from 192.168.1.1allow from
That example uses the localhost IP, but you can replace it with any other address. To include multiple addresses, separate them using a comma.
Note that blocklisting an IP means the user with that address won’t be able to load any of your site’s pages at all. They won’t see 404 errors or be redirected to login pages. Instead, they’ll get “access denied” errors.
It’s also important to understand that blocking or allowing IP addresses in your .htaccess will not supersede any IP blocking or allowing that is done at the server level, or via a security plugin or service. That is why it is important to ensure that our IP addresses are allowed at the server level and in any security plugins you may use.
5. Add a redirect
You can use the .htaccess file to implement multiple types of redirects. Earlier, we showed you how to use redirects to force WordPress to load over HTTPS. But you can also implement more straightforward rules to redirect a single page to a second address.
Here’s how a basic 301 redirect looks in .htaccess:
Redirect 301 /page.html http://www.yoursite.com/page2.html
The file also supports more complex redirects, like redirecting an entire website to a new URL. Here’s what that rule would look like in action:
Options +FollowSymLinksRewriteEngine onRewriteRule (.*) http://www.newsite.com/$1 [R=301,L]
This rule can be useful if you want to stop working on a website and redirect all of its traffic to a different property.
Keep in mind that 301 redirects are “permanent.” That means that search engines interpret them as “This page has moved permanently to a new address” and pass along some of its link equity.
Troubleshooting common .htaccess errors
One of the most common reasons you’ll interact with your .htaccess file is to fix an error, most notably the “500 Internal Server Error.” This error is often caused by a syntax mistake in the file.
How to fix a 500 internal server error:
- Access your server via FTP or File Manager.
- Rename your current
.htaccessfile to.htaccess_broken. This will deactivate it. - Check if your site loads. If it does, the problem was in your
.htaccessfile. - Create a new, blank file named
.htaccess. - Paste the default WordPress .htaccess code (provided in the section below) into the new file and save it.
- Go to your WordPress admin dashboard, navigate to Settings > Permalinks, and simply click Save Changes without making any changes. This will regenerate the file with the correct structure for your site.
.htaccess on Nginx vs. Apache
It is a common source of confusion, so let’s be clear: Nginx servers do not use .htaccess files.
The .htaccess file is specific to the Apache web server. Nginx uses a different configuration file, typically nginx.conf, which is usually not editable by users on shared or managed hosting plans.
What does this mean for you?
If your host uses Nginx, the methods and rules described in this guide will not work.
To implement redirects, security headers, or other server-level changes, you will need to either:
- Use a WordPress Plugin: This is the most common solution. Plugins like Redirection for redirects or a security plugin for IP blocking will work by using WordPress’s functions rather than modifying a server file.
- Contact Your Host: For server-level configuration changes, you will need to ask your hosting provider’s support team for assistance.
Frequently asked questions about the .htaccess file
If you still have questions about the WordPress .htaccess file, this section will answer them. Let’s start by talking about what you can do with this file!
Where can I find the WordPress .htaccess file?
You can find the WordPress .htaccess file in your website’s root directory. This is the main folder that holds your WordPress installation.
To access it, you will need to log into your hosting account’s control panel and use the File Manager tool, or connect to your server using an FTP (File Transfer Protocol) client. The root directory is usually named public_html, www, or after your domain name. The file itself is named .htaccess with a dot at the beginning, which is important.
What can you do with your .htaccess file on WordPress?
The .htaccess file on WordPress is highly versatile. You can use it to implement redirects, update your site’s permalink structure, whitelist IP addresses, password-protect directories, force your site to load over HTTPS, and more.
These changes require you to either use plugins or add code to the .htaccess file. You can do this even if you’re unfamiliar with coding since the snippets can be found online, including in this article!
What if you can’t find your WordPress .htaccess file?
You may not be able to find the .htaccess file in the WordPress root directory if it hasn’t been created yet. In some cases, WordPress doesn’t generate the file unless you change your website’s permalink structure from Plain to another option. Earlier in this article, we explain how to do this.
Do .htaccess changes take effect immediately?
Any changes that you make to .htaccess should take place immediately. You don’t need to restart the server for changes to take effect.
If you edit the file and you don’t see the changes reflected immediately, there might be an issue with your web host. In some cases, hosting providers might not provide the necessary permissions for your .htaccess file to override the server’s configuration. This is particularly common in shared hosting plans.
Should I use a plugin to edit .htaccess?
Many plugins can edit .htaccess, but some of these tools don’t give you access to the file itself. For example, if you use a redirect plugin, it likely implements redirects via .htaccess, but it doesn’t show you the changes in the file.
Some tools enable you to edit .htaccess from the dashboard. But these plugins often offer limited editor functionality, making it harder to implement changes. Whenever possible, we recommend using FTP so you can use your favorite text editor to interact with .htaccess.
Can your WordPress site’s .htaccess file be hacked?
If attackers can gain access to your server, they can also access the .htaccess file and use it to break parts of your site, implement malicious redirects, and even lock you out of the website altogether.
Backing up your website regularly is vital to protect user data and avoid downtime from attacks. With Jetpack Security, you can access real-time automatic backups and malware protection.
Jetpack also adds a firewall to your website. This feature helps further prevent other attacks, like DDoS events or attempts to brute force the WordPress login page.
How do I edit the .htaccess file in Nginx?
.htaccess files are unique to Apache servers. They’re still very common because Apache is one of the most popular server software options on the market. But it’s not the only one.
Many popular WordPress web hosts use Nginx since it offers several advantages over Apache. But Nginx servers don’t have .htaccess files. That means you may be unable to implement several of the customizations discussed in this article, or the process might be entirely different.
What is an example of a default WordPress .htaccess file?
The default .htaccess file should look the same on most WordPress websites. Here’s the code the file should contain if you’ve made no changes to it:
# BEGIN WordPressRewriteEngine OnRewriteRule .* - [E=HTTP_AUTHORIZATION:%{HTTP:Authorization}]RewriteBase /RewriteRule ^index\.php$ - [L]RewriteCond %{REQUEST_FILENAME} !-fRewriteCond %{REQUEST_FILENAME} !-dRewriteRule . /index.php [L]# END WordPress
You can use this code to restore the .htaccess file to its original settings in case of any errors while customizing it. We include instructions on how to replace the file in one of the previous sections of this article.
How do I add a 301 redirect in .htaccess?
To add a permanent 301 redirect, you need to add a line of code to your .htaccess file. This tells web browsers and search engines that a page has moved to a new location. Use the following format, adding it above the # BEGIN WordPress line.
Redirect 301 /old-page-url/ https://yourwebsite.com/new-page-url/
Replace /old-page-url/ with the path of the old page you want to redirect. Replace https://yourwebsite.com/new-page-url/ with the full URL of the new page. This method is efficient for creating redirects without needing a plugin.
Can I improve website security with .htaccess?
Yes, you can improve your website’s security by adding rules to your .htaccess file. For example, you can completely block access to your most important configuration file, wp-config.php, with a small piece of code.
You can also disable directory browsing, which stops visitors from seeing a list of all the files in your folders. Other security rules can include blocking specific IP addresses known for spam or hacking attempts. Adding these rules creates an important layer of defense for your site.
What happens if I delete my .htaccess file?
If you delete your .htaccess file, it can cause parts of your website to break. The most common issue is that your permalinks, or URL structures, will stop working. This means clicking a link to any page besides your homepage will result in a “404 Page Not Found” error.
Deleting the file will also remove any custom security or redirect rules you have added. The good news is that WordPress can easily recreate a basic version of the file. You just need to go to your WordPress dashboard, navigate to Settings, then Permalinks, and click “Save Changes.”
How do I back up my .htaccess file before editing?
Backing up your .htaccess file is simple and very important. The easiest way is to connect to your site with an FTP client or use your host’s File Manager. Find the .htaccess file. Right-click on it and choose the “Download” option. This saves a copy of the file to your computer.
Locating and changing the default WordPress .htaccess file
Knowing how to access and edit the default WordPress .htaccess file can help you change key functionality on your website and keep it safe. You can use this file for anything from implementing redirects to password-protecting directories if you know how to edit it.
Since you’re dealing with a WordPress core file, we always recommend creating a backup ahead of time. Once you start working on the file, you can use the code snippets from this article to implement new features.
Editing your .htaccess file is just one way to secure your WordPress website. Jetpack Scan constantly monitors your site for threats, notifies you about any problems, and helps you resolve any issues. Check out Jetpack Scan today!
