
Cloning a WordPress site creates an exact, independent copy of everything (your theme, plugins, content, and database) on a different server or environment. Whether you’re migrating to a new host, setting up a staging environment, or handing off a project to a client, knowing how to clone reliably is one of the most practically valuable WordPress skills you can have.
This guide covers two methods: using a plugin (fastest for most users) and doing it manually via FTP and phpMyAdmin (most control). Skip to whichever method fits your situation.
Why you might want to clone your WordPress site
When you clone a website, you’re making an exact copy of it. The only difference is that if you have a live site, the clone may be offline, or hosted locally, (depending on how you create it).
Here are some situations where it can be useful to clone a WordPress website:
- Creating a staging site. If you run a live site, and you need to update or modify it, you don’t want to implement these changes without testing them first. Otherwise, you might accidentally break your site. You can use a staging site to test changes, but if you want to be sure they’ll work on your live site, it’s best to experiment using an exact copy.
- Moving to a new host. Every web hosting provider is different, which means they offer varying levels of performance, security, and ecommerce features. If you’ve outgrown your hosting plan and want to upgrade to a new one, you’ll need a clone of your site to complete the migration process and ensure that it works well in the new environment.
- Using it as a template for a similar project/site. If you’re a web developer or designer, you may find yourself working on lots of similar projects. Creating clones means you don’t have to start from scratch, especially when designing a website that requires the same features as one you built in the past.
- Taking a dev site live. A development website is similar to a staging site, but is set up primarily for developing a new project before releasing any iterations to the public. After you create a dev site, you can then create a staging site for further quality assurance testing, or simply clone it and make it live.
These are just a few common scenarios where you may need to know how to clone a WordPress site. Of course, there are plenty of other reasons, like transferring your website to a new owner.
Three requirements to clone a WordPress site
No matter why you want to clone your WordPress site, you’ll need to do a little prep work first. It’s important to make sure you have everything you’ll need before getting started. Here are three basic prerequisites to consider.
1. A backup and migration plugin
To clone a WordPress website, you’ll need a complete backup. This includes every single aspect of the original site, including its files, databases, and settings.
If you run an ecommerce site, you’ll also need to clone customer data and orders. This way, your business can continue to operate without any interruptions.
That means the first prerequisite to clone your WordPress site is a backup and migration plugin like Jetpack VaultPress Backup.
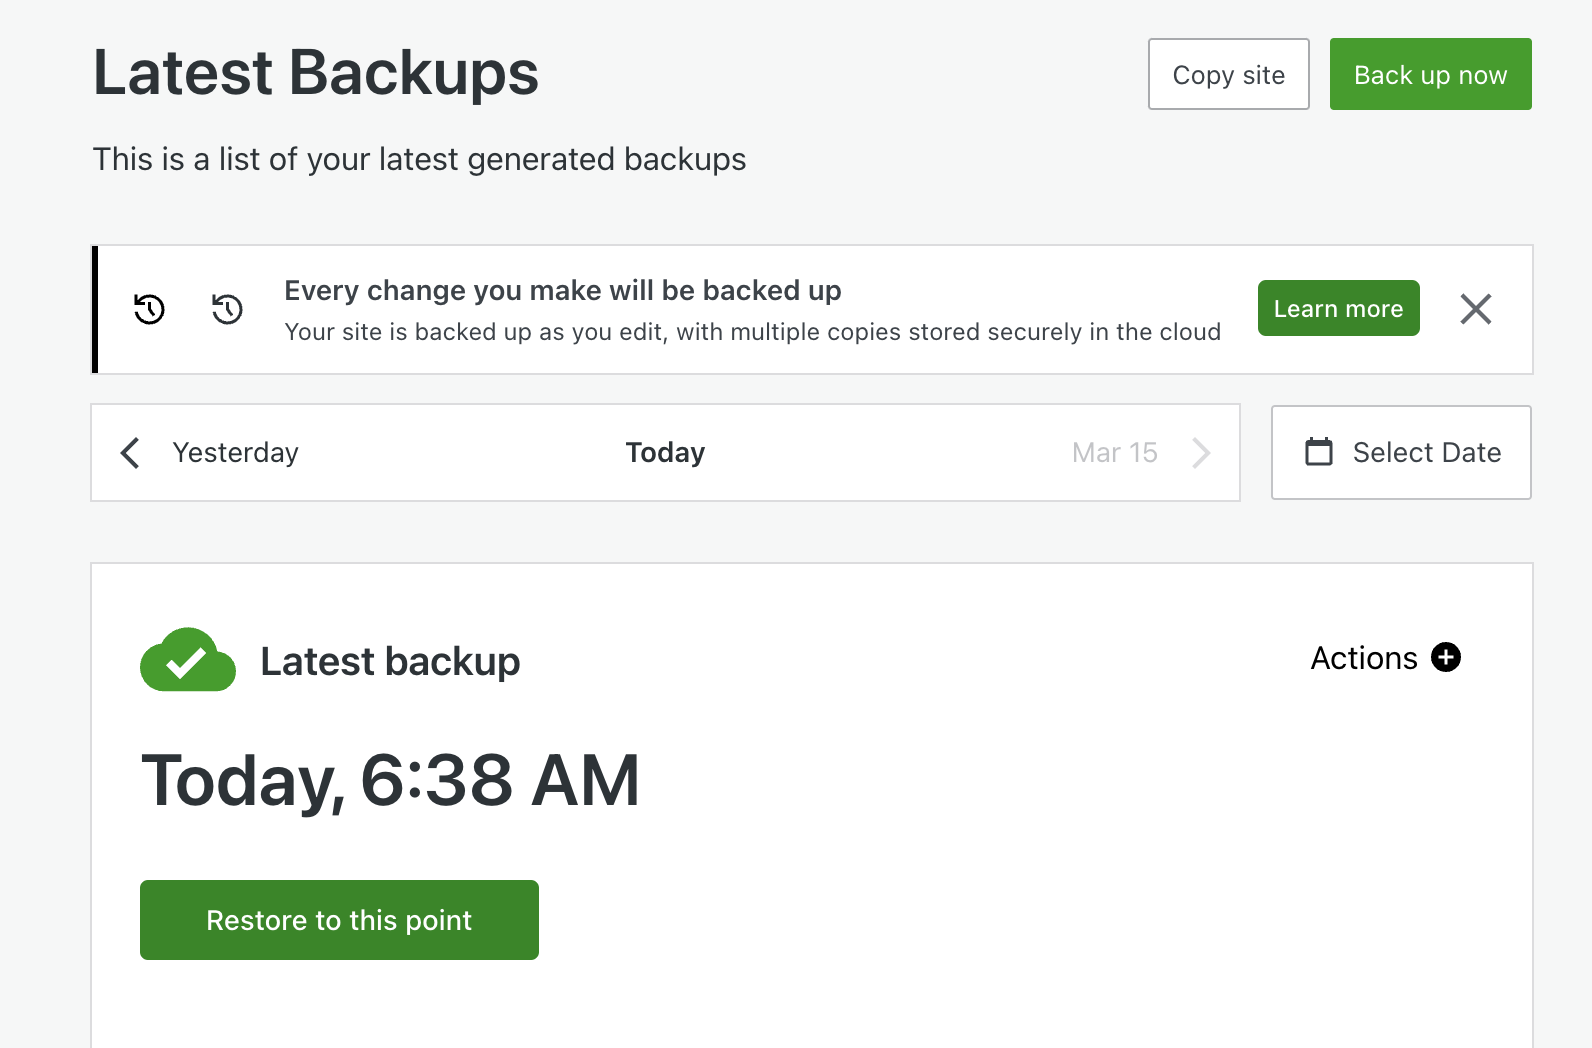
Once you install the plugin, it will start creating real-time backups of your entire WordPress site, including ecommerce data. Every change you make will be instantly saved, so you won’t have to worry about losing any of your hard work.
Backups made with VaultPress Backup are highly secure, as they are automatically saved in a remote cloud location. Plus, you’ll get easy backup restores, so you can use this plugin in case of an emergency.
VaultPress Backup was built by Automattic, the people behind WordPress.com. So you can rest assured that it will be reliable and WordPress-friendly.
It’s important to note that using a backup plugin is optional. But manually backing up a website is a technical process prone to errors, and the backup solutions that come bundled with web hosting plans are often lacking.
VaultPress Backup makes the process of cloning a WordPress site faster and simpler. Plus, you can use this plugin in multiple cloning scenarios, like migrating your WordPress site to a new host and moving your live site to a staging site.
2. Access to the site you want to clone
If you want to clone a WordPress website, you’ll need to have access to the back end. This means you’ll need the login credentials for the admin account.
Without these details, you won’t be able to install a backup plugin or create a manual backup. Therefore, if you’re not the administrator of the website, you’ll need to request the necessary permissions and credentials from the owner.
3. Access to the destination server or environment
Naturally, you’ll also need access to the destination server or environment where you’ll set up the cloned website. This could be a staging area on your hosting account, or an entirely new WordPress installation.
Note that it must be set up with a temporary or a staging URL. You’ll update the domain later in this process (if necessary).
How to clone a WordPress site with a plugin
The simplest way to clone a WordPress site is to use Jetpack VaultPress Backup. The plugin’s intuitive migration features enable you to clone a site in just a few minutes, without configuring any complex settings or fiddling with databases and files.

To do this, you’ll need to purchase Jetpack VaultPress Backup. Then, install and activate it on the WordPress site you’d like to clone.
Go to Jetpack → VaultPress Backup in the left-hand menu of your original site, followed by See your backups in the cloud.
Then, click on the button that says Copy this site.
Select Enter credentials for a new destination site. At this point, you’ll need to input your destination site URL and your new server credentials.

Next, enter the destination WordPress path, which is where your site’s files are stored. This should be something like /public_html. After that, click on Confirm credentials, followed by Continue.
Now, if you want to use the most recent backup of your site, select Clone from latest point. Otherwise, you can go into your Activity Log to find your preferred backup, and then select Clone from here.
You’ll then be able to configure your website clone. If you’re simply moving your site to a new web host, you’ll want to keep all the boxes checked.
When you’re finished, click on Confirm configuration followed by Yes, Continue (this is confirming you want to overwrite all the content on the new site). That’s it!
For detailed instructions on testing out your cloned site (or preparing for this process), check out our complete guide on cloning sites with Jetpack VaultPress Backup.
How to clone a WordPress site manually (in seven steps)
Cloning a WordPress site using a backup plugin is straightforward. If you prefer to complete the process manually, keep in mind that it will require some delicate website file and database management. So you’ll want to follow this tutorial and only choose this route if you’re comfortable with those requirements.
Step 1: Connect your site to a file transfer protocol (FTP) client
To clone your website without a plugin, you’ll need to create a manual backup of your website. While there are a number of tools available for this purpose, using a file transfer protocol client is typically the easiest way to do this.
You might already be familiar with managing files via FTP. If not, you can refer to the second step in the previous tutorial, which shows you how to connect to your site via this method.
As a quick recap, you’ll need to download an FTP client like FileZilla or Cyberduck. Then connect your site to the tool using your FTP credentials (which you can get from your web host).
Step 2: Download your root directory folder
Once your site is connected, you’ll need to locate and download your root directory folder. This contains essential information about your site, and is labeled something like public_html.

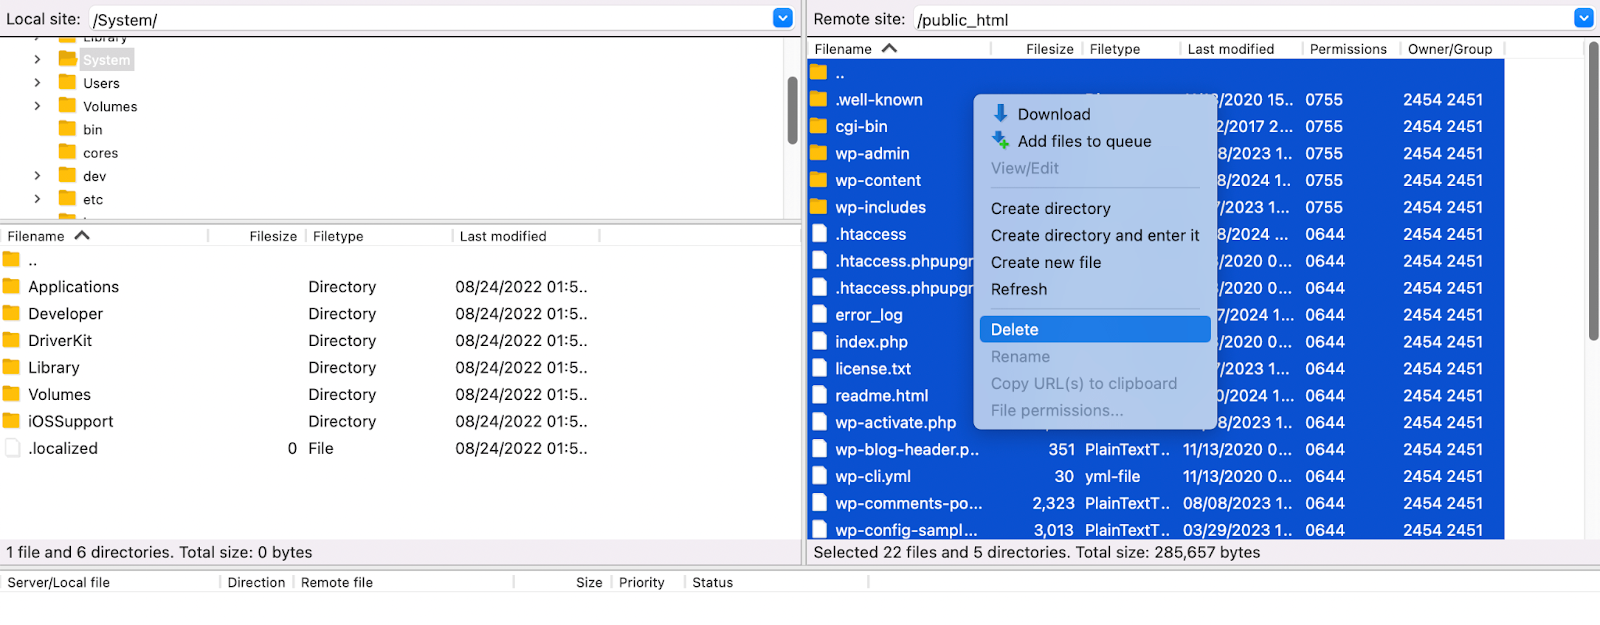
After you find the folder, access and select all of its contents.
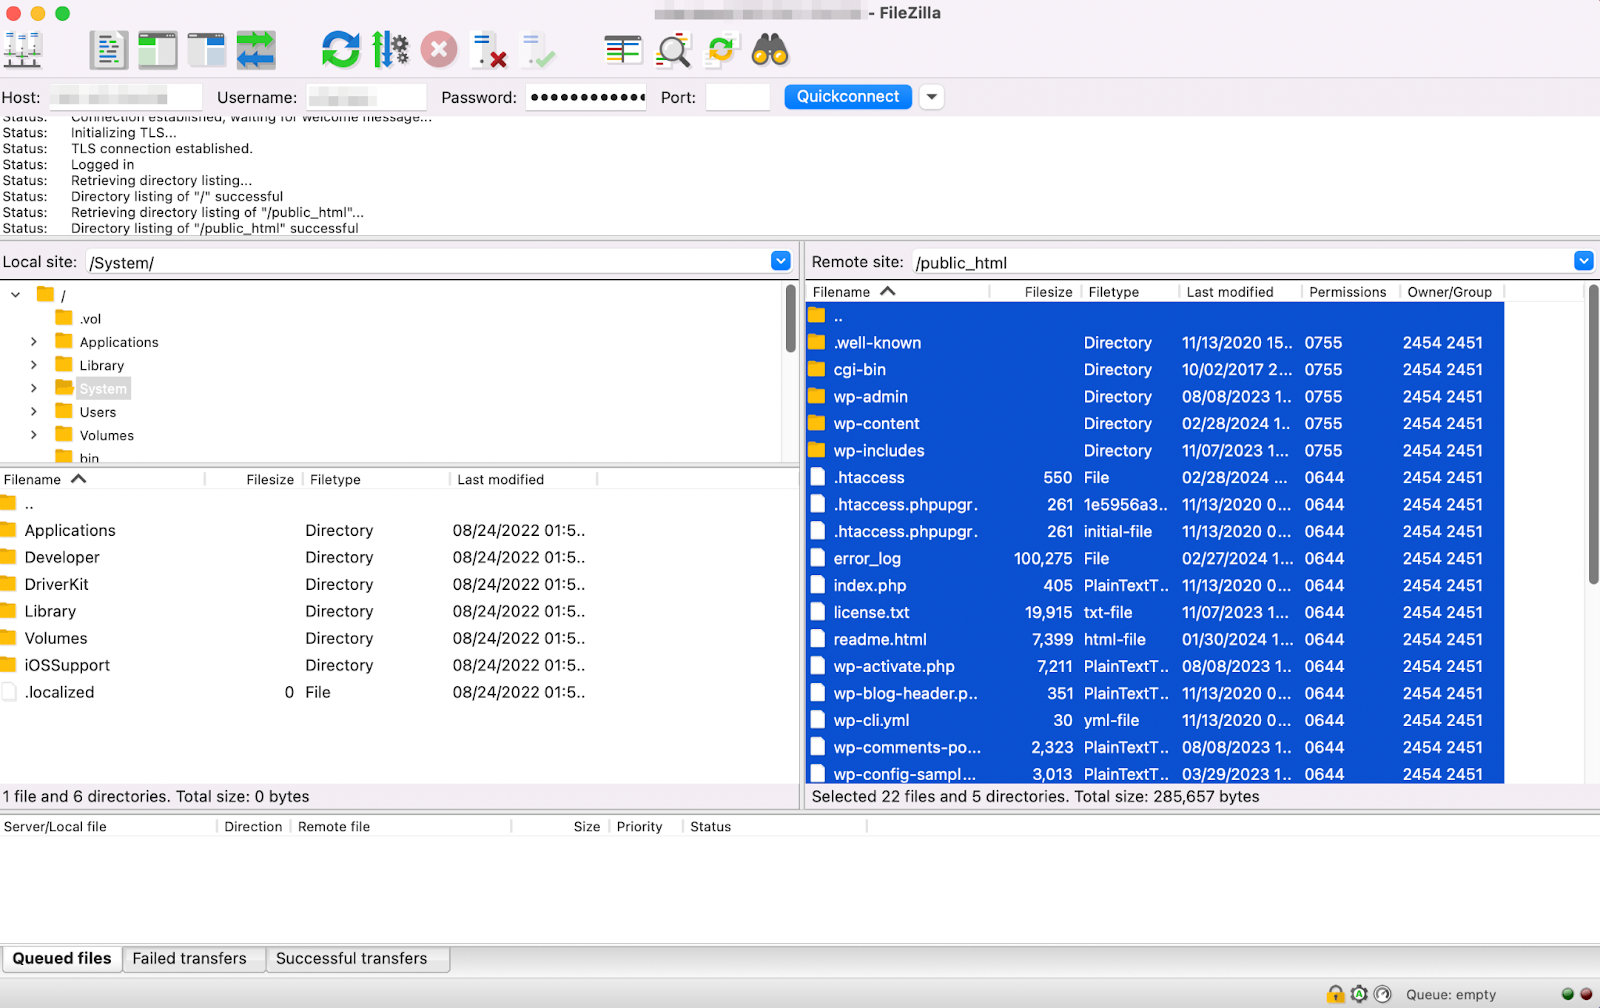
Right-click on the selected files and click on Download.
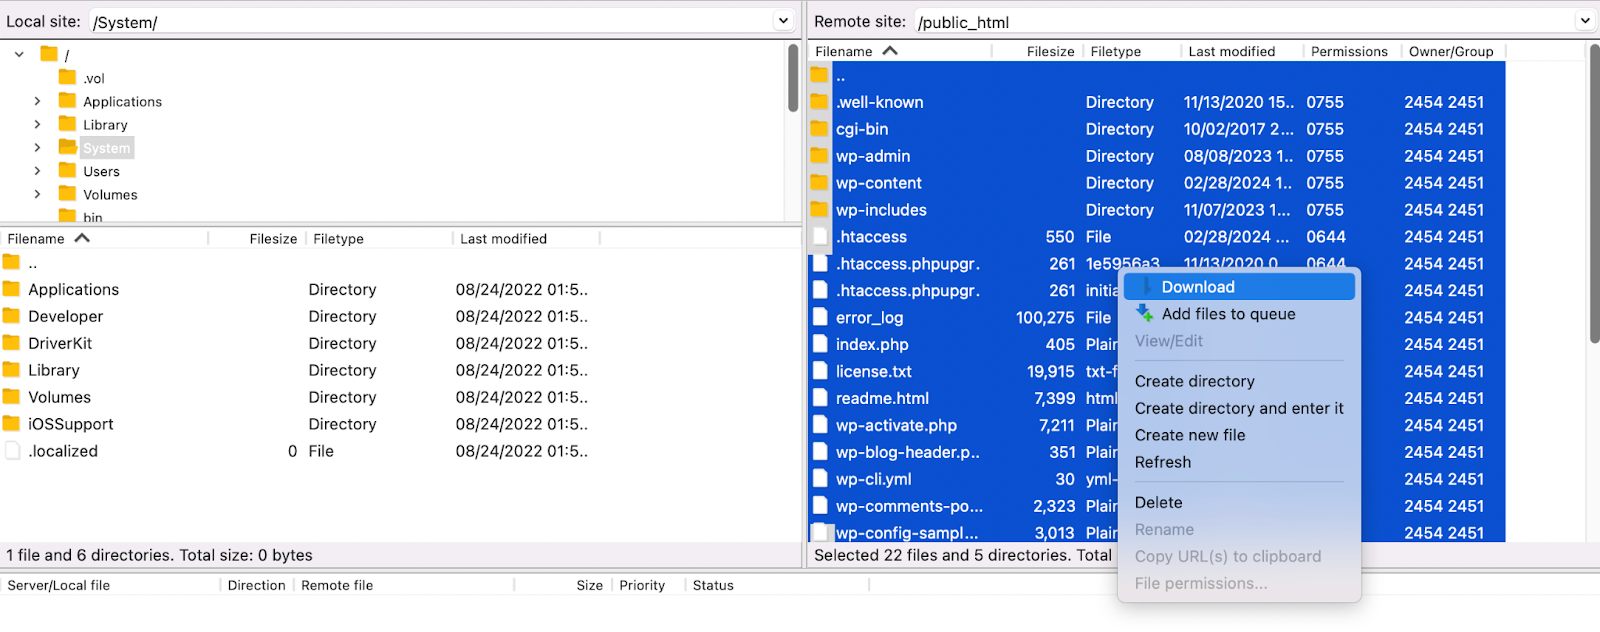
Depending on how big your site is, the download could take a while. Once the process is complete, you can save the download to your local device, or in a remote storage location.
Step 3: Upload your root directory to the new server
Once you have a manual copy of your root directory, you’ll need to connect to your new server (if you’re moving hosts) using the same method — file transfer protocol.
Then simply locate the new site’s root directory. Once again, you’ll need to highlight any files inside of it. But instead of downloading them, you’ll need to delete them.
After that, you can replace those files with the ones you downloaded in the previous step. Just drag and drop them into the empty right-hand panel.
Step 4: Export your site’s database
Your root folder doesn’t contain your WordPress database. So you’ll now need to clone that element of your website.
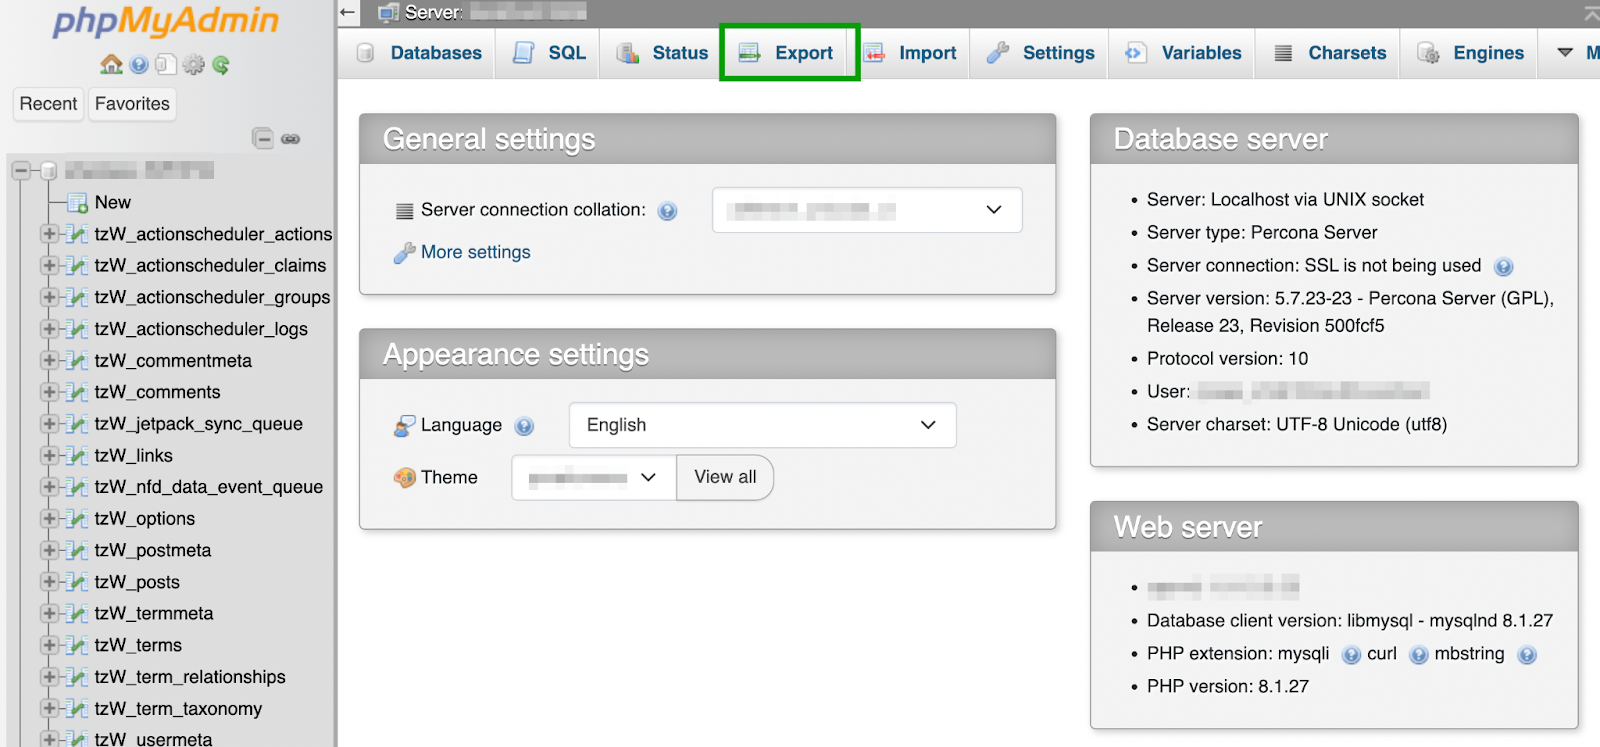
You’ll start by exporting your old site’s database. To do this, browse to your main PHPMyAdmin screen.
To access phpMyAdmin, log in to your web hosting control panel (usually cPanel, Plesk, or your host’s custom dashboard). In cPanel, look for the ‘Databases’ section and click ‘phpMyAdmin’. You’ll be taken to a web-based database management interface. Select your site’s database from the left-hand panel — it’s usually named something like yourusername_wp123.
Once you’re on the main PHPMyAdmin screen, select the Export tab.
Next, you’ll need to choose your export method. If you want to ensure that absolutely everything in your database is included in the clone, select Custom – display all possible options.
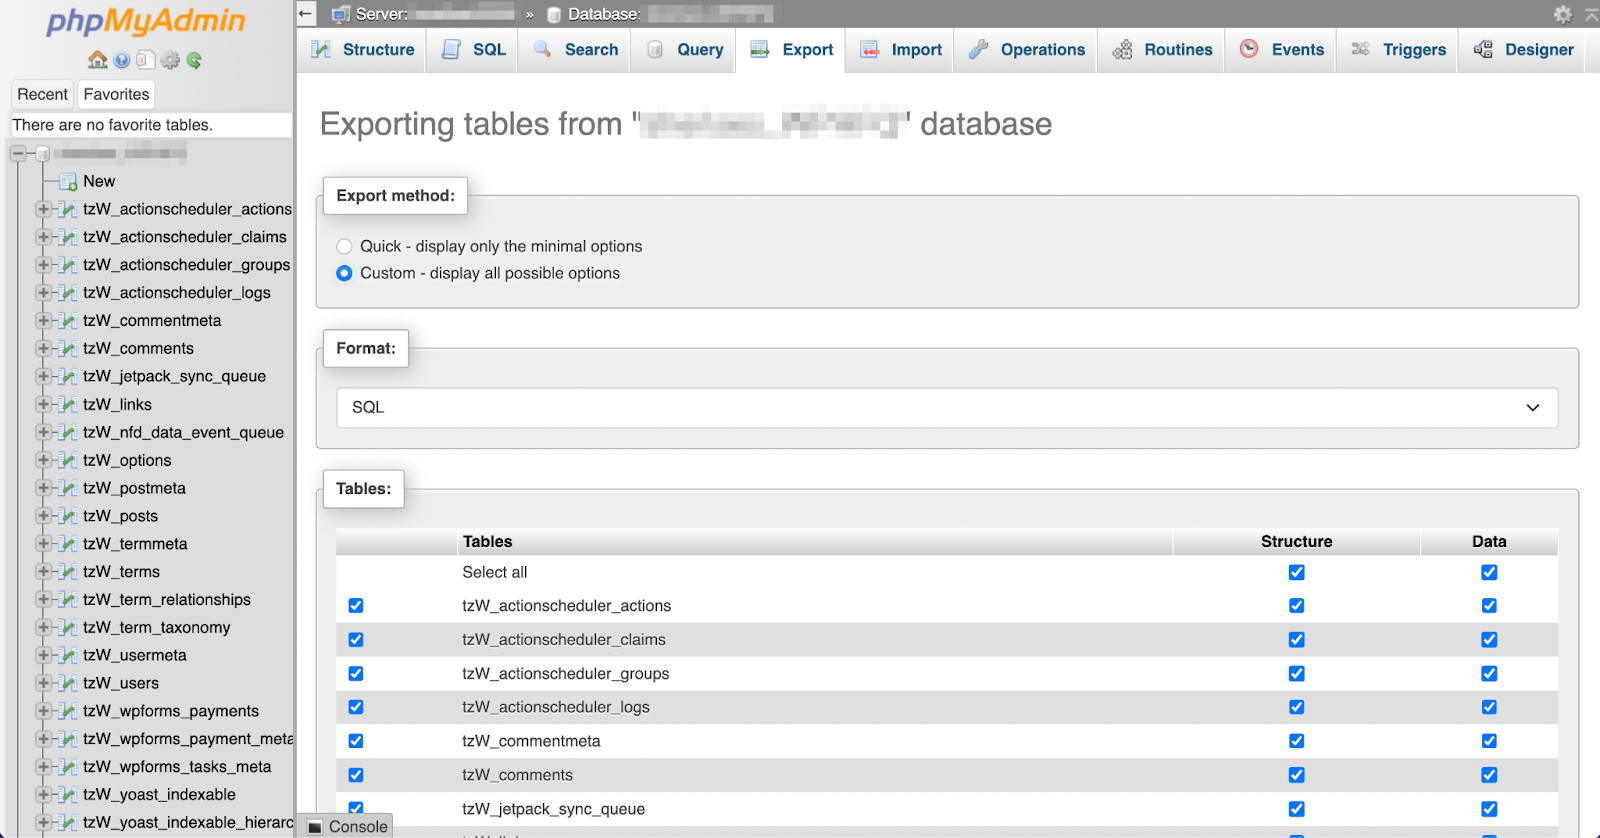
While you’re at it, you may want to take this opportunity to clean and optimize your WordPress database.
Alternatively, you can choose Quick – display only the minimal options.

After that, select a format for your database export. With WordPress, the appropriate option is SQL. When you’re ready, simply hit Export, then save the file on your computer.
Step 5: Set up your cloned database
Now you’re ready to set up your database for the cloned site.
To do this, navigate to the hosting account of your new site and look for your database settings.
This will vary based on your host. If you’re using Bluehost, for example, go to Advanced and scroll down to the Databases section.

Click on Manage to open your control panel settings. In many cases, it will be cPanel.
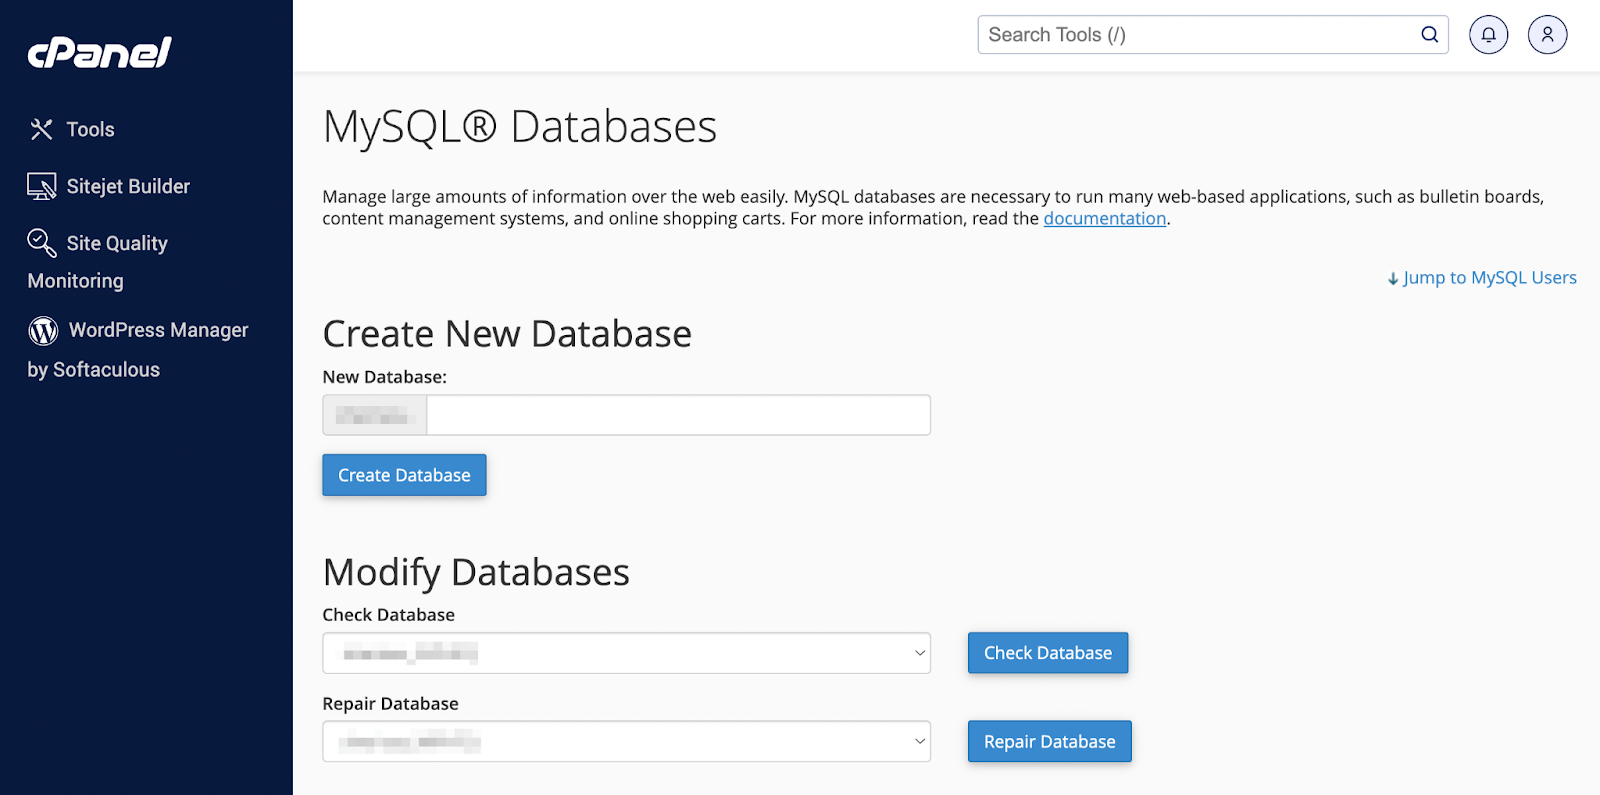
Here, you’ll need to create a new database. Simply enter a name and hit Create Database.

Then scroll down to the MySQL Users section.

Choose a new username and a strong password, and click on Create User. Next, scroll down to the Add User to Database section.
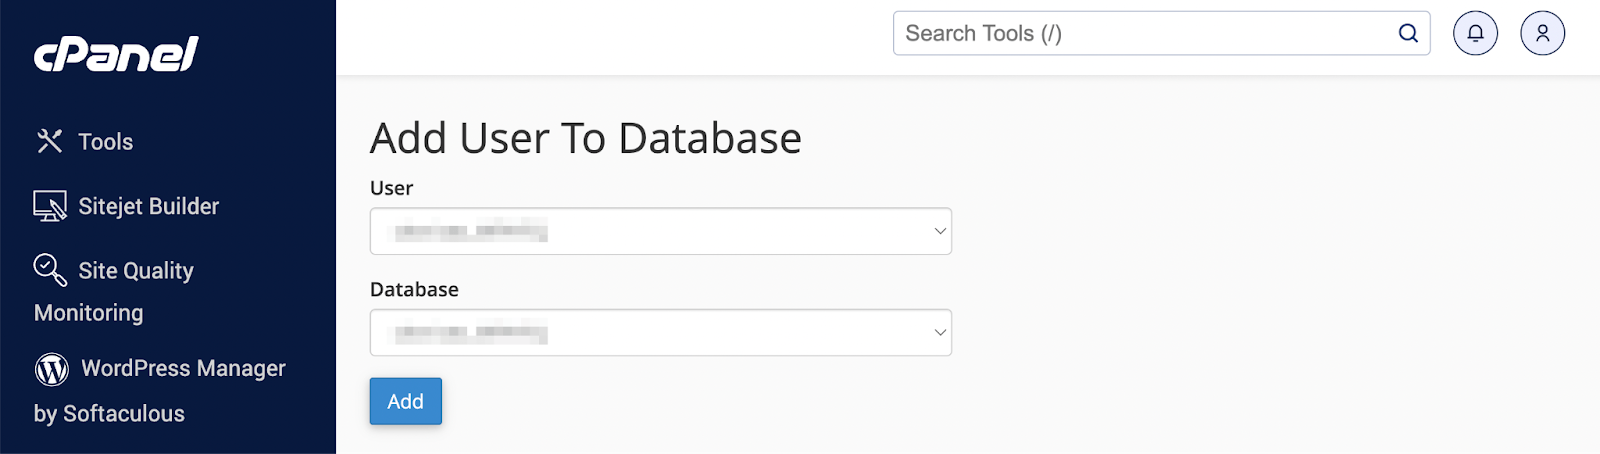
From the drop-down menus, select the database and the user you just created, and hit Add. On the next page, you’ll need to assign all privileges to this new user and save your changes.
Make sure to hold on to all the new usernames, database names, and passwords you create in this step, as you’ll need them again later.
Step 6: Import your database
Next, you’ll need to import your old database into the new database for your cloned website.
Navigate to your PHPMyAdmin dashboard for your new/cloned site. Then go to Import at the top of the screen.

On this page, simply select the database file that you saved to your device in Step 4. Scroll down to configure your database import.

In the vast majority of cases, you’ll leave all settings as is, but make sure to select SQL as your format, and then hit the Import button.
If you’re not moving a domain to a new server, you can stop here. Otherwise, read on for the final step.
Step 7: Update the wp-config.php file (optional)
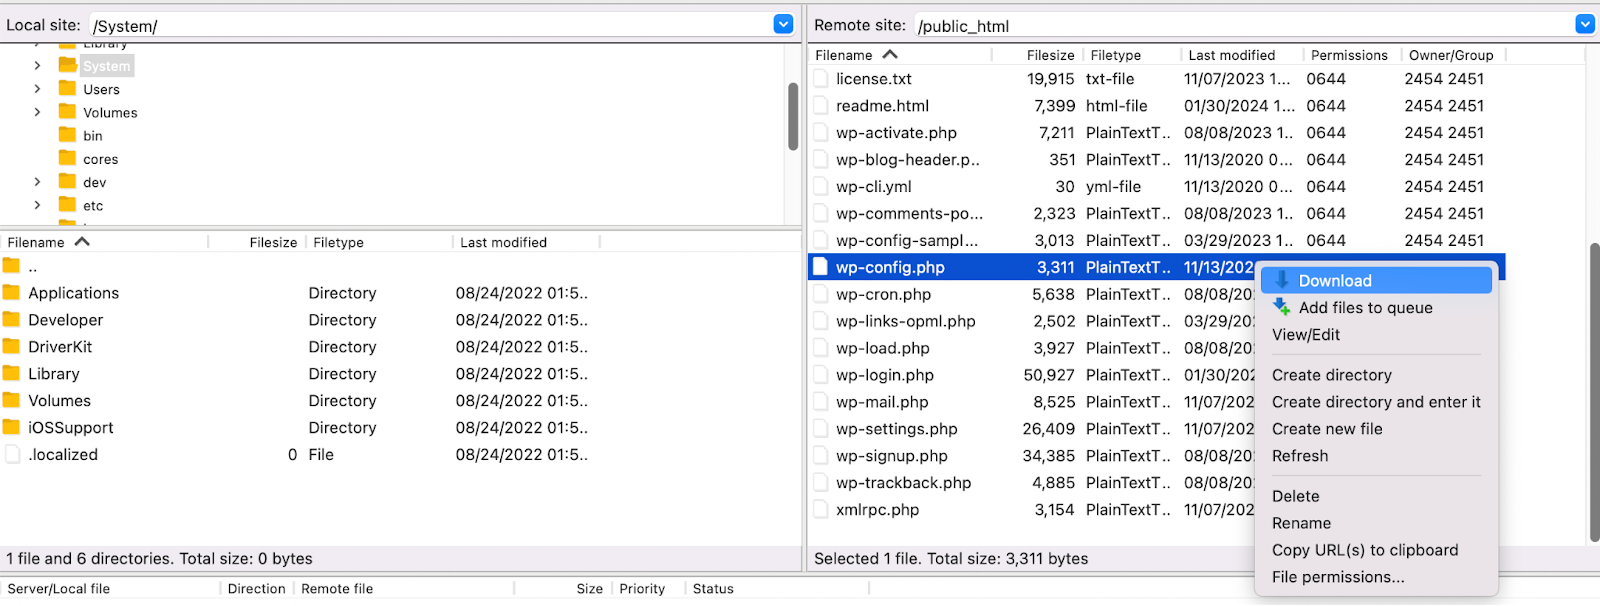
If you’re moving your domain to a new server, the last step is to update your wp-config.php file with the correct database details. To do this, you’ll need to access your cloned site’s files using your FTP client.
The wp-config.php file is located within the root directory, so you can go to public_html (or similar) to find it.
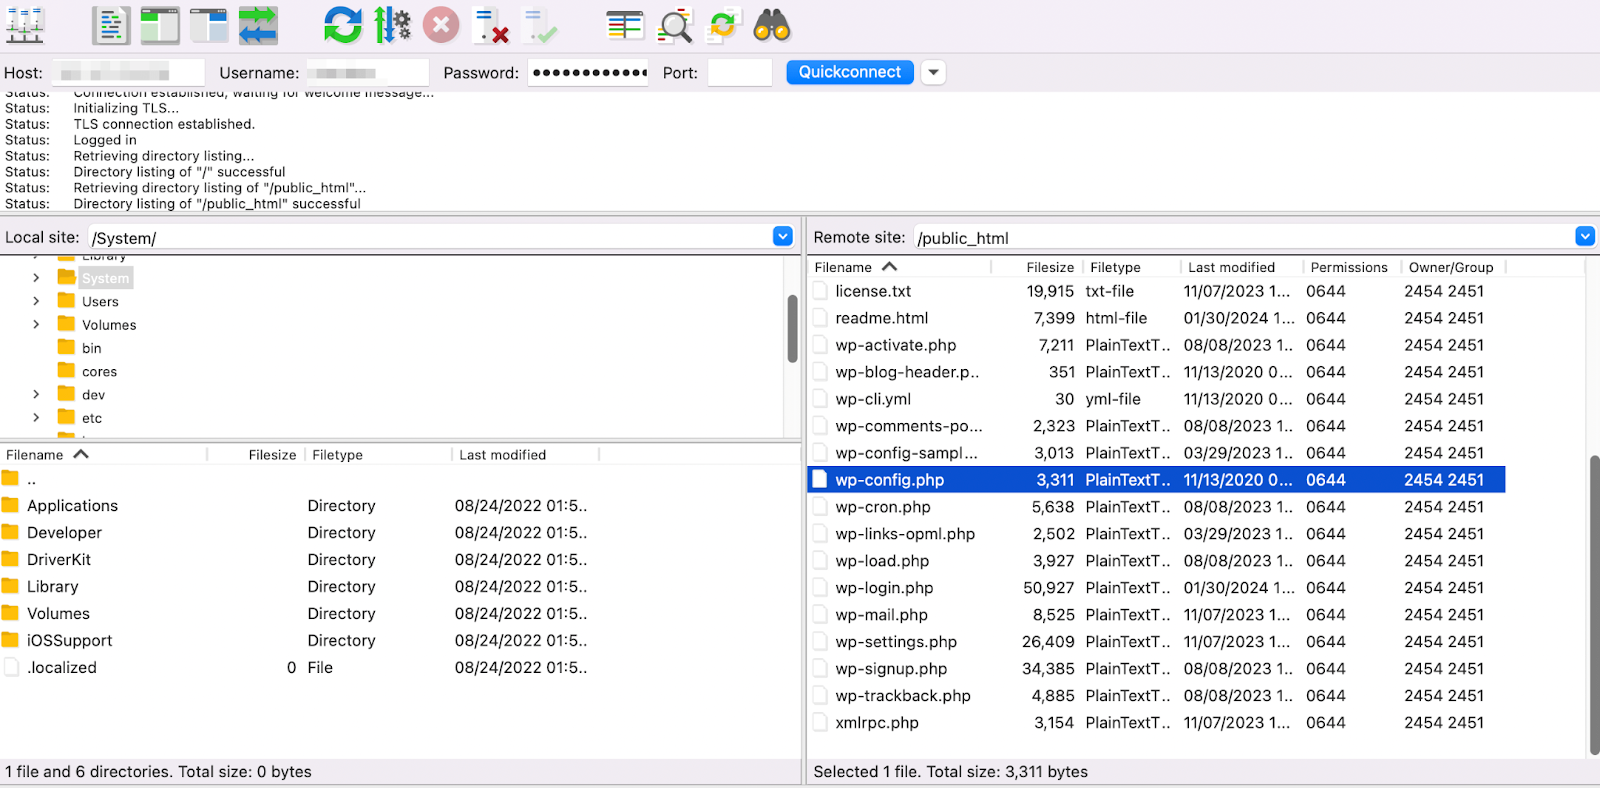
Select the file, right click on it, and choose Download.
Once you’ve downloaded the file, open it in your preferred text editor. Then scroll down until you find the code snippet that looks like this:
define('DB_NAME', 'database name');define('DB_USER', 'username for the database');define('DB_PASSWORD', 'password for the database');define('DB_HOST', 'MySQL hostname');
Update all of this information with the new credentials you created in Step 5.
If you’re also updating your domain name, find the line that says “That’s all, stop editing! Happy publishing”, and add the following code above it:
define('WP_HOME', 'http://yournewsitedomain.com');define('WP_SITEURL', 'http://yournewsitedomain.com');
It’s possible that these lines already exist. Either way, just swap in your new domain name here. Then save the file on your device, and re-upload it to your root directory to replace the old wp-config.php file.
That’s it! You now know how to clone a WordPress website both manually and using a plugin.
This tutorial will show you how to clone your site using a backup plugin. If you’d rather do this manually, you can skip to the second tutorial instead.
Which WordPress cloning method is best for you?
This article has covered two different ways to clone a WordPress website. As you’ve seen, some are more complex than others, and they all require a different amount of time and expertise.
So, if you’re a beginner, you might be wondering why anyone would choose the more tedious option.
To put it simply, cloning a WordPress site manually is probably only a viable option if you’re a developer or technically skilled. It can be useful because it allows a higher level of customization, like starting with a fresh database.
Overall, choosing an affordable, premium tool like VaultPress Backup is the best option for most users and situations. For example, if you’re migrating your business website to an entirely new host, you can rest assured that the process goes smoothly.
If you’re also searching for a WordPress tool with backup and security features, it makes the most sense to look into Jetpack Security. This plan provided through the Jetpack plugin includes VaultPress Backup, which always stores a copy of the most up-to-date version of your site in a secure, off-site location in case you ever need it. But it also has tools like malware scanning, anti-spam protection, a web application firewall, downtime monitoring, and more.
If you just want VaultPress Backup, the dedicated plugin is a great option.
Frequently asked questions
This post has covered all the steps to clone a WordPress site. Let’s discuss any lingering questions you might have.
What is the easiest way to clone a WordPress site?
The easiest way to clone a WordPress website is by using a backup plugin that enables you to copy every element of the original site. This should include the database, all files and settings, as well as ecommerce data (if you have any).
VaultPress Backup is the ideal solution, as it creates real-time, comprehensive cloud backups of your site. It also offers one-click restores.
Can I clone my WordPress site without using a plugin?
Yes, but manual cloning is much more time-consuming and tedious. Also, it requires you to be tech-savvy, as you’ll need to be comfortable with website database and file management.
Can I clone my site to a different hosting provider?
Yes, you can clone your WordPress site to a different hosting provider. The process will be simplest when you use a backup/migration plugin.
Are there any risks involved in cloning a WordPress site?
If you try to clone your website using an incomplete backup or faulty plugin, it could lead to functionality and vulnerability issues. That’s why using a proven solution like VaultPress Backup is recommended.
How long does it take to clone a WordPress site?
If you’re using a backup plugin, you can clone a WordPress website in a few simple steps. Depending on your skill level and the complexity of your website, it can take anywhere from a few minutes to a couple of hours.
If you’re manually cloning your website, it could take much longer than that. This is especially true if you’re navigating processes like managing website files for the first time.
Can I clone my site to a local development environment?
You can clone your website to a local development environment as long as you have access to the back end of both sites.
Can I clone a site from a staging environment to a live server?
Yes, you can clone a site from a staging environment to a live server (and vice versa). You’ll just need to create a complete copy of your website and migrate it to the new server. Then you’ll have to configure the new site and test it to see if it’s working properly. After that, don’t forget to update your DNS and domain settings.
Can I clone an ecommerce site with customer data and transactions?
When you clone any website, you’ll want to create a complete copy of the original site. If you have an online store, that includes customer data and transactions. Jetpack VaultPress Backup enables you to easily back up all ecommerce data.
VaultPress Backup: The easy solution for cloning WordPress sites
Whether you need to clone a WordPress website to switch hosting providers or save time on web projects, you’ll want the process to be as streamlined as possible. That’s why the best option is to use a backup plugin.
Once you’ve created a complete backup, you can migrate it to a new server. Then, all that’s left to do is configure the settings for your cloned site and test it to make sure everything is working properly. If you’re moving the site’s domain to a new server, you’ll also need to update the DNS and domain settings.
Jetpack VaultPress Backup is the ideal solution for cloning websites, as it enables you to create a complete copy of your website. You’ll even be able to clone ecommerce data, and all of your backup copies will be kept in secure cloud storage. Check out Jetpack VaultPress Backup today!
The best real‑time WordPress backup plugin
Save every change and get back online quickly with one‑click restores from VaultPress Backup.
Get VaultPress Backup