
Utilizing a localhost for your WordPress site enables you to run updates, test plugins, or build your site in private. This means you can make changes without affecting the user experience (UX) or worrying about mistakes that could disrupt operations.
Sounds pretty great, right? Even better is that most moderately-experienced developers will find it straightforward to get started.
On this page, we’ll take a closer look at WordPress localhost and its benefits. Then, we’ll show you how to configure WordPress on localhost and run through some common errors.
By following this step-by-step guide, you should be able to download the localhost software, add WordPress files, and create a database without any issues.
What is localhost, and why is it useful for WordPress?
When you create a WordPress site, you typically purchase a domain name and choose a web hosting provider. Your site resides on your web host’s server and is accessible to anybody with the correct URL.
With localhost, you can run a website from your own operating system like a PC. This means it will have a different hardware configuration than a live website. Plus, your site won’t be available online.
You’ll create a private and remote environment, using your PC storage as the host. Then, you’ll download third-party software like XAMPP to install WordPress.

There are many reasons why you might want to use localhost. First, it enables you to create a development site that you can use for testing and experimentation.
In this instance, WordPress will function as a staging site. This is a popular option for designers and developers since you can detect issues before you launch your live application. Better yet, localhost enables you to work on your website even if you don’t have an internet connection.
Additionally, a local website provides a safe environment for trying new things. This can prevent downtime on your live website in the event that a change introduced breaks something.
Localhost can also be a safer way to test new software or run updates. You won’t need to worry about breaking your site. If something goes wrong, your live site will remain completely unaffected.
Can you install WordPress locally on any operating system?
There are many platforms that enable you to install WordPress locally, such as WordPress Studio and XAMPP.
XAMPP is open-source and free, and it supports all operating systems including Mac, Windows, and Linux. When you visit the official XAMPP website, you’ll see all the different versions of the software. Then, you can download the version that’s compatible with your operating system.
Prefer a one-click localhost setup? Try WordPress Studio
If you want a fast local site without manual server setup, use WordPress Studio. Install the free app, click Add Site, and you are working in minutes with PHP, a database, and a web server configured for WordPress. You can match your live PHP version, start or stop sites from one panel, and import a recent backup to clone production for safe testing. This is ideal for anyone who values a clean, repeatable environment that’s easy and fast to set up.
Learn more about WordPress Studio here: https://developer.wordpress.com/studio/
What are the requirements to install WordPress on localhost?
To install WordPress on localhost, you’ll need a fully-functioning operating system like a PC to store your website files. This will work as a virtual server, which is equivalent to a web host’s server that you’d use for a live site.
You’ll also need to download a local development environment like XAMPP. There are plenty of tools like these that enable you to create a local environment. Studio is a free local development environment built for WordPress. WAMP, MAMP, LAMP, and Vagrant are other popular options.
XAMPP tends to be an excellent choice for WordPress, since it’s free and open-source. Plus, it works on a variety of systems including Windows, OS X, and Linux.
Once you’ve downloaded the XAMPP software, you can install it along with WordPress. You’ll also need to make sure to select three modules from the control panel. These are Apache, MySQL, and PHP.
How to install WordPress on localhost
Now that you know a bit more about localhost, let’s take a look at how to install WordPress on Localhost using XAMPP.
Step 1: Download XAMPP
The first step is to download the XAMPP software from Apache Friends. You can access XAMPP for Windows, Linux, or OS X.

Choose the version that matches your operating system. The download will start automatically and may take a few minutes.
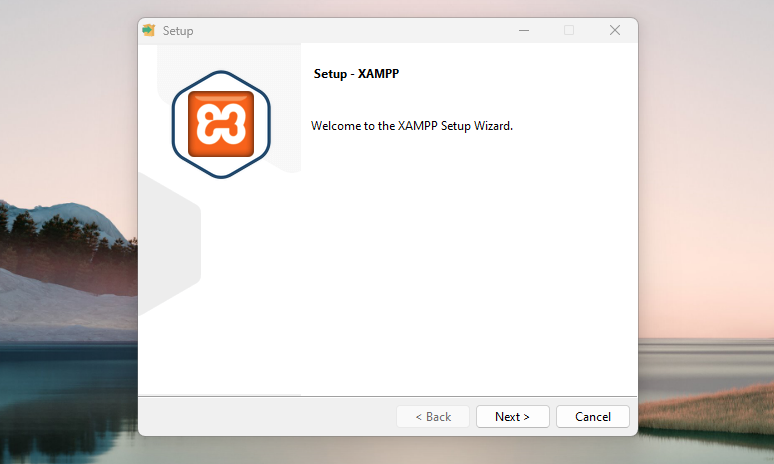
Once downloaded, run the file to launch the XAMPP importer. If you have an antivirus program installed, you might see a warning, but you can proceed with the installation.
You might also get a warning about User Account Control (UAC). In most cases, you should just continue through that prompt and any others that come up.
Then, you should see the installer screen. Here, click on Next.
Now choose which components you want to install. It’s important to note that you don’t need all the components for WordPress. Instead, you’ll need the required ones plus MySQL and phpMyAdmin.

You can install additional components. For instance, you might want email-related features if you plan to send or debug transactional emails. So, go ahead and uncheck everything you don’t need. Then, hit Next.
Now, choose which folder to install XAMPP into and select your preferred language.

You’ll be notified that you can opt to install Bitnami for XAMPP. This is not needed for WordPress, but it can make the process slightly simpler.
If you continue without Bitnami, click on Next to run the installation.

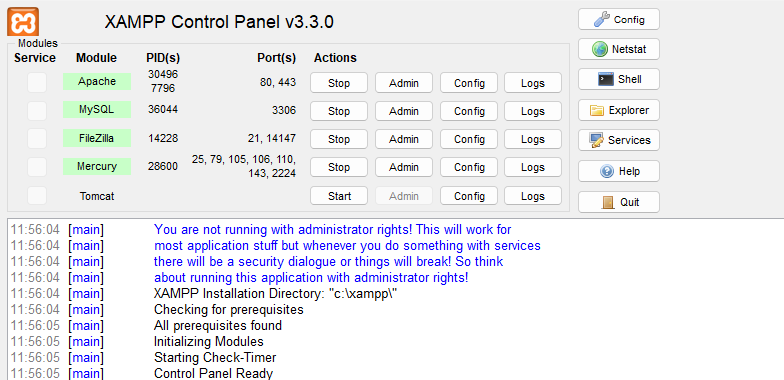
When this is complete, you can launch the control panel and start working with XAMPP.
Step 2: Run the modules
To install XAMPP and WordPress, you’ll need three specific modules:
- Apache (the web server that XAMPP relies on)
- MySQL (the database that WordPress uses)
- PHP (the programming language that WordPress is built on)
You can start these modules from the XAMPP control panel. The status of each one should turn green once it’s launched.

Then, test to see that the local server is working properly by going to http://localhost in a web browser.

If it was successful, you’ll now have a functioning XAMPP server on your operating system.
Step 3: Add the WordPress files
Now that you’ve downloaded XAMPP and run the modules, it’s time to install WordPress. To do this, navigate to the official WordPress website and download the latest version of the software by clicking on Get WordPress.
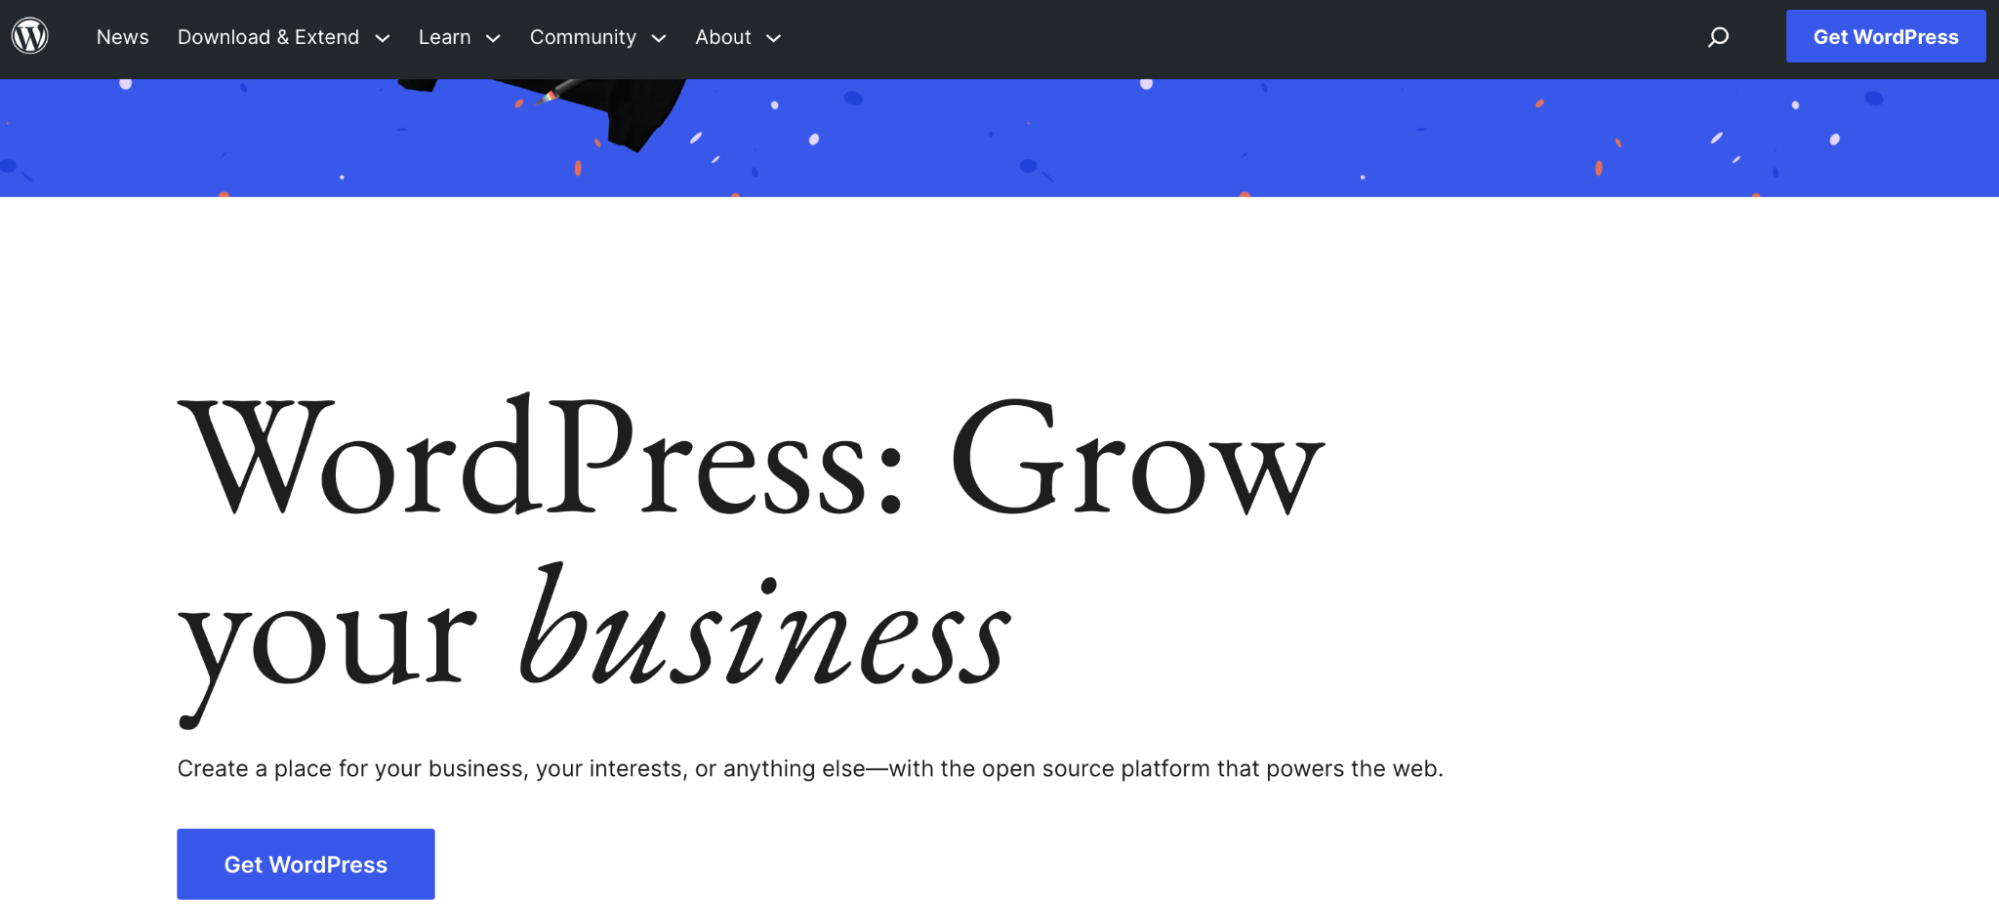
You’ll see that there’s an option to get set up with a hosting provider. This only concerns users who want to create a live WordPress site.
Since you want to install WordPress on localhost, click on Download WordPress.

At this point, WordPress will download to your computer.
Now, on your computer, head to the folder where you installed XAMPP. This might be named something like C://xampp.
Open the folder and locate the htdocs subfolder:
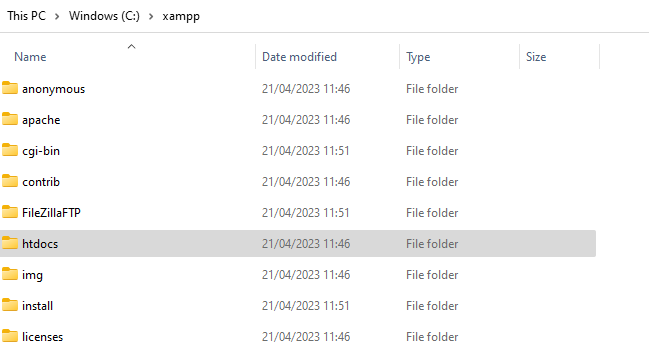
In htdocs, create a new folder for your site. The name of this folder will become the sub-name used to access your site. You might name the folder “testsite” if you’re using WordPress localhost as a staging site.
Then, you would access your site by going to http://localhost/testsite. When you’ve created the folder, extract the WordPress zip file that you downloaded at the start of this step.
Step 4: Create your database
At this point, you’ve downloaded XAMPP, run the modules, and downloaded WordPress. Now, it’s time to create a MySQL database for your WordPress installation.
First, you’ll need to launch phpMyAdmin from your XAMPP control panel. To do this, click on the Admin button for MySQL.
Inside phpMyAdmin, select the Databases tab.

Then, enter a name for your database and select Create.
That’s it! You can now move on to the last step.
Step 5: Complete the WordPress installation
The final step only requires a few tasks to complete the WordPress installation. First, visit your local website, where you should see the normal WordPress installer. You can find your website by typing http://localhost/url into the address bar.
Everything is the same as it would be for any other WordPress site except for the database details. Instead, you’ll need to enter the database details like this:
- Database name: name of the database you created in phpMyAdmin (you set this up in Step 4 of this guide)
- Username: “root”
- Password: leave blank
Complete the rest of the process. Now, you should see a fresh WordPress install running on your localhost.
How to move WordPress from localhost to a live server
To move WordPress from localhost to a live server, you can use a WordPress migration plugin like Duplicator. This will export your files from the local installation. Then, you’ll need to create a database on your live server and copy over your files using an SFTP client like FileZilla.
How to transfer WordPress localhost to another computer
You can transfer WordPress localhost to another computer by exporting your website and database to another system. There are plenty of plugins to help you do this, like All-in-One WP Migration.
You can also use the built-in WordPress import and export tools. You can find these in your WordPress dashboard by going to Tools → Export.

If you’re an experienced WordPress user, you can also transfer WordPress localhost to another computer using phpMyAdmin. This process requires you to export your old database and create a new one on the new PC.
How to uninstall WordPress on localhost
Once you’ve completed your tests, updates, or experiments in the local environment, you might want to uninstall XAMPP. To do this on Windows, open the Control Panel and navigate to Programs and Features. Then, locate the XAMPP app and right-click on it to delete it.
Now, navigate to the C:/xampp folder (or whichever folder you used for XAMPP) and delete any remaining files and folders on your computer.
Common WordPress localhost issues and how to resolve them
So far, we’ve tried to provide as much detail as possible to help you install and configure WordPress on localhost. But there are some WordPress localhost issues that you might encounter.
So, in this section, we’ll discuss some of the most common issues and show you how to fix them.
1. Installation failed: Could not create directory
The first WordPress localhost issue that you may encounter is when the installation fails. There are three situations when you might see this error:
- You install a theme or plugin in the WordPress dashboard.
- You update a plugin or theme.
- You upload files directly to the wp-content folder.
Typically, the “installation failed” error occurs on new WordPress sites. You might be seeing the message because the permission settings are incorrect. Or, you might not have enough free space on your system.
Therefore, you can clear the error by checking your file permissions. In your WordPress dashboard, go to Tools → Site Health. Then, click on the Info tab and scroll down to Filesystem permissions.
Ideally, all the files will be listed as “Writable.”

If they say “Not Writable,” your permissions aren’t configured correctly.
Fortunately, you can change the permissions by accessing your site files. To do this, you can connect to your site via FTP. Then, go to public_html and locate the following folders:
- wp_content
- wp_includes
- wp_admin
Right-click on each of the folders (one at a time) and choose File Permissions.

Check that the options are set to the following values:
- Owner permissions: Read, Write, Execute
- Group permissions: Read, Execute
- Public permissions: Read, Execute
- Numeric value: 755
- Recurse into subdirectories
- Apply to directories only
Click on OK and return to your site to see if the error has cleared.
2. Login not working
Another common WordPress localhost issue is that the login procedure doesn’t work. In this case, you’ll need to navigate to phpMyAdmin to resolve it.
First, it’s important to make a backup of your website since this might require you to edit important site files. Therefore, if you make a mistake, you won’t need to worry about losing your work.
The easiest way to create a backup of your site is to use a reliable plugin like Jetpack VaultPress Backup.
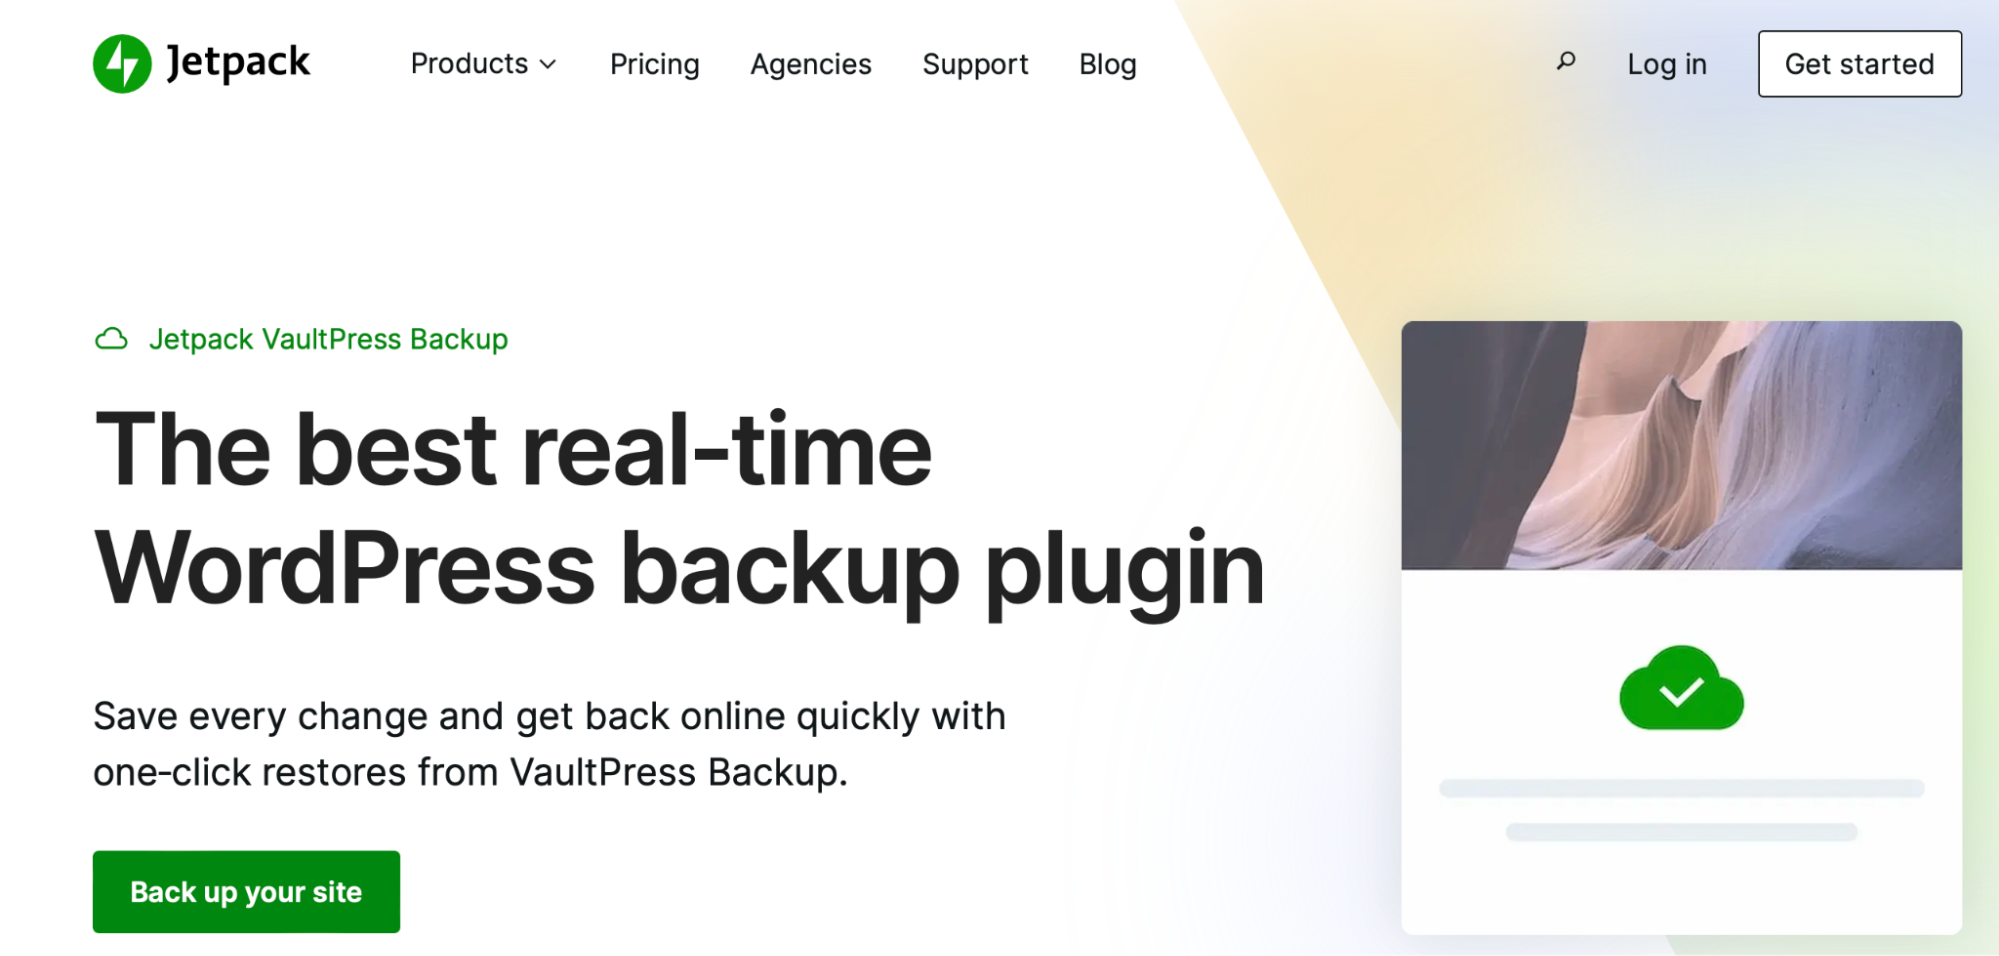
VaultPress Backup makes real-time backups that are stored securely in the cloud. The tool will store your backups for 30 days, and you can restore your site to a previous version in just one click.
Not only does VaultPress backup save your website, but it also secures all your database tables. Plus, the plugin also saves a copy of all WooCommerce customer and order data.
Once you’ve installed and activated your backup plugin, open phpMyAdmin and find the config.inc.php file. Here, you can check your login details. Then, return to the login screen and enter the values.
3. This site can’t be reached
If you see an error message that reads “This site can’t be reached,” it means there’s something stopping the browser from accessing the website. For example, you might be lacking an internet connection, or you might be facing DNS (Domain Name System) issues.
First, you’ll need to temporarily disable any antivirus software, firewall, or proxy service, since this can interrupt the connection. Then, you can check your internet connection and clear your browser cache.
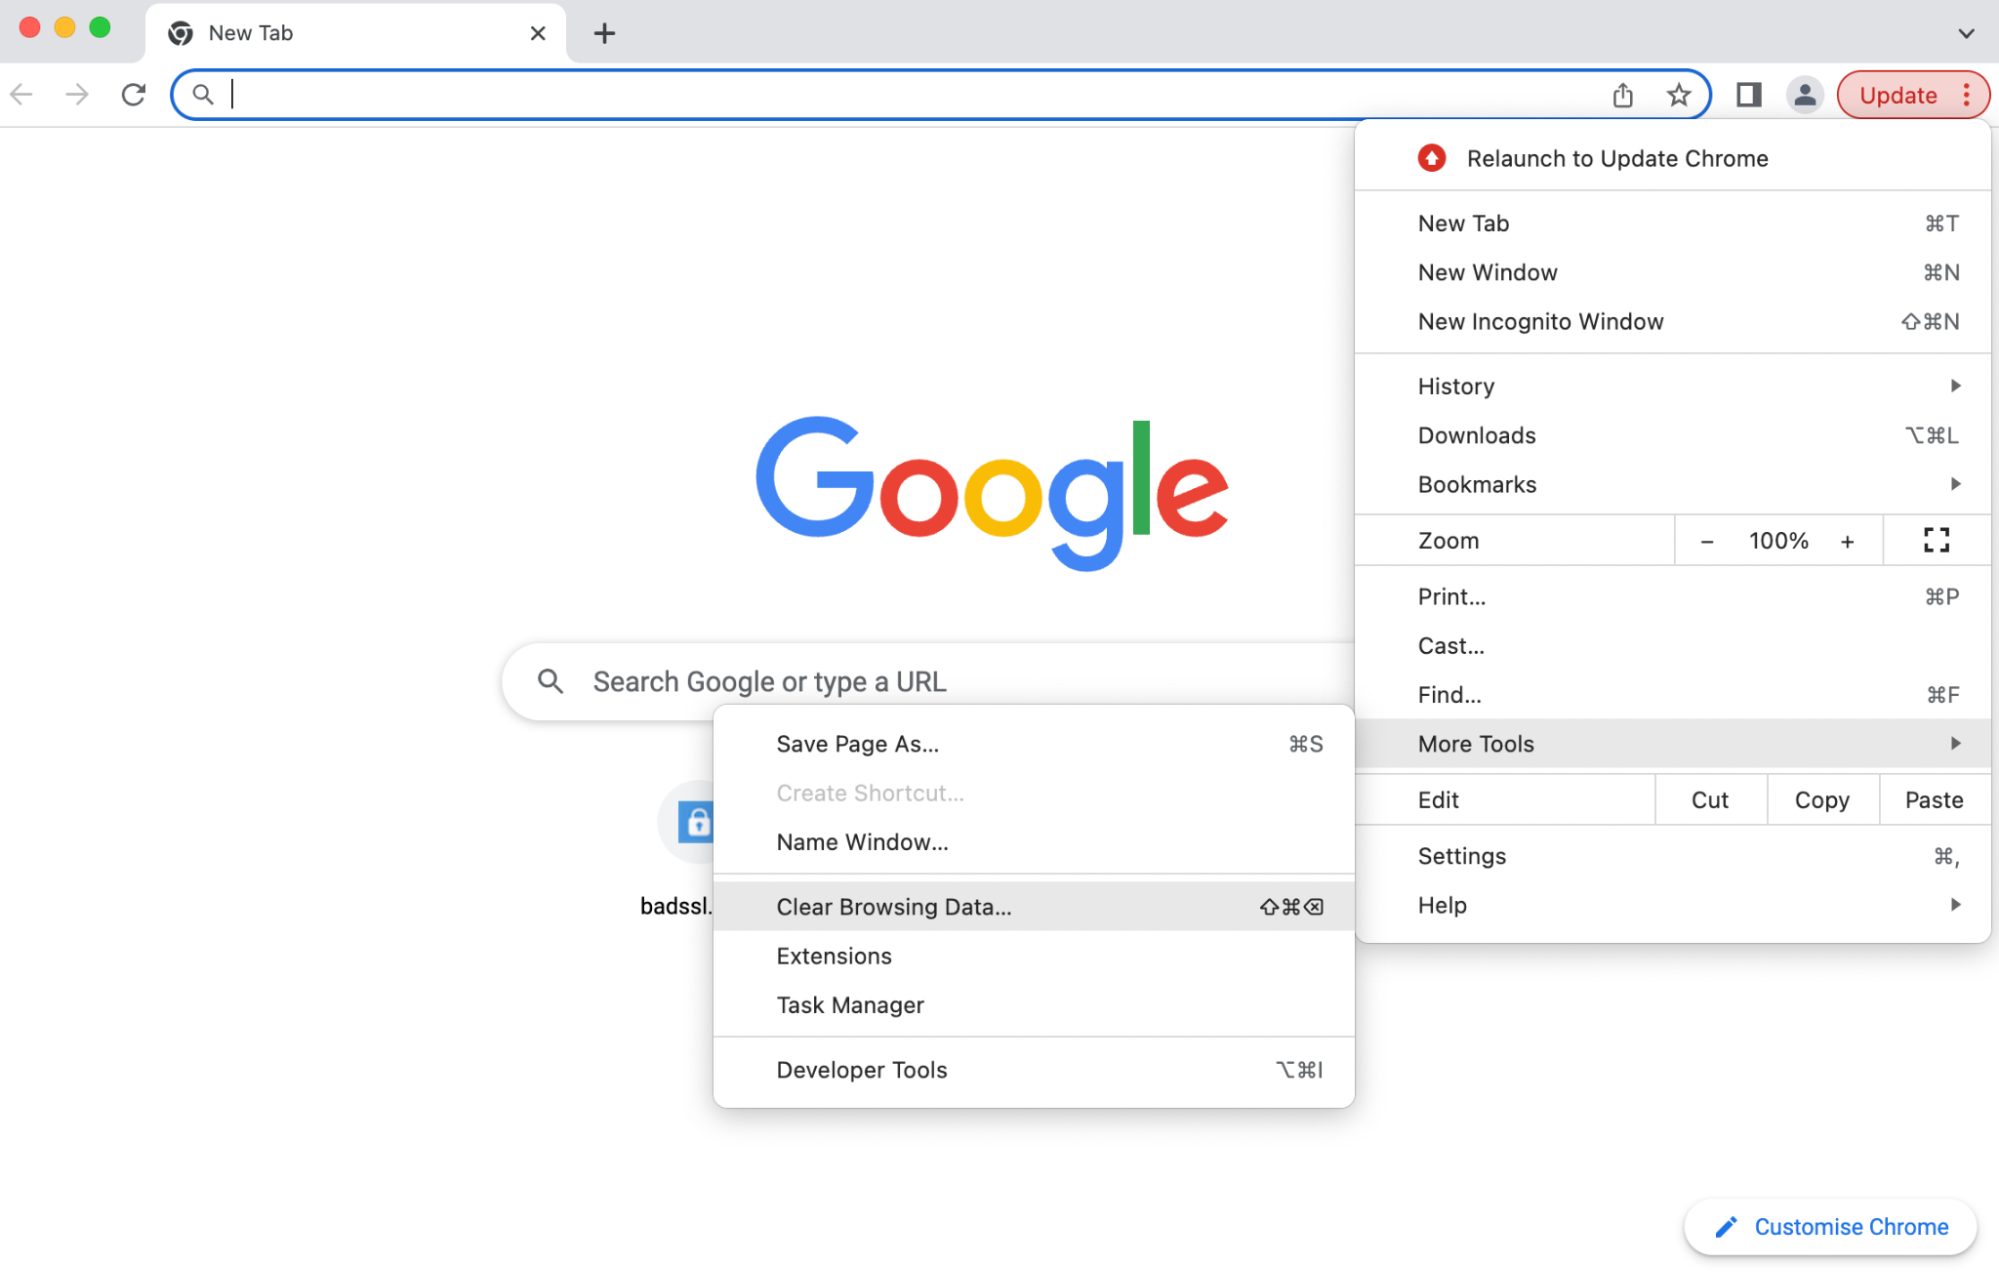
In Google Chrome, click on the three dots in the top-right corner. Then, choose More Tools → Clear Browsing Data.
If this doesn’t work, it can be useful to flush your DNS settings. To do this, check out Error 6: error_err_connection_refused further down.
Alternatively, you might simply need to change your DNS provider. Google Public DNS tends to be a safe solution.

The method for doing this varies depending on which operating system you use. For Mac users, you can change your DNS provider by going to System Preferences.
Then, click on Network → Advanced.

Open the DNS tab and click on +.

Now, type in the numbers for the public server you want to use. Click on OK → Apply to change the settings.
4. Error establishing a database connection
When you install and configure WordPress on localhost, you can often run into database connection issues. This usually indicates that there’s incorrect database information in your WordPress settings or an unresponsive database server.
To resolve this error, you can check your database credentials. These are stored in your wp-config.php file, so you can access the file through SFTP.
Once you’ve opened the file, make sure that the following credentials are correct:
- Database name
- Username
- Password
- Database host
You can also check your database credentials using phpMyAdmin. Once you’ve opened phpMyAdmin, click on wp_users.
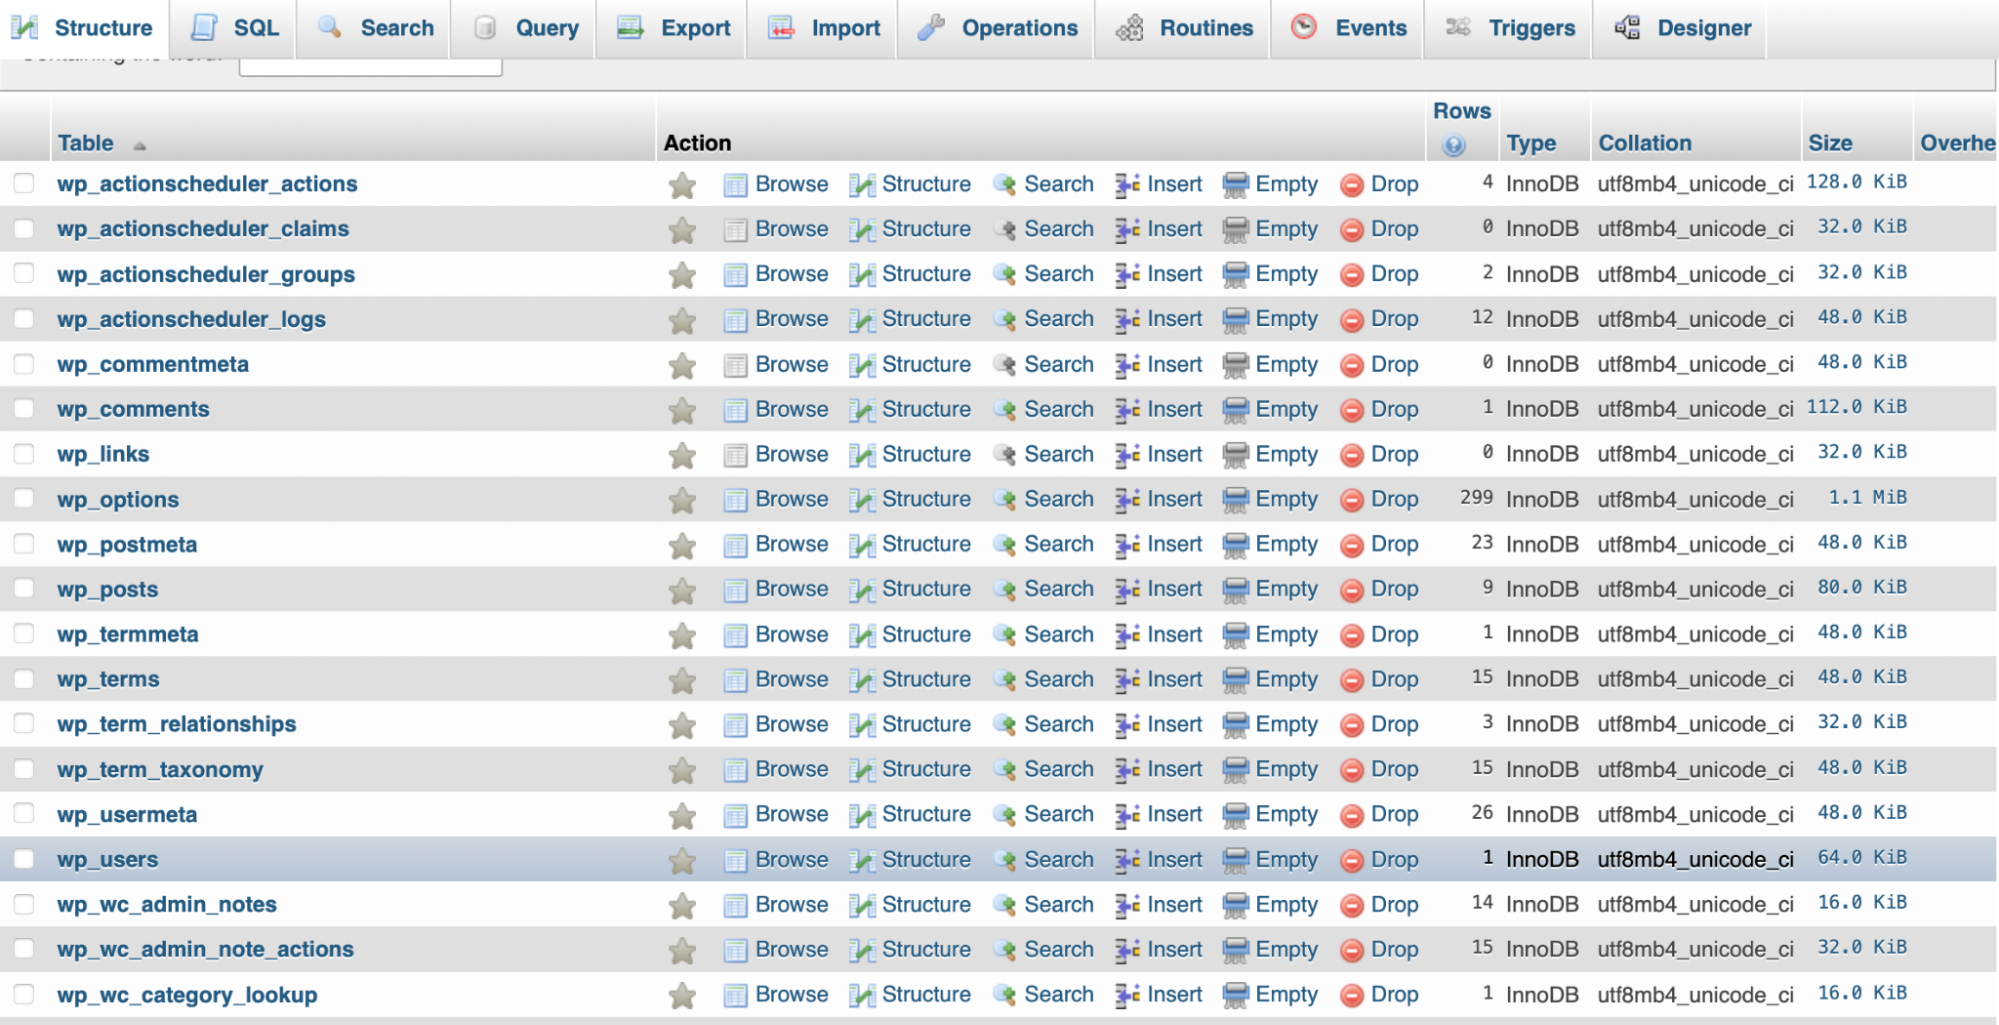
Then, find the user listing and click on the Edit link. Here, you can see the user ID, password, and more for each user on the site.
If these values aren’t correct, you can change them here. Simply delete the existing values and enter new ones. Then, click on Go to apply your changes.
You can also reboot your server. To do this, all you need to do is start and stop the server from your XAMPP control panel.
5. Error err_ssl_protocol_error
The err_ssl_protocol_error can present itself in a number of different ways. For instance, you might be told that your site can’t provide a secure connection or that localhost sent an invalid response.
Sometimes this issue can be easily resolved by clearing your browser cache. To do this in Google Chrome, see Error 3: This site can’t be reached.
You can also try using your site’s DNS entry instead of the URL. So, in this case, you’d type something like: http://127.0.0.1:8080 into your browser instead of http://localhost:8080.
6. Error err_connection_refused
The err_connection_refused error is another common localhost issue. It’s likely due to a misconfigured port. It might also indicate incorrect permissions or alert you to the fact that the Apache web server is not running properly.
If it’s an issue with WordPress permissions, see Error 1: Installation failed. If you want to change the port number, go to Error 13: XAMPP Apache shutdown unexpectedly. You can also disable your firewall or antivirus program since this might be blocking the connection.
The next solution is to flush your DNS, since this can fail if it’s storing too many records. To do this, open the command prompt by typing “cmd” in the search bar next to the start menu.
Now, enter the following command: ipconfig /flushdns
You can also make sure that Apache is definitely running. Go to the XAMPP control panel. If it says Start then the server must have stopped running and was likely the cause of the err_connection_refused error.
7. 404 page not found error
If you see the 404 page not found error when you try to install and configure WordPress on localhost, it means that the requested page can’t be found on the web server. Typically, this indicates that another program is on the port (port 80).
Fortunately, you can clear the error by changing the port number. To do this, see Error 13: XAMPP Apache shutdown unexpectedly.
If you’ve already tried this solution, and you’re still seeing the 404 page not found error, the problem may be that you’re not adding the port number to every URL that you type in the browser. For example, you might need to enter: http://localhost:8080 instead of just http://localhost.
8. WordPress localhost asking for FTP credentials
Another common issue with WordPress localhost is that your site might start asking for your FTP credentials. Typically, this occurs when you try to run an update or install a new theme or plugin.
It’s generally the result of WordPress having insufficient permissions. Therefore, you can try changing the permissions. To do this, see Error 1: Installation failed.
You can also try to force WordPress to use the direct PHP method for updates (rather than using FTP). You can do this through your wp-config.php file, using SFTP.
Once you’ve opened the wp-config.php file, add the following line of code:
define('FS_METHOD', 'direct');Make sure to save your changes. Then, head back to WordPress to see if the error has cleared.
9. Images not showing
Whether you’re using WordPress on localhost or a live WordPress site, you might encounter an error that prevents images from showing. This means that the path toward the images is broken.
The first step is to check that your WordPress Address (URL) and Site Address (URL) match. All you need to do is go to your WordPress dashboard and click on Settings → General.
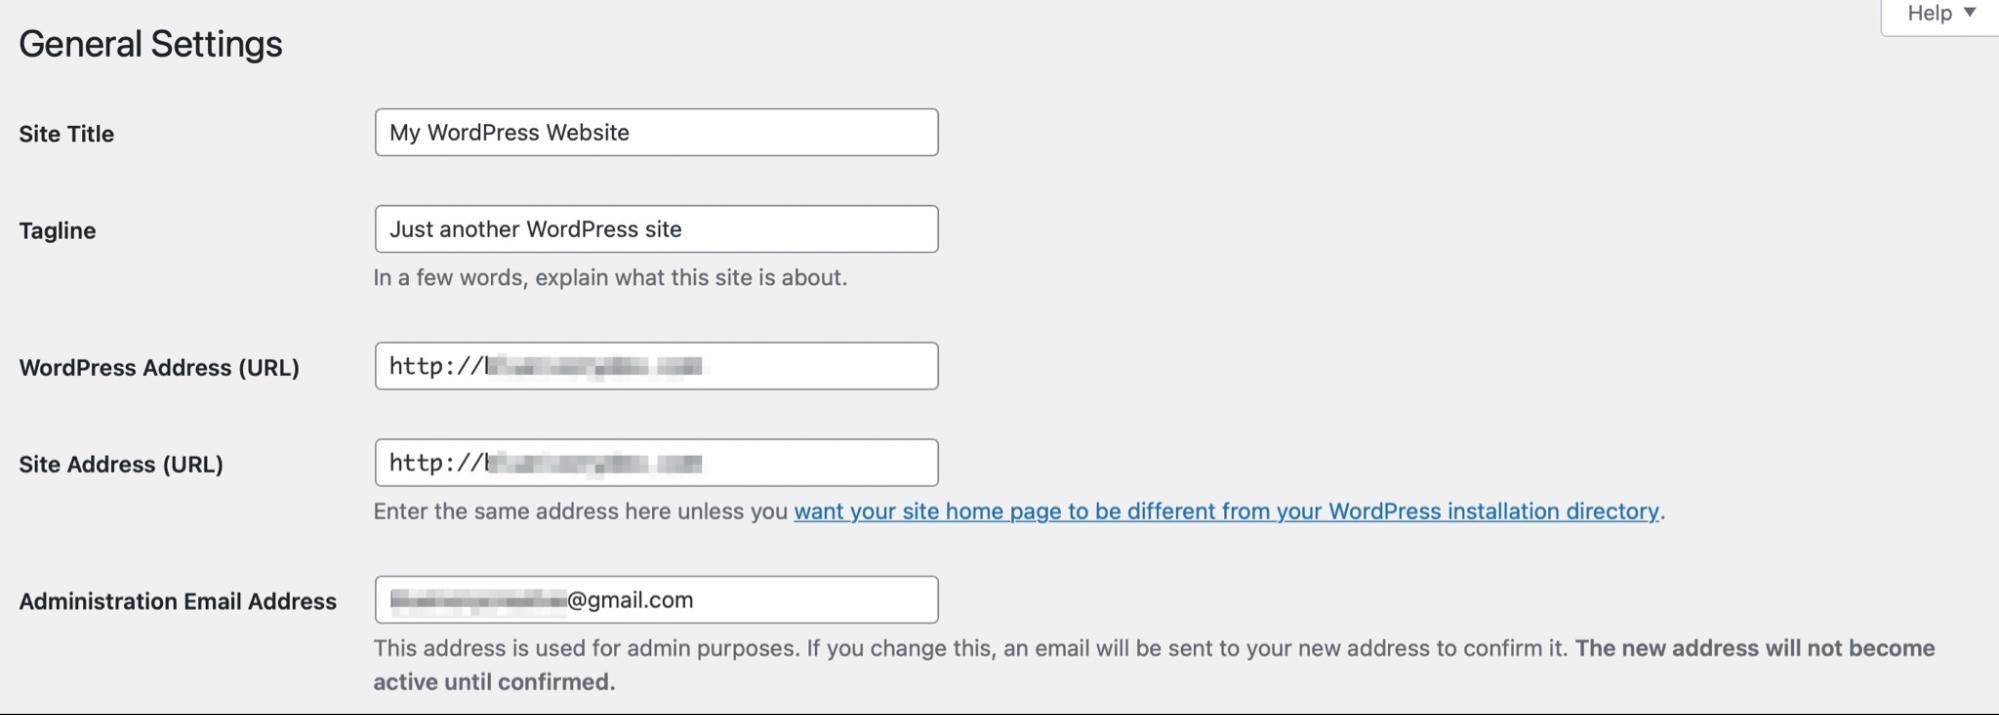
Then, check to see whether the name of the folder where your images are stored is added to the URL. This folder might be named uploads or images.
Now, navigate to Settings → Permalinks.

Here, you can select Post name for the permalink structure. Then, save the changes and see whether your images are now showing.
10. WordPress localhost is very slow
Your WordPress localhost website may be slow if you have too many plugins or poor code on your site. Therefore, it’s a good idea to make sure you only have the resources you need.
Slow websites and poor code can leave your website more susceptible to security threats. The best way to stay ahead of these issues is to use a plugin like Jetpack Protect.

Once installed, you’ll get access to automated security and malware scans to keep your website safe. Better yet, the plugin can pick up vulnerabilities in the core software and any plugins and themes on your site.
If you want even more protection, check out the Security bundle available with Jetpack. It comes with all the benefits of Jetpack Protect, plus real-time backups and additional features.
If WordPress localhost is running very slow, you can also try using the raw IP address for localhost. This can be effective as some systems (like Windows) don’t directly support the type of connection that MySQL uses when localhost is specified.
To get started, you’ll need to access your wp-config.php file. Here, make sure DB_HOST is not set to localhost.
Instead, change it to define(‘DB_HOST’, ‘127.0.0.1’);
Then, save the changes and return to your site to see if the problem has been resolved.
11. XAMPP maximum PHP execution time exceeded
The “XAMPP maximum PHP execution time exceeded” error is quite easy to fix. You’ll just need to edit a line of code in one of the XAMPP configuration files.
Open the XAMPP control panel and click on the Config button next to Apache. In the dropdown list, choose the option for PHP (php.ini).
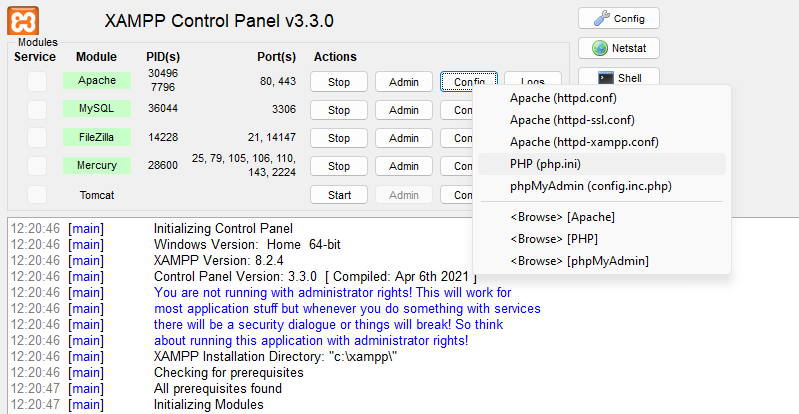
This will open the php.ini file where you can search for the following line:
Max_execution_timeThe value should be set to 120. To clear the error, you can increase the value.You might try doubling it to 240.
12. XAMPP maximum file size exceeded
Another common XAMPP localhost issue is the “XAMPP maximum file size exceeded” error. You might see this error when you try to upload a file to the local WordPress site that you created with XAMPP.
Again, you’ll need to find the php.ini file within your XAMPP configuration file. But this time, search for the following line: upload_max_filesize
Typically, this is set to 40M. To resolve the error, you can try increasing this value. It’s also important to note that when you edit the php.ini file, you’ll also want to make the same change to the post_max_size number.
13. XAMPP Apache shutdown unexpectedly
When you see the “XAMPP Apache shutdown unexpectedly” error, the likelihood is that something has gone wrong with Apache, causing it to crash. Apache is the web server that XAMPP relies on, so this error will mean that your local site will also stop working.
This error suggests that another program might be using the same port as XAMPP. Since ports only support one program at a time, Apache will stop working.
Skype is one program that uses the same default port as XAMPP. The good news is that the error is easy to fix as long as you have access to your XAMPP dashboard.
First, you’ll need to launch XAMPP. Then, go to Apache → Config. Here, choose the option Apache (httpd:conf).
The default port for XAMPP is 80 (this is used for most HTTP programs), so you can redirect Apache to port 8080. In the Apache file, press Ctrl + F and enter “80” to search for every instance of 80.
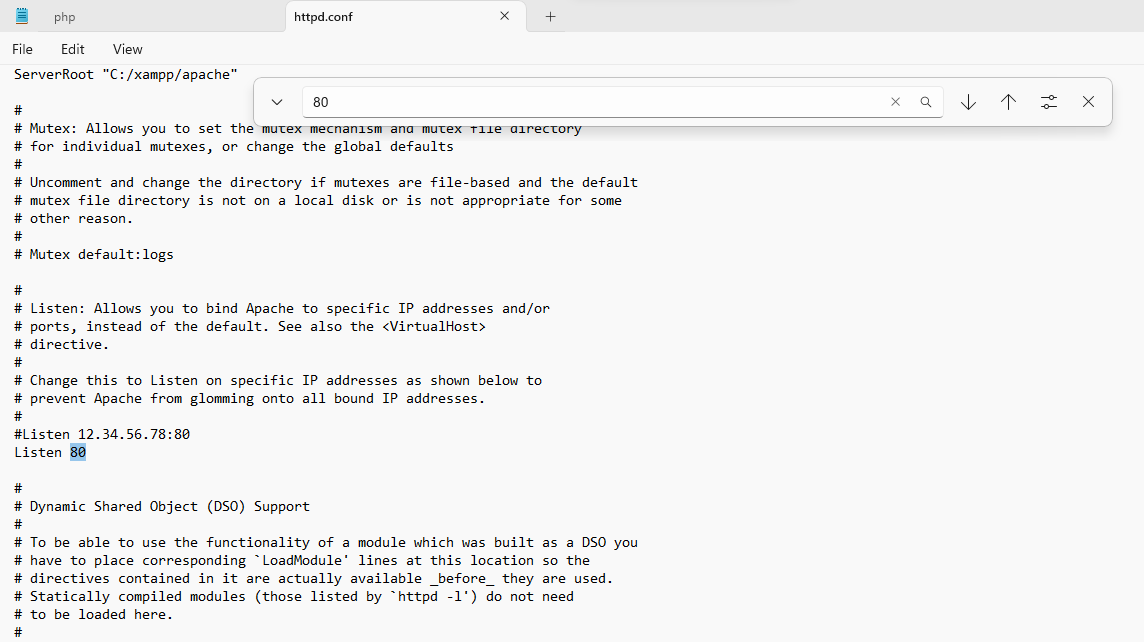
Then, change the following values:
- Port 80 to Port 8080
- Listen 80 to Listen 8080
- Change servername localhost: 80 to servername localhost: 8080
Now, go back to your XAMPP control panel and revisit Apache → Config. This time, select the file Apache (httpd-ssl.conf).
Open the file and press Ctrl + F to search for 443. Port 443 is typically used for secure web transactions, but Apache also needs it.
In this file, you need to change two instances of 443:
- Listen 443 to Listen 4433
- <VirtuaHost_default_:443> to <VirtualHost_default_:4433>
Then, restart Apache by clicking on the Stop and Start buttons in XAMPP.
14. XAMPP 403 access forbidden error
The final WordPress localhost issue to discuss is the XAMPP 403 access forbidden error. Typically, this occurs when you try to access your database using phpMyAdmin.
One of the most common causes of the 403 forbidden error is a misconfiguration in one of the XAMPP configuration files. So, to resolve the issue, you’ll need to open your XAMPP control panel. Then, click on Apache → Config.
From the dropdown list, select httpd-xampp.config file.
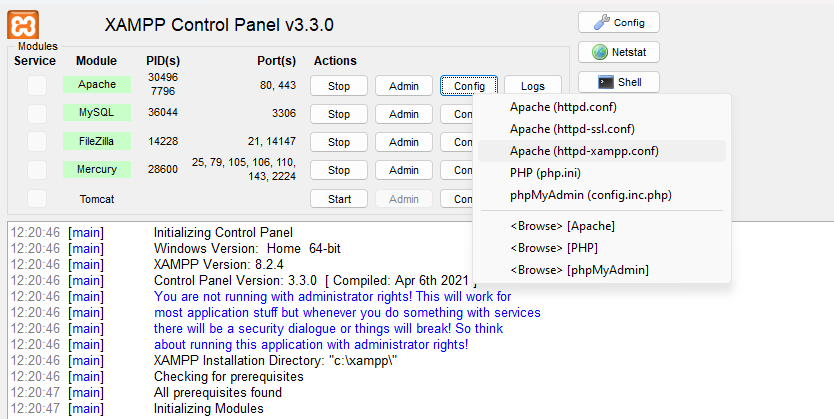
Once you’ve opened the file, look out for the following line of code that starts with: Alias/phpmyadmin
Within that code block, you should see a line that reads: Require local
Now, change that line to say: Require all granted
At this point, the 403 access forbidden error should clear, giving you access to phpMyAdmin.
Frequently asked questions about configuring WordPress on localhost
Although we’ve tried to cover the basics of how to install and configure WordPress on localhost, you might still have some questions. Let’s take a look at the most common ones.
Is localhost a web server?
Localhost is the hostname or computer that runs the program. In this instance, the computer becomes the virtual server for your application. This virtual server is offline and stores your site data the same way that a web host’s server would if you were running a live website.
Can someone access your localhost?
You can share your web server with someone else, but they’d need to have your IP address or your hostname. You can find this information on Windows with ipconfig /all on a command line.
WordPress localhost vs live server: what are the main differences?
Localhost is a virtual server that can be stored on your computer. Plus, it’s kept offline, so it isn’t accessible to the public.
On the other hand, a live server generally requires a web host that stores your website’s data. Meanwhile, you’ll need to purchase a domain name. This way, anyone on the internet can find your site by typing the URL into the browser.
What are the benefits of using localhost for WordPress development?
There are many benefits to using localhost for WordPress development. Since the website is kept offline, it creates a private space for you to test out functionality or experiment with new features.
What’s more, any changes that you make in localhost will leave your live website completely unaffected. Therefore, you can experiment freely without worrying about things going wrong. Then, once you’ve verified that updates or plugins are working (and safe), you can easily push them to your live website.
This enables you to preserve your UX. So, while you get creative in your local environment, people can still visit and interact with your live website.
How do I access WordPress on localhost?
To access WordPress on localhost, you’ll need to have a local server like XAMPP set up on your computer. Then, you can install the WordPress files. For full details, check out the tutorial above.
Once you’ve successfully installed and configured WordPress on localhost, open a web browser and enter this address: http://localhost/filename.
In this case, “filename” refers to the directory of your local server where you installed WordPress. Here, you should see the WordPress login page where you can enter your username and password to access your site.
How do I log into WordPress on localhost?
You can log into WordPress on localhost in the same way that you’d log into a live WordPress website. All you need to do is enter the correct URL into the browser.
Usually, it looks something like this: http://localhost/yoursitename. Then, add the login page suffix like /admin or wp-login.php at the end of the address.
How do I reset a localhost WordPress password?
You can’t reset your localhost WordPress password by email (unless you’ve enabled the mail function on your server). This is because the mail function is turned off by default on local servers.
Therefore, to reset your password, you’ll need to open phpMyAdmin by typing the following URL: http://localhost/phpmyadmin. Then, you’ll need to provide your MySQL password and username. Generally, the username is “root” and no password.
Then, select your WordPress database and find the wp-users table. Here, click on the Edit link next to the username of the administrator.

This opens a form where you can edit the information for that user.
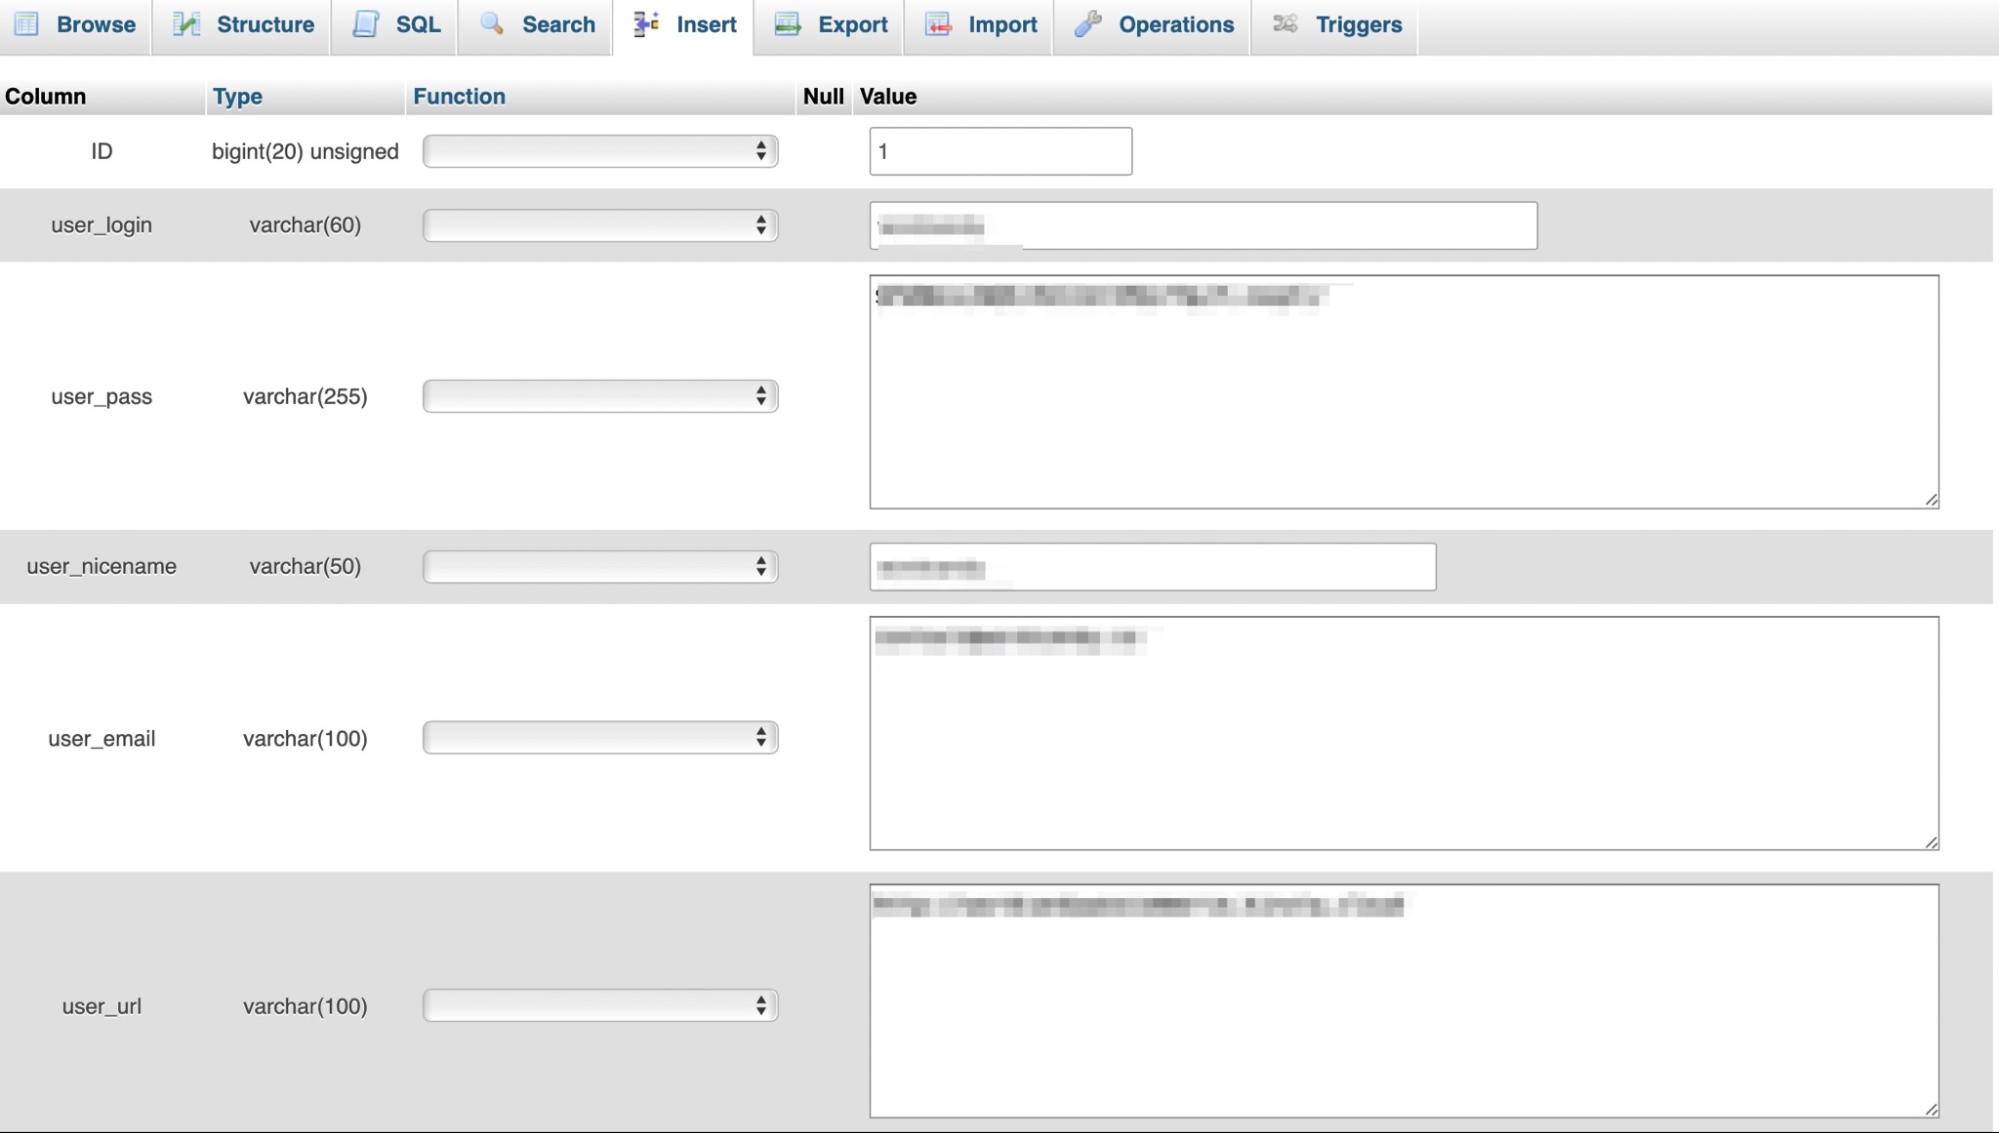
Scroll down to user_pass and type a new password in the value column. Then, select MD5 in the Function column and click on Go to save your changes.
Can I send an email from WordPress on localhost?
By default, the mail function is disabled in localhost, so you can’t send an email from WordPress. But you can enable emails by installing a plugin like WP Mail SMTP.
In this instance, the plugin will take over the default email delivery function and route emails through an SMTP provider. You’ll need to choose an SMTP provider like Sendinblue, which works particularly well for WordPress websites. Then, you can follow the installation wizard in the WP Mail SMTP to set this up successfully.
Can I install WordPress plugins and themes on a localhost site?
Yes, you can install any WordPress plugin or theme on your localhost site, just as you would on a live site. This is one of the main reasons to use a local environment. It lets you safely test themes and plugins to see if they work well together, check for bugs, or learn how they function before you install them on your public website. You can install them by using the WordPress dashboard search function if you are online, or by uploading the plugin’s or theme’s zip file if you are working offline.
Can I access WordPress localhost from another computer?
Yes, you can access WordPress localhost from another computer, but you’ll need the local IP address and the port number. So, instead of simply entering the website’s address, it will look something like this: http://192.168.0.4:80/wordpress.
How do I move my finished site from localhost to a live server?
To move your site from a localhost to a live server, the easiest way is to use a backup & migration plugin. Plugins like VaultPress Backup let you package your entire site, including the database, plugins, and themes, into a single file. You then upload this file to your new WordPress installation on your live hosting account and use the same plugin to unpack it. This process copies your local site exactly as it is. It is much simpler and less prone to errors than trying to move all the files and the database by hand.
Why is my WordPress localhost running so slow?
If your localhost site feels slow, it is usually due to your computer’s resources. The local server software needs enough of your computer’s processing power and memory to run smoothly. You can try closing other applications to free up resources. Sometimes, a poorly coded plugin or theme can also cause slowness. To check for this, try deactivating all your plugins and switching to a default WordPress theme. If the site speeds up, reactivate each item one by one to find the one causing the problem.
Are there security risks with running a WordPress localhost?
A WordPress localhost is generally very secure because it is not connected to the public internet. Since it only runs on your machine, outside hackers cannot access it. The only small risk comes if you configure your local server software incorrectly and accidentally open a port on your computer to the outside network. However, standard setups with tools like XAMPP do not do this by default. As long as you follow standard installation guides, your local site will remain private and safe on your computer.
Is XAMPP safe?
Yes. XAMPP is open-source, free, and safe to use as a local server for your WordPress website.
Does XAMPP install PHP?
XAMPP is one of the most popular PHP development environments. It’s an Apache distribution containing PHP, Pearl, and MariaDB so yes, it does install PHP. But you’ll still need to install WordPress separately to set up WordPress on localhost.
Can you run multiple local WordPress sites under XAMPP?
Yes, you can run multiple local WordPress sites on LocalHost.
Multisite is a network of more than one website that operates off the same WordPress installation. Even if you run your website on a local computer under XAMPP, you can install WordPress Multisite.
You’ll need to have a standard WordPress installation running first. Then, you can add more sites under a subdomain or a subdirectory.
Localhost: A powerful tool for WordPress developers
WordPress on localhost is a great tool for designers and developers since it enables you to create a safe, private environment to test out new features and functionality. Better yet, the live website will still be available for visitors and remains completely unaffected by the changes you make in the local environment.
What’s more, it’s simple to install and configure WordPress on localhost when you use software like XAMPP. Once you’ve installed XAMPP, you can run the necessary modules and then download the latest version of WordPress. Then, you’re ready to add the WordPress files and create your database.
For most developers, it’s also important to find a reliable backup plugin like Jetpack VaultPress Backup so that it’s easy to restore your website in case anything goes wrong. Plus, you can use Jetpack Protect to access a powerful security and malware scanner.
Another useful tool is the Jetpack Agency Program.

This is an all-in-one platform that enables you to manage site security, plugins, and licenses. Additionally, you can get your very own Jetpack partner manager to help you grow your business. Meanwhile, you can access your websites from any location using the user-friendly mobile app.
Get started with localhost for WordPress
WordPress on localhost is an ideal solution for designers and developers to experiment with new software. It’s also handy for new website owners who want to build their websites offline. While it’s slightly more complex, you can install and configure WordPress on localhost fairly easily.
To recap, here are five steps to install and configure WordPress on localhost:
- Download XAMPP.
- Run the modules.
- Add the WordPress files.
- Create your database.
- Complete the WordPress installation.
Jetpack for Agencies is another useful development tool. You can monitor every action on your site with an activity log, access your websites from the mobile app, and get your own Jetpack partner manager. Get started today!
