
When putting together a WordPress site, it’s easy to get lost in the details. The content management system (CMS) offers so many features and options, it can be hard to decide what’s best for your website.
There’s a lot of talk about topics like what pages to include or how to set up a site header and menu. However, a slightly less talked about feature is the widget.
Thankfully, that’s the focus of our article today. We’ll break down what WordPress widgets are, explain how they work, and offer examples of how to set up widgets on multiple areas of your website.
There’s a lot to cover, so let’s get started.
Before you start: Block theme vs classic theme (why your menu differs)
You must know what kind of theme you use before you start. WordPress changed how this works recently. The steps to add a widget depend on your theme type.
Go to your dashboard. Look at the Appearance menu on the left.
Do you see “Editor”?
You likely have a Block Theme. You will not use the old widgets screen. You will use the Site Editor to place blocks. This gives you more control. You can put things anywhere, not just in a sidebar.
Do you see “Widgets”?
You have a Classic Theme. You will use the traditional screen described in most guides. You drag items into specific areas like the Footer or Sidebar.
Knowing this saves time. You will not look for settings that do not exist.
What is a widget in WordPress?
A WordPress widget is a drag-and-drop content feature that you can place almost anywhere on your WordPress website.
Widgets were originally designed to give users more control over their sidebar content. Over time, however, the WordPress community found new and improved ways to use widgets throughout a site.
For example, most WordPress themes now come equipped with widget-ready areas that can be used to display all sorts of helpful information.
This includes things like social media feeds, email opt-in forms, search bars, and more. You can even use widgets to create custom navigation menus in certain areas of your site.
In other words, widgets are versatile tools that can be used in a number of ways to improve the overall design and functionality of a WordPress website.
Widgets vs blocks: What changed (and what didn’t)
If you’re using a classic theme, widgets live in widget areas (often sidebar/footer) and are managed in Appearance > Widgets.
If you’re using a block theme, many “widget-like” elements are just blocks placed in Template Parts (Header/Footer) or templates in the Site Editor.
The key difference is that blocks can be placed almost anywhere, while classic widgets are constrained to registered widget areas.
How do WordPress widgets work?
Now that we know what a WordPress widget is, it’s time to take a look at how they work.
For the most part, working with widgets is a pretty straightforward process. That said, there are a few key things you need to know before diving in and adding your first widget.
1. Widgets require a widget-ready area
As we mentioned before, not all WordPress themes come equipped with widget-ready areas. If you want to use them on your site, be sure to check and see if your theme has pre-designed locations for them.
If your theme does have widget-ready areas, you’ll be able to find them by navigating to the Appearance → Widgets section of your WordPress admin panel. Here, you should see a list of all the available widget areas on your site, as well as which ones are currently populated with content.

If you don’t see any widget areas listed, it’s likely that your theme doesn’t support them. In that case, you’ll need to either choose a different theme or look into installing a WordPress plugin that can create custom widget areas for you.
2. You can add widgets via the Appearance → Widgets section
The Appearance → Widgets area of the WordPress dashboard is where you’ll go to add, remove, and manage all the widgets on your site.
To add a new widget, simply drag and drop it from the list of available widgets into the desired location. Once you’ve added a widget to an area, you can then configure its settings to better suit your needs.
Let’s say you want to add a social media icon widget to your site. Drag and drop the Social Icons block wherever you’d like, then click on the widget to open its settings panel.
This will appear on the right side of the page, and allow you to choose which social media platforms to display links for, as well as how many links to show, what order they should be displayed in, and more.
Some widgets will have more settings than others. For example, a simple text widget will only let you add content, whereas a more complex widget, like the Jetpack Display WordPress Posts widget, has settings for blog URL, the number of posts you’d like to display, whether the links should open in a new tab, etc.

3. You can add widgets to multiple areas
For example, if you want to display a social media widget in both your sidebar and footer, you can simply add it to both areas from the Appearance → Widgets section.
This can be helpful if you want to make sure that your content is being seen by as many people as possible. It can also be useful for testing purposes, as you can easily add and remove widgets from different areas of your site without affecting the rest of your content.
What are some popular WordPress widgets?
There are all sorts of different WordPress widgets available, ranging from simple text boxes to complex social media plugins. If you’re using a block theme, you can also add any block that you’d like to a widgetized area.
Some of the most popular widgets include:
- The social media icons widget: This widget lets you display links to your social media profiles in a variety of ways.
- Social media feed widgets: A social feed widget lets you display a feed of your social media content on your website. This can be helpful for promoting your latest posts and engaging with your audience.
- A search bar: The search bar widget lets visitors quickly look for a specific piece of content on your site. This is especially helpful if you have a large volume of posts or pages.
- Email opt-in forms: An email opt-in form widget lets you collect email addresses from visitors so that you can add them to your mailing list. This is a great way to grow your list and promote your content.
- Calendar widgets: A calendar widget can be helpful for displaying events or deadlines on your site.
- Slideshow widgets: A slideshow widget lets you display a series of images in a rotating carousel. This is a great way to showcase multiple images on your site.
- RSS feed widgets: An RSS feed widget lets you display the latest content from another website on your site. This is helpful for keeping your content fresh and up-to-date.
- Weather widgets: A weather widget can be used to display the current weather conditions. This is useful for sites that are weather-dependent, such as a ski resort or golf course.
Of course, this is just a small sampling of the types of widgets that are available. There are hundreds of different plugins and themes that offer their own custom widgets, so do your due diligence in finding those that best serve your needs.
If you’re using Jetpack, you’ll enjoy access to quite a few widgets and blocks by default, including:
- Embeds for external social platforms and services like Facebook, Instagram, Twitter, Loom, Eventbrite Checkout, and Pinterest.
- Monetization widgets for accepting payments, integrating with OpenTable, and adding payment buttons.
- Growth widgets for adding business hours, contact forms, Mailchimp integrations, and opt-in forms.
- Widgets that enable you to add special content like authors, blog stats, media, GIFs, maps, star ratings, and tiled galleries.
How and where to add WordPress widgets
Now that we’ve covered some of the basics, let’s take a look at how you can actually add widgets to your WordPress site in detail.
The Appearance → Widgets section is where you’ll find all the available widget areas on your site. Simply click the + sign in the designated widgetized area and select from the available widgets.
It’s important to note, however, that because widgets don’t have autosave or revisions functionality, you should always back up your WordPress site before adding new widgets or updating existing ones.
Here’s a brief rundown of how to add widgets to various places on a WordPress website. Note that these instructions assume that you’re using the Block Editor on your site.
1. In your sidebar
To add widgets to your sidebar, simply click Appearance → Widgets then click on the + icon and search for the widget you want to add.
In this example, we’ve added a business hours widget to the sidebar.
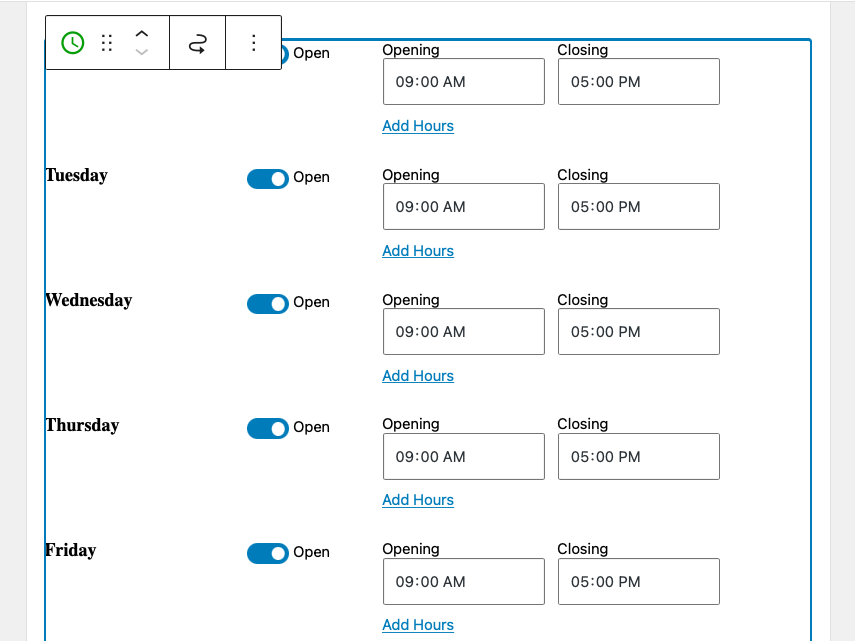
By default, this widget will appear on all posts and pages. Be sure to click Update at the top of the screen to save your changes.
2. In your header
If your theme includes widget areas in the header, you can add blocks by going to Appearance → Widgets. All you need to do is locate the widgetized section that reads “Header” then click the + sign within it to search for and select a widget.
Or, if you’re using a block theme, you can go to Appearance → Editor, open the Template Parts list, and click on Header. Then you can drag and drop blocks just like you would elsewhere on your site.
3. In your footer
If your theme includes widget areas in the footer, you can add blocks from the Appearance → Widgets section. Just click the + sign under “Footer,” then select the appropriate widget to insert.
Or, if you’re using a block theme, you can go to Appearance → Editor, open the Template Parts list, and click on Footer. Then you can drag and drop blocks just like you would elsewhere on your site.
4. On specific pages or posts
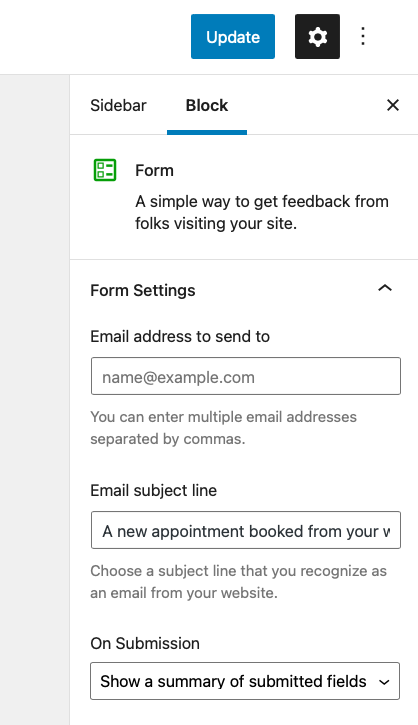
If you want to conditionally display WordPress widgets (i.e. show or hide widgets based on certain conditions), you can do so using Jetpack. Simply install and activate the plugin, then go to the Appearance → Widgets section.
Insert the widget as you would normally, then click the gear icon on the right hand side of the screen to access customization options.
From there, scroll down to the Advanced section. Click the drop down, then select the button that says Add new rule.

From here, you can choose whether you wish to show or hide this widget and choose where you’d like the rule to apply.
Here, we’ve selected to Show widget on the Services page, and only that page.

As always, be sure to click the Update button at the top of the Widgets screen to save these changes.
5. On specific categories or tags
This works similarly to the process of setting your preferences for the widget to appear on certain pages or posts.
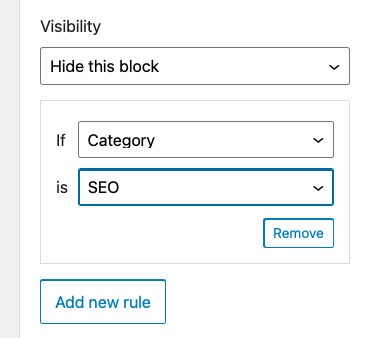
Insert your widget where you’d like it to appear, then click the gear icon, and scroll down to Advanced. Click Add new rule and select Show this block under Visibility. Next to If select Category, then next to is, select the category pages on which you’d like the widget to appear.
If you want the widget to appear in multiple categories, you’ll need to set a new rule and repeat this process for each one. If you want it to appear for most categories with the exclusion of just a few, you’d be better served to select Hide this block, then choose the category for which you’d like to hide the widget.
The process is identical for setting visibility rules for tags, date, author, and, if you have WooCommerce installed, taxonomy.
6. Only to logged-in users
You can set visibility rules for how and when widgets appear for logged-in users as well. To do this, you’d perform the same tasks described previously: insert the widget, click the gear icon, select Advanced → Add new rule.
Then choose Show this block and, next to If, select User. Next to Is, select Logged In.
This can be especially helpful if you want to provide site maintenance and management resources for members of your team while they’re logged in or include exclusive content for members of your program.
7. Only on specific devices or screen sizes
There are certain instances where displaying widgets (especially sidebar widgets) would be intrusive and generally in the way. This mostly applies to mobile devices like smartphones and tablets.
In these instances, hiding widgets on all mobile devices — or electing to only show them on devices with a certain screen size — is a great way to avoid this issue.
To do this, you will need a plugin. Widget Options is ideal for the job.
To install it, go to Plugins → Add New, then search for “Widget Options.” Install the plugin and click Activate.
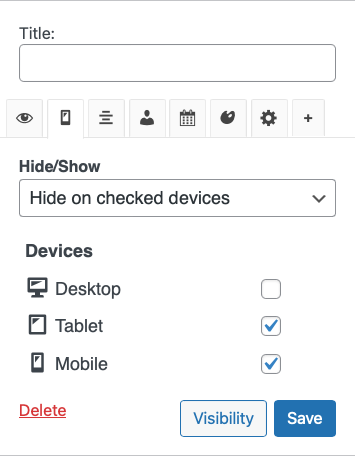
Next, go to Appearance → Widgets and select the widget for which you’d like to apply special device/screen size display rules.
In this instance, we’ve selected the Search widget. You can see how the Widget Options plugin has added numerous visibility controls.

Here, click the tab with the device icon. Select which devices you’d like the widget to be hidden on and click Save.
How to add a new widget area in WordPress
In some cases, you might want to add an entirely new widgetized area to your WordPress site. The first thing you’ll need to do is to back up your site before making any changes. And you should also work with a child theme to avoid any mishaps.
Next, you’ll need to add a new widget area to your functions.php file. You can do this by adding the following code, as detailed by Qode Magazine:
function register_custom_widget_area() {
register_sidebar(
array(
'id' => 'new-widget-area',
'name' => esc_html__( 'My new widget area', 'theme-domain' ),
'description' => esc_html__( 'A new widget area made for testing purposes', 'theme-domain' ),
'before_widget' => '<div id="%1$s" class="widget %2$s">',
'after_widget' => '</div>',
'before_title' => '<div class="widget-title-holder"><h3 class="widget-title">',
'after_title' => '</h3></div>'
)
);
}
add_action( 'widgets_init', 'register_custom_widget_area' );
Now that you have your new area registered in functions.php, you can start adding widgets to it from the Appearance → Widgets screen in your WordPress dashboard.
If you’re using the Block Editor, click the + sign below the new widget area and add widgets as you would normally.
Once you’ve done this, you’ll still need to add a bit of additional code to one of your theme’s files to make the new widgetized area appear on your site. Place the following code snippet (again from Qode Magazine) in the appropriate file, e.g. footer.php, sidebar.php, etc:
<?php if ( is_active_sidebar( 'new-widget-area' ) ) : ?>
<div id="secondary-sidebar" class="new-widget-area">
<?php dynamic_sidebar( 'new-widget-area' ); ?>
</div>
<?php endif; ?>
How to export and import WordPress widgets
In some cases, you may need to export and import WordPress widgets. For example, you may want to move widgets from one WordPress site to another.
Exporting and importing WordPress widgets is a straightforward process. First, you need to install and activate a plugin to assist. You can use the Widget Options plugin discussed above to accomplish this task.
Go to Settings → Widget Options and click Enable next to Import & Export Widgets.
Then go to Tools → Import / Export Widgets.
The options presented are super simple. You can either export widgets to then upload to another site or import widgets that you’ve already downloaded from elsewhere.
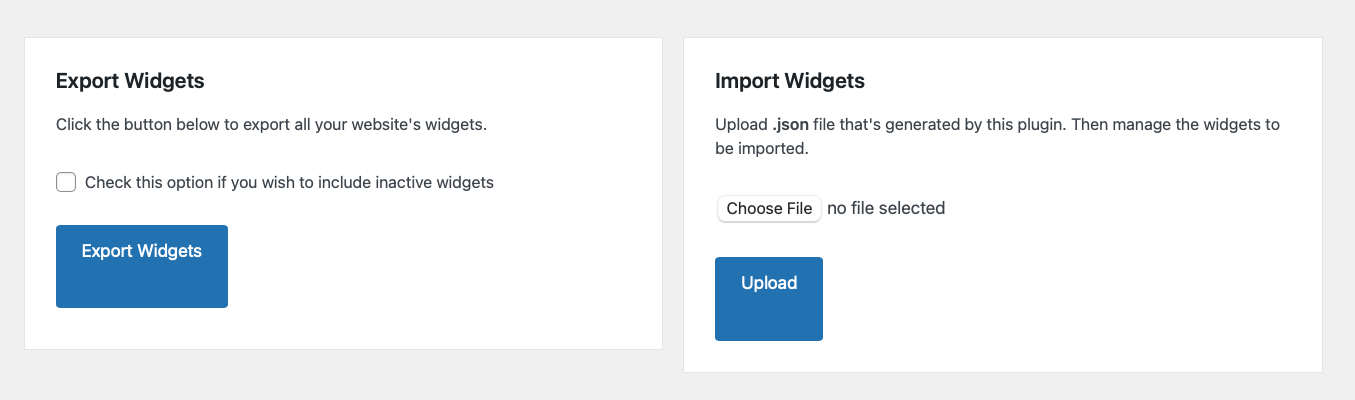
Select the file(s) you’d like to upload if importing. Or, select where you’d like to save the exported files to on your computer. That’s all there is to it.
Other plugins are available that perform this same function as well, including the Widget Importer & Exporter plugin.
How to disable widgets in WordPress
In some cases, you may need to disable widgets in WordPress. For example, you may want to disable the Recent Posts widget if you don’t publish content very often.
Disabling widgets in WordPress only takes a couple of steps. While logged into the WordPress dashboard, go to Appearance → Widgets and click on the one you’d like to disable. If you’d like to just get rid of the widget altogether — including any customization or settings you’ve configured — just click the widget and hit backspace or delete on your keyboard.
If you’d like to maintain the settings you’ve ascribed to this widget, however, drag it by clicking the drag icon and placing it in the Inactive Widgets section.
Frequently asked questions
Now that you’ve learned how to use WordPress widgets effectively, let’s answer some frequently asked questions.
Why are my WordPress widgets not displaying?
If your WordPress widgets are not displaying, the most likely reason is that you haven’t added any widgets to your sidebar. To fix this, go to Appearance → Widgets and add an element to the widgetized area that you’d like.
Another reason why your WordPress widgets may not be displaying is because your theme does not support widgets. If that’s the case, then you need to switch to a widget-ready WordPress theme or manually add a widget area to your site as described above.
Why are my WordPress widgets not updating?
If you’re adding new widgets or updating existing widgets and the changes are not reflected on your website, then the most likely cause is caching. Caching enables browsers to serve saved copies of your website to returning visitors so that it loads much faster. However, this can occasionally cause temporary delays in displaying your updates to your site.
If you’re using a caching plugin, then you need to clear the cache to see the changes on your website. If that still doesn’t work, you may need to check your hosting provider’s cache or clear your own browser cache.
Why is the widgets area not showing up in the admin dashboard?
If you don’t see the widgets area in your WordPress admin dashboard’s “Appearance” section, then it is most likely because your theme doesn’t support widgets. In that case, you need to switch to a widget-ready WordPress theme.
How can I change the size of a WordPress widget?
The size of a WordPress widget is determined by the theme that you’re using. If you want to change the size of a widget, then you need to edit your theme’s stylesheet. Or, you can use a plugin like Widget Options to set the specific dimensions of each widget.
But with a block theme, instead of editing your theme’s code, you can use the WordPress Editor to make template changes. For example, if you have a Post Categories block in your footer, you can simply open the Footer template, then edit the dimensions for that specific block in just a few clicks — no code required! In fact, you can control significantly more aspects with the WordPress Editor than with widget areas. Customize everything from font and background color to button appearance.
Where are widgets stored in the WordPress database?
Widgets are stored in the wp_options table under the name widget_sidebars. If you want to view all the widgets that are currently active on your website, then you can use the following SQL query:
SELECT * FROM wp_options WHERE option_name LIKE '%widget%'This query will show all the records from the wp_options table that have the word “widget” in their option_name.
Do WordPress widgets slow down my website?
No, WordPress widgets do not slow down your website. However, if you’re using a lot of widgets, then it can make your website look cluttered and affect the user experience. Don’t get carried away with excessive widgets.
What’s the difference between a widget and a plugin?
A WordPress plugin is a piece of software that you can install on your website to add new features and functionality. Widgets are small blocks of content that you can add to your website’s sidebars and other widget-ready areas. Unlike plugins, widgets do not need to be installed and activated. However, you can install plugins to add additional widgets and blocks to your site.
WordPress widgets vs blocks — which to use and when?
WordPress widgets and blocks are two different ways to add content and functionality to your website. Widgets are older and have been around since WordPress version 2.2. Blocks, on the other hand, were introduced in WordPress version 5.0.
Widgets are small pieces of content that you can add to your website’s sidebars and other widget-ready areas. Blocks are similar to widgets in that they add specific kinds of content to your site. The block-based widget editor was introduced to bring blocks to even more areas of WordPress, including the sidebar, header, and footer.
As long as you’re using a theme that supports the Block Editor, you can use blocks anywhere. You aren’t just limited to widgetized areas — but you can put a block in a widgetized area.
In many cases throughout this article, we use these terms interchangeably.
Why did my WordPress widgets disappear after I updated my theme?
This generally happens when you switch from a Classic theme to a Block theme. In newer Block themes, the traditional widget areas do not exist in the same way. They were replaced with the Site Editor.
You will not find the old “Widgets” screen under the Appearance menu anymore. Instead, you must go to Appearance > Editor. From there, you can add blocks to your headers, footers, and sidebars.
If you are certain you are using a Classic theme and widgets are still missing, check your installed plugins. A conflict between plugins can sometimes hide the widget screen. Disabling plugins one by one helps identify the problem.
What is the difference between a widget and a block in WordPress?
A widget and a block serve the same general purpose but work in different systems. A widget is a legacy component used in Classic themes. You place it in specific “widget areas” defined by the theme developer, such as a sidebar or footer.
A block is the modern standard used in the Gutenberg editor. Blocks are more flexible. You can place a block anywhere on a page, post, or template. While widgets are stuck in their designated zones, blocks allow you to build entire layouts. Eventually, blocks will replace widgets completely, but WordPress currently supports both to ensure older sites keep working.
Is it possible to revert to the classic widget screen in WordPress?
Yes, you can restore the old screen if you do not like the new block-based widget editor. The easiest method is to install the “Classic Widgets” plugin. Once you install and activate it, the block-based widget editor disappears. The interface returns to the traditional drag-and-drop list that existed before WordPress version 5.8.
This is very helpful if the new editor feels slow or if your older theme has compatibility issues with blocks. You do not need to configure any settings; simply activating the plugin makes the switch immediately.
Get started with WordPress widgets
We hope you’ve found this tutorial helpful and that you understand what WordPress widgets are and how to add them to your site. There are lots of fun and useful widgets to explore. Have fun creating a great site for your visitors and exploring unlimited possibilities with WordPress!
