This guide helps site owners running Classic Search upgrade to Jetpack Search 3.0. You’ll learn what’s changed, how to migrate, and what to do if something doesn’t look right after you switch.
What is Classic Search?
Classic Search is the original Jetpack Search experience. It replaces the default WordPress database query with Elasticsearch-powered results, but uses your theme’s built-in search page to display them. Filters are configured through the Jetpack Search widget in Appearance → Widgets, and search settings live under Jetpack → Settings → Performance.
If your search results page looks like the rest of your theme and you’ve never enabled the Instant Search overlay, you’re on Classic Search.
What’s changing in Search 3.0
Search 3.0 introduces a completely new way to build and customize your search experience using blocks in the editor. Instead of relying on widgets and your theme’s search template, you assemble your search page from a set of composable Jetpack Search blocks in the Site Editor.
Here’s how the two experiences compare:
| Classic Search (v1) | Search 3.0 (embedded search) | |
|---|---|---|
| How results display | Your theme’s search template | A block-based page template you customize in the editor |
| How you configure filters | Jetpack Search widget in Appearance → Widgets | Filter blocks added directly to your search page |
| Post type exclusions | One sitewide list in the Jetpack Search settings panel | Per-page, using the Post Type Scope block |
| Sort options | Limited to the widget’s built-in options | A Sort By block with configurable options per page |
| Result format | Controlled by your theme | Three block-based layouts: Compact, Expanded, and Product (WooCommerce) |
| Search input | Your theme’s search form | A Search Input block you place wherever you want |
| Technology | Standard WordPress hooks | WordPress Interactivity API, renders inline with your theme |
Before you migrate
Before switching, take note of your current Classic Search configuration so you can recreate it in Search 3.0:
- Go to Appearance → Widgets and open the Jetpack Search Sidebar widget area. Note which filters you have configured (categories, tags, post types, dates, custom taxonomies) and their order.
- Go to Jetpack → Search and note any post types you’ve excluded from results.
- If you’ve set a default sort order, note that as well.
You won’t lose any search data during the migration. Your Elasticsearch index, search history, and indexed content remain unchanged. The migration only changes how results are displayed and how filters are configured.
How to switch to Search 3.0
- Make sure your Jetpack plugin is updated to version 15.9 or later.
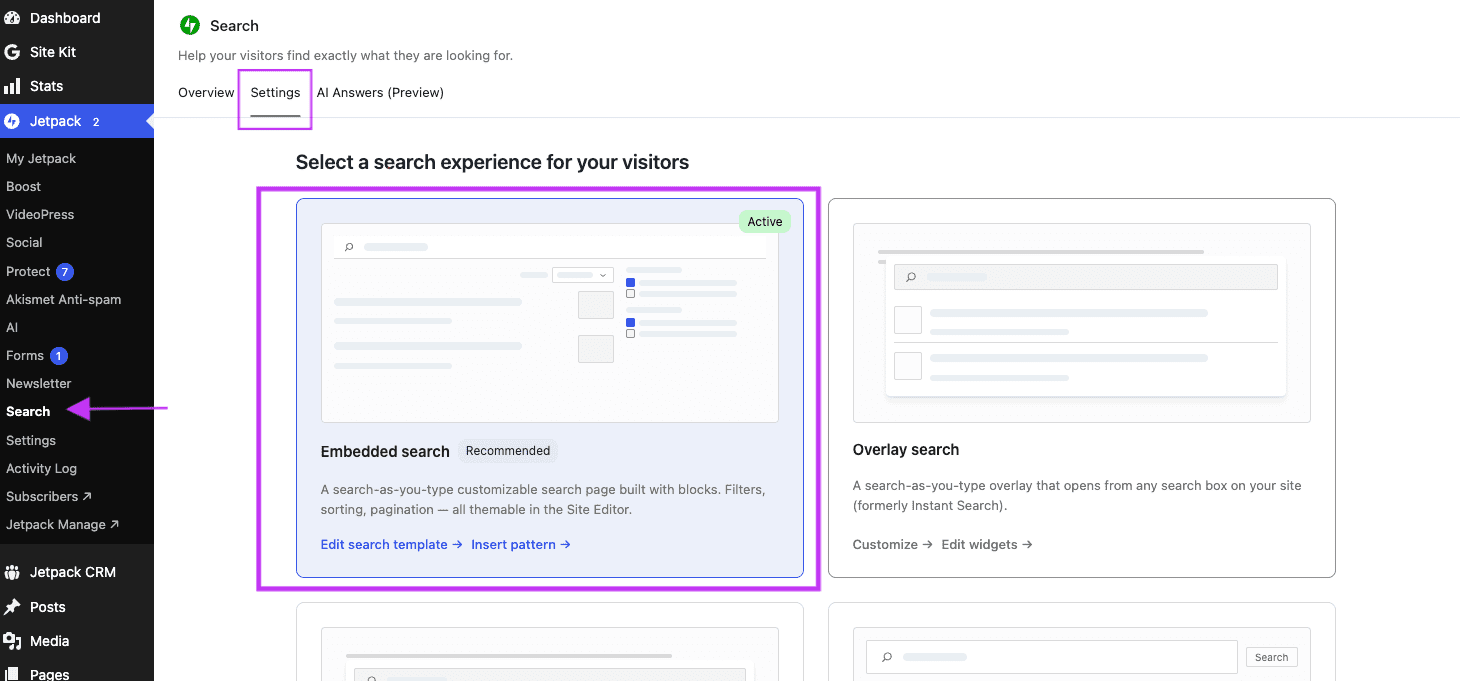
- Go to Jetpack → Search in WP Admin.
- In the search experience selector, choose Embedded search. This replaces the previous toggle for “Enable instant search experience.”
- A Jetpack Search page template is automatically created for your site. Your search URL (for example, yourjetpack.blog/?s=hello) now renders this template instead of your theme’s search page.
To customize the template, go to Appearance → Editor → Templates and select Jetpack Search. You can add, remove, and rearrange blocks just like any other page template.
See Jetpack Search blocks for more on getting started with Embedded search.
Recreating your Classic Search settings
Filters
In Classic Search, filters lived in the Jetpack Search widget. In Search 3.0, each filter type has its own block.
To recreate your filters:
- Open the Jetpack Search template in Appearance → Editor → Templates.
- Add a Filters block (or Collapsible Filters for compact layouts) to create a filter sidebar.
- Inside the container, add the filter blocks that match your previous widget configuration:
| Classic Search widget filter | Search 3.0 block |
|---|---|
| Categories | Filter (Checkbox) set to Category |
| Tags | Filter (Checkbox) set to Tag |
| Post types | Post Type Scope |
| Date (year/month) | Filter by Date |
| Custom taxonomies | Filter (Checkbox) set to Custom Taxonomy |
| Authors | Filter (Checkbox) set to Author |
- Configure each filter block’s settings in the editor sidebar to match your previous setup (sort order, maximum items, display style).
For more detailed settings on each filter block, see Jetpack Search blocks: filter types.
Post type exclusions
In Classic Search, excluded post types were a sitewide setting you configured once in the Jetpack Search settings panel. That single list applied to every search on your site.
In Search 3.0, post type scoping is per-page. Instead of one global exclusion list, you add a Post Type Scope block to each search page. This block lets you include or exclude specific post types for that page only, so different search pages can show different content types.
To recreate your exclusions:
- Open the Jetpack Search template in Appearance → Editor → Templates.
- Click the + inserter inside your filters area and add a Post Type Scope block.
- In the block’s settings panel, choose the post types you want to include or exclude.
- Repeat for any other search pages on your site that need the same exclusions.
The Post Type Scope block doesn’t display anything to your visitors. It works behind the scenes to control which content types appear in results.
Sort order
In Classic Search, the default sort order was a sitewide setting. In Search 3.0, add a Sort By block to your search page and configure which sort options are available to visitors. The block supports Relevance, Newest, and Oldest by default.
Result format
Classic Search used your theme’s markup to display results. Search 3.0 uses a Results List block with three layout options:
- Compact displays the title and a short excerpt.
- Expanded adds an image thumbnail and breadcrumbs.
- Product is designed for WooCommerce stores and shows the product image, title, price, and star rating.
Choose the format that best matches what your visitors expect to see.
What to expect after the switch
- Your search URL stays the same. Visitors searching your site won’t notice a URL change.
- Your Elasticsearch index is unaffected. All your indexed content, search stats, and ranking signals carry over automatically.
- Your old Jetpack Search widget in Appearance → Widgets will no longer control what appears in search results. You can remove it once you’ve confirmed your new search page is working.
- If anything looks unexpected after switching, you can reset the search template to its default. Go to Appearance → Editor → Templates, select Jetpack Search, and use the reset option.
Switching back
If you want to return to the previous search experience, go to Jetpack → Search and select a different option from the experience selector. Your Classic Search widget configuration in Appearance → Widgets is still there if you haven’t removed it.
Still need help?
Please contact support. We’re happy to advise.


