Meet Tracy from Jetpack: From NASA and the Navy to Happiness Engineer

At Jetpack, our Happiness Engineers are usually busy supporting our customers to ensure that they have everything they need for a successful website — but we interrupted one of them for an inside look at Jetpack and some valuable tips and tricks.

Continue reading → Meet Tracy from Jetpack: From NASA and the Navy to Happiness Engineer

Posted in Meet Jetpack | Tagged , , , , , , | Comments Off on Meet Tracy from Jetpack: From NASA and the Navy to Happiness Engineer
Better Social Media Sharing with Jetpack

What Is Time on Page and Why Is It Important?

Once you understand the importance of optimizing your page views and attracting site visitors, there is another site performance metric that you should consider: time on page. According to survey results from Brafton, the average time on page for 181 sites surveyed was 2 minutes and 17 seconds.

Similar to a bounce rate (the percentage of visitors who leave your site after viewing only one page), the amount of time that a visitor spends on one of your pages can be an indicator of false leads — visitors who land on your site, only to realize that it’s not what they were looking for and leave immediately. A bounce rate tells you when a visitor has viewed only a single page on your site. Time on page, however, gives you insight into how well your content is actually performing.

Let’s take a closer look at time on page to learn how it works, and what information this metric can disclose about your site performance.

Continue reading → What Is Time on Page and Why Is It Important?

Posted in Analytics | Tagged , , | Comments Off on What Is Time on Page and Why Is It Important?

How to Reduce Your Bounce Rate on WordPress (5 Easy Steps)

Encouraging people to read your site content is probably one of your goals as a site owner; however, once visitors land on your site, it’s even more important that they stick around long enough to do so.

If you’re noticing a pattern of visitors who view one page on your site and then leave, they likely came to your site and didn’t find what they were looking for, or they had poor experiences. This leads to having a high bounce rate (the percentage of visitors who leave your website after viewing a single page).

If you’re experiencing a high bounce rate, read on to learn how to keep visitors on your site longer.

Continue reading → How to Reduce Your Bounce Rate on WordPress (5 Easy Steps)

Posted in Tips & Tricks | Tagged , | 24 Comments

How to Improve User Experience (UX) With Google Analytics

Creating a good user experience (UX) for people who visit your site is important for a number of reasons. A good UX enhances site accessibility and increases the chances that your visitors will engage with your content in deeper ways by exploring your blog, buying your products, or subscribing to your content.

Sites with strong user experiences may also notice increasing visitor numbers, as visitors will want to return to them. Additionally, SEO experts from Search Engine Land believe that good user experiences can have bigger impacts on search engine rankings.

The importance of good user experience has also grown with the rise of mobile internet browsing. Someone using a small screen doesn’t need a site to look beautiful as much as they need it to be laid out clearly, with an easy process for finding and consuming content.

A site with great UX will offer content that’s clear and readable, has an intuitive navigation system in place, a logical structure, tools such as search, and forms that are easy to use.

So, if you want your site to succeed, you’ll want it to have a good UX. But, how can you measure yours? There are a number of ways to test UX, including feedback, test sessions, and hands-on testing conducted yourself.

In this article, you’ll learn about some of the Jetpack tools you can use to measure the success of your user experience, and identify ways you can make improvements.

Continue reading → How to Improve User Experience (UX) With Google Analytics

Posted in Analytics | Tagged , , , , | Comments Off on How to Improve User Experience (UX) With Google Analytics

Understanding Your Site’s Performance with Google Analytics

Now that your site is up and running, you might want to figure out what’s working — and what’s not. This means figuring out how to measure its success.

Jetpack offers built-in stats, but if you want to take a deeper look at how well your site is performing, you can use Jetpack to connect to Google Analytics. Google Analytics provides a comprehensive report on website traffic, referral traffic, and additional insights meant to help you understand your audience.

So, what is Google Analytics and why should you use it? Let’s explore how Google Analytics works, plus some of the most useful features it offers to WordPress site owners.

Continue reading → Understanding Your Site’s Performance with Google Analytics

Posted in Analytics | Tagged , , , | Comments Off on Understanding Your Site’s Performance with Google Analytics

Monitor Your Site’s Success with Analytics

You’ve done it: you finally launched a website to promote your small business. One of the next steps you should take is to determine your site’s success in terms of visits, clicks, and conversions.

If you want to figure out how well your site is performing, you’ll want to collect data on your traffic. There are lots of different data collection and site analytics tools on the market, but figuring out which one to use can be challenging, time-consuming, and costly.

Fortunately, you don’t have to worry about taking the time to evaluate these tools and install them on your site. There’s an easier way to track your visitor and viewing trends with Jetpack.

Read on to learn more about Jetpack’s analytics tools, including built-in stats and the Google Analytics integration.

Continue reading → Monitor Your Site’s Success with Analytics

Posted in Analytics | Tagged , , | 11 Comments

Jetpack 4.6: Google Analytics Integration, PHP 7.1 Compatibility, and Publicize Improvements

Welcome to Jetpack 4.6, available now for upgrade or installation. This release includes:

  • Google Analytics integration
  • PHP 7.1 compatibility
  • Publicize improvements
  • Enhancements to shortcodes and widgets

Continue reading → Jetpack 4.6: Google Analytics Integration, PHP 7.1 Compatibility, and Publicize Improvements

Posted in Releases | Tagged , , , | 16 Comments

How to install Stats and Analytics on your WordPress site with Jetpack

If you run a website, you probably want to know how many visitors you’re getting. So, unsurprisingly, Jetpack Stats is one of the most popular features we offer! This feature gives you the ability to quickly see how many visits your site gets, what posts and pages are most popular and where your visitors are coming from.

There are many plugins and services that provide statistics, but data can be overwhelming. Jetpack Stats makes the most popular metrics easy to understand through a clear and attractive interface. Plus, you can use them in conjunction with other analytics plugins and services.

This article covers:

  1. How to enable your stats
  2. View and understand your stats
  3. Configure and customize your settings
  4. What about Google Analytics?
  5. Installing Jetpack

1. Enabling your Stats

Jetpack Stats are automatically enabled when you activate and connect Jetpack to WordPress.com: no additional setup required! (See the last section for help installing Jetpack.)

smiley

How do you know it’s working? We add a little smiley face at the bottom of your webpage like the one on the right. (Note: From Jetpack version 3.1 onwards the smiley won’t be on by default. You can turn it on and off yourself as described in the Configure and Customize your Settings section below.)

If you’re saying to yourself “Whoa! That’s big!”, don’t panic: in fact it’s quite tiny. Here the smiley in its actual size: actualsize

It’s pretty small. However, we do give you the choice of turning the smiley display off: see the Configure and Customize your Stats section below to find out how.

2. View and Understand your Stats

Now that your stats are enabled and running, you can view them in a number of different ways with Jetpack.

  1. Add to Main Dashboard
    You can add the stats module to your main Dashboard screen to give you at-a-glance site views as soon as you log in. On your main Dashboard screen, you can enable the Site Stats widget by opening your Screen Options tab and check the Site Stats box.

    jp-stats2-edit

    Then you can see your site visits, most viewed pages, and search terms people used to find your site at a glance. Handy, right?

    Jetpack Dashboard Stats

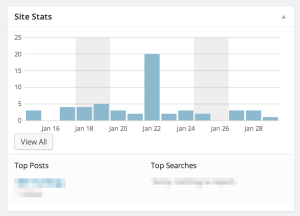
    The Site Stats widget on your Dashboard.

  2. In-Depth Stats
    Get more in-depth stats from your Dashboard by visiting Jetpack –> Stats from the menu bar on the left hand side. Here you can see information about Referrers, Top Posts & Pages, Search Engine Terms, Subscriptions, and Clicks.

    This is a great way to see what content is popular on your site so that you can write more about the topics that your visitors really like.

  3. Enhanced Stats

    WordPress.com Stats

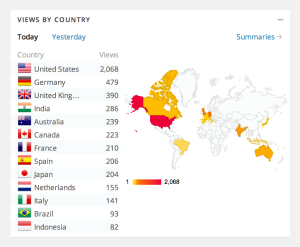
    Country view stats on WordPress.com

    To get even more information on Stats, you can click the “Show Me” button next to the “Did you know you can view enhanced stats on WordPress.com?” text at the top of your Dashboard stats page to view your stats on WordPress.com.

    By visiting your stats page, we bring you even more information about your site including your best total views per day, your all-time views and comments totals, and features like Views By Country which shows you where in the world your posts are being seen!

    You can also look at stats per day, week, and month. Find out even more about the Jetpack Site Stats – including on what we don’t track through Jetpack – on the WordPress.com documentation page.

3. Configure and Customize your Settings

Everything we’ve covered up to this point is turned on by default when you activate and connect Jetpack to WordPress.com.

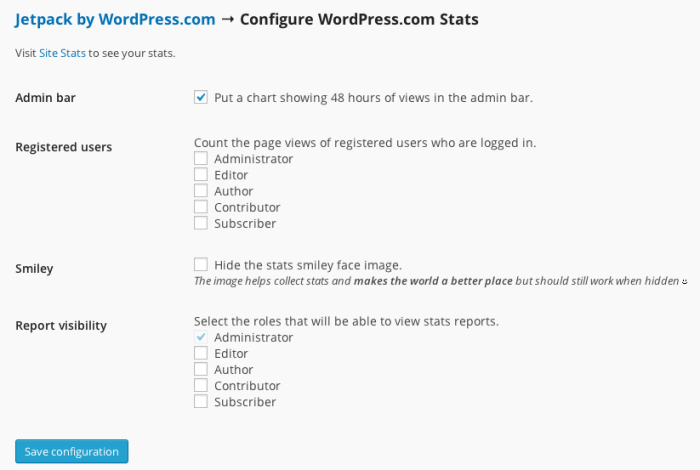
But did you know that you can also do some custom configuration of stats? Go to Jetpack –> Settings in your dashboard, find the WordPress.com Stats feature in the alphabetized list, and click the “Configure” link that appears when you hover your mouse over it:

configure_stats

In the next screen, you’ll see a number of options for configuring your stats. I’ll cover each one more in depth below.

configure_jetpack_options

  1. Admin Bar
    Checking this box will add the stats “Sparkline” to your admin bar when you’re viewing the front end of your site. If you’re in the wp-admin part of your site, this will not display.

    It looks like this (highlighted in green):

    stats_chart

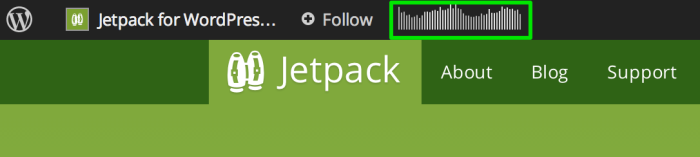
    These lines represent the last 48 hours of page views for the current blog, with darker lines indicating nighttime page views. Each line spans a time period of two hours. The number that appears when you hover over the Sparkline is the overall highest amount of views per hour during the most recent 48 hour period.

    You might ask why you would need this. It’s a great way of seeing you site’s activity at a glance so that you can quickly note any unusual traffic activity when you’re not in your Dashboard.

  2. Registered Users
    You can choose whether or not to track site visits or site page views from logged in users. You can even specify different user groups that you want to track – or not to track – stats for.

    If you want to know how often your Editors are on your website, you can track it by checking the box next to Editor. It’s that simple!

  3. Smiley
    Remember how I mentioned earlier about how you could hide the stats smiley? (Although I’m not sure why you would, it makes the world a better place!) But, if you want to hide the smiley from displaying on your website, then you can check the box here.
  4. Report Visibility
    By default, Stats can only be viewed by logged in, Administrator users. This hides stats from other registered users who are not Administrators.

    If you want other user groups (Editor, Author, Contributor, or Subscriber) to have the ability to view stats, you would have to opt-in those user groups by checking the box next to the user group you want to add. (Note: you cannot uncheck stats visibility for Administrator users.)

4. What about Google Analytics?

One of the more common questions we get about Jetpack is: “I want to use Google Analytics! Do I have to disable WordPress.com Stats in Jetpack?”

No!

You can use both on your WordPress installation. The benefit of using Jetpack Stats is that you can see a snapshot of your blog’s activity right from your Dashboard. If you want to use another analytics service you can certainly do so. Jetpack Stats works great alongside Google Analytics and other stats tracking services.

5. Installing Jetpack

To see Jetpack Stats working on your site you will need to install the Jetpack plugin. (Note: Jetpack works with self-hosted WordPress sites. If your site or blog is hosted at WordPress.com you already have access to all Jetpack features!)

There are two ways of installing the Jetpack plugin:

  1. The simplest way is install it directly from your Dashboard. You can find step-by-step instructions here.
  2. Alternatively, if you’re an advanced user, you can download the plugin files (.ZIP) and install it manually.

I hope this has helped you learn more about the Jetpack Stats feature. If you have any questions please feel free to leave a comment below.

Posted in Features | Tagged , , , , | 3 Comments
  • Enter your email address to follow this blog and receive news and updates from Jetpack!

    Join 112.8K other subscribers
  • Browse by Topic