
Selling digital products is an excellent opportunity for store owners, bloggers, and other content creators alike.
Digital downloads — like eBooks, music files, images, sewing patterns, and fonts — work well as standalone purchases, or as add-ons to physical products or services. For example, if you sell music courses online, you might also sell digital sheet music. Or if you crochet baby toys, you could sell downloadable patterns for those who also enjoy crafting.
The best part is that they help you generate revenue without having to worry about things like inventory, shipping, and storage. Once you set up your digital products, there’s very little maintenance involved.
And if you already have a WordPress site, getting started is simple and straightforward. Let’s take a look at how to sell digital downloads with WooCommerce, along with some best WordPress security practices.
How to sell digital products on WordPress
While WordPress includes a lot of powerful functionality by default, you’ll need a plugin to sell products on your site. Plugins are free or premium tools that you install to provide extra functionality.
There are several different plugins that you can use to sell digital downloads with WordPress. However, below are some reasons that WooCommerce is the best, most effective and efficient choice.
Why choose WooCommerce to sell digital products and downloads
1. It was built for WordPress and is supported by the WordPress team
WooCommerce was designed for WordPress and is supported by Automattic, the team behind WordPress.com and Jetpack. Why is this critical? If an eCommerce tool wasn’t built for WordPress specifically, you might encounter compatibility issues. In many cases, setup will be more difficult and it may not match the rest of your site perfectly. This could create a jarring experience for your customers and visitors.
In contrast, WooCommerce works seamlessly with WordPress, along with all major themes and plugins. It’s regularly updated to ensure compatibility, will blend beautifully into your site’s design, and has settings that are managed directly through the same WordPress dashboard that you’re already familiar with.
Another bonus is that WooCommerce support knows WordPress like the back of their hands. This means that they can troubleshoot any problems that you run into much more effectively than support offered by third-party solutions.
2. It’s free to use
WooCommerce core, along with the basic functionality you need to sell digital downloads, is completely free. While there are premium extensions available that cover everything from marketing and conversions to payments and merchandising, many stores won’t need to pay anything at all to sell online.
3. It offers endless flexibility
You can create absolutely anything you want with WooCommerce — the only limit is your imagination! There’s a large library of extensions designed to add functionality to your store without requiring a developer.
Want to offer multiple currencies? Sell memberships to a digital content library? Send abandoned cart emails? There’s an extension that will make this possible.
You can also sell your digital downloads alongside physical products, online courses, services, membership programs, and more. Everything’s under one roof, which provides a better experience for your customers and your team — especially if that team’s just you.
4. It’s easy to scale
WooCommerce provides all the functionality you need to grow as large as you want. There are absolutely no limits on the number of products, sales, or variations, so whether you make ten sales a week or 10,000, WooCommerce has you covered. Learn more about how to scale with WooCommerce.
How to sell digital products with WooCommerce
Now that you know what WooCommerce is and why it’s the best tool for digital eCommerce, let’s take a look at how you can sell downloads on your website. We’ll also answer a few common questions.
What are the differences between virtual and downloadable product types on WooCommerce?
WooCommerce is a powerful eCommerce tool which lets you sell everything from physical and digital products to tickets, courses, memberships, and subscriptions. Here are the most common product types you can choose from:
- Simple products. Basic, physical products that don’t require customers to select from a set of options. E.G. a hardcover book.
- Variable products. Physical products that have options for customers to choose from. E.G. a t-shirt with size and color choices.
- Downloadable products. Digital products with downloadable files. E.G. eBooks, graphic templates, or MP3s.
- Virtual products. Digital products that don’t necessarily require file delivery. E.G. a service or insurance policy.
- External or affiliate products. Products that are listed on your site but sold elsewhere. E.G. a product available as part of the Amazon Affiliate program.
- Subscription products. Physical or digital products that are paid for on a recurring basis. E.G. a subscription box or maintenance service. This requires an extension called WooCommerce Subscriptions.
- Membership products. Members-only products or content libraries. E.G. membership to a library of workout videos. This requires an extension called WooCommerce Memberships.
- Bookable products. Items that require appointments or reservations. E.G. a jet ski rental or online consultation. This requires an extension called WooCommerce Bookings.
As we mentioned earlier, you can sell any combination of these product types side-by-side in the same store. So, for example, you could sell online cooking courses, physical cookbooks, and eBooks of recipes all in the same place.
So what is the difference between virtual and downloadable products? And which is the right product type for you?
Virtual products aren’t physical and, therefore, aren’t shipped. But they also don’t necessarily require the customer to download anything. They’re the right fit for things like:
- Services, like accounting, graphic design, and lawncare
- Access to online libraries of recipes, files, or videos
- Access to online forums or Facebook groups
- Coaching packages
Downloadable products are technically types of virtual products, but they send a download to the customer after their purchase. This is the right fit for anything that involves sending files, including:
- eBooks and other types of PDFs
- Graphic templates, such as .PSD, .AI, and .EPS files
- Font files
- Software and license keys
- Craft templates, like sewing patterns
- Music and audio files
- Stock photos
- Printable artwork
One Stop Map sells vector maps, which customers can download to either print or edit. Their products are both virtual products and digital downloads.
ShadowTrader sells one-hour financial consultations, among other things, which are conducted via Skype with clients. Those consultations are virtual products, but not digital downloads because there are no files delivered.
How to add digital products to WordPress using WooCommerce
If you already use WordPress, then getting started with WooCommerce should be a pretty seamless transition — it uses the same dashboard you’re already familiar with. Here’s how to get started:
1. Install and activate WooCommerce
In your WordPress dashboard, navigate to Plugins → Add New. Search for “WooCommerce” and click Install → Activate. A setup wizard will appear that will walk you through all the first steps of building your online store.
2. Choose a payment gateway
A payment gateway allows you to securely collect money from your customers and transfer those payments to your bank account. WooCommerce integrates with a variety of payment gateways — you may be familiar with PayPal and Stripe — and the right fit for you will depend on your specific needs. Here are some qualities to look for:
- Fees that fit your budget. Payment gateways typically take a percentage of each sale (generally around 2.9%) but some also charge flat fees on top of that. Learn what each payment gateway charges and see if that works for your business.
- An easy checkout process. The simpler it is for customers to check out, the more likely they are to actually complete the purchase. Some payment gateways direct shoppers to a third-party site for payment, while others keep them on yours.
- Multi-currency acceptance (if you’re an international store). This won’t apply to everyone, but if you want to sell globally, you may need the ability to accept multiple currencies.
- Recurring payment acceptance (if needed). If you want to sell subscriptions to your digital products, you’ll need a payment gateway that allows for automatic, recurring payments.
WooCommerce Payments is an excellent option. It checks all of the boxes above and ensures a seamless checkout experience for customers, reducing potential abandoned carts. It can integrate with tools like Apple Pay for one-click purchases. And the best part is that it allows you to manage everything from payments to refunds directly in the WordPress dashboard.
For more tips, read this guide to choosing a payment gateway.
3. Create your product pages
Now it’s time to create your digital products in WooCommerce! To do this, go to Products → Add New. The first thing you’ll see is a Product name field — this is where you’ll add a title for your product.

Keep scrolling down to find the Product Data box and click the dropdown to see a list of product types. If your digital download has options, you’ll want to select Variable Product. If not, select Simple Product. Then, make sure to check the boxes next to both Virtual and Downloadable.

In the Regular price box, add a price for your product. You can also add a Sales price below, if you ever host a sale on your website.
Below that, you’ll see a section for Downloadable files. Here, you can add one or more downloads. For each one, you’ll set the File name and File URL. For the URL, you can either upload a file directly to the media library or use external file management tools like Google Drive or Dropbox. You can learn all the details from the WooCommerce guide to digital product handling.
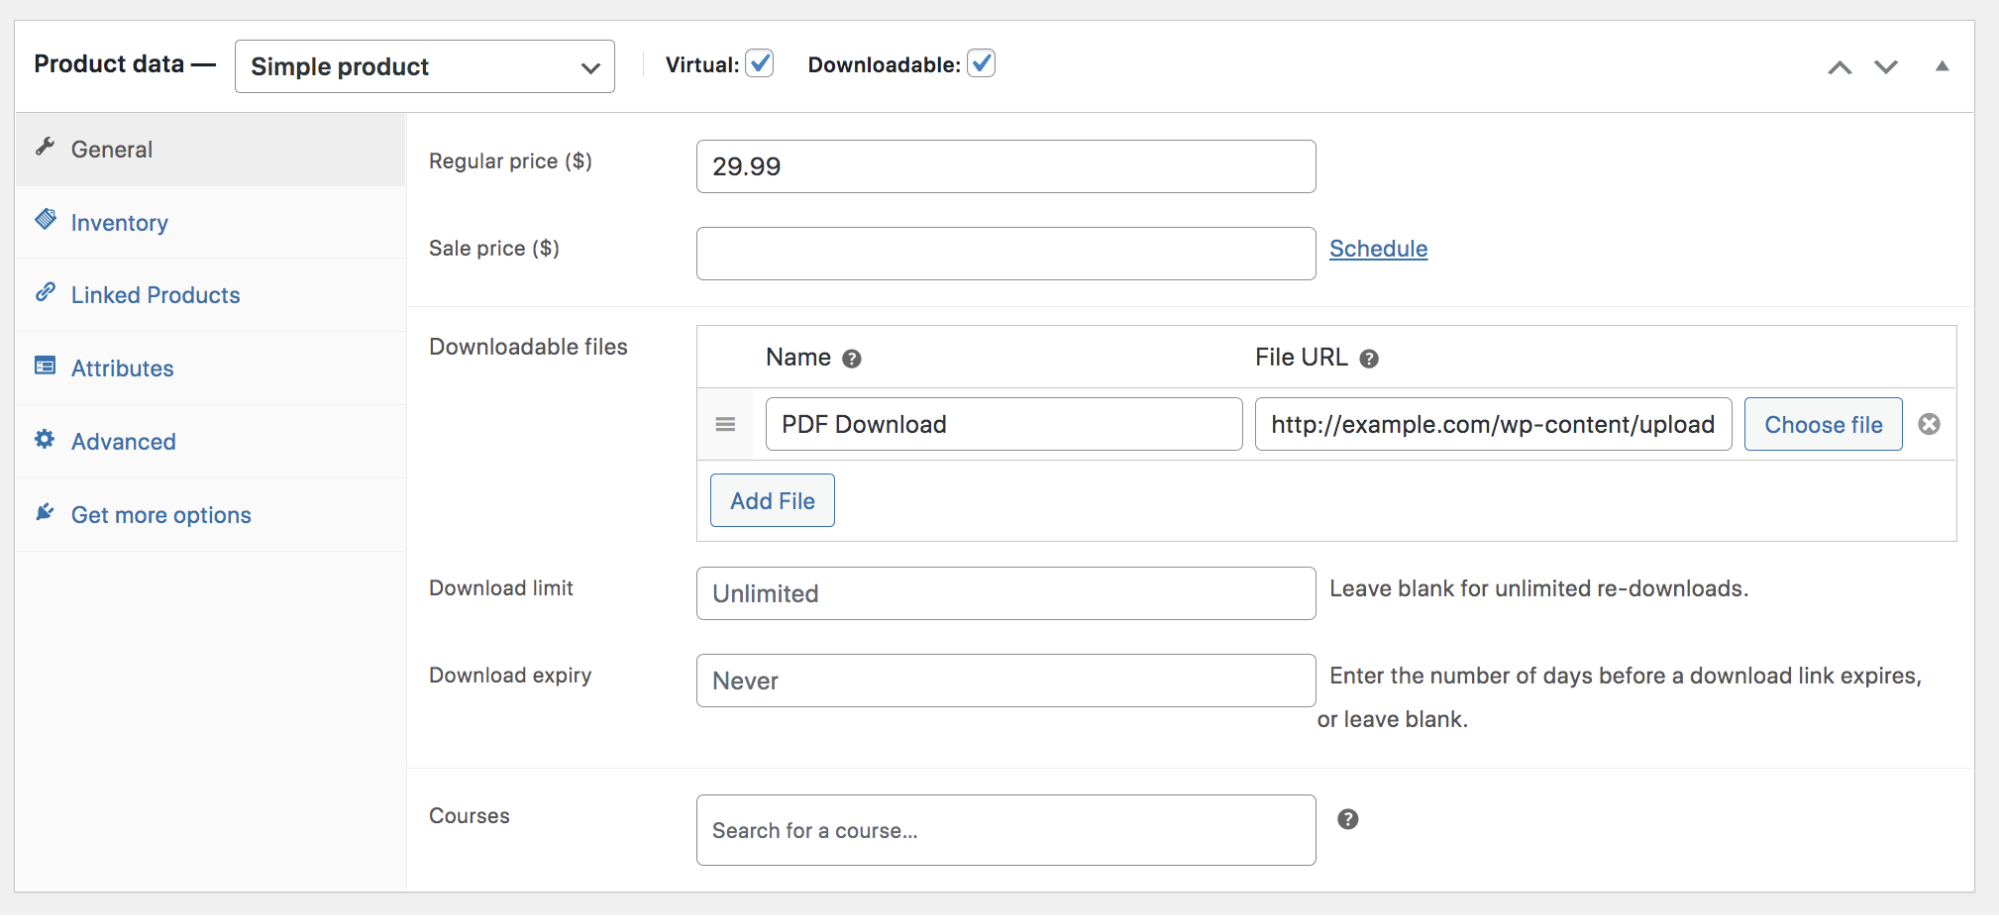
In the Product Data box, there are also settings for inventory levels, SKU numbers, related items, and more.
Now, keep scrolling down to the Product short description box, where you’ll add a description for your product. Think through what information customers will find the most helpful in convincing them to buy. But keep things concise — this info shows up right beside your product photo, so you don’t have a ton of room. Save extra details for the large text box right underneath the Product name field.

There are just a couple of steps left to publish your product and the first is to add images. Even though your items are digital, you’ll still want to give people an idea of what they’re getting. For eBooks, consider making a mockup book cover, or including previews of pages. For sewing or craft templates, show photos of the finished products. For music files, add cover art.
To include photos, look in the right-hand column for the Set product image link. This will allow you to upload the primary, featured image that will show up first for your item. You can also add secondary gallery images by clicking Add product gallery images.
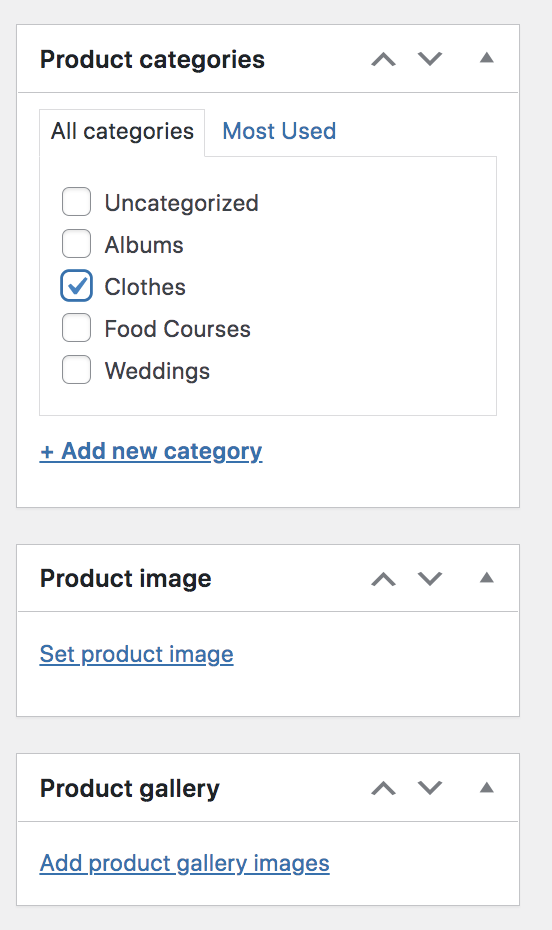
Finally, you can choose a category for your product, if you have several that you’d like to group. All you need to do is add a category in the Product categories box in the right-hand column.
Now, just publish your product, and you’re live!
To learn even more about adding products, along with setting up the cart and checkout pages, read the full WooCommerce documentation.
How to add download limits and expiry dates to WooCommerce downloadable content
Your product download limit is the number of times customers can download the file they purchased. A higher download limit may make things easier for shoppers. But if you’re having issues with people sharing your downloads with friends and family members who didn’t pay for them, you may want to lower this number.
The expiry date is the number of days customers have to download their product before the links expire. Again, a higher number may provide a better experience, but a lower number is more secure.
To set these for your product, go to Products in your WordPress dashboard, and open the one you want to edit. In the Product data box, you’ll see fields for both the Download limit and Download expiry. Note that you can leave the download limit blank to allow for unlimited downloads. Once you’ve made those changes, simply save the product.

What are the different download methods for digital products on WooCommerce?
Once a customer purchases your digital products, how do they access the files? There are a few different options you can choose from:
- Force downloads. With this setting turned on, WooCommerce uses PHP to force file downloads and hides the file URL. This means that customers can’t directly link to your digital products and allow people who haven’t purchased to download them. However, it’s important to note that if you have very large files or a lower-quality server, this could cause timeouts during the download process.
- X-Accel-Redirect/X-Sendfile. This turns the download process over to your hosting provider, ultimately resulting in the best-performing and most reliable method. However, it does require that your host have the X-Accel-Redirect/X-Sendfile module enabled. If you’re not sure whether or not it’s turned on for your site, reach out to your provider.
- Redirect only. This method means that, when customers download your products, the link redirects to the file. Turning this on doesn’t secure your files and means that people can download them even if they’re not logged into their account.
There are pros and cons of each of the methods. Consider your unique website, hosting plan, and customer base when choosing one. Ideally, you’ll want a balance of user friendliness and security.
There are also a couple of other settings that apply to the download process:
- Allow using redirect mode (insecure) as a last resort. You may want to turn this on if you’re using either of the first two download methods. When enabled, the Redirect method will be used if there’s a problem with the primary method, like a server timeout. While this does make things a bit less secure, it only kicks in if there’s an issue and ultimately provides a better user experience. It can keep you from having to deal with frustrated customers who may not return to make another purchase.
- Downloads require login. This means that customers have to log in to download their purchases, which provides more security.
- Grant access to downloadable products after payment. This gives file access to customers when orders are Processing, instead of waiting until they’re Completed.
- Append a unique string to filename for security. This is checked by default, and adds extra characters to the end of each file to make them unique for individual customers.
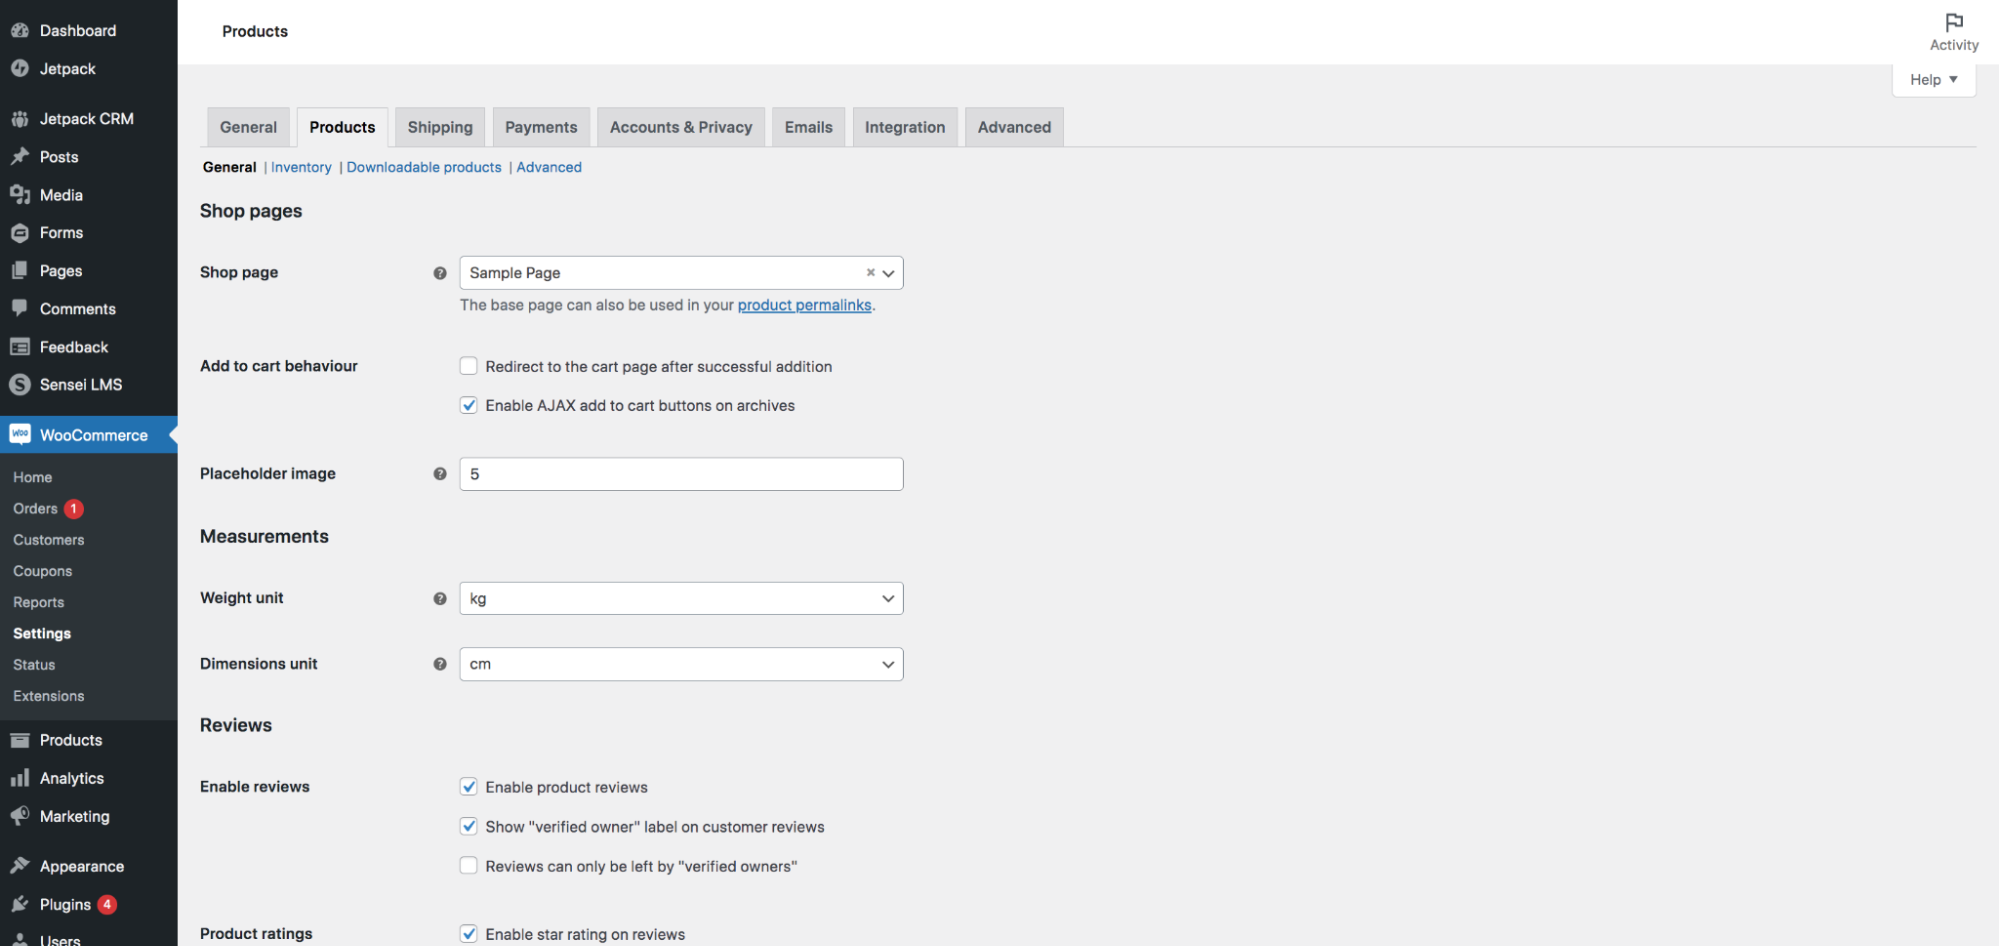
You can access all of these settings by going to WooCommerce → Settings → Products → Downloadable Products. Learn more about each one in the WooCommerce documentation.
How to analyze your digital product sales data on WordPress
Now that your store is up and running, it’s important that you keep an eye on sales data so you can find opportunities for improvement and ultimately increase your sales. WooCommerce provides a lot of great information by default, which you can find by navigating to Analytics in your WordPress dashboard.
In the Overview section, you can see basic information like total sales, net sales, views, and products sold. You can also filter this data based on date ranges. To get even more granular, click on the options under Analytics to view specific data on products, variations, coupons, stock, and more.
For example, the Categories section will show information based on each of the categories in your store. So if you sell sheet music, you can find out exactly how many pieces of piano music were sold in a given time frame, compared to guitar music.
In the Downloads section, you can view data about the sales of your digital products specifically. Learn more about WooCommerce Analytics.
If you want to track even more, like which of your advertising campaigns are leading to the most sales, you’ll also want to set up Google Analytics. This will open up a wealth of information that can help you make important decisions about marketing strategies, design choices, and merchandising. And Jetpack makes it super easy to install Google Analytics tracking tags, though you can also do this manually.
The importance of website security for sites selling digital products
Security is absolutely imperative for any website, but even more so for eCommerce stores. Why? Because online stores also handle sensitive customer information like addresses.
A lot of protecting your digital products goes back to some of the things we’ve already discussed. Make sure that you choose a high-quality payment gateway that secures customer payment information. And choose to force downloads and append unique strings to your file URLs, if at all possible.
However, there are some additional considerations here. If a hacker gets into your website, they can replace your digital products with malicious software or redirect them to dangerous URLs. This can put your customers at risk and ultimately damage your reputation. Here are a few steps you can take to protect your website against hackers:
- Protect your store with a web application firewall (WAF). A website firewall is your first line of defense against bad actors. They analyze incoming traffic to a site and decide to allow or block it based on various rules. A good WordPress firewall will be backed by a team of security experts who automatically update your firewall’s rules as exploits become known to keep your site protected around the clock.
- Block brute force attacks. These types of attacks occur when hackers use bots to guess your username and password — thousands of combinations per minute! Implementing a tool specifically designed to block brute force attacks is your best security measure here.
- Automatically scan for malware. If a hacker manages to get into your website and add malware, you want to know about it as quickly as possible. A WordPress malware scanning tool lets you know the second malware is found, allowing you to get ahead of things, before they impact your customers.
- Keep an activity log. A WordPress activity log lets you track every action that takes place on your site, along with who performed each one and when it occurred. This enables you to identify suspicious behavior that could potentially harm your website.
- Find out the second your site goes down. A down website is one potential indication of a hack, or even a malicious actor trying to access your site. Set up a tool with downtime alerts so you can troubleshoot and restore it right away. This means fewer lost sales!
- Prevent spammy comments and reviews. Spammers can plague your reviews and comments with unrelated or dangerous messages, putting your customers at risk. A WordPress anti-spam tool can flag anything that looks suspicious, keeping it off your website.
- Secure your login page. Your login page is the access portal to your store, so you want it to be as secure as possible. One way to do this is by enabling two-factor authentication for all administrative users. Each time you log in, you’ll get a unique code sent to your device that you’ll need to enter to access the dashboard. Because it’s incredibly unlikely that a hacker would have your phone in hand, this is a very effective measure.
- Regularly update WordPress, plugins, and themes. Updating all of your software to its latest version helps secure potential bugs and vulnerabilities that hackers could take advantage of. Stay on top of regular updates and, to make things easier, consider turning on auto-updates.
It’s also important that you always have backups available that you can restore in case anything does go wrong. This can save you a lot of time and hassle by returning your site to its previous state with just a few clicks. Jetpack Backup is the best backup plugin for WooCommerce stores because it saves copies of your site in real-time — every time you add a product, update inventory, or make a sale. Plus, it stores your backups on secure servers completely separate from your site, which you can restore even if your website is completely down.
You can access all of these valuable security features in one easy-to-use package with the Jetpack Security plan for WordPress.
Want more information? Learn about WordPress security basics and all the steps you can take to secure your WooCommerce store.
