
The WordPress database stores all the information for your site and enables you to make changes to your content. And if you’re new to WordPress, you might not know how to access and use this database.
Fortunately, it’s not as complicated as you might think. Once you learn the basics, you can secure your database, resolve errors, and perform vital tasks when you don’t have access to the dashboard.
In this guide, we’ll take a closer look at the WordPress database. Then, we’ll show you how to access, create, and secure it. Plus, we’ll cover some common database issues and their fixes.
What is a WordPress database?
The WordPress database is a collection of your site’s data. This is where you’ll find all the files and tables to create and manage posts, pages, users, comments, and more.
To manage this data, you’ll need access to a special type of software. WordPress uses MySQL and relies on Hypertext Preprocessor (PHP) to store and fetch data from the database. PHP is the programming language that WordPress is built on.
Why does WordPress require a database?
Every WordPress site requires a database. Even if your site is small, there’s a lot more going on behind the scenes.
Your website is made up of different kinds of data like pages, user information, comments, settings, plugins, theme data, categories, tags, and more. Therefore, you need a separate place to store this information, as your website wouldn’t be able to accommodate all of it.
Thanks to the WordPress database, your website can function seamlessly and you (and others) can apply changes. Plus, if you need to switch to a different web host, you can make a copy of the database and move it to the new server, without losing your site’s valuable content.
How does a WordPress database work?
Now that you know what the WordPress database is, it can be useful to understand how it works. When you install WordPress to create a website, you’ll need to create a database to store important information.
This process is typically automated, especially when using a managed hosting plan. You can also configure a WordPress database manually, though this requires a fair bit of technical knowledge.
Once you’ve created a database, it will reside on your host’s server. Therefore, every time a user requests your website, their browser sends the request to your hosting server. Then, the server sends the data required to display your site, dynamically generating HTML pages.
WordPress uses MySQL. This software enables the database to store information and provide access to it.
Additionally, when data (like comments or posts) needs to be changed or deleted, WordPress sends a MySQL query to the database, instructing the action. It’s important to note that many of these queries work automatically. Therefore, you’ll be completely unaware of this process as you make changes to your site.
Some advanced users might prefer to access the database and run these queries manually. This way, you can perform tasks that you can’t do through the dashboard, like changing your account’s username and password. Plus, it can be a much faster way to execute certain commands.
What is inside a WordPress database?
The WordPress database is organized into tables that make it easy to find, view, and edit data on your website. Each table contains a specific type of data.
You’ll find one table for posts, one for comments, and so on. These tables often start with the wp_ prefix, so your comments table will be named something like wp_comments.
Within WordPress tables, you’ll find columns and fields that contain more specific information. So, if you open the wp_comments table, you’ll see fields like comment_ID, comment_author, and comment_date.
An overview of the tables in a WordPress database
Now that you know what’s inside the WordPress database, let’s take a closer look at the tables that you can access.
1. wp_posts
The wp_posts table contains the data for all content on your site. This isn’t specific to posts. Instead, it extends to pages, products, courses, revisions, custom post types, and any other content on your site.
2. wp_postmeta
As the name suggests, the wp_postmeta table supports all the meta information about your content. You’ll find the template used to display the page, custom fields, SEO information, and more.
3. wp_options
If you open the wp_options table, you can access most of the settings for your WordPress website. You can edit your site URL and admin URL, change the number of posts per page, adjust the time format, and more. Additionally, wp_options is used by some plugins to store the plugin settings.
4. wp_users
The wp_users table is where you’ll find user information like usernames, email addresses, and passwords.
5. wp_usermeta
With wp_users, you’ll find a corresponding wp_usermeta table that contains the meta information about users registered on your site.
6. wp_termeta
If you’re a standard WordPress user, wp_termeta shouldn’t concern you too much. It’s mainly used by developers to store custom metadata for terms under custom taxonomies. For example, WooCommerce uses wp_termeta to store metadata for product attributes and categories.
7. wp_terms
In wp_terms, you’ll find the terms for each of your taxonomies. To help you understand, individual taxonomy items (like tags and categories) are called taxonomies, while each tag and category within the taxonomies are known as terms.
8. wp_term_relationships
The wp_term_relationships table is an important one since it manages the relationship between WordPress post types and terms in the wp_terms table. This helps WordPress determine which category each of your posts is in.
9. wp_term_taxonomy
The wp_term_taxonomy table defines taxonomies for terms in the wp_terms table. Here, you’ll find all the data that says your term is associated with a taxonomy called category. This way, WordPress can differentiate between which term is a category, which is a tag, and so on.
10. wp_links
Within wp_links, you can access all the information needed to manage blogrolls that were created by earlier versions of WordPress.
11. wp_comments
The wp_comments table stores all data concerning your WordPress comments. Therefore, you can expect to find the user’s name, URL, email address, comment, and more.
12. wp_commentmeta
Lastly, the wp_commentmeta contains meta information about the comments posted on your site. This table consists of four main fields: comment_ID, meta_ID, meta_key, and meta_value. You might come to this table to check on the status of a comment to see whether it’s been approved, is pending approval, or is logged as trash.
How to access the WordPress database
It’s important to note that while you can access the WordPress database, you don’t need to access the database to manage your site. For most users, the WordPress dashboard is sufficient for carrying out the majority of tasks.
But there are some situations when it can be useful to access your database. If you’re a beginner, you might like to understand more about your site’s structure.
On the other hand, advanced users can access the database to perform tasks that can’t be done through the dashboard. Plus, the database enables you to troubleshoot common WordPress errors if you get locked out of your dashboard.
In the next section, we’ll show you two ways to access the WordPress database. Note that, if you’re on a shared hosting plan, you may not have access to the database. Therefore, you might need to ask your web host to make database changes for you.
1. Using phpMyAdmin
As we mentioned earlier, your WordPress database is stored on your host’s server. Therefore, you can access it by logging into your hosting account. This method varies depending on your host, but you’ll likely be using phpMyAdmin.
Before you get started, it’s important to make a fresh backup of your site in case anything goes wrong. The easiest way to do this is to use a backup plugin like Jetpack VaultPress Backup. If you accidentally delete an important site file, you can replace it with the one stored in your backup. If at all possible, you should use a staging website or development environment when making changes to a database.
To access phpMyAdmin, you’ll normally need to log into cPanel through your hosting account. Then, look for the Databases section and you should see an option for phpMyAdmin.

You might need to enter your database username and password to access the software. These should be different from the credentials you use to access cPanel.
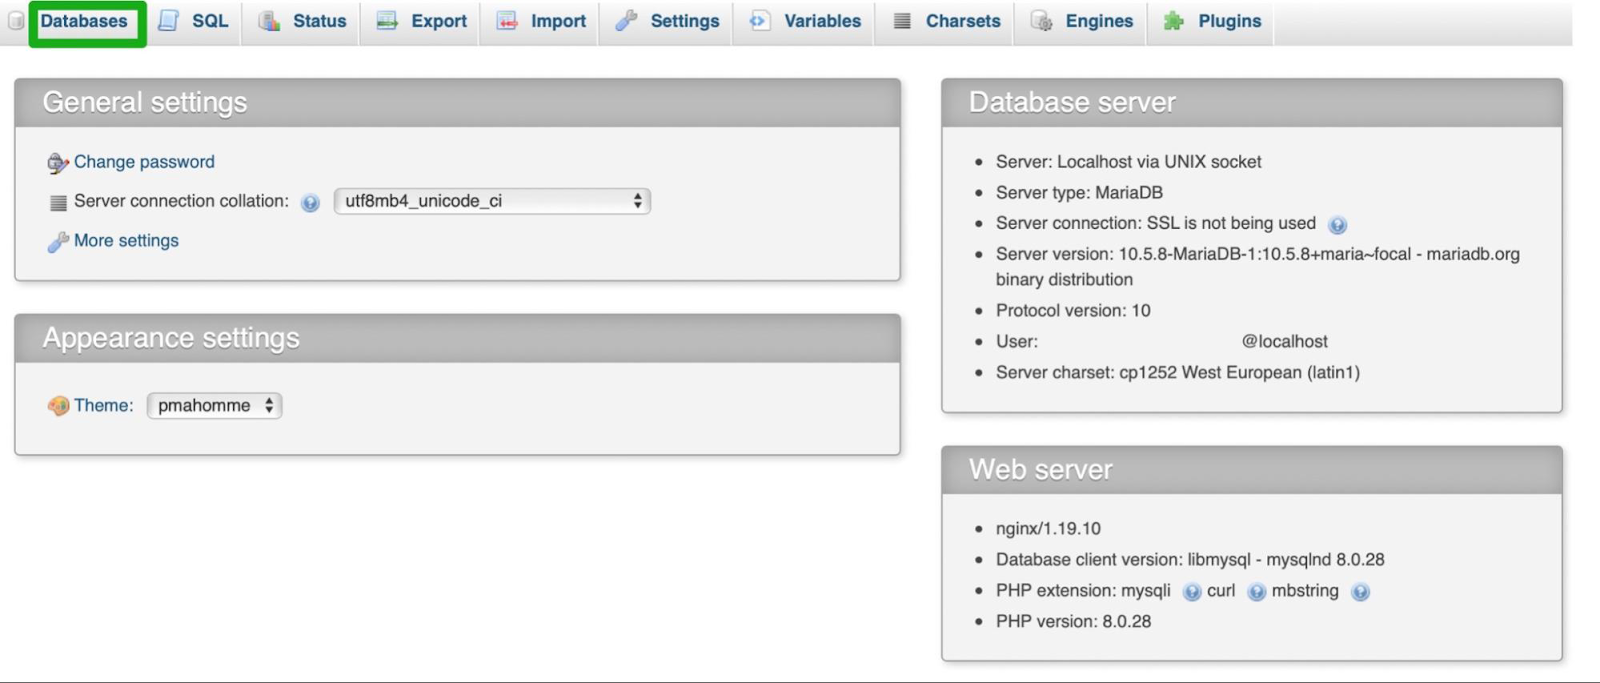
The phpMyAdmin interface should look something like this:
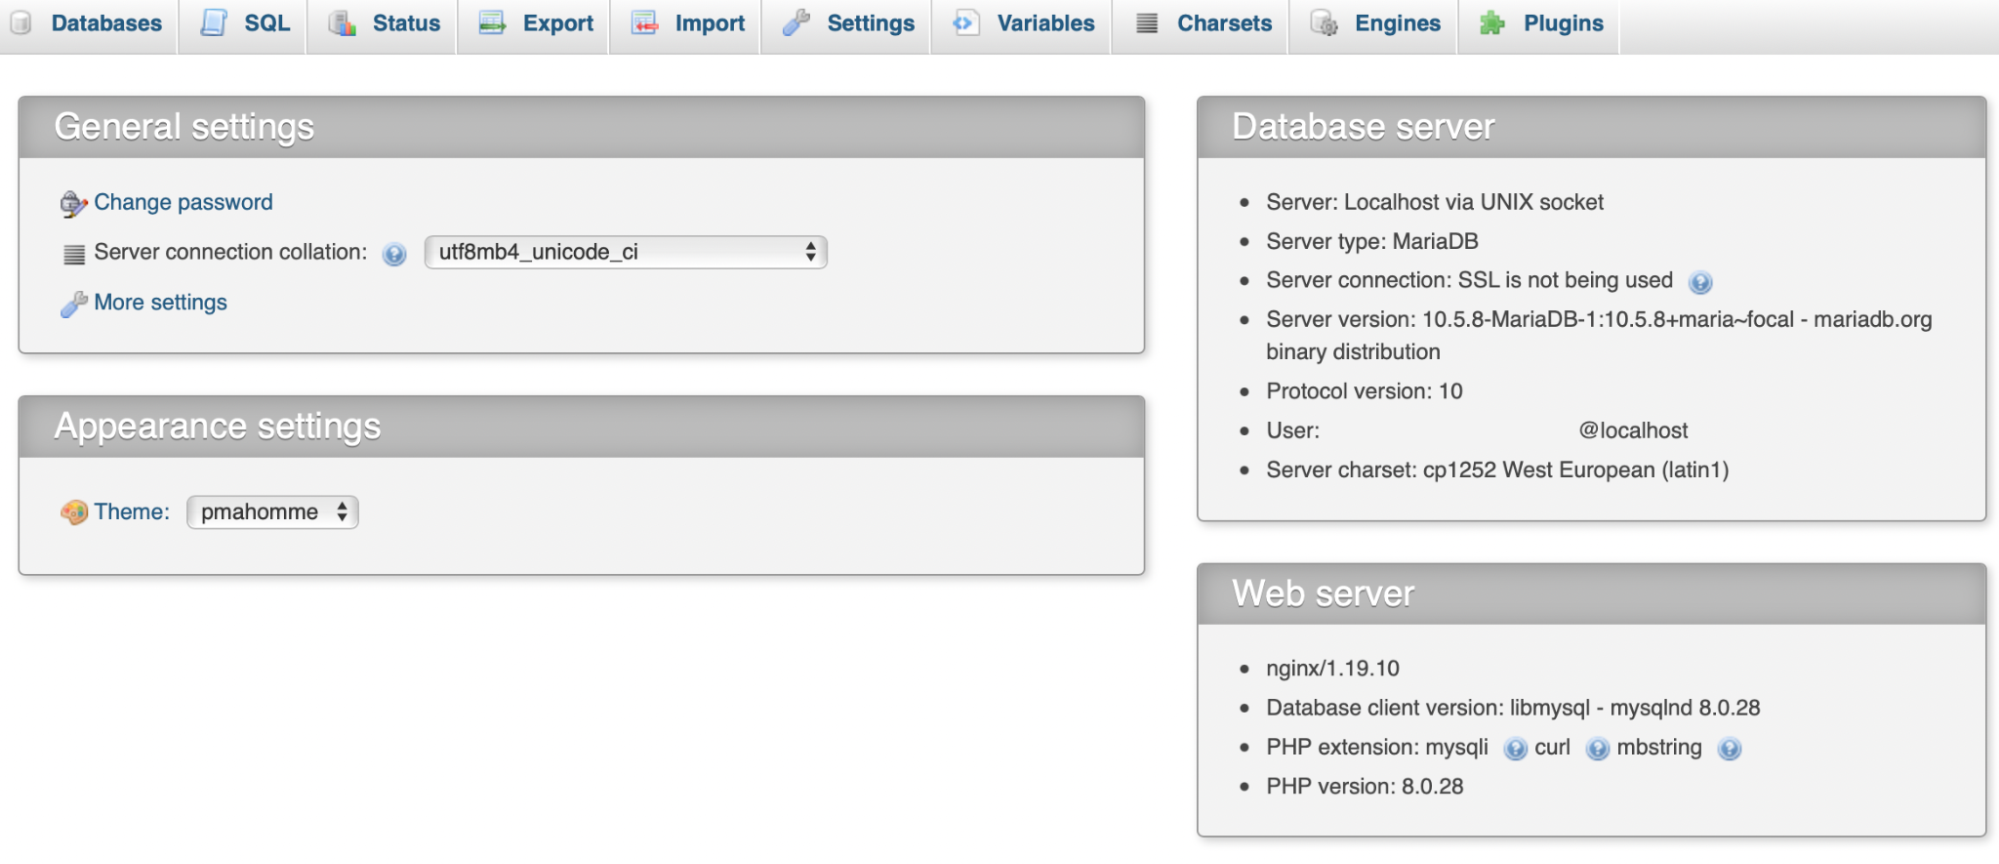
Next, click on Databases and choose your website from the menu. Now, you should see all the tables within your WordPress database.

Here, you can click on any of the tables to add, change, or delete data. If you’re making a change to a field, you’ll need to click on Browse. Then, find the exact row that you want to edit, and use the Edit link to do so.

Once you’re done editing, click on Go to apply the changes.
2. Using a WordPress plugin
If you don’t want to use phpMyAdmin to access the WordPress database, you can use a plugin instead. For example, you might not be comfortable using the interface and would prefer to remain in the WordPress dashboard.
WP Data Access enables you to perform database tasks without leaving your website. Once you’ve installed and activated the plugin, navigate to WP Data Access in your WordPress dashboard and use the Database dropdown to select your database.

Here, you can view all the tables within your database. These are presented similarly to posts and pages in WordPress, so you won’t need to learn a complex layout like phpMyAdmin.
When you hover over a table, you’ll see two options: Manage and Explore. If you click on Manage, you’ll be able to control all data on your site.
You can rename, copy, or export data. Meanwhile, the ALTER link enables you to edit the table directly.

If you click on Explore, you’ll find details about the table and where it’s used on your site. Note that some tables won’t display any options when clicked.
How to create a WordPress database
Now that you know how to access the WordPress database, let’s take a look at two ways to create one for your site.
1. Create a database with cPanel
The easiest way to create a WordPress database is to use cPanel. To get started, log into your hosting account and then the cPanel.
Now, look for the Databases section and select the MySQL Database Wizard.
In the Create Database Users area, enter the database name and click on Next Step.

Then, find Create Database Users and create the database username and password. To keep your database secure, make sure that you create a unique and strong password.

Now, click on Create User.

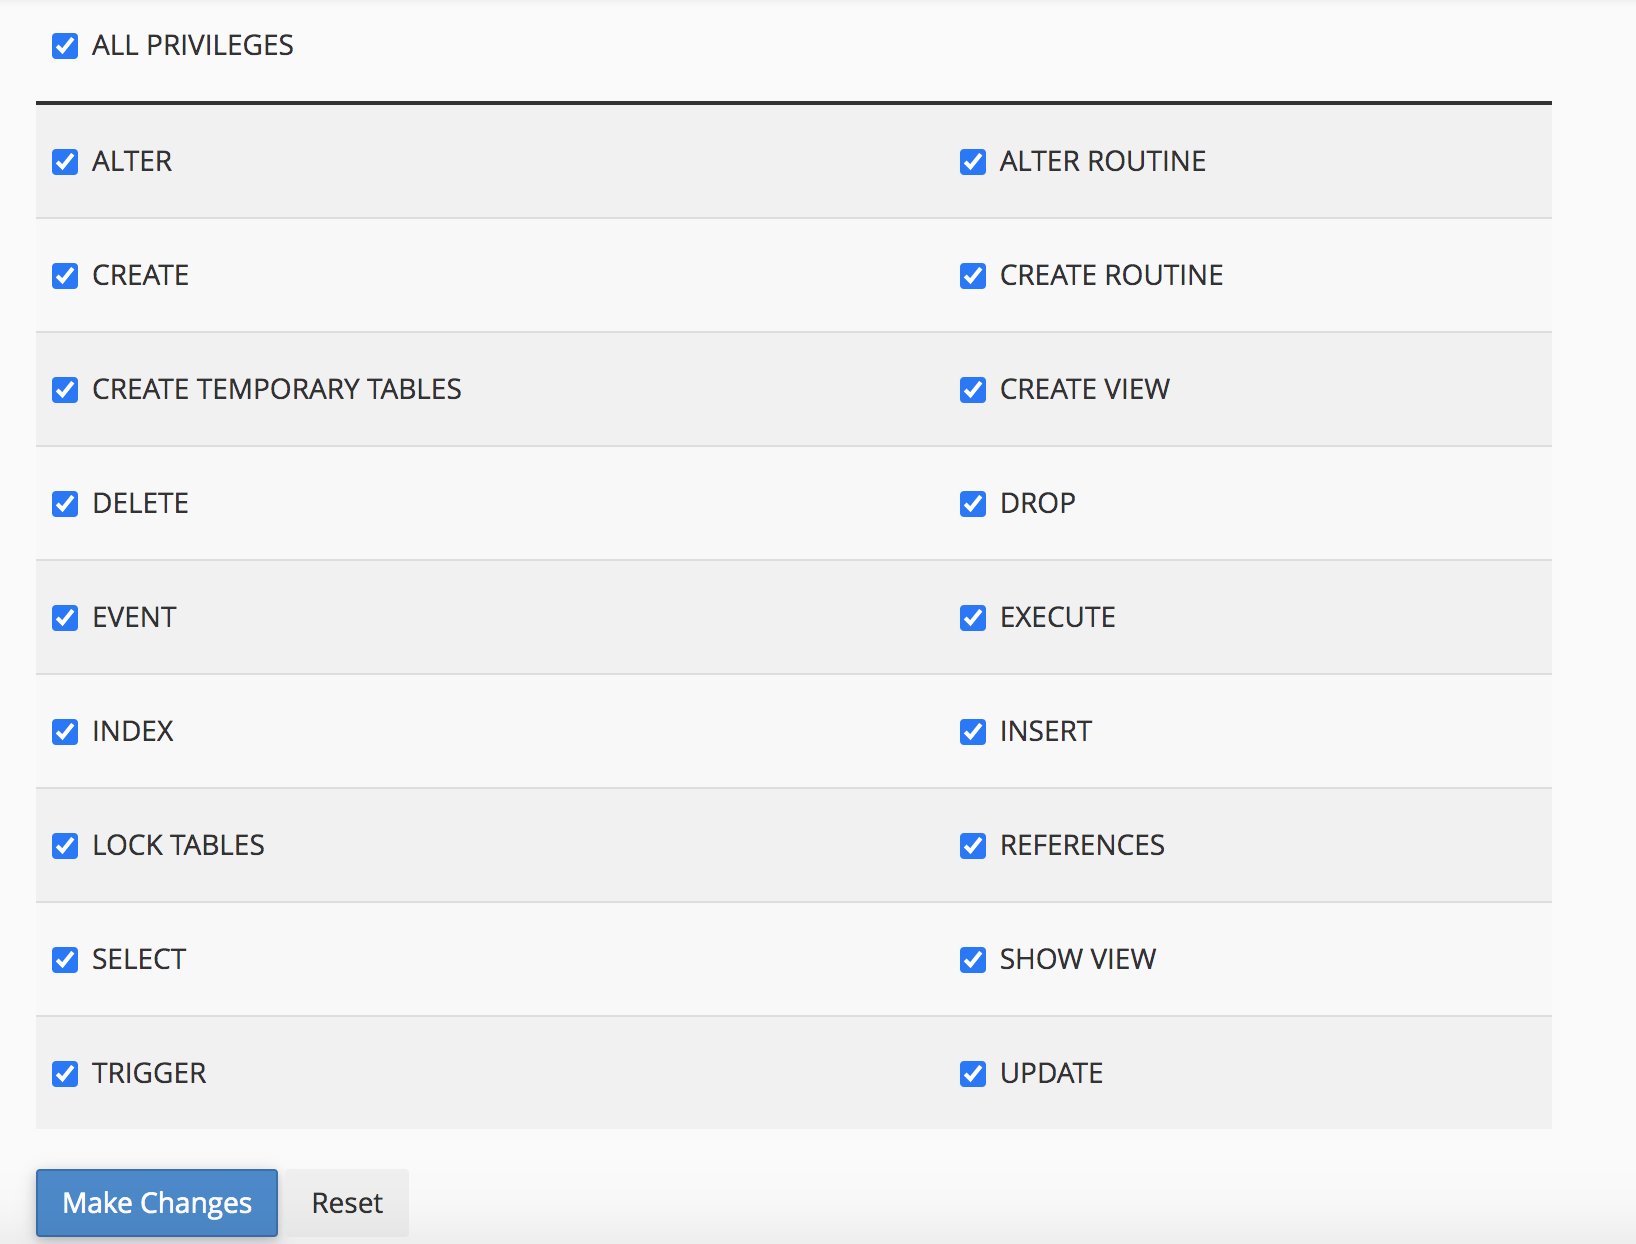
In Add User to Database, check the All Privileges checkbox and proceed by selecting Next Step. Here, it’s important to take note of the hostname, username, and database name so that you remember them for future reference.
2. Create a database with phpMyAdmin
The next way to create a WordPress database is to use phpMyAdmin. This can be slightly more complicated, but it’s a great solution for users that don’t have access to cPanel.
To get started, open phpMyAdmin from your hosting account. Then, click on the Database tab at the top of the screen.
Here, click on Create database and enter a database name. Then, choose the best configuration option for language and encoding.
Now, select phpMyAdmin to return to the main page and navigate to Users. This is where you can create users for your database.
Click on Add User and enter a name in the User field. Then, create a strong and unique password for the user.
You’ll want to leave the options under Global privileges as they are. When you’re ready, select Go and return to the Users screen.
Next, you’ll need to configure the correct permissions for each user with access to your database. Click on the Edit privileges icon. In the Database-specific privileges, select the new database under the Add privileges to the Server.localhost database dropdown. Then, click on Go.
The importance of backing up your database
Now that you have created a database for your WordPress website, let’s take a look at some of the best backup practices to keep your data secure.
1. Schedule regular backups
Making a backup of your WordPress database is great, but it’s important to remember that this isn’t a one-time thing. You must make backups at regular intervals so that you always have a recent copy of your WordPress data.
The easiest way to schedule regular backups is to use an automated plugin like Jetpack VaultPress Backup.

Once activated, the plugin will perform a backup of your site. Then, you can navigate to Jetpack → VaultPress Backup to see your backups in the cloud or view your most recent restore point.
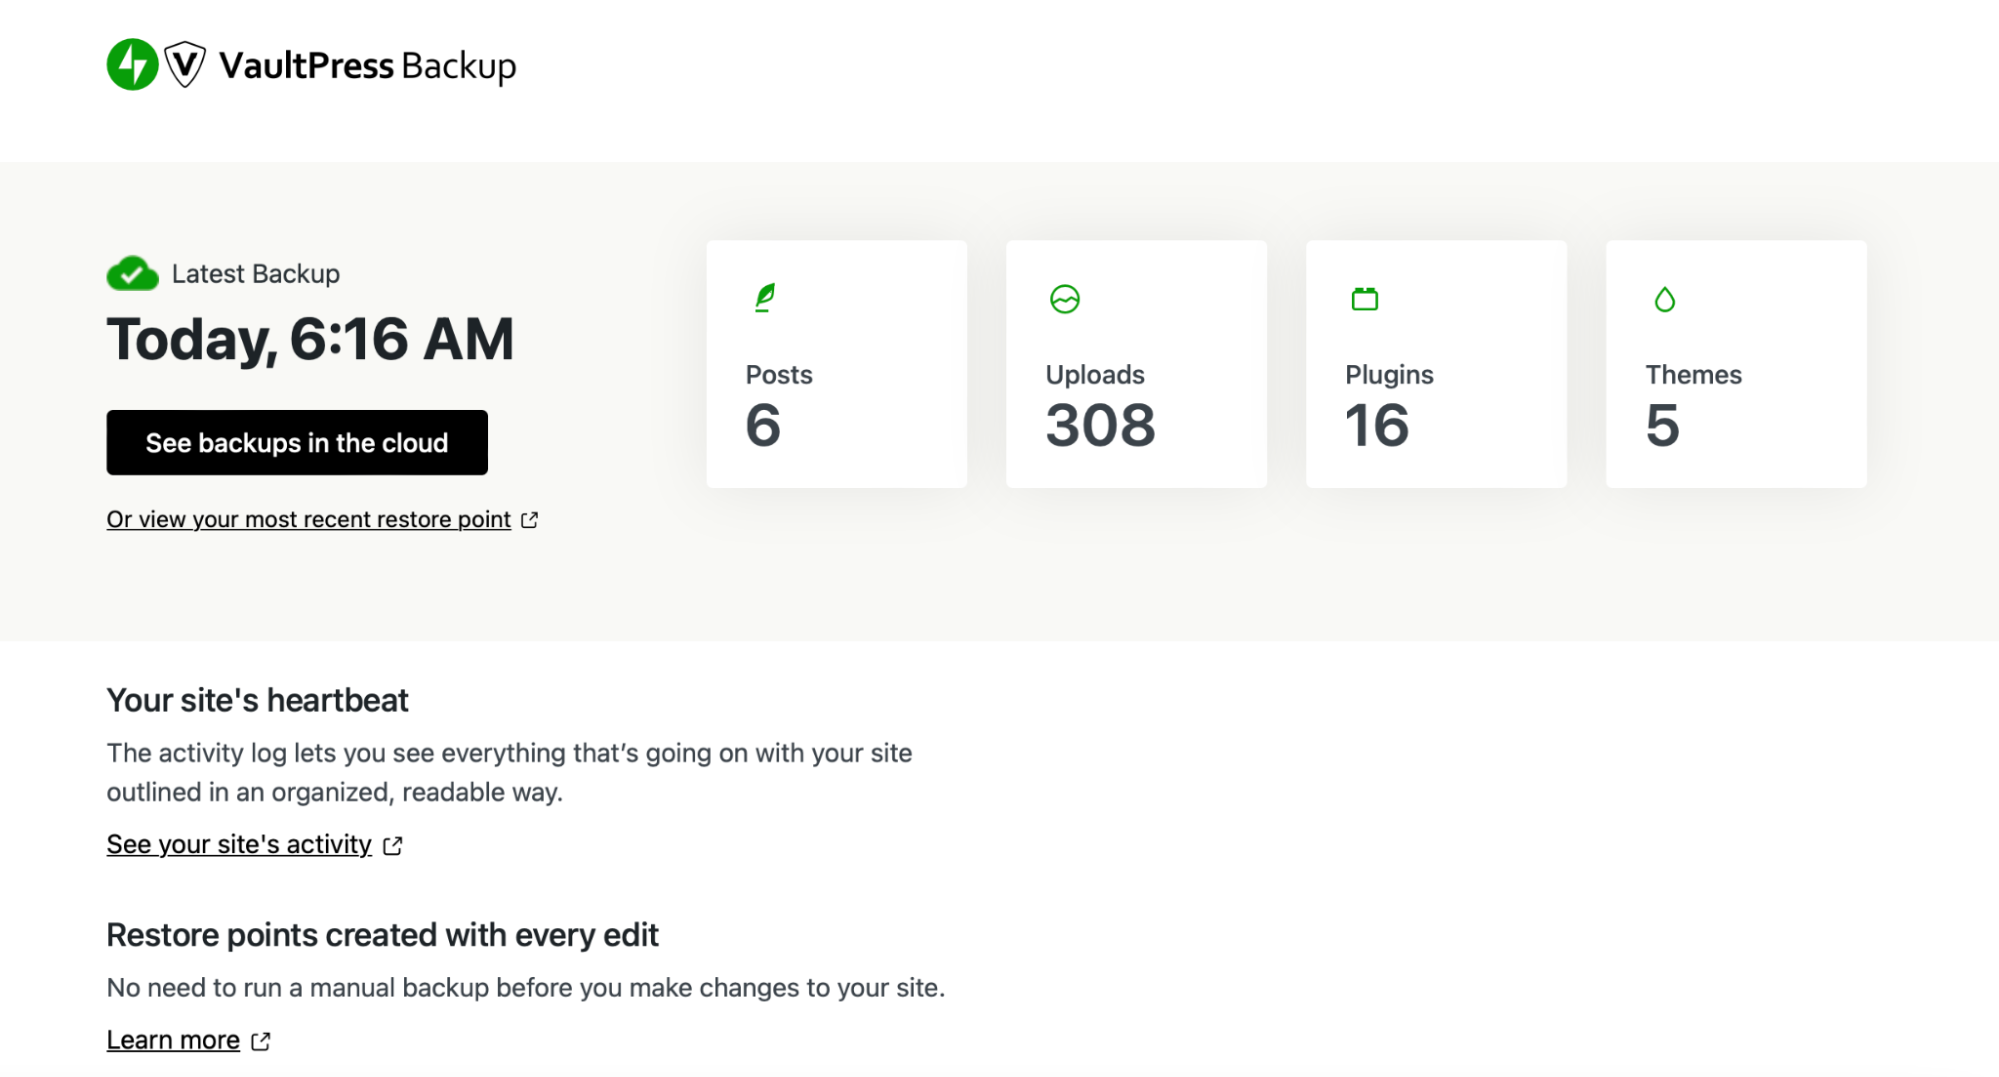
Jetpack VaultPress Backup will automatically save your website in real-time, so every single change made on your site — updated pages, new blog posts, customer orders, etc. — will always be available if you need it. The best part? You can restore a backup even if your site is completely down.
2. Securely store your backups off-site
It’s important to store backups offsite to keep your database copies safe. If your backups are stored on the same server as your site, they can be just as susceptible to online attacks and malware infections.
For this reason, you’ll want to choose a secure location to store your backups. You could download backups to your computer or save them to the cloud.
VaultPress Backup is, again, an ideal solution for this as it uses the same secure, off-site servers trusted by Automattic, the people behind WordPress.com.
3. Have a disaster recovery plan in place
Having a solid disaster recovery plan can help reduce the time needed to resolve a problem. Otherwise, you might waste precious time troubleshooting the problem.
Plus, if something goes wrong, your website might be offline and inaccessible to the public. Not only will you lose traffic and revenue, but this can also damage your reputation.
Jetpack VaultPress Backup offers one-click restores that are available even if you can’t access your dashboard. Plus, with the app, you can restore from nearly anywhere in the world.
The importance of securing your database
While backups are a must-have in case something goes wrong, you should also be mindful of preventative measures to make your database more secure. Let’s look at some of them.
1. Use strong passwords
One of the easiest ways to secure any aspect of your website is to use strong passwords. This goes for your WordPress dashboard, your hosting account, and your database.
It’s important to use a mix of letters, numbers, and symbols in your passwords. You’ll also want to make them long, using at least eight characters.
You can use a password generator to handle the process for you. If you’re worried about forgetting your passwords, you can store them with a password management tool.
2. Limit access to the database
Another way to secure the WordPress database is to limit the number of individuals that can use it. Only users that you trust should have access to your site’s data.
Additionally, you’ll want to make sure that they understand how to use it. The last thing you want is for a new user to find their way into the database and accidentally delete vital WordPress tables.
If you’re using a plugin to access your database, users with certain roles will have the ability to make database changes that could harm your site.
For this reason, and for general security-best practices, it’s always a good idea to regularly review your user roles and permissions, making sure that the correct privileges are assigned to the right people. You can do this from your WordPress dashboard by going to Users → All Users. Then, click on Edit and scroll down to Role.
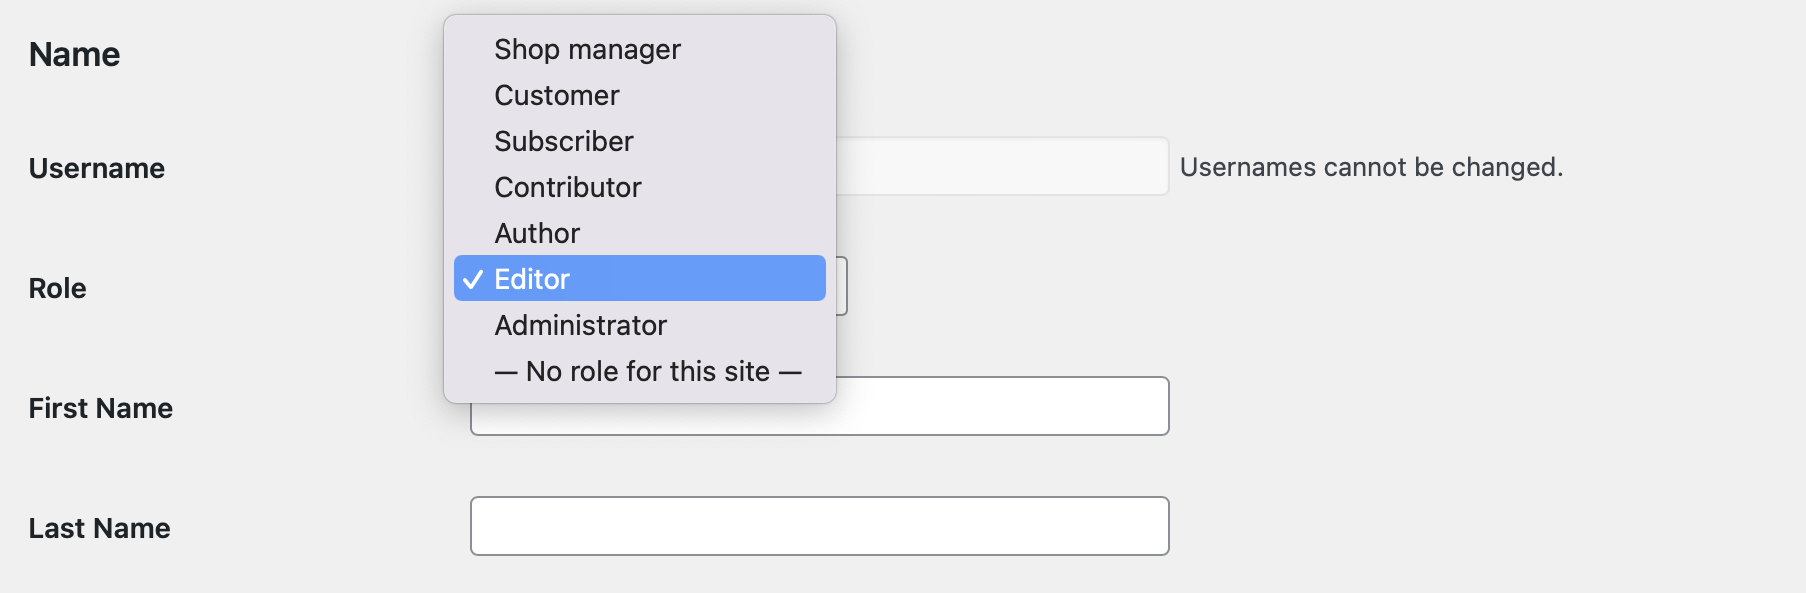
Here, use the dropdown to select the correct role for each user registered on your site. Typically, only administrators will have complete access to the database.
The same advice goes for any accounts on your cPanel or hosting provider’s dashboard.
3. Keep software up-to-date
Updating software can increase security on your WordPress site. This includes plugins, themes, and WordPress Core.
When you have outdated tools on your site, hackers might exploit vulnerabilities in the software to gain entry. Updates typically contain patches for these security flaws, so you’ll want to run them as soon as they’re released.
4. Monitor database logs for suspicious activity
Another way to secure the WordPress database is to monitor logs for suspicious activity. Database logs enable you to track all user activity so that you can see all actions taken on your site, all requests made, and all errors encountered.
Typically, you can view your logs through cPanel. Here, you’ll find a Log Viewer where you can monitor these activities:

If you use a plugin like VaultPress Backup, you’ll also get access to an activity log that lets you see everything that happens on your website. Note that it will not, however, log changes made directly in the database, but can be an excellent indication of suspicious activity and a handy tool when troubleshooting common WordPress errors.
5. Consider an enterprise security plugin like Jetpack Security
One of the best solutions for protecting your WordPress database is to use an enterprise security plugin like Jetpack Security. With this tool, you’ll get a suite of advanced features in one installation.
This includes Jetpack’s Web Application Firewall (WAF), which blocks malicious traffic from reaching your website. Plus, the plugin provides complete comment and spam protection, and conducts automatic malware scans.
With Jetpack Security, you’ll also get an activity log for your site. This way, you can view every action and find the cause of any issue that arises.
The plugin also comes with VaultPress Backup, enabling you to make real-time backups of your website, database tables, WooCommerce data, and more. Better yet, with the mobile app, you can restore your site from any location.
How to optimize your database
Over time, your database performance starts to slow down. This typically happens because the database has grown in size since you first launched your site. Therefore, the query execution time will get slower as your memory overheads increase.
Fortunately, there are plenty of ways to optimize your WordPress database. One of the quickest methods is to run a MySQL command.
To get started, open phpMyAdmin and click on your database to see the list of WordPress tables. Then, select the Check All option below the tables and use the With Selected dropdown menu to choose Optimize table.

This will defragment the selected tables, making queries run a bit faster. Plus, it will slightly reduce the size of the database.
How to migrate your database to a new server or hosting provider
You might find yourself in a situation where you need to migrate your database. For instance, you might want to move your site to a new server or hosting provider.
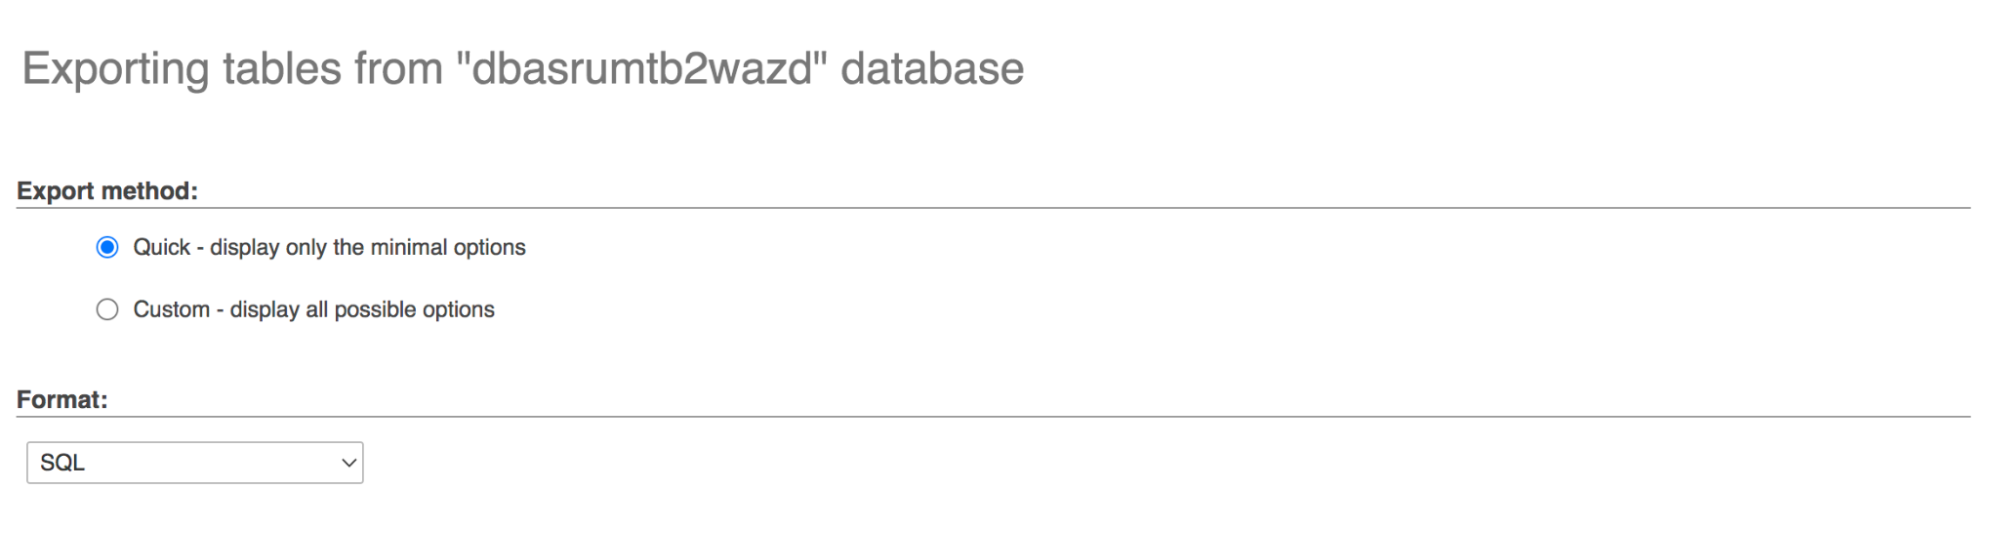
First, you’ll need to navigate to phpMyAdmin in your current hosting account and select your database in the list on the left-hand side. Then, click the Export tab.
You can either choose a Quick export, which is plenty for most websites, or a Custom export, which allows you to configure settings for the database export. Then, click Go, and the file will download to your computer.
Now, navigate to your new hosting provider, where you’ll need to create a new database user. This will vary depending on your host, but if you’re using cPanel, you’ll take the following steps:
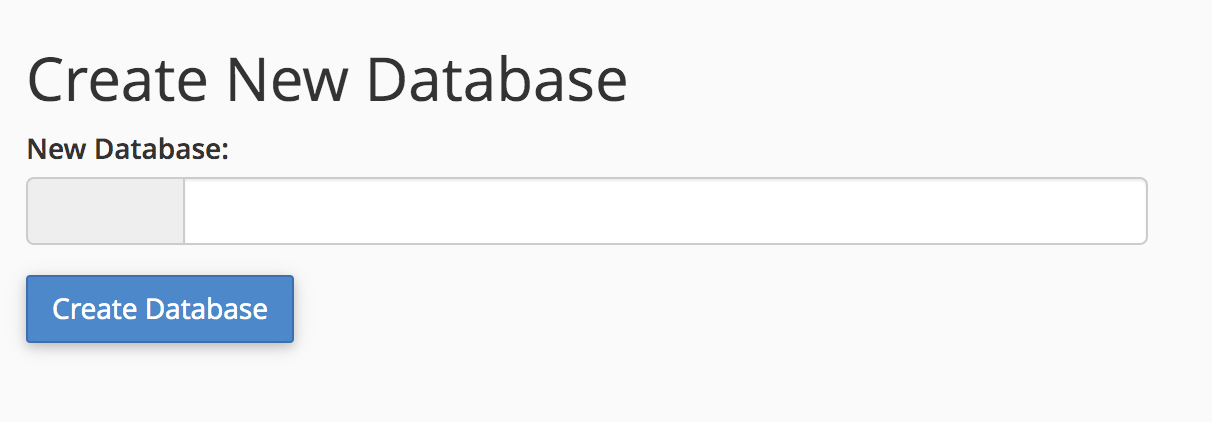
Under Databases, select MySQL Databases. Create a database name and click Create Database.
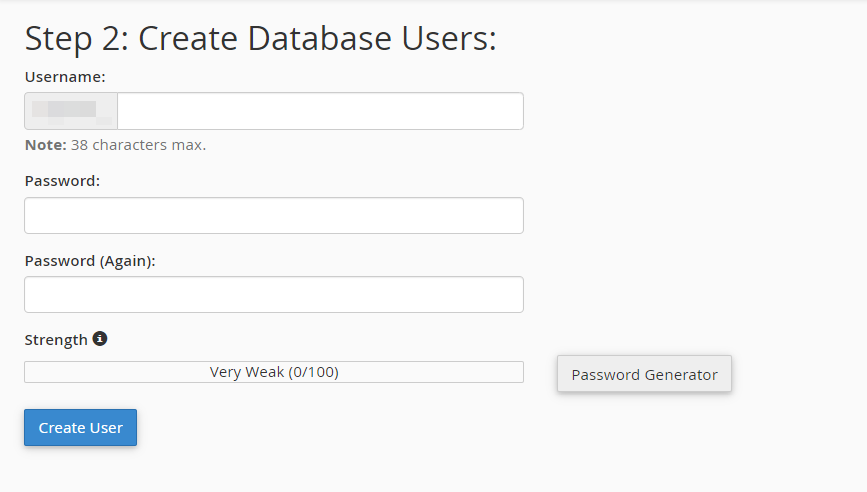
Scroll down and find the Add New User section. Create a new user here, keeping in mind security best practices for the password you generate. Click Create User.
Scroll to the Add User to Database section. In the User dropdown, choose your new user. In the Database dropdown, choose your new database. Click Add. A new screen will appear, allowing you to set permissions for the new user. Check the box next to All Privileges, then click Make Changes.
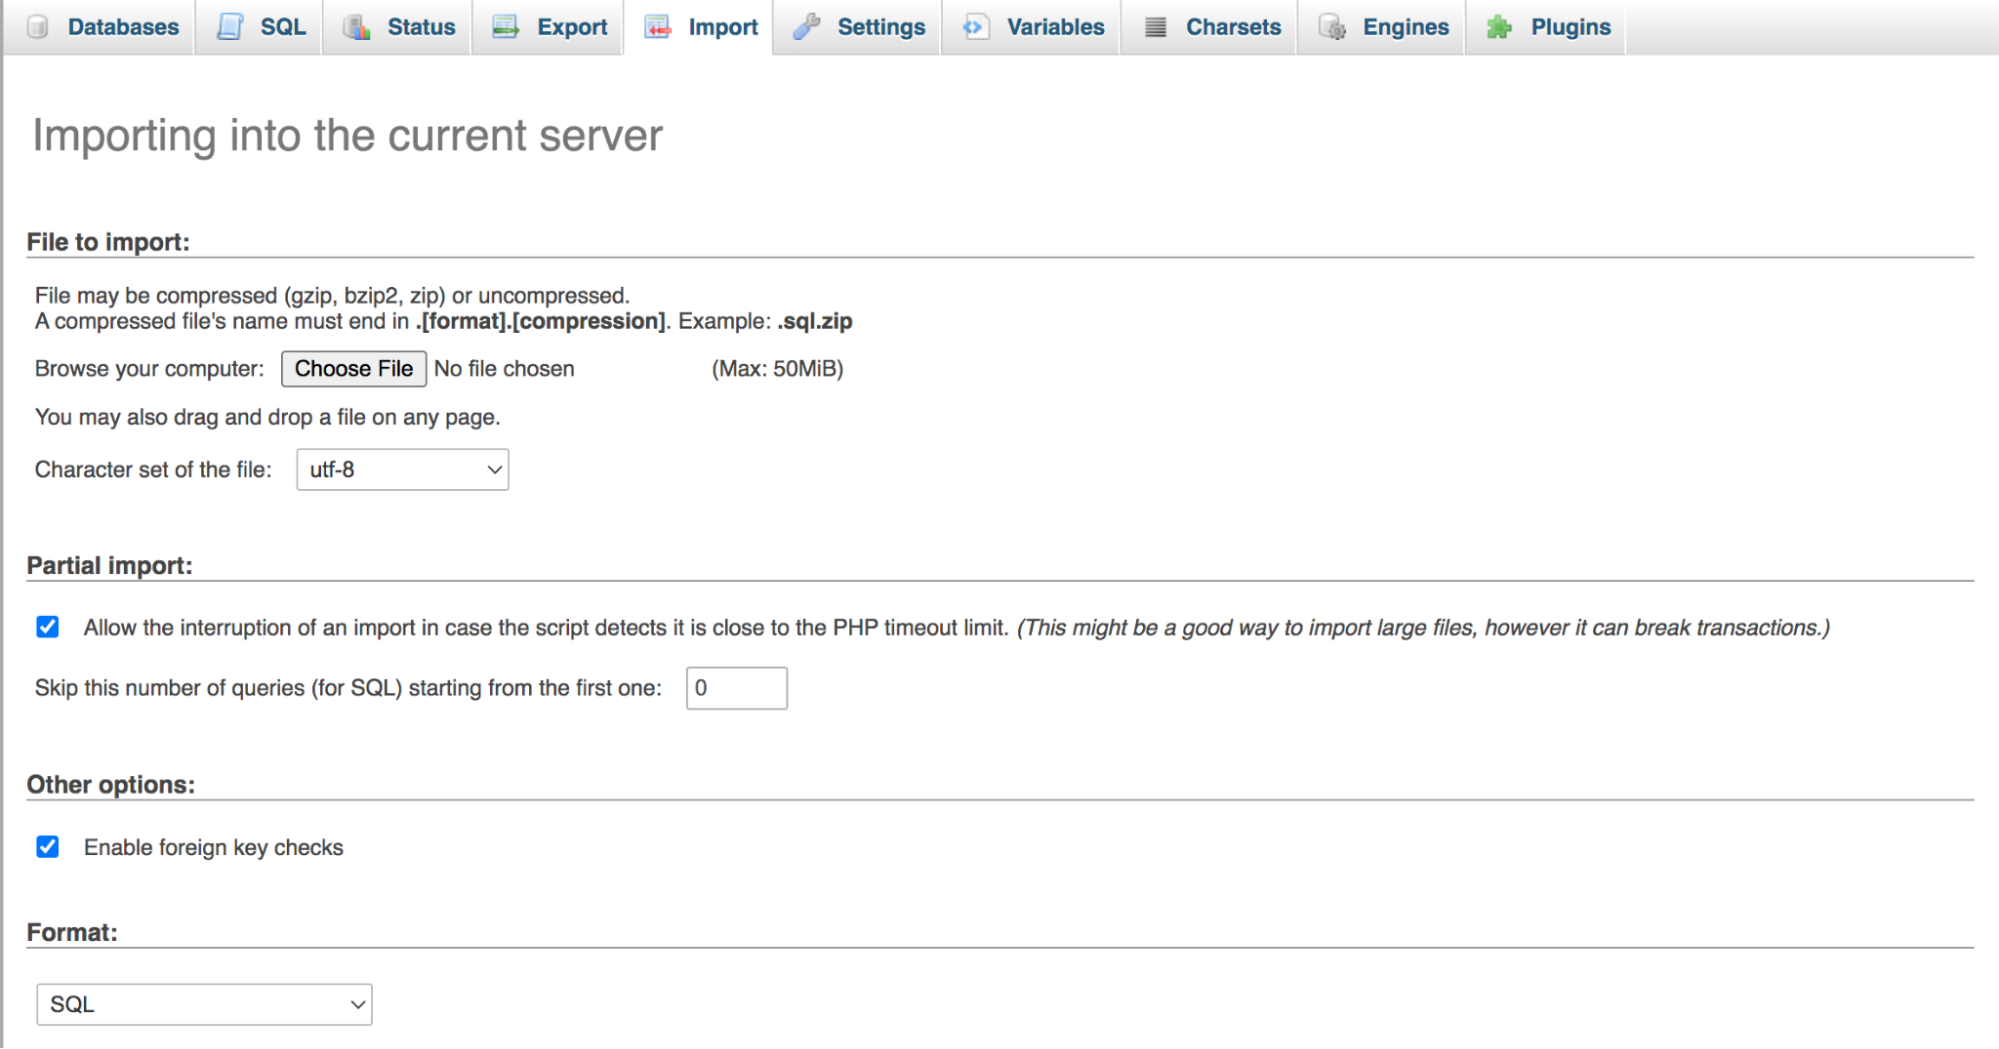
Now, navigate to phpMyAdmin in cPanel and select the new database you created in the left-hand list. Click the Import tab at the top. Upload the database file you saved earlier, then click Go.
And your database is migrated! Your final step will be to tell your site on the new host that it should use the new database. Note that this step assumes that you’ve already migrated your website files to your new hosting provider.
Navigate to your File Manager, find your website’s folder (typically public_html) and open the wp-config.php file. Find the following block of code:
/** MySQL database username */

define('DB_USER', ‘sample_username’);

/** MySQL database password */

define('DB_PASSWORD', ‘27839hafgdl’);
Replace the username and password with the ones you created for your new database, being sure to keep the quotation marks in place. In the example above, you’d replace ‘sample_username’ with ‘new_username’ and ‘27839hafgdl’ with ‘newpassword’. And that’s it!
If you’re looking for a simpler solution, you can use a plugin like Duplicator to export and import databases between sites.
Common database uses
At this point, you might be wondering how to utilize the WordPress database. Let’s look at four common use cases.
1. Edit post or page content
One of the most popular ways to use phpMyAdmin is to edit post or page content from the interface. All you need to do is open phpMyAdmin from your hosting account. Then, click on Databases and select the database for your website.
Next, locate the wp_posts table. This is where WordPress stores all content like posts, pages, custom post types, and more.

Here, you’ll see a list of all content items on your site. You can also see information like the post status and comment status for each of your pages and posts.
Once you find the post that you want to modify, click on the Edit link. Then, you can change the post content, post title, comment status, post excerpt, and more.
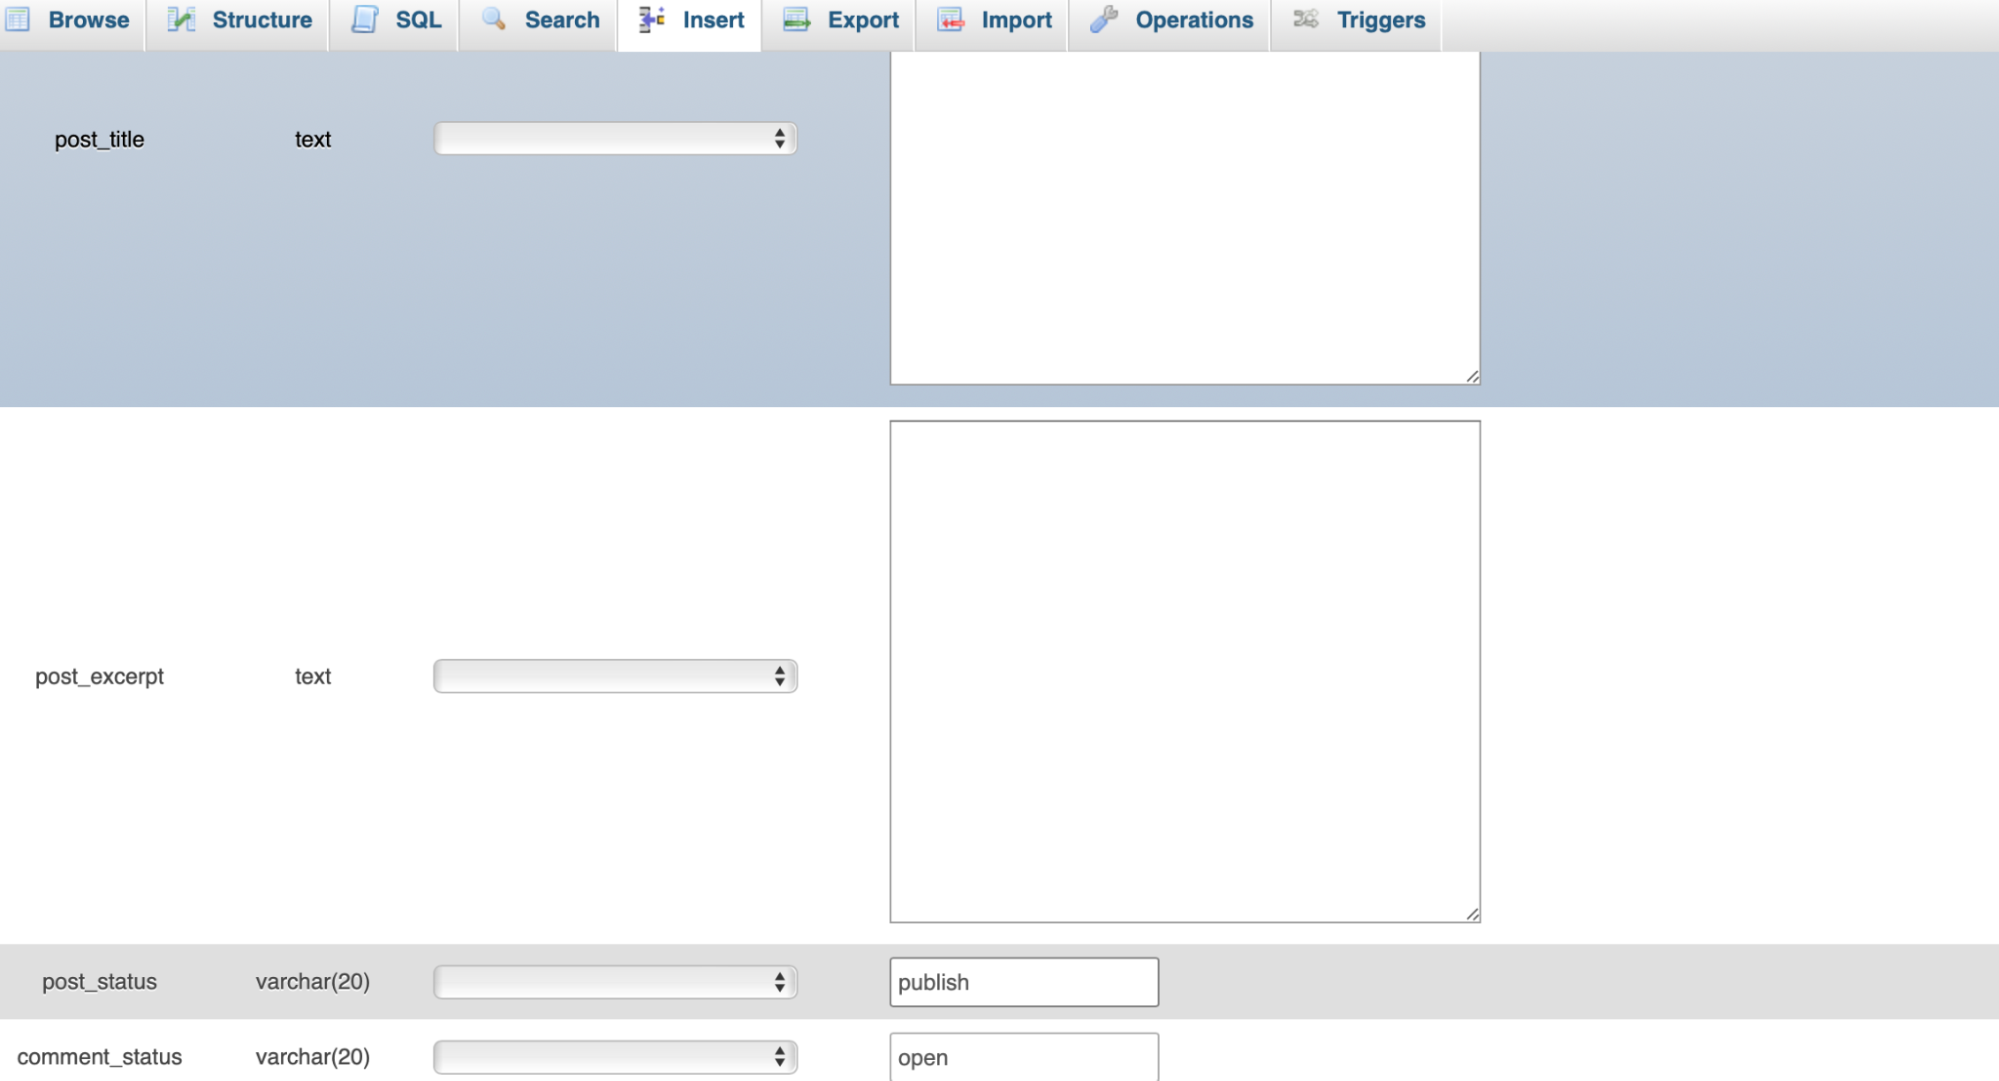
Once you have finished making changes to the post, click on Go at the bottom of the screen to save your work.
2. Change user information
You might also find it useful to change user information from the phpMyAdmin interface. For instance, you might wish to reset your WordPress password.
To do this, launch phpMyAdmin and select your database. Then, locate the wp_users table and click on Browse.
Now, you’ll see a list of all the users registered on your site. Click on Edit next to the user account that you need to change.
Here, you’ll see all the user fields that you can edit, like the username, email, password, and more.
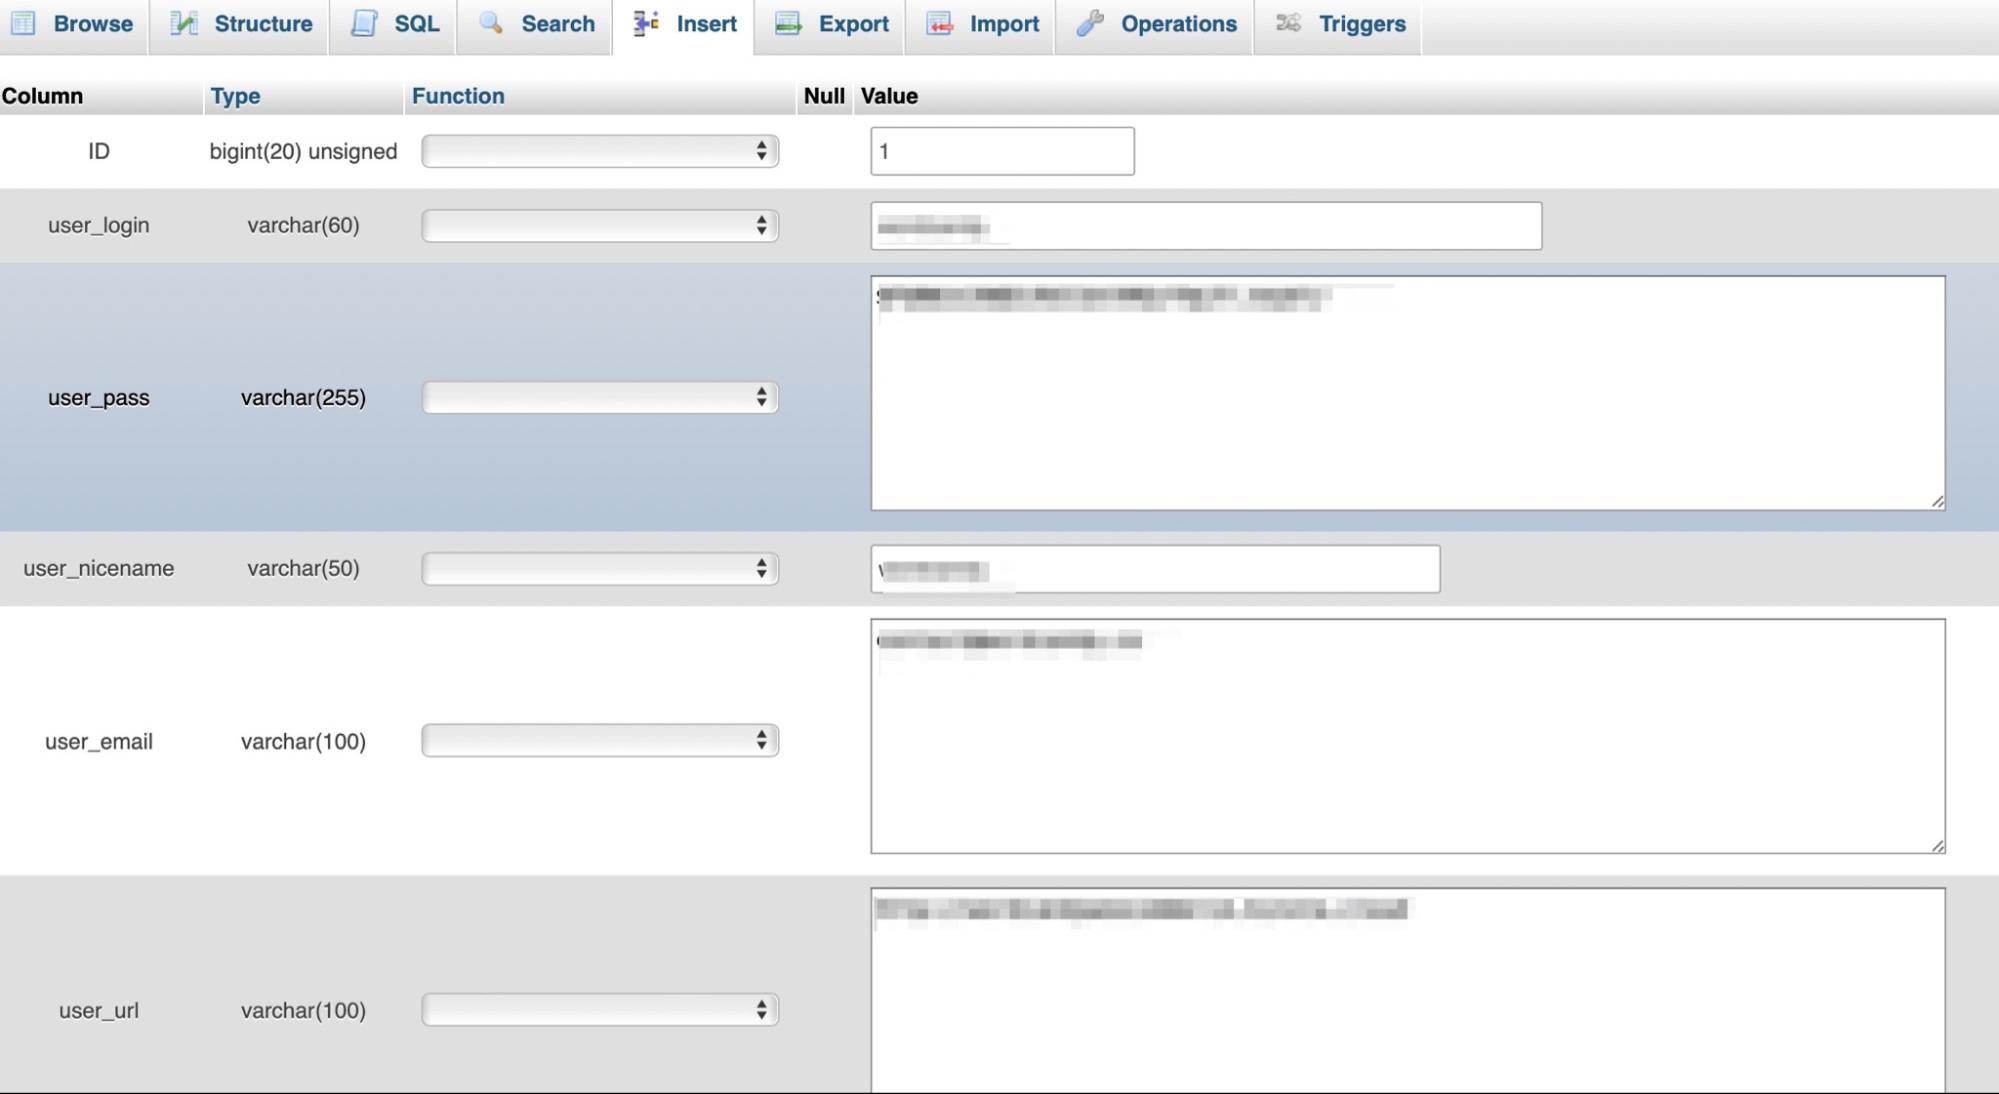
To change the password for your user, you’ll need to delete the value in the user_pass field and enter a new one. Under the Function column, select MD5. Then, click on Go to save the changes.
3. Update WordPress settings
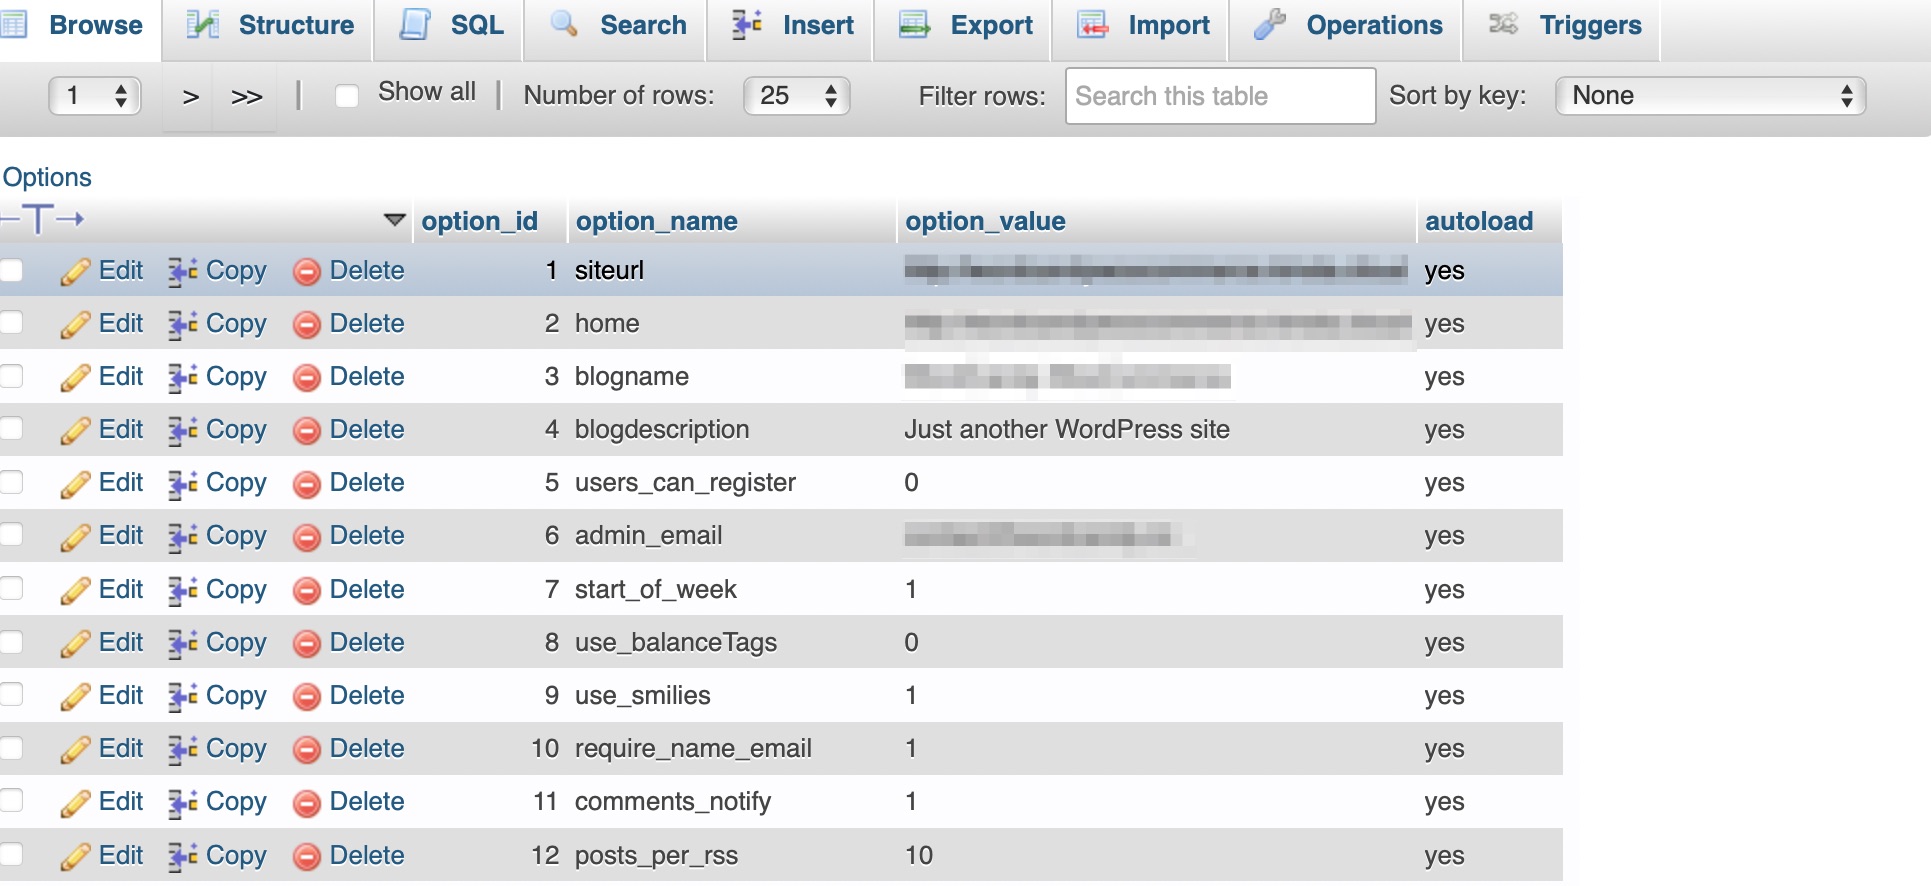
As we mentioned earlier, the wp_options table contains most of your site-wide settings. You can access this table via phpMyAdmin to update settings like the time format, site URL, plugin configuration, and more.
To get started, launch phpMyAdmin and select your database. Then, open wp_options and locate the row you need to change.
You’ll see plenty of fields here, like admin email, site URL, posts per RSS, and more.
Click on Edit next to the setting you want to change. Then, enter a new value into the field and click on Go.
4. Delete plugins or themes
There are times when it might be necessary to delete a plugin or theme from your website via phpMyAdmin. This is often the case if you’ve encountered a WordPress error (caused by a problematic plugin), leaving you without access to your WordPress dashboard.
Additionally, even when you delete themes and plugins from your dashboard, some tools leave behind rows and tables in your database. Over time, this data can mount up and start to affect your site’s performance.
In this instance, you can launch phpMyAdmin and find your WordPress database. Depending on the plugin, there can be traces of it in multiple database tables. That’s why the best method to delete plugins in phpMyAdmin is to use the Search feature.

For instance, if you want to delete the WooCommerce plugin from your site, enter “woocommerce” into the search bar. Under Find, check the option that says all the words. Then, select Go.
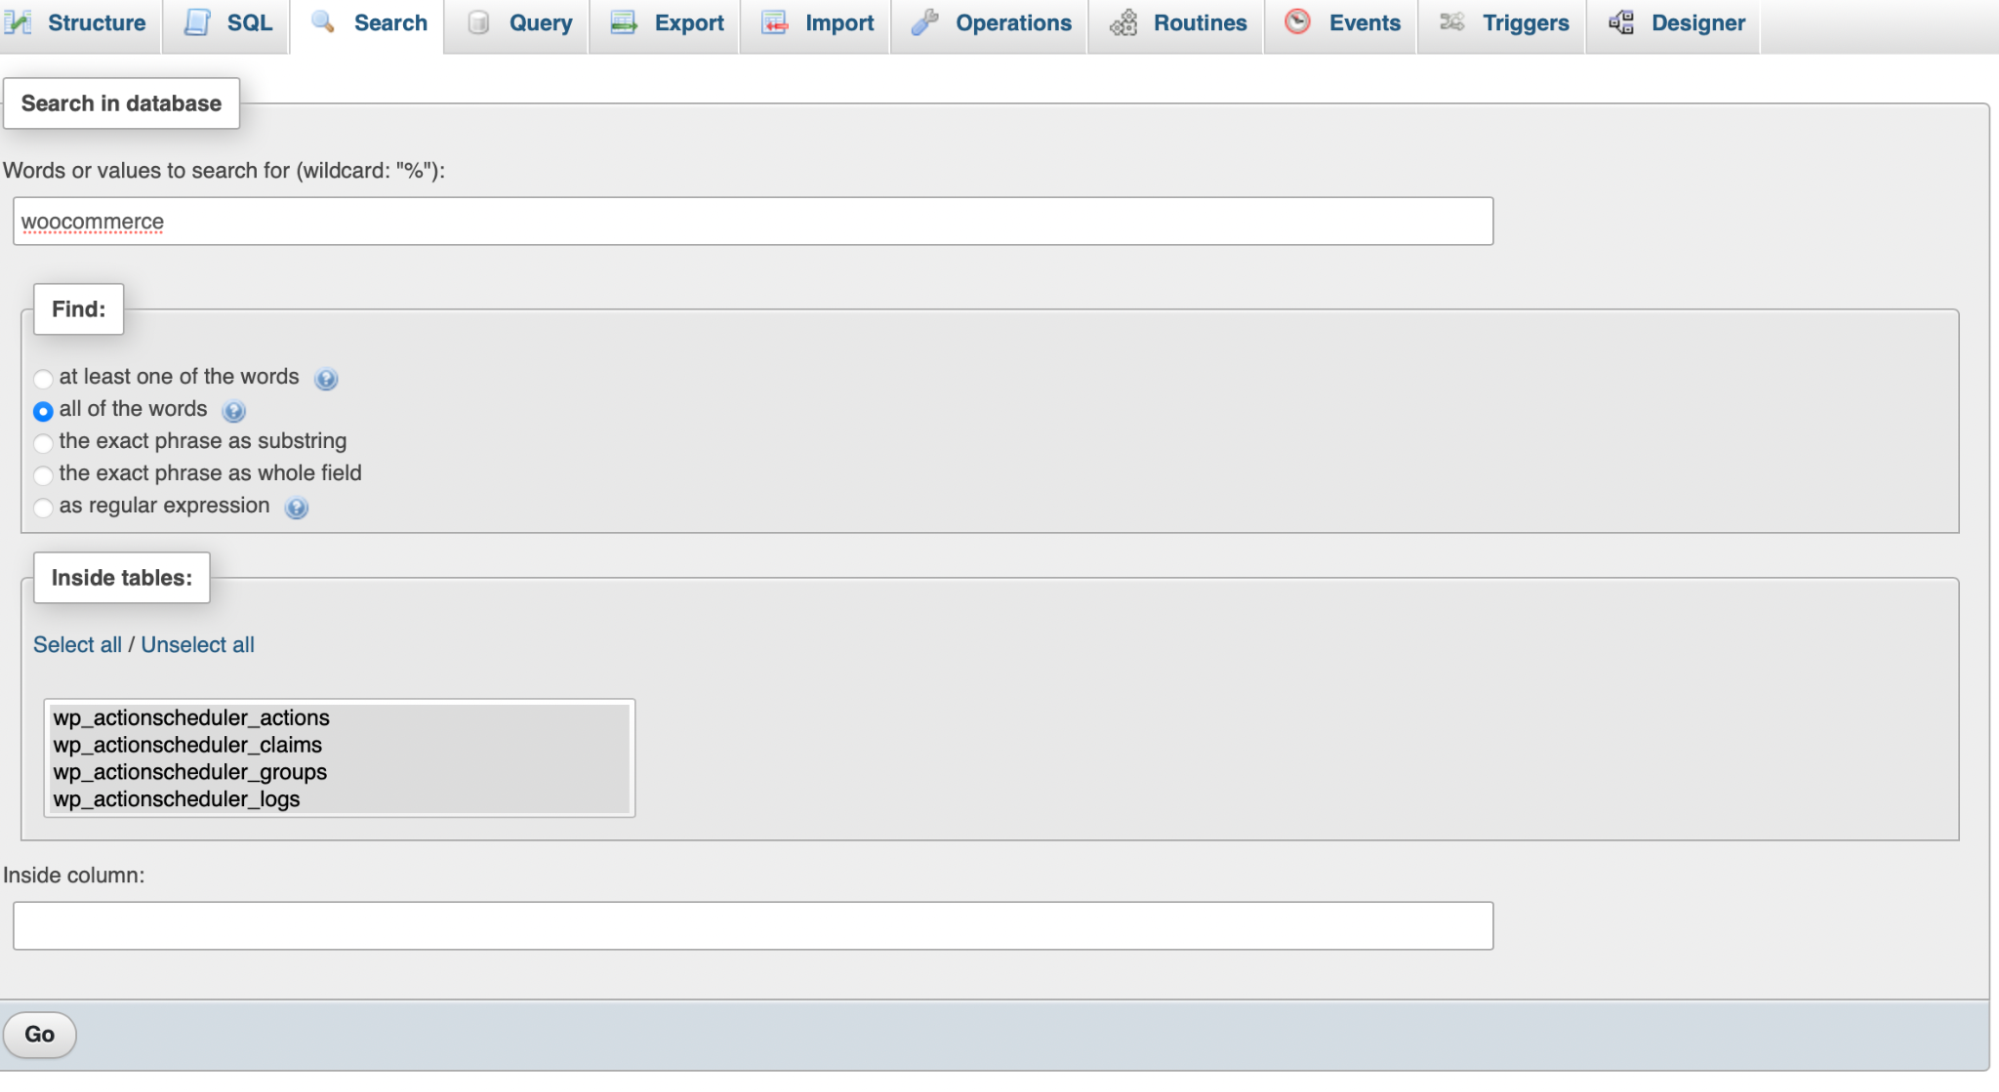
Here, you’ll see a list of all the fields and tables where the plugin stores data on your site.

As you can see, there are traces of WooCommerce in tables like wp_posts, wp_users, and wp_options.
Click on Browse to open the table. Then, you’ll want to filter the table to find every instance of WooCommerce. Enter “woocommerce” where it says Filter rows.
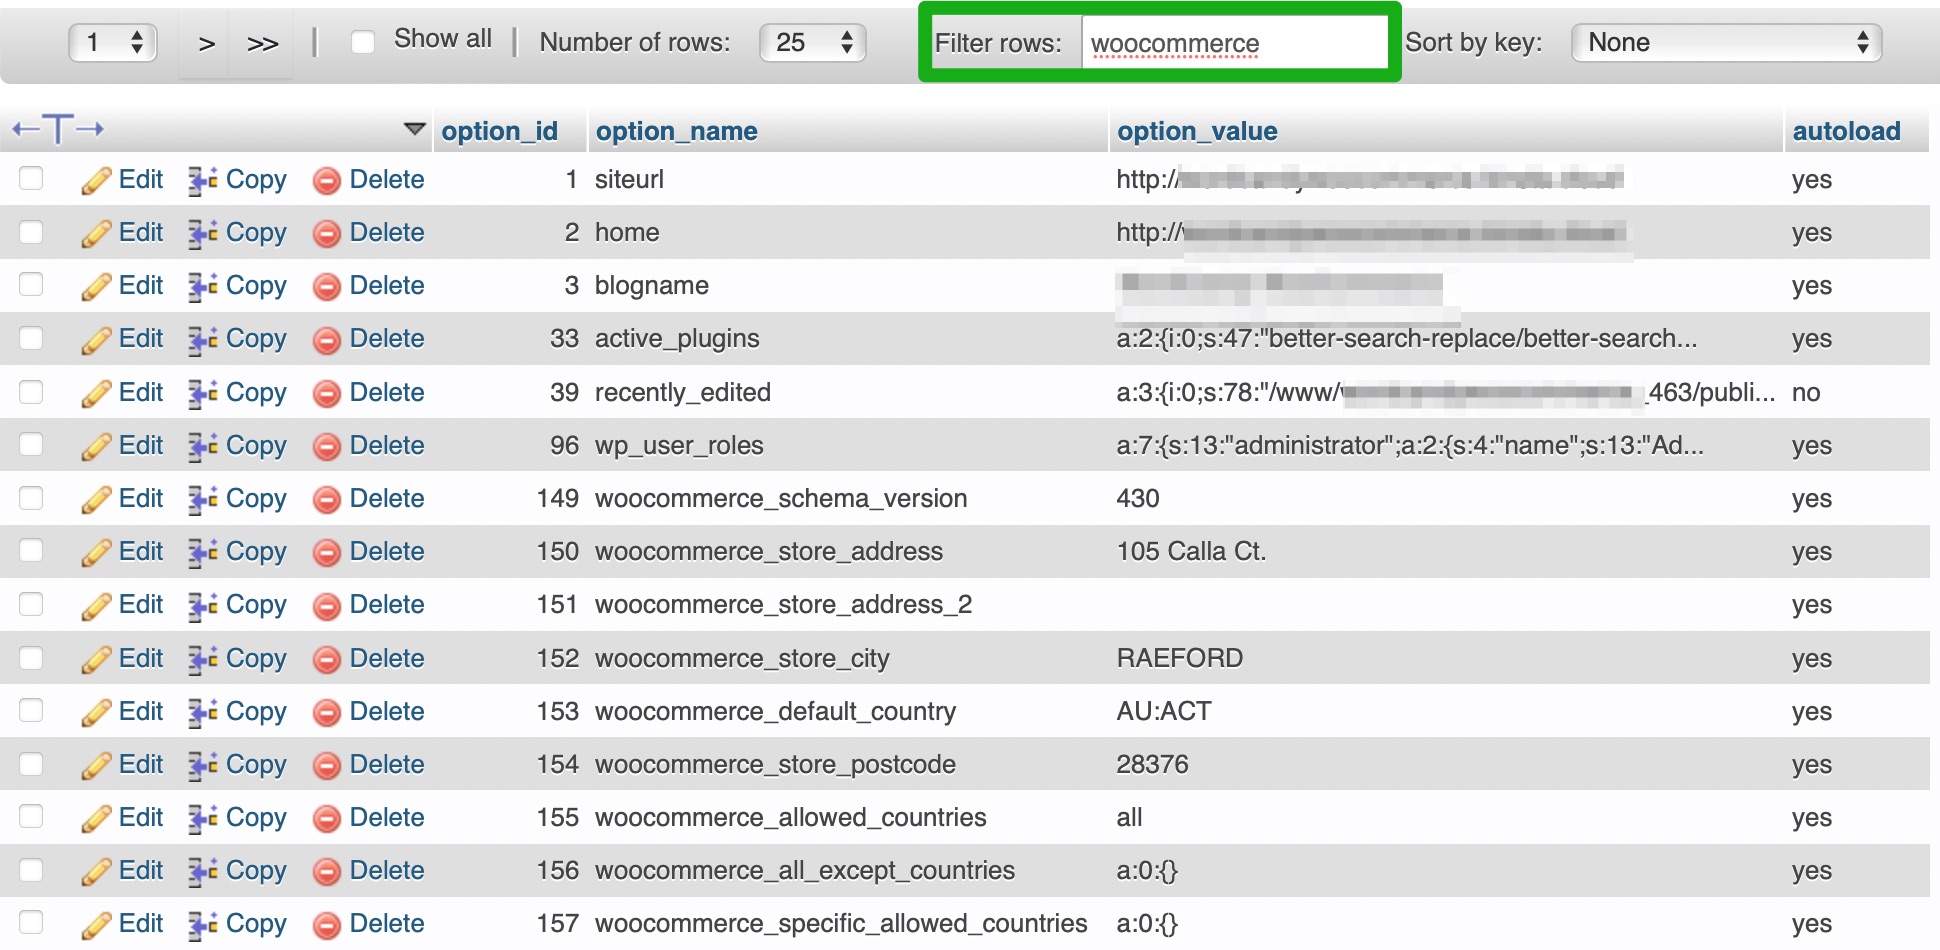
Select all the relevant rows and click on the Delete link. Then, you can go through all the other tables where the plugin stores data and repeat the same steps.
Common database issues and their causes
When accessing and editing your WordPress site, you might run into some issues. Typically, you’ll know if it’s a database issue because you’ll see the following error message: “Error establishing database connection”.
Other signs of a database issue are:
- Images missing from your site
- Content missing from your site
- The “No update required your WordPress database is already up-to-date” error
Meanwhile, some common causes of database issues include:
- Incorrect database access credentials
- Connection errors
- Corrupt database tables
- A hacked database
It’s a good idea to work your way through the list and eliminate each of the potential problems. You can check your connection on your operating system and make sure you’re running the latest version of your browser. It’s also useful to double-check your database credentials in your hosting account.
As we mentioned earlier, you might also want to optimize your database using a simple MySQL command to ensure faster performance.
Frequently asked questions about the WordPress database
Although we’ve tried to provide a complete guide to the WordPress database, you might still have some questions. Let’s answer some of them.
Where is the WordPress database stored?
The WordPress database is stored on your web host’s server. Therefore, you can access it through cPanel. If your host does not provide access to cPanel, you might be able to use a plugin to access it. It’s important to note that the WordPress database is sometimes inaccessible to those on shared hosting plans.
Can my WordPress database be stored on a separate server?
Yes, but you’ll need to make sure that the MySQL server allows the database to be accessed by an external server. You can export the current database and create a new one on another server.
Then, in wp-config.php, find define (‘DB_HOST’’localhost’) and add the IP address of the server instead of localhost.
Can I export my WordPress database to use on another website?
Yes, there are various ways to export the WordPress database. The easiest option is to use the built-in export tool in your dashboard. To access the tool, go to Tools → Export.

Then, select the content that you want to export and download your export file.
You can also use a plugin like Duplicator to export your WordPress database. For advanced users, you can export your database manually using phpMyAdmin.
What happens if I accidentally delete a record from the WordPress database?
If you delete a row like wp_posts, you’ll lose all the content on your site. Meanwhile, if you delete a row like wp_options, you’ll lose your site settings. This can have a negative impact on your search engine rankings. Plus, your website may suffer downtime as you repair the issue.
That’s why it’s important that you assign the correct permissions to users on your site. That way, only those with technical knowledge can access and edit your database.
On top of that, it’s a good idea to install a backup recovery plugin like Jetpack VaultPress Backup. Then, even if you accidentally delete a record from the database, you can easily restore your site to an earlier version.
What are the best practices for backing up the WordPress database?
One of the best ways to secure your website is to make frequent backups. With a plugin like Jetpack VaultPress Backup, you can also back up your entire database.
You’ll also want to store your database backup in a different location than your server. You might download it to your computer, or save it in a remote location like the cloud.
It’s important to make sure that you can restore your site quickly should something go wrong. Otherwise, you can lose out on traffic and revenue.
With VaultPress Backup, you can restore your site in just one click. Plus, if you use the Jetpack mobile app, you can even get your site up and running again from almost anywhere.
How can I ensure the security of my WordPress database?
It’s important to maintain top levels of security for your WordPress database since this is where vital information is stored. For instance, anyone with database access can edit content on your site, change user passwords, and delete entire tables.
Therefore, consider limiting the number of people with access to your database. In fact, you should make sure that only those you trust have these privileges. Additionally, you can educate them on how to interact with the interface to reduce the likelihood of accidents.
You’ll also want to enforce strong passwords on your site. Ideally, they should contain a combination of letters, numbers, and special characters.
Finally, you’ll need to make sure that software, like plugins and themes, is kept up-to-date. This will help protect your database against cyberattacks.
WordPress database: The power of independence at your fingertips
While you don’t need to understand how the WordPress database works to run your website, this knowledge can come in handy. For instance, you might need to edit user information, troubleshoot common errors, or perform certain actions when you can’t access your dashboard.
Your database is stored on your web host’s server, and you can access it via phpMyAdmin. You can also create a new database in phpMyAdmin and perform tasks like configuring site-wide settings.
Protect your WordPress site
After all the hard work you’ve put into learning how to work with your site’s database, building the perfect site, and developing a strong flow of visitors and users, you don’t want anything to stop your progress.
Jetpack’s top-tier WordPress security plugin not only provides a best-in-class, real-time, cloud-based backup solution, but also features that prevent most issues and resolve many others in just a few clicks.
From malware scanning to spam prevention, downtime monitoring, brute force attack protection and more — Jetpack’s got your back.
Don’t risk losing your hard work — get Jetpack Security today.
