Enhance your social media strategy and complement our auto-sharing feature with Manual sharing. Connect with your audience on platforms not currently supported by auto-sharing and take full control of your social posts by customizing your message for each social platform.
Manual sharing with Jetpack Social is completely freeand does not require a paid subscription to Jetpack Social.
Benefits to using the Manual sharing feature
Manual sharing is perfect for those times when you prefer a more hands-on approach:
Reaching diverse audiences: Extend your content’s reach to social platforms not currently supported for auto-sharing, such as WhatsApp and X.
Targeting specific audiences: Craft unique messages tailored to different platforms to engage diverse audiences.
Capitalizing on trending topics: Quickly share posts related to current events or trends for maximum relevance and impact.
Testing engagement: Experiment with various posting times or messages to discover what resonates best with your followers.
Using the Manual sharing feature
Right after publishing:
Immediately after publishing your post, find the Manual sharing section in the right sidebar.
Click the icon for the social network where you want to share your post. Jetpack will automatically generate a shareable link.
Use the Copy to clipboard button to copy this link if you intend to share it on other networks not listed.
For previously published posts:
Log into your site’s WP Admin and navigate to Posts → All Posts.
Locate a previously published post you want to share.
Click the Jetpack or Jetpack Social icon in the top-right corner to access the sharing options.
In the opened sidebar, scroll down to the Manual sharing section.
Click on the social network icon or the clipboard icon to copy the post’s link for sharing.
By using Manual sharing, you can fine-tune your social media sharing strategy and engage your audience more effectively.
Thanks to Jetpack Social‘s auto-sharing feature, you can automatically publish each one of your blog posts on your Nextdoor profile.Foster community engagement by sharing content with your neighbors on Nextdoor.
Connecting Jetpack Social to your Nextdoor account
Important: Jetpack Social currently supports sharing only to personal Nextdoor profiles. Nextdoor Business Pages are not supported at this time.
To automatically share your posts to Nextdoor, you first need to connect to your account. You can do that by following the steps:
Navigate to your site’s WP Admin and go to Jetpack -> Social.
Click Connect an account, find Nextdoor in the list, and click Connect.
A new tab will open where you can log in to your Nextdoor account.
On the Nextdoor login screen, press the Accept button to continue.
You’ll be redirected back to your WP Admin. Locate and click the Connect button once more to complete the connection.
To confirm the successful connection, you’ll see a notice at the top of the screen that says, “Your Nextdoor account has been successfully connected.”
Marking the Nextdoor as shared
If you’d like to give your site’s other users (administrators, editors, and authors) access to your Nextdoor connection, enabling them to share posts to the same Nextdoor profile, you can do so by following the steps:
From your site’s WP Admin, go to Jetpack -> Social.
Under Connected accounts, click the downward facing arrow beside the Nextdoor connection.
Check the option that says Mark the connection as shared.
When this option is enabled, all administrators, editors, and authors who publish posts on your site will be able to share them to the same Nextdoor profile.
Connecting multiple Nextdoor accounts
With Jetpack Social, you can easily expand your network by connecting multiple Nextdoor accounts. This enables you to conveniently share your posts across more Nextdoor profiles. To add a new account, follow these steps:
From your site’s WP Admin, go to Jetpack -> Social.
Under Connected accounts, click Connect an account.
Find Nextdoor in the list and click Connect more.
Follow the prompts to connect your additional Nextdoor account.
Troubleshooting Jetpack Social Nextdoor connections
Automatically publish each one of your blog posts on your Instagram business account with Jetpack Social‘s auto-sharing feature.
To connect Jetpack Social with Instagram, you need an Instagram business account that is linked to a Facebook Page. Follow these steps to create and link your Instagram business account.
Create an Instagram business account
If you don’t have an Instagram business account, follow these steps to create one:
Log in to your Instagram account using a laptop or desktop
Click Edit profile.
Click Account type and tools from the left sidebar.
Click Switch to professional account.
Select Business and click Next; you’ll go througha few additional steps like choosing a category
Add your contact details and tap Next. (You can skip this step if preferred.)
You’ll see a confirmation that your Instagram account is a business one now, then click Done to finish the process.
Connect your Instagram business account with your Facebook Page
To connect the newly created Instagram page, you need to share login information. Follow these steps:
Follow the prompts to connect your Instagram business account to the appropriate Facebook Page.
Connect your site to Instagram
Once you have an Instagram business account and connected it to a Facebook Page you manage, you can now connect your Jetpack Social to Instagram by following the steps below:
From your site’s WP Admin, go to Jetpack → Social.
Turn on the Automatically share your posts to social networks toggle.
Click on the Connect an Account button.
Find the Instagram Business and click the Connect button adjacent to it.
Follow the indications to connect your Instagram Business account to your site through Jetpack social
Click the Connect account button.
Next, a dialogue box will appear, prompting you to authorize the connection. Click the Authorize button to do so.
Confirm the connection on the following pop-up window by clicking on the Connect button.
By following these steps and setting the appropriate permissions, Jetpack Social will be authorized to manage your Instagram account(s) and share your content automatically.
Reconnect Instagram
If for some reason, the Instagram gets disconnected, you can re-establish the connection by following the steps below:
From your site’s WP Admin, go to Jetpack → Social.
Navigate to the Instagram connection and click the Connect button.
On the next screen, click Continue if you’re already connected to your Facebook account or connect to the account you intend to use.
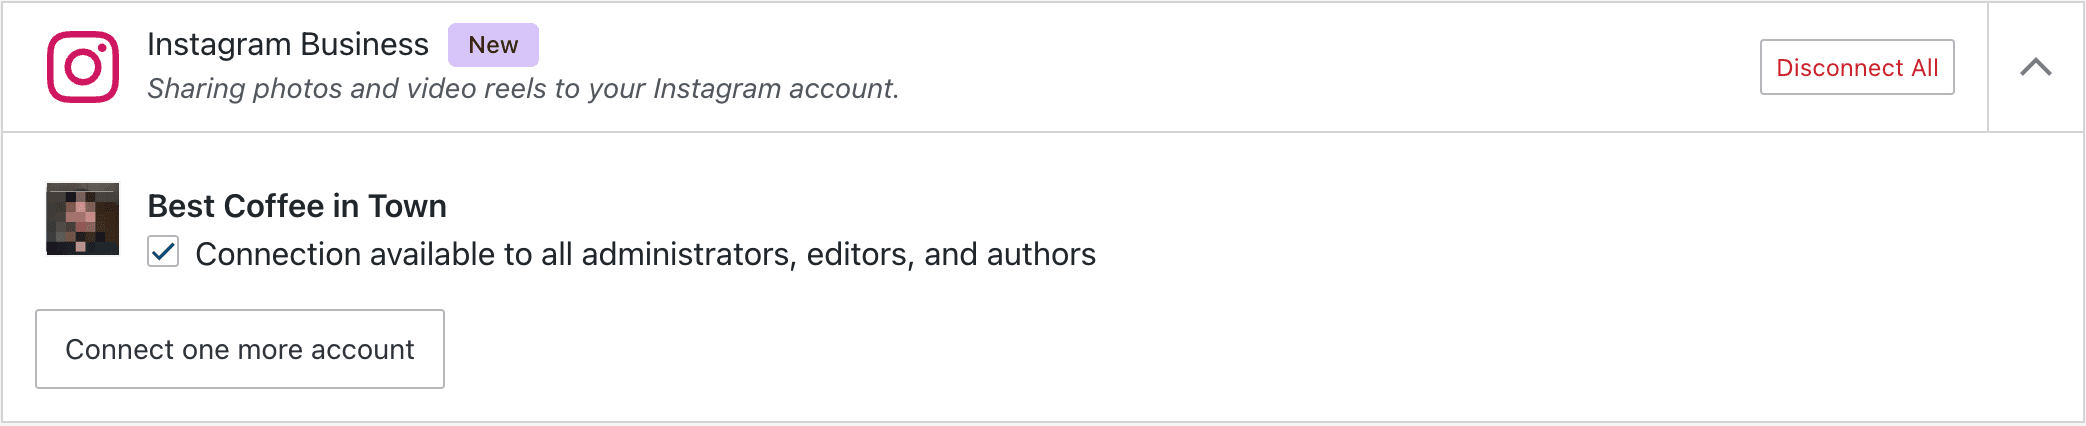
Make the Instagram connection available to all users
To make the Instagram connection available to all users of the blog (global), please follow the steps below:
Access your site at Jetpack → Social
Click the ⌄ arrow next to the Instagram connection.
Click and enable Connection available to all administrators, editors, and authors
Make the Instagram connection available to all administrators, editors, and authors.
This will make sure that any other Jetpack-connected users will automatically publish through this Instagram connection when they publish a post on this site.
Troubleshoot Jetpack Social Instagram Business Connections
As a first step, check that your Jetpack connection is working properly – Jetpack Social will not work correctly otherwise. If you continue to have trouble with Jetpack Social, take a look at our Troubleshooting page.
Known Issue: Previously scheduled posts not sharing after Instagram reconnection
In certain situations, when Instagram is reconnected, posts that have already been scheduled to be published may not be shared as anticipated.
Status: Our team of developers is currently working to address this problem. It is a top priority for us, and we appreciate your patience while we work towards a solution.
Temporary Workaround: In the interim, we suggest you follow these steps to mitigate this issue:
Switch the affected scheduled post back to ‘draft’.
Remove the existing Instagram connection.
Re-establish the Instagram connection.
Change the status of the post from ‘draft’ to ‘scheduled’ again.
By following these steps, you can ensure that your posts are shared on Instagram as planned. We apologize for the inconvenience this may cause and thank you for your understanding while we work on resolving this issue.
If the Jetpack Social sharing feature is turned off, turn on the Automatically share your posts to social networks toggle to enable it.
Click on the Connect an Account button.
Find the Mastodon logo on the “Manage Jetpack Social connections” window and click the Connect button adjacent to it. A field will open below for you to input your Mastodon username in this format: @yourmastodonusername@mastodon.social.
Click the Connect account button.
Next, a dialogue box will appear, prompting you to authorize the connection. Click the Authorize button to do so.
Confirm the connection on the following pop-up window by clicking on the Connect button.
You can also link another Mastodon account by clicking the Connectone more account button and following the indications.
Open the Mastodon connection to other website users
Additionally, you can extend the Mastodon connection to all blog users:
Click the arrow beside the Mastodon sharing option.
Select the Connection available to all administrators, editors, and authors option. This ensures that any other users connected via Jetpack can automatically publish posts through this Mastodon connection.
Note that by opening the Mastodon social connection to other Jetpack users, these users can only share their posts on Mastodon. They don’t have access to anything else; for example, they cannot access your Mastodon account(s) directly.
Reset Mastodon connection
If you experience issues with Jetpack Social sharing to your Mastodon account, such as posts failing to publish, outdated permissions, or connection errors, resetting the connection can often resolve the problem.
To do this, you’ll first need to revoke Jetpack’s access from within your Mastodon account settings:
Log in to your Mastodon instance and navigate to Preferences → Account → Authorized apps (or Settings → Account → Authorized apps, depending on your instance).
Locate the Jetpack entry in the list. You’ll see the permissions it was granted, along with the date it was originally authorized.
Click the “✕ Revoke” button next to the Jetpack entry to remove its authorization.
Once revoked, return to your WordPress site and navigate to Jetpack → Social (or Tools → Marketing → Connections on WordPress.com).
Click Connect next to Mastodon and follow the prompts to re-authorize Jetpack with your Mastodon account.
After reconnecting, Jetpack Social will be issued a fresh set of credentials. Try publishing or sharing a test post to confirm that the connection is working as expected.
Note that revoking and reconnecting will not affect your existing Mastodon posts or followers: it only resets the authorization between Jetpack and your Mastodon instance.
Troubleshooting Jetpack Social Mastodon connections
When you think something is not working properly between Jetpack and your Mastodon profile, always check first that your Jetpack connection is working properly—Jetpack Social will not work correctly otherwise. If you continue to have trouble with Jetpack Social, look at our dedicated Jetpack Social Troubleshooting page.
The Social Image Generator (SIG) helps you automatically create a unique image for each post before sharing it to your connected social accounts. This guide will show you how to enable the feature, customize your image, and use default settings to streamline your workflow.
Toggle on Automatically share your posts to social networks.
Switch on Enable Social Image Generator (SIG).
When enabled, SIG will be active by default for new posts. If it’s turned off, you can still activate it manually in the post editor.
The Social Image Generator works only with the Block Editor. It is not compatible with the Classic Editor or plugins that rely on it, such as WooCommerce.
Customize your social image in the post editor
Once enabled, you can preview and customize your image directly in the editor:
In the Block Editor, click the Jetpack icon (or Social icon) in the top-right corner to open the Social panel.
Scroll to the Share to Social Media section.
The “Link Preview Image” option, with the “Enable Social Image” toggle, is the feature to work on.
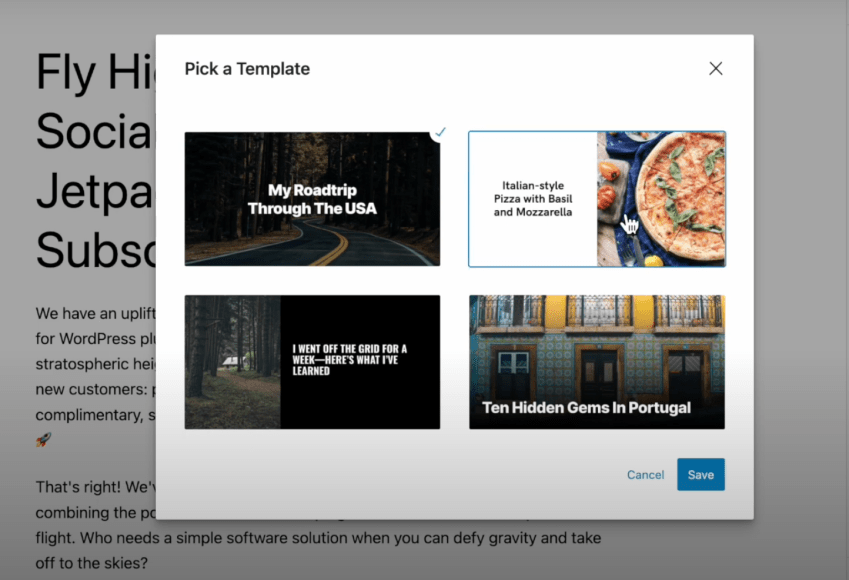
Customize the following options by clicking on the Settings link:
Preview: See a live preview of your social image.
Image Type:
Featured Image – Uses your post’s featured image, and only appears in the image type menu when a featured image has been set on the post. If no featured image exists, this option is hidden entirely.
Custom Image – Upload your own image.
Plugin Default Image – Uses the default image set by your site admin.
No Image – Displays only your post title or custom header.
Custom Header: Add your own text to appear on the image. By default, this uses the post title.
Fonts: Add the option of choosing a preferred font to match with the blog and post layout.
Templates: Choose from a selection of predesigned layouts.
Click Save when you’re done.
Automatic Social Preview Images
As of Jetpack v15.0, the Social Image Generator can now create a social-preview image for you automatically. If you don’t choose or customize an image before publishing or sharing your post, Jetpack will generate a default preview image based on your post’s title and your active design settings.
You can still manually replace or edit this image at any time, but you no longer need to select one before sharing: Jetpack will take care of it for you.
Set a default image for new posts
Site admins can configure a default image for social shares. This image is used when no featured or custom image is selected in the post.
To set a default image:
In WP Admin → Jetpack → Social, click Change defaults under Enable Social Image Generator.
Under Default Image, click to upload or select an image from the Media Library.
Click Save.
Choose fonts for your social images
When customizing your social images, Jetpack Social Image Generator lets you select from a range of clean, legible fonts designed to look great across platforms like X (Twitter), Facebook, and LinkedIn.
From the same screen, you can also choose a font style that best matches your site’s personality, from modern sans-serifs for a sleek, professional look to classic serif fonts for a more editorial feel.
This way, you can maintain consistent branding and you make sure your posts stand out in social feeds.
The selected font will automatically apply to your image titles, keeping the layout balanced and visually appealing.
Enhance your social media engagement by creating eye-catching social media posts using custom images and videos. These features are available with a Jetpack Social paid plan.
Studies show that social media posts that are created manually receive up to 50% more engagement compared to those that simply share links to other content on the web. With Jetpack Social, you can enhance your auto-published content by adding custom images or videos. This makes your posts look like genuine social media posts instead of generic link previews, which helps boost engagement.
To make your posts resemble native social media content, you can add a custom image or video to your social posts or easily combine images and text with the Social Image Generator.
Add a custom image or video to social posts
You can add a custom image or video to your social posts by following the steps:
In your WP Admin, navigate to Posts and create a new post.
Once your post is ready to be published, open the Social sidebar by clicking the Jetpack icon or the Jetpack Social icon in the top-right corner, depending on whether you are using the Jetpack plugin or the standalone Jetpack Social plugin.
In the Social sidebar, select the social networks where you want the post to be shared.
Below the image preview, click Select to upload an image or video from your media library, or use AI to generate one. Each AI-generated image is saved in your site’s Media Library. You can also switch between image types (Link preview, Attachment, or No media) using the image type menu below the preview.
Optionally, add a custom message you’d like to share with your audience; otherwise, the message will display the default WordPress excerpt.
Publish the post or schedule it to be published later.
Generate a custom image using the Social Image Generator
Use the Social Image Generator to instantly create unique images for your social posts. This feature significantly reduces the manual work that’s typically involved in designing social media images, helping to save time while also enhancing the visual appeal of your posts.
The feature works only with the Block Editor, not with the Classic Editor or WooCommerce. Read more about how to activate and use the Social Image Generator here.
Media requirements by social platform
Not all platforms support all media types, but Jetpack Social will attempt to automatically adjust your image to comply with individual platform requirements. If you choose an unsupported media type, you will see an error message in the plugin.
Attract high-quality traffic to your site using Blaze. Using this service, you can advertise a post or page on some of the millions of pages across WordPress.com and Tumblr from just $5 per day.
Requirements
The Jetpack plugin should be installed and connected on your site. New to Jetpack? Check out this support guide to get started with that.
To access Blaze Ads from WP Admin, the menu location depends on your site’s setup:
On a Jetpack site (without WooCommerce): go to Jetpack → Blaze Ads
On a site with WooCommerce and Jetpack: go to Marketing → Blaze Ads
If your site has active Blaze campaigns, “Blaze Ads” is promoted to a top-level WP Admin menu item (look for the megaphone icon!) for quicker access.
You can also access Blaze Ads from the WordPress.com Dashboard by going to Tools → Blaze Ads, or by visiting wordpress.com/advertising/your-site.com.
To launch a Blaze campaign for your post or page, when on the Balze Ads dashboard:
Use the search bar or scroll to find the content you want to promote (posts or pages).
Click Promote next to the post or page. This will open the campaign setup screen, where you can configure your ad.
Once you start creating your campaign, you’ll be able to customize your ad’s appearance, choose your audience, set your budget, and schedule.
Appearance
This section asks for information to determine how your Blaze campaign will look when promoted across the network.
Ad creative: Upload an image for your ad. This will be the post’s featured image by default, but you can upload a different one. You can also crop the image from here.
Site title: This appears just below your image and as non-bolded text. This can be the post title or something more catchy and will be truncated if it exceeds 32 characters. Use this to briefly describe what the ad is about.
Snippet: A short text description of your post that appears underneath your image and title. You can write a maximum of 140 characters here. We recommend using this text to support the title and give viewers more context about what they will see when they click the ad and arrive at your content. You can also use it to capture their attention.
Note that the ad creative, site title and snippet are all required.
Audience
Choose who will see your ad by adjusting the following:
Language: Select the target language(s) spoken by your intended audience. You can select more than one target language here and can choose All languages to target all available languages.
Interests: Choose the interests of your intended audience using the dropdown. Select All topics to show your post to all potential viewers regardless of their interests.
Location: Select geographic areas where your post will be promoted. You can narrow down your audience or select Everywhere to show your post to all potential viewers regardless of their location.
As you adjust your settings on this screen, your ad preview will reflect your choices and provide you with an estimated reach for your campaign, which is the number of times your ad will be shown.
Budget and duration
Control how much you would like to spend on your Blaze campaign:
Total: Select your total spend for the campaign using the slider. You can choose a minimum of $5 per day and up to a maximum of $50 per day. Your budget will be shown in USD. No other currencies are supported at this time.
Start date: Choose when you would like your campaign to start running.
Duration (days): Select the number of days you would like your campaign to run, between 1 and 28 days.
If you’re not sure what to select here, we suggest starting at $5 per day over 7 days, then growing from there based on your results.
As you adjust your targeting choices, you will see an estimate of how many people you will reach (estimated number of impressions). It’s important to balance your reach with how relevant your content is to the audience. This helps to maximize how many clicks your ad receives and, ultimately, how much traffic it produces for you.
Advanced Settings
Select your target devices, set your destination URL, and add any custom parameters for tracking:
Targeted Devices: Choose whether you would like your post to be seen by viewers on desktop computers or mobile devices. Select All devices to show your post to all potential viewers regardless of the device they’re using.
Destination URL: This is where visitors will be directed when they click on the campaign. This can be the post itself or your site’s homepage.
URL parameters: Add custom parameters to your destination URL for more advanced tracking and analytics purposes. This is especially useful for platforms like Google Analytics and your in-house analytics tools if you have those.
Payment
Currently, Blaze supports payment only through credit/debit cards for campaign creation.
In the Payment section, fill out your payment details and then click the Submit campaign button. You won’t be charged until after the ad has been approved and starts running on our network of sites.
Payments will be made automatically on a weekly basis based on delivered impressions over that period (i.e. how many times your ad was served). You will be charged weekly for ads served across all of your promotions.
When a payment is made, you will receive an email receipt to the email address associated with your WordPress.com account.
You can cancel your campaigns at any time. You will only be charged for the portion of your ad campaign that was served up until that point. It is not possible to refund any charges for ads served, so it is recommended to set your budget to an amount you are willing to pay.
Ad Approval
We review all Blaze campaigns for compliance with our Advertising Policy before they are seen by others.
We try to moderate posts as quickly as possible, depending on how much content we need to review. Currently, we average around 30 minutes, but there’s no guaranteed time.
If your post has been approved, you will receive an email saying that your post was approved and will be put online.
Your post will be rejected if it does not conform to our Advertising Policy. You will not be charged if your post is rejected.
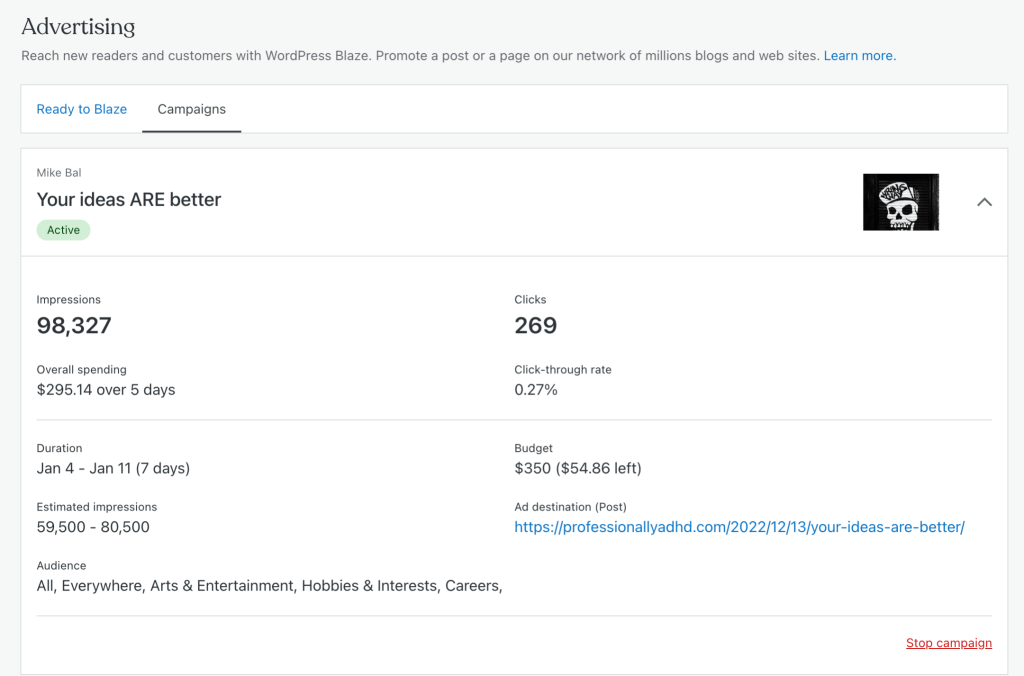
Manage Your Campaigns
Visit wordpress.com/advertising to access your running campaigns. You will see the details of your live campaigns and any posts awaiting moderation:
Note: all analytics tools work a little differently, so you may see clicks on your campaign that don’t show up in your site stats or preferred analytics tool.
If you wish to stop a campaign, follow the steps below:
Click the downward arrow to the right of the campaign you’d like to stop.
Click on the Cancel campaign link in the bottom right corner.
Once a campaign has been canceled, it will stop running, with no option to restart it.
If you need to edit a campaign that’s already submitted, you can cancel that campaign and create a new one with the necessary updates, then submit that for approval.
Where Your Ad Appears
Your Blaze campaign will appear across the network of Tumblr and free WordPress.com sites, with an ‘Advertisement’ label like in this example:
Quickly import your email subscribers from another platform.
This guide will show you how to import a CSV file of your subscribers so that they’ll be notified each time you publish a post on your site.
Add up to 100 subscribers
People with a free Jetpack plan may import up to 100 subscribers. This counts both towards a bulk .csv import or adding subscribers manually one at a time. The 100-subscriber limit on the free plan is a total cap on your account, not a per-import limit.
To help protect against spam, the free plan limits importing up to 100 subscribers. Paid plans have no limit, but imports of more than 10,000 subscribers will go through a manual review.
No matter what plan you have, there is no limit to the number of people who can choose to subscribe to your blog directly via your subscription form or the WordPress.com Reader.
Writing engaging content and promoting it via Jetpack Blaze or to your social media is a great way to have more followers.
Before you import
Get permission
Please ensure that you have permission to email your subscribers. If we receive complaints from your subscribers about spam, or if your emails have a high bounce rate, we may take action against your account.
Clean up your list
Subscriber list hygiene is important for successful imports. If our tools suspect that too many of your email addresses are invalid, your import may fail.
Do your best to have a clean and updated list when importing your subscribers to Jetpack. When you have an old list or if you haven’t sent any emails to your subscribers in more than 1 year, it is very likely that over 10% of the email addresses no longer exist because people change jobs.
To prevent this from happening, we strongly suggest that you clean your subscribers’ lists using a third-party service, such as the ones listed below:
Click the Add Subscribers button at the top right end of the screen.
If you have just a few email addresses to add, you can type them in the boxes provided. Alternatively, click the uploading a CSV file link to select a file from your computer.
Click the Add subscribers button after you have made your selection.
You can either manually type in email addresses, or upload a CSV file that you downloaded from another email platform. When uploading a CSV file, all email addresses in your CSV file will be imported.
Import from Substack
You can import free and paid subscribers from Substack, along with your entire Newsletter if you’d like. Head to your Subscription dashboard at https://cloud.jetpack.com/subscribers/YOURSITEURL. Click on Import from Substack, and follow the instructions.
Import subscribers with Newsletter categories
You can import subscribers directly into specific Newsletter categories, both manually and via CSV uploads, via the Jetpack Cloud dashboard.
The feature is available on Jetpack Cloud → Subscribers when the Newsletter module, Newsletter categories, and categories are all enabled and selected in Jetpack → Settings → Newsletter. You can read more about that on the Newsletter Categories documentation page.
Manage your subscribers
You can view your imported subscribers from your dashboard by clicking on Users and then clicking on the Subscribers tab.
Here, you can:
Click Add Subscribers to add more subscribers.
Remove individual subscribers.
Note: At this time, there is no way to manually change a subscriber’s status from free to paid. If you are importing subscribers and some of them should be marked as paid, try re-importing only your paid subscribers. This may update their subscription details correctly.
Publish a Post
When you publish a post, an email is sent to all your email subscribers. When you click Publish on a new post, scroll down until you see the number of subscribers to which the post will be sent.
Jetpack will only send out notifications for new public posts. Publishing other content types (like pages or a custom post type) or updating an already published post will not send a notification email.
Migrate subscribers from a WordPress.com site
If you want to migrate subscribers from a WordPress.com website to a self-hosted Jetpack-connected site, you can use our Subscription migration tool.
Troubleshoot issues with subscribers import
Errors during import
If you face any errors importing a CSV file of followers, here are a few things to verify first:
Go through your subscriber email list and make sure that all of the email addresses are valid. If we detect any invalid email addresses, the import will not work.
Make sure you have collected all your subscriber email addresses by yourself and that you have not purchased any subscriber lists. We take spam very seriously, and your email list will be blocked if we detect known spam addresses.
If you have lots of email addresses, try importing them in smaller batches of 500 each (this only applies if you have Growth, Social, Security, Complete, or the legacy Jetpack Creator plan).
Here is a list of common subscriber import errors, and what you can do about them:
Error Message
Explanation
Suggested Action
Can’t start subscriber import while another one is running.
Another import is already running.
Make sure you haven’t started imports in another tab. Otherwise, contact support.
No subscribers have been submitted.
An empty file was submitted.
Examine your CSV file and double-check whether it’s empty.
The CSV file does not contain information.
The CSV file is empty.
Examine your CSV file and double-check whether it’s empty.
You cannot add more subscribers on the free plan.
It is only possible to import up to 100 subscribers without a paid Jetpack Creator, Jetpack Social plan or bundled Jetpack plan.
If you’re running into issues with Jetpack Social, as a first step, check that your Jetpack connection is working properly. Jetpack Social will not work correctly if the Jetpack connection is unhealthy.
Use the standalone Jetpack Social plugin to share your WordPress posts with your social networks. Use all the features of Jetpack Social without installing the full Jetpack plugin.
The latest version of WordPress. If your version of WordPress is out of date, you’ll see a prompt to automatically upgrade with a single click, or can upgrade manually.
A WordPress.com account. Don’t have one yet? Sign up for one here, or create one during the Jetpack connection flow. You only need one WordPress.com account to access all our services (including Akismet, Crowdsignal, Gravatar, and WordPress.com itself). If you use any of these services, you already have a WordPress.com account to connect to Jetpack. You can reset your WordPress.com password if you need to.
A publicly accessible WordPress site: no password protection or Coming Soon / Maintenance Mode plugin in use.
Install the Jetpack Socialfrom your site’s WP Admin by following these steps:
Start from your WP Admin dashboard.
Navigate to Plugins → Add New.
Look for Jetpack Social. The latest version will show in the search results.
Once found, click Install Now and Activate.
Complete the setup by connecting to Jetpack when prompted.
Enable auto-share
Once the Jetpack Social plugin is installed and activated, you will be able to turn on the auto-share by following the steps:
Start from your WP Admin dashboard.
Navigate to Jetpack → Social.
Toggle on Automatically share your posts to social networks.
Connect your social accounts
In order to share your posts on social media, you first need to connect your social accounts. You can do that by following the steps:
Start from your WP Admin dashboard.
Navigate to Jetpack → Social.
Click Connect an account and follow the instructions.
You can link your site with your accounts on the following networks: Facebook, Instagram, Tumblr, LinkedIn, Nextdoor, Threads, and Mastodon. Read more about each connection.
Share your posts
To configure the Jetpack Social options when writing a new post, click the green Jetpack icon at the top right of the editing sidebar.
You’ll then see the Social options under the Share to Social Media section, where you can toggle social media connections, connect new platforms, and create a custom message to be used when your post is shared.
Jetpack Social includes My Jetpack, a dashboard for managing all of your Jetpack products and plans in one place. All of your Jetpack products will be displayed in a grid, and you’ll be able to see which are active and which are inactive. You can click on the View button for each product to access its product dashboard and settings, and make changes.