Check how popular your Jetpack VideoPress videos are, with Jetpack Stats.
Jetpack Stats, including video stats, are only available in the Jetpack plugin. If you’re using the individual VideoPress plugin and want stats for your videos, please install the Jetpack plugin as well.
Video views have their own section within the Jetpack Stats page under Stats → Traffic tab in your WP Admin.
Scroll down on the page to find the video stats section.
VideoPress stats display
Jetpack VideoPress videos on your site are listed by title, along with how many views a particular video has received.
To view detailed stats for a video, click on the video’s title.
Click on View details to view more detailed stats for all videos.
Impressions: The number of times a video was loaded on the page.
Hours watched: The total number of hours that the video has been watched by all viewers.
Views: The total number of how many times the video was played.
Please note this is the total number of views, even if one person watched a video multiple times. We record a single play while the page is open. If a person reloads the page or revisits the page later and watches it again, then that would count as a separate play.
Retention rate calculation
The Retention Rate is calculated by the percentage of a video’s total duration that is watched on average per view.
Chapters are a great way to split up longer videos and organize them into different sections. Your visitors can see what each section is about and skip to their favorite parts.
Click the “Done” button once it is finished uploading.
Navigate to the block settings for the video in the editor sidebar. Make sure you’ve clicked on the VideoPress block in the editor section of the screen, then click the ‘cog’ icon below the Publish button to make the block settings appear.
In the Description box, add a list of timestamps in minutes and seconds, along with corresponding chapter titles.
Make sure that the first timestamp starts with 00:00.
Add at least three chapter entries, in consecutive order, with at least 10-second intervals between each.
For example:
00:00 Intro
00:24 Mountains arise
02:38 Coming back home
03:04 Credits
Your site has an active Jetpack Complete, Jetpack Security, or standalone VideoPress plan.
You have a subtitle file in .vtt (Web Video Text Tracks) or .srt (SubRip Text) format, or you plan to use auto-generated subtitles.
Adding subtitles or captions to your VideoPress videos makes them accessible to a wider audience. You can upload a subtitle file in .vtt (Web Video Text Tracks) or .srt (SubRip Text) format, or let VideoPress generate subtitles automatically. SRT files are automatically converted to .vtt format on upload.
You can upload a .vtt or .srt file at any time to override auto-generated subtitles.
Auto-generated subtitles
New uploads automatically receive auto-generated subtitles. This applies to new uploads only; videos uploaded before this feature went live are not retroactively transcribed. Videos without an audio track do not receive a transcript.
You can still upload a .vtt or .srt file to add or override auto-generated subtitles at any time.
To access auto-generated subtitles on an eligible video:
Click on the video player’s Settings.
Select Captions.
Select Auto-Generated.
Add a subtitle file to a VideoPress video
You can upload a .vtt or .srt file to add subtitles or captions to any VideoPress video. If you upload an .srt file, VideoPress automatically converts it to .vtt format. Follow these steps to add a subtitle file:
Click on the Text Tracks icon in the block toolbar
Click Upload track to upload your .vtt or .srt file. The Label and Source Language fields are automatically populated if you leave them empty.
Click Save.
Preview your post to verify the subtitles appear correctly. The subtitles menu should be visible in the VideoPress player, with your subtitles track listed as an option.
Subtitle file formats
VideoPress accepts .vtt (Web Video Text Tracks) and .srt (SubRip Text) files. SRT files are automatically converted to .vtt format on upload.
Subtitles limitations
You cannot associate a subtitle file directly with a video in the Media Library. You must add the VideoPress block first. However, when you upload a track file to the video using the steps above, it is associated with the media file itself. If you reuse the video file elsewhere, the track is already in place.
Customize caption appearance
Viewers can use the Captions Settings menu in the VideoPress player on the front end of the site to customize the appearance of the subtitles or captions.
Privacy information
Subtitle processing may involve transmitting audio data for transcription. For details on how VideoPress handles data, refer to the Jetpack privacy information page. This section is pending review by the DRI/Editor-in-Chief.
Display your videos on any post or page on your site, using our quick shortcodes.
Find a shortcode via WP Admin
Go to your WP Admin.
Click Media.
Click on the video you need a shortcode for.
Copy the shortcode in the video details.
Get a shortcode from WordPress.com
Go to WordPress.com, select your site from My Sites.
Click Media.
Click on the video you need the Shortcode for
Click Edit.
Copy the Shortcode in the video details.
Use VideoPress shortcodes in your posts and pages
To insert a video using a shortcode:
Directly paste shortcodes into any of your posts or pages, or you can add via a Shortcode Block.
Your video will not be displayed while editing, you will only see the Shortcode Block. Click Preview to see how your video looks and make necessary edits.
Head back to your page or post you are building to make any necessary changes via Shortcode attributes which are listed below:
Get control over your VideoPress shortcodes with attributes
Copy and paste your Shortcode as outlined in the above steps.
Add attributes before the last bracket on your Shortcode, as shown in this example:
[videopress uhAZ9tzd attribute=value]
You can add a range of different attributes for your video, in just one Shortcode.
If you wanted to change the height to 200 and width to 600, enable autoplay and loop your video, it will look like this:
freedom=true/false to force only use open source video formats
autoplay=true/false to automatically play the video when it loads
loop=true/false to automatically play the video over and over
controls=false to hide the default video controls when displaying a video
*VideoPress uses Adaptive Streaming to adjust video quality based on display size and bandwidth. The hd=true/false attribute only works for legacy videos uploaded before Adaptive Streaming. It doesn’t affect the playback quality of new videos.
Embed videos on a different site
The VideoPress shortcode can only be used to display videos on the site the video was uploaded to. To embed a video on a different site:
Make sure sharing is enabled for the video.
View the video and click the share icon.
Copy and paste the Embed (HTML) code.
Related Support Articles
These articles go over topics that are helpful when using Jetpack VideoPress via either plugin:
Host your videos on WordPress.com rather than your host’s servers. Your videos will load more quickly on your website and will not take up any space from your host’s storage limits. Take control of your branding, and say goodbye to third-party players’ logos on your site.
The latest version of WordPress. If your WordPress version is outdated, you’ll see a prompt to automatically upgrade with a single click or you can upgrade manually.
A WordPress.com account. Don’t have one yet? Sign up for one here, or create one during the Jetpack connection flow. You only need one WordPress.com account to access all our services (including Akismet, Crowdsignal, Gravatar, and WordPress.com). If you use any of these services, you already have a WordPress.com account to connect to Jetpack. You can reset your WordPress.com password if you need to.
A publicly accessible WordPress site: no password protection or Coming Soon / Maintenance Mode plugin in use.
Go to WP Admin -> Jetpack -> My Jetpack. Then click Purchase.
Once purchased, VideoPress will be enabled for your site. Click Manage in the VideoPress product box to view VideoPress Settings.
Make sure VideoPress is enabled on the management page in Settings.
You can select your site-wide video privacy here and see your VideoPress storage usage.
Activate VideoPress with the VideoPress plugin
If VideoPress is the only Jetpack feature you want to use, you can install only the VideoPress plugin, and don’t need to install also the Jetpack core plugin. This dedicated plugin also creates a VideoPress dashboard directly in WP Admin, where you can upload and manage all your videos.
Add your first video
You have several options for uploading videos to VideoPress:
Upload via WP Admin → Jetpack → VideoPress.
Upload via VideoPress Block.
Please read more in Uploading Your Videos, including full details about video format requirements.
Control who can see your videos with Jetpack VideoPress.
You have complete control over who can view your videos in VideoPress. You can manage visibility settings to suit your preferences, whether you’re sharing content with a select audience, subscribers, or the public. This ensures that your videos reach only the people you intend to share them with.
The site’s default privacy settings determine the access and view of the videos globally. Modifying this option will change videos privacy settings for all videos.
You can set the site default settings for VideoPress content and restrict all videos on your site to members only in two different ways:
Head to Jetpack —> Settings —> Performance —> Media—> VideoPress —> Privacy: Restrict views to members of this site.
Head to Jetpack —> VideoPress —> Settings —> Video Privacy: Restrict views to members of this site.
This setting is available in both the Jetpack and the Jetpack VideoPress plugins.
Set privacy options for each video individually
In some scenarios, you want to customize the privacy option for specific videos individually. You can set privacy per video in your WP Admin Media Library or in the VideoPress block on a page or post.
Please note that choosing Public or Private for an individual video will override the site default.
Video privacy settings in the Media Library
Adjust the video privacy settings from the Media Library by following these steps:
Go to your WP Admin page.
From the left sidebar, click on Media → Library.
Go to Media.
Click on the video you want to change privacy settings on or click the Add New button to upload a new video.
Click the Edit button to open the granular video settings.
Under the Privacy setting you’ll see options for Site Default, Public or Private. Select your desired privacy setting; the system will autosave the change.
VideoPress block on a WordPress editor
To change the video privacy directly in a post or a page with the VideoPress block, follow these steps:
In the right sidebar, under Block Settings, scroll down to Video Privacy.
Select Site Default, Public, or Private option for that video.
When you choose Private, only members of your site can view the video on your posts or pages. Non-members will see a message that the video is private and for members only.
Check this page to read more about the VideoPress block settings.
Uploading videos via the Classic Editor requires the Jetpack plugin. It will not work when using the standalone Jetpack VideoPress plugin.
To add a video to a post, follow these instructions:
In the post editor, position the cursor where you’d like the video to be displayed.
Click the “Add Media” button to bring up the Media Library view.
From that view, select your video, or upload a new one.
Jetpack’s video hosting supports MP4 (.mp4, .m4v), QuickTime movies (.mov), Windows Media Video (.wmv), Audio Video Interleave (.avi), MPEG (.mpg), 3GPP ( .3gp ) and 3GPP2 ( .3g2 ).
The VideoPress seekbar automatically changes color for a better video-watching experience. The color-changing effect can be activated and deactivated by appending the useAverageColor parameter to the VideoPress video URL and setting it to true or false.
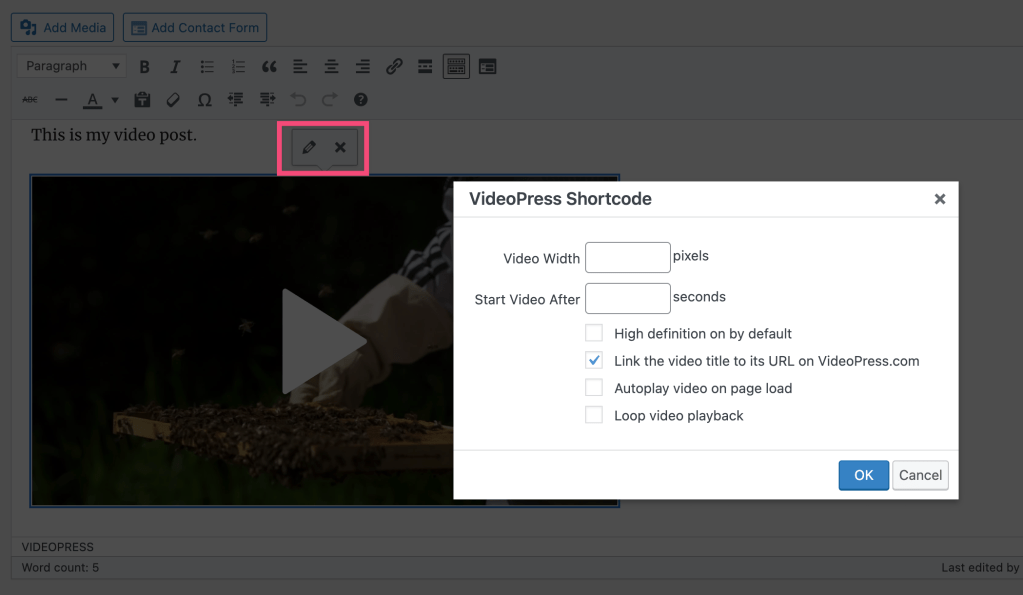
Adjust video settings
After embedding a video, adjust its settings:
Select the video.
Click the pencil icon
Update the settings as needed. This includes:
Adjusting the video width in pixels
Selecting a custom time to start the video
High definition by default
Link the video title to its URL on VideoPress.com (if this is unselected, the title only will appear, without a link)
Autoplay video on page load
Loop video playback
Adjust sharing settings
By default, your visitors can click the sharing icon in the top right of the video player to reveal the following sharing and embedding options:
Direct URL to the video (at VideoPress.com)
Start time
Loop
Autoplay
HTML Embed
To disable sharing:
Go to the Media Library.
Select the video.
Uncheck “Display share menu and allow viewers to embed or download this video.”
Note: Disabling the sharing options removes the functionality from the video player, but it is still possible to download the video from your browser. We take reasonable steps to prevent embedding on other sites by hiding the sharing options, which should stop most attempts.
Video stats
All videos come with stats tracking, which can be viewed within your Jetpack Stats. You can scroll down and find the “Videos” stats.
Insert your videos directly into posts and pages on your website; they’ll be automatically uploaded to VideoPress hosting.
Jetpack VideoPress is free to try, and you can upload and host one video (up to 1 GB in size) at no cost. If you use the Classic Editor plugin, please refer to this guide instead: Add a Video Using the Classic Editor.
The VideoPress block is a part of the Jetpack Blocks suite. See our Jetpack Blocks article to learn about the available blocks and how to activate them.
Jetpack Blocks require the Block Editor (also referred to as the Gutenberg editor). If you’ve installed the Classic Editor plugin, you have a few options:
Deactivate the Classic Editor: Go to Plugins → Installed Plugins in your WP Admin and deactivate the Classic Editor plugin.
Enable both editors: If you prefer flexibility, navigate to Settings → Writing in your WP Admin (not the menu under Jetpack settings). Set Allow users to switch editors to Yes. You will only see these options if you have the Classic Editor plugin installed and active.
Some custom themes or plugins may prevent you from using the Block Editor. In that case, please contact the support team for the plugin or theme for further assistance.
Add the VideoPress block by searching for and selecting it within the block selector on a post or page on your site. Alternatively, you can type /videopress directly into the content of the page or post, then select the block from the drop-down that appears. To unlock all VideoPress features, please be sure to select the VideoPress block and not the Video block.
Adding the VideoPress Block from the block selector.
Select a video
Drag your video directly to the block within your post or page to upload it. Alternatively, you can use one of the three options: Upload, Media Library, or Insert from URL. Each option is outlined below:
Upload: Upload a new video file from your computer. See our article Uploading a Video to Jetpack VideoPress for recommendations on file size and format for your videos.
Media Library: Select any VideoPress file that’s already been uploaded to your library.
Insert from URL: Insert the video URL directly.
Once the video successfully uploads, you’ll see the ‘Upload complete!’ notification. When you are happy with your Video Title and Thumbnail, click Done and you’ll see your video embedded into your post or page. From there, you’ll be able to set a caption for your video and access the Block Toolbar.
Adjust your video’s settings
Access video settings options either from the VideoPress Block toolbar or the block’s sidebar settings for maximum control over how your video plays, and for whom. These different settings areas are outlined below.
The VideoPress Block toolbar will hover above the block in the editor.
A screenshot of the VideoPress block toolbar.
Every WordPress block has settings available in the editor sidebar. If you do not see the sidebar, click the ‘cog’ icon next to the Publish button, and it will appear. These settings include adjusting how your video plays for visitors (playback settings), progress bar color customization, and privacy options.
A screenshot of where to find the WordPress Block editor settings on a post or page
Video settings
Video alignment
Change the alignment of your video to left justify, center justified, or right justified in the VideoPress Block toolbar.
Add video captions or subtitles
Add text tracks (captions or subtitles) in the VideoPress Block toolbar.
Edit video poster image
In the VideoPress Block toolbar, edit the poster image to change the thumbnail image that will be displayed before a video is played:
Choose an appealing image that’s most indicative of the video’s content.
While there isn’t a minimum required size for your poster image, we recommend that the image be at least the size of your video.
For example, if your video is a 1080p video, you should use a poster image that is 1920 x 1080 pixels.
Video title and description
Title and description:
can be modified in the block sidebar settings
can improve SEO (search engine optimization) and accessibility
The following video playback settings can be modified in the block sidebar settings:
Autoplay: Set your video to automatically play when someone visits your page or post. Some browsers do not respect this setting. You may need to enable mute for autoplay to work in those instances.
Loop: Choose if the video repeats automatically after it plays through.
Muted: Choose if the video has sound when it plays. Users can still unmute the video from the player controls. It’s recommended to use the muted option if you choose to have your video autoplay.
Show Controls: Show or hide the playback controls on the video. This option is turned on by default.
Play Inline: Play your video inline within the element’s playback area. Not selecting this option doesn’t mean that your video will always be played fullscreen.
VideoPress Progress Bar Colors
Adjust the color of the VideoPress progress bar in the block sidebar settings:
VideoPress will automatically default to the Dynamic color setting, which will make the progress bar adapt to the video as it plays.
If you toggle off Dynamic color, you’ll see three color sections to change: Main, Loaded, and Progress.
After you select your desired Progress Bar colors, the player on the page will update automatically.
Preview the colors you have selected before publishing or updating a page or post.
When you publish or update your page or post, these color changes will be live on your selected video.
Video privacy and rating
Video privacy and ratings can be adjusted in the sidebar block settings:
Rating: Select a rating for the video, based on its content.
Privacy: Decide who gets to see your videos: site members only (private), or all visitors to your site (public). For more information, check out our VideoPress: Privacy article.
Allow Download: Control whether the VideoPress player should include the option for users to download the video.
Advanced video player settings
Add a CSS class to your block in the Advanced section of the sidebar block settings, so you can write custom CSS and style the block as you see fit.
The VideoPress video player is embedded in an iframe, meaning it’s not possible to style the video player itself. Only the <div> which contains the video player can be styled with CSS.
You can also add an HTML anchor to the block, to create a link directly to that section of the page.
Adaptive streaming and VideoPress
VideoPress supports adaptive streaming, which enables faster video playback by automatically adjusting the quality based on the viewer’s bandwidth and screen size. However, viewers can still manually select their preferred video quality from the video player’s menu.
To learn more about other VideoPress options, please visit this guide.
Why can’t I find the VideoPress block?
If you can’t find the Jetpack VideoPress block, check the following:
The ideal solution is to use the Jetpack VideoPress plugin alongside the main Jetpack plugin.